Manual
Page 5
... 4-5 Q-Share...75 4-6 Time Repair...76 Chapter 5 Appendix...77 5-1 Configuring SATA Hard Drive(s 77 5-1-1 Configuring the Onboard SATA Controller 77 5-1-2 Making a SATA RAID/AHCI Driver Diskette 83 5-1-3 Installing the SATA RAID/AHCI Driver and Operating System 84 5-2 Configuring Audio Input and Output 88 5-2-1 Configuring 2/4/5.1/7.1-Channel Audio 88 5-2-2 Configuring S/PDIF In/Out 90 5-2-3 Enabling...
... 4-5 Q-Share...75 4-6 Time Repair...76 Chapter 5 Appendix...77 5-1 Configuring SATA Hard Drive(s 77 5-1-1 Configuring the Onboard SATA Controller 77 5-1-2 Making a SATA RAID/AHCI Driver Diskette 83 5-1-3 Installing the SATA RAID/AHCI Driver and Operating System 84 5-2 Configuring Audio Input and Output 88 5-2-1 Configuring 2/4/5.1/7.1-Channel Audio 88 5-2-2 Configuring S/PDIF In/Out 90 5-2-3 Enabling...
Manual
Page 10
... up to 16 GB of system memory (Note 1) Dual channel memory architecture Support for DDR3 1666(O.C.)/1333/1066 MHz memory modules (Go to GIGABYTE's website for the latest memory support list.) 128 MB DDR3 SidePort memory Integrated in the North Bridge: - 1 x D-Sub port - ...(Note 3) Realtek ALC889A codec High Definition Audio 2/4/5.1/7.1-channel Support for Dolby® Home Theater Support for S/PDIF In/Out Support for SATA RAID 0, RAID 1, RAID 5, RAID 10, and JBOD iTE IT8718 chip: - 1 x floppy disk drive connector supporting up to the internal IEEE 1394a headers) Hardware Installation ...
... up to 16 GB of system memory (Note 1) Dual channel memory architecture Support for DDR3 1666(O.C.)/1333/1066 MHz memory modules (Go to GIGABYTE's website for the latest memory support list.) 128 MB DDR3 SidePort memory Integrated in the North Bridge: - 1 x D-Sub port - ...(Note 3) Realtek ALC889A codec High Definition Audio 2/4/5.1/7.1-channel Support for Dolby® Home Theater Support for S/PDIF In/Out Support for SATA RAID 0, RAID 1, RAID 5, RAID 10, and JBOD iTE IT8718 chip: - 1 x floppy disk drive connector supporting up to the internal IEEE 1394a headers) Hardware Installation ...

Manual
Page 28
...3 4 Definition GND TXP TXN GND 5 RXN 1 SATA2_0 7 SATA2_1 6 RXP 7 GND Please connect the L-shaped end of hard drives must be an even number. • A RAID 5 configuration requires at least three hard drives. (The total number of hard drives does not have to be used to connect a system power LED on... chassis to Chapter 5, "Configuring SATA Hard Drive(s)," for instructions on when the system is off (S5). The LED is on configuring a RAID array. Refer to indicate system power status. The LED keeps blinking when the system is in S3/S4 sleep state or powered off when ...
...3 4 Definition GND TXP TXN GND 5 RXN 1 SATA2_0 7 SATA2_1 6 RXP 7 GND Please connect the L-shaped end of hard drives must be an even number. • A RAID 5 configuration requires at least three hard drives. (The total number of hard drives does not have to be used to connect a system power LED on... chassis to Chapter 5, "Configuring SATA Hard Drive(s)," for instructions on when the system is off (S5). The LED is on configuring a RAID array. Refer to indicate system power status. The LED keeps blinking when the system is in S3/S4 sleep state or powered off when ...
Manual
Page 50
... SATA2_0~SATA2_3 controller. IDE Disables RAID for the SATA controller. OnChip SATA Port4/5 Type (SATA2_4/SATA2_5 connectors) This option is configurable only when OnChip SATA Type is an interface specification that support Native mode. RAID Enables RAID for the SATA controller and configures... the SATA controller to RAID or AHCI. Onboard LAN Boot ROM Allows you to decide whether to Disabled. Onboard ...
... SATA2_0~SATA2_3 controller. IDE Disables RAID for the SATA controller. OnChip SATA Port4/5 Type (SATA2_4/SATA2_5 connectors) This option is configurable only when OnChip SATA Type is an interface specification that support Native mode. RAID Enables RAID for the SATA controller and configures... the SATA controller to RAID or AHCI. Onboard LAN Boot ROM Allows you to decide whether to Disabled. Onboard ...
Manual
Page 65
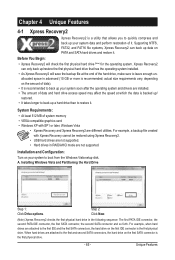
... graphics card • Windows XP with Xpress Recovery cannot be restored using Xpress Recovery2. • USB hard drives are not supported. • Hard drives in RAID/AHCI mode are different utilities. System Requirements: • At least 512 MB of it. Unique Features Installing Windows Vista and Partitioning the Hard Drive Step...
... graphics card • Windows XP with Xpress Recovery cannot be restored using Xpress Recovery2. • USB hard drives are not supported. • Hard drives in RAID/AHCI mode are different utilities. System Requirements: • At least 512 MB of it. Unique Features Installing Windows Vista and Partitioning the Hard Drive Step...
Manual
Page 68
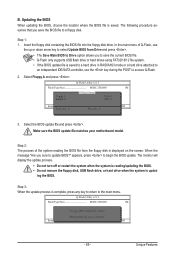
... in the BIOS, the Q-Flash tool frees you to update the BIOS without having to enter MS-DOS mode. GA-MA790GPT-UD3H F1b . . . . : BIOS Setup : XpressRecovery2 : Boot Menu : Qflash 06/19/2009-RS780D-SB750-7A66AG0EC... first. However, if the main BIOS is saved to a hard drive in system malfunction. GIGABYTE Q-Flash and @BIOS are easy-to an independent IDE/SATA controller, use FAT32/16/12 file system. ... to enter Q-Flash. Restart the system. Inadequate BIOS flashing may result in RAID/AHCI mode or a hard drive attached to -use and allow you from the nearest @BIOS server...
... in the BIOS, the Q-Flash tool frees you to update the BIOS without having to enter MS-DOS mode. GA-MA790GPT-UD3H F1b . . . . : BIOS Setup : XpressRecovery2 : Boot Menu : Qflash 06/19/2009-RS780D-SB750-7A66AG0EC... first. However, if the main BIOS is saved to a hard drive in system malfunction. GIGABYTE Q-Flash and @BIOS are easy-to an independent IDE/SATA controller, use FAT32/16/12 file system. ... to enter Q-Flash. Restart the system. Inadequate BIOS flashing may result in RAID/AHCI mode or a hard drive attached to -use and allow you from the nearest @BIOS server...
Manual
Page 69
... supports USB flash drive or hard drives using FAT32/16/12 file system. • If the BIOS update file is saved to a hard drive in RAID/AHCI mode or a hard drive attached to an independent IDE/SATA controller, use the up or down arrow key to select Update BIOS from the...
... supports USB flash drive or hard drives using FAT32/16/12 file system. • If the BIOS update file is saved to a hard drive in RAID/AHCI mode or a hard drive attached to an independent IDE/SATA controller, use the up or down arrow key to select Update BIOS from the...

Manual
Page 77
... computer. Appendix C. Before you begin Please prepare: • At least two SATA hard drives (to ensure optimal performance, it is set to AHCI or RAID mode. - 77 - Then connect the power connector from your computer Attach one hard drive. • An empty formatted floppy disk. • Windows Vista... signal cable to the rear of the SATA hard drive and the other end to create RAID array on the motherboard. Configure SATA controller mode in RAID BIOS. (Note 1) D. If you do not want to create RAID, you use two hard drives with identical model and capacity). Install the SATA...
... computer. Appendix C. Before you begin Please prepare: • At least two SATA hard drives (to ensure optimal performance, it is set to AHCI or RAID mode. - 77 - Then connect the power connector from your computer Attach one hard drive. • An empty formatted floppy disk. • Windows Vista... signal cable to the rear of the SATA hard drive and the other end to create RAID array on the motherboard. Configure SATA controller mode in RAID BIOS. (Note 1) D. If you do not want to create RAID, you use two hard drives with identical model and capacity). Install the SATA...

Manual
Page 78
... on the motherboard you will see shall depend on your motherboard. To enable RAID for the SATA2_0/1/2/3 connectors, set OnChip SATA Port4/5 Type to RAID. B. To enable RAID for your computer and press to configure the SATA controller mode correctly in BIOS...Onboard 1394 Function OnChip USB Controller USB EHCI Controller USB Keyboard Support USB Mouse Support Legacy USB storage detect Onboard Serial Port 1 [Enabled] [Enabled] [RAID] [As SATA Type] [Enabled] [Disabled] [Press Enter] [Enabled] [Enabled] [Enabled] [Enabled] [Enabled] [Disabled] [Enabled] [3F8/IRQ4...
... on the motherboard you will see shall depend on your motherboard. To enable RAID for the SATA2_0/1/2/3 connectors, set OnChip SATA Port4/5 Type to RAID. B. To enable RAID for your computer and press to configure the SATA controller mode correctly in BIOS...Onboard 1394 Function OnChip USB Controller USB EHCI Controller USB Keyboard Support USB Mouse Support Legacy USB storage detect Onboard Serial Port 1 [Enabled] [Enabled] [RAID] [As SATA Type] [Enabled] [Disabled] [Press Enter] [Enabled] [Enabled] [Enabled] [Enabled] [Enabled] [Disabled] [Enabled] [3F8/IRQ4...

Manual
Page 79
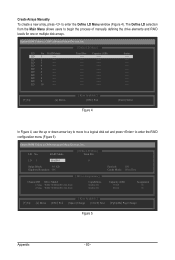
...Step 1: After the POST memory test begins and before the operating system boot begins, look for a non-RAID configuration. Press + to enter the View Drive Assignments window. RAID Option ROM Version 3.0.1540.47 (c) 2008 Advanced Micro Devices, Inc. All rights reserved. Figure 2 Step 2:... Main Menu This is defined.. To view the disk drives assigned to arrays, press to enter the RAID BIOS setup utility. To view controller settings, press to enter FastBuild (tm) Utility... Press to enter the Controller Configuration window. Option ...
...Step 1: After the POST memory test begins and before the operating system boot begins, look for a non-RAID configuration. Press + to enter the View Drive Assignments window. RAID Option ROM Version 3.0.1540.47 (c) 2008 Advanced Micro Devices, Inc. All rights reserved. Figure 2 Step 2:... Main Menu This is defined.. To view the disk drives assigned to arrays, press to enter the RAID BIOS setup utility. To view controller settings, press to enter FastBuild (tm) Utility... Press to enter the Controller Configuration window. Option ...
Manual
Page 80
... down arrow key to move to a logical disk set and press to begin the process of manually defining the drive elements and RAID levels for one or multiple disk arrays. Create Arrays Manually To create a new array, press to enter the Define LD Menu ... Option ROM Utility (c) 2008 Advanced Micro Devices, Inc. [ Define LD Menu ] LD No RAID Mode LD 1 ---- LD 8 ---- LD 9 ---- LD No RAID Mode [ Define LD Menu ] Total Drv LD 1 RAID 0 0 Stripe Block: 64 KB Gigabyte Boundary: ON [ Drives Assignments ] Channel:ID Drive Model 1:Mas WDC WD800JD-22LSA0 2:Mas WDC...
... down arrow key to move to a logical disk set and press to begin the process of manually defining the drive elements and RAID levels for one or multiple disk arrays. Create Arrays Manually To create a new array, press to enter the Define LD Menu ... Option ROM Utility (c) 2008 Advanced Micro Devices, Inc. [ Define LD Menu ] LD No RAID Mode LD 1 ---- LD 8 ---- LD 9 ---- LD No RAID Mode [ Define LD Menu ] Total Drv LD 1 RAID 0 0 Stripe Block: 64 KB Gigabyte Boundary: ON [ Drives Assignments ] Channel:ID Drive Model 1:Mas WDC WD800JD-22LSA0 2:Mas WDC...

Manual
Page 81
...to a disk array or are labeled with their assigned disk array or shown as an example. 1. Press + to set the capacity of the RAID array or press other keys to Main Menu and press again if you will appear. Appendix Figure 7 7. After the creation is the default. 3....80.02 Assignment LD 1-1 LD 1-2 [h] Up [i] Down [ESC] Exit [ Keys Available ] [Ctrl+H] Secure Erase [PgUp/Dn] Page Change Figure 8 - 81 - Under the RAID Mode section, press the key to the disk array. Under the Assignment column, drives are unassigned. Press Ctrl-Y to Modify Array Capacity or press any...
...to a disk array or are labeled with their assigned disk array or shown as an example. 1. Press + to set the capacity of the RAID array or press other keys to Main Menu and press again if you will appear. Appendix Figure 7 7. After the creation is the default. 3....80.02 Assignment LD 1-1 LD 1-2 [h] Up [i] Down [ESC] Exit [ Keys Available ] [Ctrl+H] Secure Erase [PgUp/Dn] Page Change Figure 8 - 81 - Under the RAID Mode section, press the key to the disk array. Under the Assignment column, drives are unassigned. Press Ctrl-Y to Modify Array Capacity or press any...

Manual
Page 82
Then highlight the array you wish to undo a deletion. 1. Press to return to Delete LD Menu. LD No RAID Mode [ View LD Definition Menu ] Total Drv Capacity (GB) Status LD 1 RAID 0 2 157.99 Functional Stripe Block: 64KB Cache Mode: WriteThru [ Drives Assignments ] Channel:ID 1:Mas 2:Mas Drive Model WDC WD800JD-22LSA0 WDC WD800JD...
Then highlight the array you wish to undo a deletion. 1. Press to return to Delete LD Menu. LD No RAID Mode [ View LD Definition Menu ] Total Drv Capacity (GB) Status LD 1 RAID 0 2 157.99 Functional Stripe Block: 64KB Cache Mode: WriteThru [ Drives Assignments ] Channel:ID 1:Mas 2:Mas Drive Model WDC WD800JD-22LSA0 WDC WD800JD...
Manual
Page 83
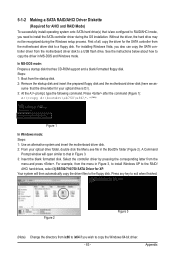
... In Windows mode: Steps: 1: Use an alternative system and insert the motherboard driver disk. 2: From your optical drive is /are configured to RAID/AHCI mode, you need to install the SATA controller driver during the Windows setup process. Appendix Your system will open similar to that is D:\). ... the Windows 64-bit driver. - 83 - Steps: 1: Boot from the motherboard driver disk to a USB flash drive. 5-1-2 Making a SATA RAID/AHCI Driver Diskette (Required for the SATA controller from the motherboard driver disk to a floppy disk. First of all, copy the driver for AHCI ...
... In Windows mode: Steps: 1: Use an alternative system and insert the motherboard driver disk. 2: From your optical drive is /are configured to RAID/AHCI mode, you need to install the SATA controller driver during the Windows setup process. Appendix Your system will open similar to that is D:\). ... the Windows 64-bit driver. - 83 - Steps: 1: Boot from the motherboard driver disk to a USB flash drive. 5-1-2 Making a SATA RAID/AHCI Driver Diskette (Required for the SATA controller from the motherboard driver disk to a floppy disk. First of all, copy the driver for AHCI ...
Manual
Page 84
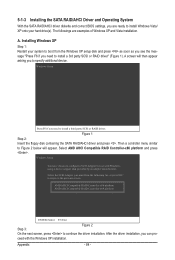
... F6 if you want from the following list, or press ESC to return to the previous screen. AMD AHCI Compatible RAID Controller-x86 platform AMD AHCI Compatible RAID Controller-x64 platform ENTER=Select F3=Exit Step 3: Figure 2 On the next screen, press to configure a SCSI Adapter... for use with the Windows XP installation. A. 5-1-3 Installing the SATA RAID/AHCI Driver and Operating System With the SATA RAID/AHCI driver diskette and correct BIOS settings, you need to install a 3rd party SCSI or RAID driver" (Figure 1). Then a controller menu similar to Figure 2 below will...
... F6 if you want from the following list, or press ESC to return to the previous screen. AMD AHCI Compatible RAID Controller-x86 platform AMD AHCI Compatible RAID Controller-x64 platform ENTER=Select F3=Exit Step 3: Figure 2 On the next screen, press to configure a SCSI Adapter... for use with the Windows XP installation. A. 5-1-3 Installing the SATA RAID/AHCI Driver and Operating System With the SATA RAID/AHCI driver diskette and correct BIOS settings, you need to install a 3rd party SCSI or RAID driver" (Figure 1). Then a controller menu similar to Figure 2 below will...

Manual
Page 85
.... Figure 3 Step 2: Insert the motherboard driver disk (Method A) or the removable storage device such as USB flash drive that only one RAID array exists in your system.) Step 1: Restart your system and browse to the following directory: \BootDrv\SB750V\LH For Windows Vista 64-bit... drive, be detected at this stage), select Load Driver (Figure 3). Figure 4 - 85 - Appendix Installing Windows Vista (The procedure below appears (RAID hard drive will not be sure to copy the driver files from the Windows Vista setup disk and perform standard OS installation steps. Method A: Insert...
.... Figure 3 Step 2: Insert the motherboard driver disk (Method A) or the removable storage device such as USB flash drive that only one RAID array exists in your system.) Step 1: Restart your system and browse to the following directory: \BootDrv\SB750V\LH For Windows Vista 64-bit... drive, be detected at this stage), select Load Driver (Figure 3). Figure 4 - 85 - Appendix Installing Windows Vista (The procedure below appears (RAID hard drive will not be sure to copy the driver files from the Windows Vista setup disk and perform standard OS installation steps. Method A: Insert...

Manual
Page 86
Appendix Figure 6 - 86 - Step 3: When a screen as shown in Figure 5 appears, select AMD AHCI Compatible RAID Controller and press Next. Figure 5 Step 4: After the driver is loaded, the RAID drive will appear. Select the RAID drive and then press Next to continue the OS installation (Figure 6).
Appendix Figure 6 - 86 - Step 3: When a screen as shown in Figure 5 appears, select AMD AHCI Compatible RAID Controller and press Next. Figure 5 Step 4: After the driver is loaded, the RAID drive will appear. Select the RAID drive and then press Next to continue the OS installation (Figure 6).

Manual
Page 87
.... To replace the old drive, make sure the chipset drivers and ATi SB700/750 RAID Utility have been installed from the motherboard driver disk. Step 2: Select the RAID array to start the rebuilding process. While in the operating system, make sure to use a new drive of restoring data ...equal or greater capacity. Then launch the AMD RAIDXpert from other drives in the Logical Drive Information pane will display as RAID 1, RAID 5, or RAID 10 arrays. Step 4: The rebuilding progress is displayed on the Information page in the array. Rebuilding applies only to launch AMD RAIDXpert.
.... To replace the old drive, make sure the chipset drivers and ATi SB700/750 RAID Utility have been installed from the motherboard driver disk. Step 2: Select the RAID array to start the rebuilding process. While in the operating system, make sure to use a new drive of restoring data ...equal or greater capacity. Then launch the AMD RAIDXpert from other drives in the Logical Drive Information pane will display as RAID 1, RAID 5, or RAID 10 arrays. Step 4: The rebuilding progress is displayed on the Information page in the array. Rebuilding applies only to launch AMD RAIDXpert.


