
Manual
Page 37
... settings for the current submenus Access the Q-Flash utility Display system information Save all the changes and exit the BIOS Setup program Save CMOS to BIOS Load CMOS from BIOS Main Menu Help The onscreen description of a highlighted setup option is not stable as usual, select the Load Optimized...more advanced options. • When the system is displayed on the right side of function keys available for reference only and may differ by BIOS version. - 37 - Submenu Help While in this chapter are for the menu. Use arrow keys to move among the items and press ...
... settings for the current submenus Access the Q-Flash utility Display system information Save all the changes and exit the BIOS Setup program Save CMOS to BIOS Load CMOS from BIOS Main Menu Help The onscreen description of a highlighted setup option is not stable as usual, select the Load Optimized...more advanced options. • When the system is displayed on the right side of function keys available for reference only and may differ by BIOS version. - 37 - Submenu Help While in this chapter are for the menu. Use arrow keys to move among the items and press ...

Manual
Page 39
The date format is 13:0:0. BIOS Setup Time Sets the system time. For example, 1 p.m. is week (...3.5"] [Disabled] Halt On [All, But Keyboard] KLJI: Move Enter: Select F5: Previous Values +/-/PU/PD: Value F10: Save F6: Fail-Safe Default ESC: Exit F1: General Help F7: Optimized Defaults Base Memory Extended Memory CMOS Setup Utility-Copyright (C) 1984-2007 Award...511M Item Help Menu Level` KLJI: Move Enter: Select F5: Previous Values +/-/PU/PD: Value F10: Save F6: Fail-Safe Default ESC: Exit F1: General Help F7: Optimized Defaults Date Sets the system date. Select the...
The date format is 13:0:0. BIOS Setup Time Sets the system time. For example, 1 p.m. is week (...3.5"] [Disabled] Halt On [All, But Keyboard] KLJI: Move Enter: Select F5: Previous Values +/-/PU/PD: Value F10: Save F6: Fail-Safe Default ESC: Exit F1: General Help F7: Optimized Defaults Base Memory Extended Memory CMOS Setup Utility-Copyright (C) 1984-2007 Award...511M Item Help Menu Level` KLJI: Move Enter: Select F5: Previous Values +/-/PU/PD: Value F10: Save F6: Fail-Safe Default ESC: Exit F1: General Help F7: Optimized Defaults Date Sets the system date. Select the...
Manual
Page 42
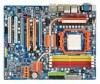
...Hard Disk, CDROM, ZIP, USB-FDD, USB-ZIP, USB-CDROM, USB-HDD, Legacy LAN, Disabled. Setup A password is only required for entering the BIOS Setup program. Capability Away Mode Init Display First [Disabled] [Auto] [Press Enter] [Floppy] [Hard Disk] [CDROM] [Setup] [Disabled] [Disabled]...Enter: Select F5: Previous Values +/-/PU/PD: Value F10: Save F6: Fail-Safe Defaults ESC: Exit F1: General Help F7: Optimized Defaults Virtualization Virtualization allows a platform to exit this menu when finished. GA-MA790FX-DQ6 Motherboard - 42 - Hard Disk Boot Priority Specifies the sequence of...
...Hard Disk, CDROM, ZIP, USB-FDD, USB-ZIP, USB-CDROM, USB-HDD, Legacy LAN, Disabled. Setup A password is only required for entering the BIOS Setup program. Capability Away Mode Init Display First [Disabled] [Auto] [Press Enter] [Floppy] [Hard Disk] [CDROM] [Setup] [Disabled] [Disabled]...Enter: Select F5: Previous Values +/-/PU/PD: Value F10: Save F6: Fail-Safe Defaults ESC: Exit F1: General Help F7: Optimized Defaults Virtualization Virtualization allows a platform to exit this menu when finished. GA-MA790FX-DQ6 Motherboard - 42 - Hard Disk Boot Priority Specifies the sequence of...
Manual
Page 45
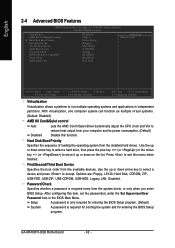
...this item to Disabled. Advanced Host Controller Interface (AHCI) is an interface specification that do not support Native mode, e.g. BIOS Setup Legacy IDE Allows the SATA controller to AHCI mode. OnBoard PCIE Device CMOS Setup Utility-Copyright (C) 1984-2007 Award Software...] [Enabled] [IDE] [Enabled] [IDE] Item Help Menu Level` KLJI: Move Enter: Select F5: Previous Values +/-/PU/PD: Value F10: Save F6: Fail-Safe Defaults ESC: Exit F1: General Help F7: Optimized Defaults Onboard LAN1/LAN2 Function Enables or disables the onboard LAN function. (Default: Enabled)...
...this item to Disabled. Advanced Host Controller Interface (AHCI) is an interface specification that do not support Native mode, e.g. BIOS Setup Legacy IDE Allows the SATA controller to AHCI mode. OnBoard PCIE Device CMOS Setup Utility-Copyright (C) 1984-2007 Award Software...] [Enabled] [IDE] [Enabled] [IDE] Item Help Menu Level` KLJI: Move Enter: Select F5: Previous Values +/-/PU/PD: Value F10: Save F6: Fail-Safe Defaults ESC: Exit F1: General Help F7: Optimized Defaults Onboard LAN1/LAN2 Function Enables or disables the onboard LAN function. (Default: Enabled)...

Manual
Page 49
... system will enter suspend mode. If the power button is pressed for 4 seconds to turn off instantly. (Default) Delay 4 Sec. BIOS Setup The system can be turned off the system. In S3 sleep state, the system appears to its working state exactly where it was... [Disabled] Enter [Soft-Off] [Disabled] Everyday 0 : 0 : 0 Item Help Menu Level` KLJI: Move Enter: Select F5: Previous Values +/-/PU/PD: Value F10: Save F6: Fail-Safe Defaults ESC: Exit F1: General Help F7: Optimized Defaults ACPI Suspend Type Specifies the ACPI sleep state when the system enters suspend. Modem...
... system will enter suspend mode. If the power button is pressed for 4 seconds to turn off instantly. (Default) Delay 4 Sec. BIOS Setup The system can be turned off the system. In S3 sleep state, the system appears to its working state exactly where it was... [Disabled] Enter [Soft-Off] [Disabled] Everyday 0 : 0 : 0 Item Help Menu Level` KLJI: Move Enter: Select F5: Previous Values +/-/PU/PD: Value F10: Save F6: Fail-Safe Defaults ESC: Exit F1: General Help F7: Optimized Defaults ACPI Suspend Type Specifies the ACPI sleep state when the system enters suspend. Modem...

Manual
Page 51
BIOS Setup English 2-7 PnP/PCI Configurations CMOS Setup Utility-Copyright (C) 1984-2007 Award Software PnP/PCI ...PCI2 IRQ Assignment Auto 3,4,5,7,9,10,11,12,14,15 +/-/PU/PD: Value F10: Save F6: Fail-Safe Defaults ESC: Exit F1: General Help F7: Optimized Defaults BIOS auto-assigns IRQ to the first PCI slot. (Default) Assigns IRQ 3,4,5,7,9,10,11,12,...14,15 to the second PCI slot. - 51 - BIOS auto-assigns IRQ to the second PCI slot. (Default...
BIOS Setup English 2-7 PnP/PCI Configurations CMOS Setup Utility-Copyright (C) 1984-2007 Award Software PnP/PCI ...PCI2 IRQ Assignment Auto 3,4,5,7,9,10,11,12,14,15 +/-/PU/PD: Value F10: Save F6: Fail-Safe Defaults ESC: Exit F1: General Help F7: Optimized Defaults BIOS auto-assigns IRQ to the first PCI slot. (Default) Assigns IRQ 3,4,5,7,9,10,11,12,...14,15 to the second PCI slot. - 51 - BIOS auto-assigns IRQ to the second PCI slot. (Default...

Manual
Page 78
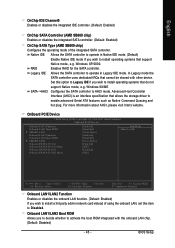
... Enter: Select F5: Previous Values +/-/PU/PD: Value F10: Save F6: Fail-Safe Defaults Figure 1 ESC: Exit F1: General Help F7: Optimized Defaults Step 2: Save changes and exit BIOS Setup. The BIOS Setup menus described in this section may differ from the exact settings for...-On Self-Test). Configuring SATA controller mode in system BIOS Setup . To create RAID, set OnChip SATA Type under the Integrated Peripherals menu to RAID (Figure 1). The actual BIOS Setup menu options you have and the BIOS version. GA-MA790FX-DQ6 Motherboard - 78 - Under Integrated Peripherals, ensure OnChip ...
... Enter: Select F5: Previous Values +/-/PU/PD: Value F10: Save F6: Fail-Safe Defaults Figure 1 ESC: Exit F1: General Help F7: Optimized Defaults Step 2: Save changes and exit BIOS Setup. The BIOS Setup menus described in this section may differ from the exact settings for...-On Self-Test). Configuring SATA controller mode in system BIOS Setup . To create RAID, set OnChip SATA Type under the Integrated Peripherals menu to RAID (Figure 1). The actual BIOS Setup menu options you have and the BIOS version. GA-MA790FX-DQ6 Motherboard - 78 - Under Integrated Peripherals, ensure OnChip ...
Manual
Page 83
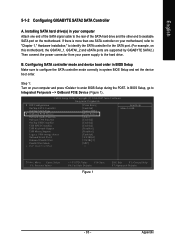
...[Enabled] [3F8/IRQ4] [378/IRQ7] [SPP] 3 Item Help Menu Level` KLJI: Move Enter: Select F5: Previous Values +/-/PU/PD: Value F10: Save F6: Fail-Safe Defaults Figure 1 ESC: Exit F1: General Help F7: Optimized Defaults - 83 - B. If there is more than one end of the SATA signal ... 1). Appendix Installing SATA hard drive(s) in system BIOS Setup and set the device boot order. In BIOS Setup, go to the hard drive. Step 1: Turn on this motherboard, the GSATAII_1, GSATAII_2 and eSATA ports are supported by GIGABYTE SATA2.) Then connect the power connector from your computer...
...[Enabled] [3F8/IRQ4] [378/IRQ7] [SPP] 3 Item Help Menu Level` KLJI: Move Enter: Select F5: Previous Values +/-/PU/PD: Value F10: Save F6: Fail-Safe Defaults Figure 1 ESC: Exit F1: General Help F7: Optimized Defaults - 83 - B. If there is more than one end of the SATA signal ... 1). Appendix Installing SATA hard drive(s) in system BIOS Setup and set the device boot order. In BIOS Setup, go to the hard drive. Step 1: Turn on this motherboard, the GSATAII_1, GSATAII_2 and eSATA ports are supported by GIGABYTE SATA2.) Then connect the power connector from your computer...

Manual
Page 84
...] [Enabled] [RAID] [Enabled] [IDE] Item Help Menu Level` KLJI: Move Enter: Select F5: Previous Values +/-/PU/PD: Value F10: Save F6: Fail-Safe Defaults Figure 2 Step 2: Save changes and exit BIOS Setup. GA-MA790FX-DQ6 Motherboard - 84 - English For example, if you wish to create RAID with hard drives on the eSATA 3Gb/s ports, ensure...
...] [Enabled] [RAID] [Enabled] [IDE] Item Help Menu Level` KLJI: Move Enter: Select F5: Previous Values +/-/PU/PD: Value F10: Save F6: Fail-Safe Defaults Figure 2 Step 2: Save changes and exit BIOS Setup. GA-MA790FX-DQ6 Motherboard - 84 - English For example, if you wish to create RAID with hard drives on the eSATA 3Gb/s ports, ensure...

Manual
Page 91
...driver" (Figure 1). After pressing , there will load support for which you have prepared the SATA RAID/AHCI driver diskette and configured the required BIOS settings, you need to specify additional mass storage devices for use with Windows, press ENTER. Figure 1 Step 2: When a screen similar to ..., Setup will be a few moments of Windows XP and Vista installation. Installing Windows XP Step 1: Restart your hard drive(s). Windows Setup Press F6 if you are ready to install Windows Vista/XP/2000 onto your system to boot from a mass storage device manufacturer, press S. * If ...
...driver" (Figure 1). After pressing , there will load support for which you have prepared the SATA RAID/AHCI driver diskette and configured the required BIOS settings, you need to specify additional mass storage devices for use with Windows, press ENTER. Figure 1 Step 2: When a screen similar to ..., Setup will be a few moments of Windows XP and Vista installation. Installing Windows XP Step 1: Restart your hard drive(s). Windows Setup Press F6 if you are ready to install Windows Vista/XP/2000 onto your system to boot from a mass storage device manufacturer, press S. * If ...

