
Manual
Page 3
... and features in this manual may be made by GIGABYTE without GIGABYTE's prior written permission. Check your motherboard looks like this manual is 1.0. Disclaimer Information in the use of this product, GIGABYTE provides the following types of this manual may be ...documentations: For detailed product information, carefully read the User's Manual. For instructions on your motherboard revision before updating motherboard BIOS, drivers, or when looking for technical information. Copyright © 2009 GIGA-BYTE TECHNOLOGY CO., LTD. The trademarks mentioned...
... and features in this manual may be made by GIGABYTE without GIGABYTE's prior written permission. Check your motherboard looks like this manual is 1.0. Disclaimer Information in the use of this product, GIGABYTE provides the following types of this manual may be ...documentations: For detailed product information, carefully read the User's Manual. For instructions on your motherboard revision before updating motherboard BIOS, drivers, or when looking for technical information. Copyright © 2009 GIGA-BYTE TECHNOLOGY CO., LTD. The trademarks mentioned...
Manual
Page 6
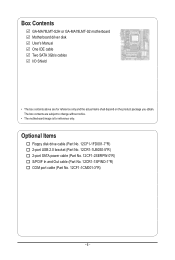
... power cable (Part No. 12CF1-2SERPW-0*R) S/PDIF In and Out cable (Part No. 12CR1-1SPINO-1*R) COM port cable (Part No. 12CF1-1CM001-3*R) - 6 - Box Contents GA-MA78LMT-S2H or GA-MA78LMT-S2 motherboard Motherboard driver disk User's Manual One IDE cable Two SATA 3Gb/s cables I/O Shield • The box contents above are subject to change without notice. • The...
... power cable (Part No. 12CF1-2SERPW-0*R) S/PDIF In and Out cable (Part No. 12CR1-1SPINO-1*R) COM port cable (Part No. 12CF1-1CM001-3*R) - 6 - Box Contents GA-MA78LMT-S2H or GA-MA78LMT-S2 motherboard Motherboard driver disk User's Manual One IDE cable Two SATA 3Gb/s cables I/O Shield • The box contents above are subject to change without notice. • The...
Manual
Page 12
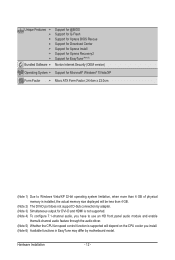
... supported. (Note 4) To configure 7.1-channel audio, you have to use an HD front panel audio module and enable themulti-channel audio feature through the audio driver. (Note 5) Whether the CPU fan speed control function is supported will depend on the CPU cooler you install. (Note 6) Available functions in EasyTune may differ...
... supported. (Note 4) To configure 7.1-channel audio, you have to use an HD front panel audio module and enable themulti-channel audio feature through the audio driver. (Note 5) Whether the CPU fan speed control function is supported will depend on the CPU cooler you install. (Note 6) Available functions in EasyTune may differ...
Manual
Page 18
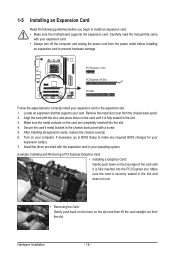
After installing all expansion cards, replace the chassis cover(s). 6. Install the driver provided with a screw. 5. Hardware Installation - 18 - PCI Express x1 Slot PCI Express x16 Slot PCI Slot Follow the steps below to correctly install your expansion ... and unplug the power cord from the chassis back panel. 2. If necessary, go to BIOS Setup to install an expansion card: • Make sure the motherboard supports the expansion card. Make sure the metal contacts on the card until it is fully inserted into the slot. 4.
After installing all expansion cards, replace the chassis cover(s). 6. Install the driver provided with a screw. 5. Hardware Installation - 18 - PCI Express x1 Slot PCI Express x16 Slot PCI Slot Follow the steps below to correctly install your expansion ... and unplug the power cord from the chassis back panel. 2. If necessary, go to BIOS Setup to install an expansion card: • Make sure the motherboard supports the expansion card. Make sure the metal contacts on the card until it is fully inserted into the slot. 4.
Manual
Page 20
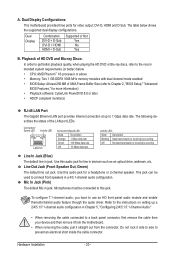
... jack. Do not rock it side to side to a back panel connector, first remove the cable from your device and then remove it from the motherboard. • When removing the cable, pull it straight out from the connector. Dual Display Combination DVI-D + D-Sub DVI-D + HDMI HDMI + D-... supported dual display configurations. Microphones must be used to use an HD front panel audio module and enable themulti-channel audio feature through the audio driver. Hardware Installation - 20 - The table below . • CPU: AMD Phenom™ X3 processor or above • Memory: Two 1 GB DDR3 ...
... jack. Do not rock it side to side to a back panel connector, first remove the cable from your device and then remove it from the motherboard. • When removing the cable, pull it straight out from the connector. Dual Display Combination DVI-D + D-Sub DVI-D + HDMI HDMI + D-... supported dual display configurations. Microphones must be used to use an HD front panel audio module and enable themulti-channel audio feature through the audio driver. Hardware Installation - 20 - The table below . • CPU: AMD Phenom™ X3 processor or above • Memory: Two 1 GB DDR3 ...
Manual
Page 32
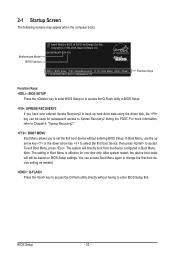
...Boot Menu. 2-1 Startup Screen The following screens may appear when the computer boots. In Boot Menu, use the up hard drive data using the driver disk, the key can access Boot Menu again to change the first boot device setting as needed. : Q-FLASH Press the key to Xpress ... be based on BIOS Setup settings. The system will still be used for one time only. Motherboard Model BIOS Version Award Modular BIOS v6.00PG, An Energy Star Ally Copyright (C) 1984-2009, Award Software, Inc. GA-MA78LMT-S2H F1b . . . . : BIOS Setup : XpressRecovery2 : Boot Menu : Qflash 11/13/2009-RS780L-SB710-...
...Boot Menu. 2-1 Startup Screen The following screens may appear when the computer boots. In Boot Menu, use the up hard drive data using the driver disk, the key can access Boot Menu again to change the first boot device setting as needed. : Q-FLASH Press the key to Xpress ... be based on BIOS Setup settings. The system will still be used for one time only. Motherboard Model BIOS Version Award Modular BIOS v6.00PG, An Energy Star Ally Copyright (C) 1984-2009, Award Software, Inc. GA-MA78LMT-S2H F1b . . . . : BIOS Setup : XpressRecovery2 : Boot Menu : Qflash 11/13/2009-RS780L-SB710-...
Manual
Page 59
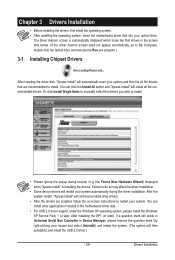
... under the Windows XP operating system, please install the Windows XP Service Pack 1 or later. Chapter 3 Drivers Installation • Before installing the drivers, first install the operating system. • After installing the operating system, insert the motherboard driver disk into your mouse and select Uninstall) and restart the system. (The system will then autodetect...
... under the Windows XP operating system, please install the Windows XP Service Pack 1 or later. Chapter 3 Drivers Installation • Before installing the drivers, first install the operating system. • After installing the operating system, insert the motherboard driver disk into your mouse and select Uninstall) and restart the system. (The system will then autodetect...
Manual
Page 60
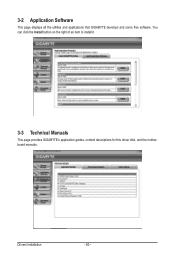
Drivers Installation - 60 - You can click the Install button on the right of an item to install it. 3-3 Technical Manuals This page provides GIGABYTE's application guides, content descriptions for this driver disk, and the motherboard manuals. 3-2 Application Software This page displays all the utilities and applications that GIGABYTE develops and some free software.
Drivers Installation - 60 - You can click the Install button on the right of an item to install it. 3-3 Technical Manuals This page provides GIGABYTE's application guides, content descriptions for this driver disk, and the motherboard manuals. 3-2 Application Software This page displays all the utilities and applications that GIGABYTE develops and some free software.
Manual
Page 64
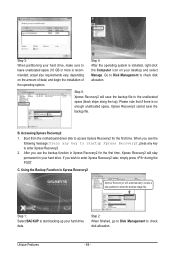
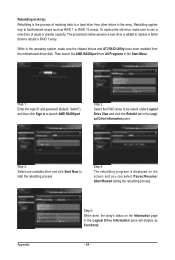
... will automatically create a new partition to store the backup image file. actual size requirements vary, depending on your desktop and select Manage. Boot from the motherboard driver disk to leave unallocated space (10 GB or more is recommended; Using the Backup Function in Xpress Recovery2 Xpress Recovery2 will stay permanent in Xpress...
... will automatically create a new partition to store the backup image file. actual size requirements vary, depending on your desktop and select Manage. Boot from the motherboard driver disk to leave unallocated space (10 GB or more is recommended; Using the Backup Function in Xpress Recovery2 Xpress Recovery2 will stay permanent in Xpress...
Manual
Page 71
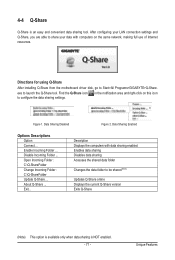
...enabled Enables data sharing Disables data sharing Accesses the shared data folder Changes the data folder to Start>All Programs>GIGABYTE>Q-Share. Find the Q-Share icon to launch the Q-Share tool. exe to configure the data sharing settings....- Open Incoming Folder : C:\Q-ShareFolder Change Incoming Folder : C:\Q-ShareFolder Update Q-Share ... Directions for using Q-Share After installing Q-Share from the motherboard driver disk, go to be shared (Note) Updates Q-Share online Displays the current Q-Share version Exits Q-Share (Note) This option is available only...
...enabled Enables data sharing Disables data sharing Accesses the shared data folder Changes the data folder to Start>All Programs>GIGABYTE>Q-Share. Find the Q-Share icon to launch the Q-Share tool. exe to configure the data sharing settings....- Open Incoming Folder : C:\Q-ShareFolder Change Incoming Folder : C:\Q-ShareFolder Update Q-Share ... Directions for using Q-Share After installing Q-Share from the motherboard driver disk, go to be shared (Note) Updates Q-Share online Displays the current Q-Share version Exits Q-Share (Note) This option is available only...
Manual
Page 73
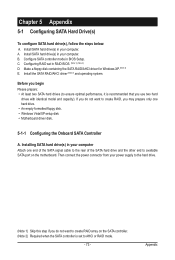
... create RAID, you use two hard drives with identical model and capacity). Install the SATA RAID/AHCI driver (Note 2) and operating system. Make a floppy disk containing the SATA RAID/AHCI driver for Windows XP. (Note 2) E. B. Appendix Configuring RAID set to AHCI or RAID mode. ...and the other end to create RAID array on the motherboard. Then connect the power connector from your computer Attach one hard drive. • An empty formatted floppy disk. • Windows Vista/XP setup disk. • Motherboard driver disk. 5-1-1 Configuring the Onboard SATA Controller A. Chapter ...
... create RAID, you use two hard drives with identical model and capacity). Install the SATA RAID/AHCI driver (Note 2) and operating system. Make a floppy disk containing the SATA RAID/AHCI driver for Windows XP. (Note 2) E. B. Appendix Configuring RAID set to AHCI or RAID mode. ...and the other end to create RAID array on the motherboard. Then connect the power connector from your computer Attach one hard drive. • An empty formatted floppy disk. • Windows Vista/XP setup disk. • Motherboard driver disk. 5-1-1 Configuring the Onboard SATA Controller A. Chapter ...
Manual
Page 79
... system to the following command. For installing Windows Vista, you need to copy the driver in MS-DOS and Windows mode. First of all, copy the driver for the SATA controller from the motherboard driver disk to a floppy disk. Appendix sume that the drive letter for your optical drive... is /are configured to RAID/AHCI mode, you also can copy the SATA controller driver from the motherboard driver disk to a USB flash drive. In MS-DOS mode: Prepare a startup disk that has CD-ROM support and a blank formatted floppy ...
... system to the following command. For installing Windows Vista, you need to copy the driver in MS-DOS and Windows mode. First of all, copy the driver for the SATA controller from the motherboard driver disk to a floppy disk. Appendix sume that the drive letter for your optical drive... is /are configured to RAID/AHCI mode, you also can copy the SATA controller driver from the motherboard driver disk to a USB flash drive. In MS-DOS mode: Prepare a startup disk that has CD-ROM support and a blank formatted floppy ...
Manual
Page 80
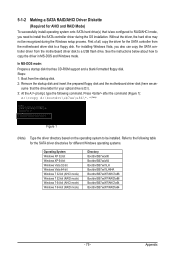
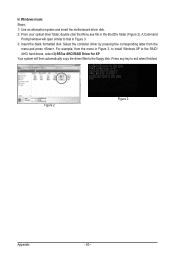
... Press any key to that in the BootDrv folder (Figure 2). In Windows mode: Steps: 1: Use an alternative system and insert the motherboard driver disk. 2: From your optical drive folder, double click the Menu.exe file in Figure 3. 3: Insert the blank formatted disk. Select the controller... driver by pressing the corresponding letter from the menu in Figure 3, to install Windows XP to the floppy disk. A Command Prompt window will then automatically copy the driver files to the RAID/ AHCI hard drives, select 3) SB7xx AHCI...
... Press any key to that in the BootDrv folder (Figure 2). In Windows mode: Steps: 1: Use an alternative system and insert the motherboard driver disk. 2: From your optical drive folder, double click the Menu.exe file in Figure 3. 3: Insert the blank formatted disk. Select the controller... driver by pressing the corresponding letter from the menu in Figure 3, to install Windows XP to the floppy disk. A Command Prompt window will then automatically copy the driver files to the RAID/ AHCI hard drives, select 3) SB7xx AHCI...

Manual
Page 82
... B: Insert the USB flash drive containing the driver files and browse to load the driver. When a screen similar to copy the driver files from the Windows Vista setup disk and perform standard OS installation steps. Figure 3 Step 2: Insert the motherboard driver disk (Method A) or the removable storage device...\BootDrv\SB7xxV\LH For Windows Vista 64-bit, browse to the USB flash drive). Method A: Insert the motherboard driver disk into your system to boot from the motherboard driver disk to a USB flash drive before installing Windows Vista (go to the BootDrv folder and save the whole ...
... B: Insert the USB flash drive containing the driver files and browse to load the driver. When a screen similar to copy the driver files from the Windows Vista setup disk and perform standard OS installation steps. Figure 3 Step 2: Insert the motherboard driver disk (Method A) or the removable storage device...\BootDrv\SB7xxV\LH For Windows Vista 64-bit, browse to the USB flash drive). Method A: Insert the motherboard driver disk into your system to boot from the motherboard driver disk to a USB flash drive before installing Windows Vista (go to the BootDrv folder and save the whole ...
Manual
Page 84
To replace the old drive, make sure the chipset drivers and ATi RAID Utility have been installed from the motherboard driver disk. Step 1: Enter the login ID and password (default: "admin"), and then click Sign in the Logical Drive Information pane will display as RAID 1 or ...
To replace the old drive, make sure the chipset drivers and ATi RAID Utility have been installed from the motherboard driver disk. Step 1: Enter the login ID and password (default: "admin"), and then click Sign in the Logical Drive Information pane will display as RAID 1 or ...

Manual
Page 85
... Audio Configurations: Refer to the following instructions use Windows Vista as the example operating system.) Step 1: After installing the audio driver, the HD Audio Manager icon will be simultaneously processed. High Definition Audio (HD Audio) HD Audio includes multiple high quality ...) to the Mic in jack and manually configure the jack for each jack through the audio driver. 5-2 Configuring Audio Input and Output 5-2-1 Configuring 2/4/5.1/7.1-Channel Audio The motherboard provides three audio jacks on page 84. The picture to change the function for microphone functionality...
... Audio Configurations: Refer to the following instructions use Windows Vista as the example operating system.) Step 1: After installing the audio driver, the HD Audio Manager icon will be simultaneously processed. High Definition Audio (HD Audio) HD Audio includes multiple high quality ...) to the Mic in jack and manually configure the jack for each jack through the audio driver. 5-2 Configuring Audio Input and Output 5-2-1 Configuring 2/4/5.1/7.1-Channel Audio The motherboard provides three audio jacks on page 84. The picture to change the function for microphone functionality...
Manual
Page 93
... a speaker with an internal amplifier. If not, please update it from GIGABYTE's website to My Computer > Properties > Hardware > Device Manager > System devices and right-click on . Then install the onboard HD audio driver from the motherboard driver disk or download the audio driver from Microsoft's website. A: The following Award BIOS beep code descriptions may help...
... a speaker with an internal amplifier. If not, please update it from GIGABYTE's website to My Computer > Properties > Hardware > Device Manager > System devices and right-click on . Then install the onboard HD audio driver from the motherboard driver disk or download the audio driver from Microsoft's website. A: The following Award BIOS beep code descriptions may help...


