User Manual
Page 1
... from without the expressed, written permission of this manual may void the warranty of GBT. No part of this motherboard. GA-K8VM800M AMD Socket 754 Processor Motherboard User's Manual Rev. 1003 12ME-K8VM800M-1003 Copyright © 2005 GIGABYTE TECHNOLOGY CO., LTD Copyright by GIGA-BYTE TECHNOLOGY CO., LTD. ("GBT"). The author assumes no responsibility for any...
... from without the expressed, written permission of this manual may void the warranty of GBT. No part of this motherboard. GA-K8VM800M AMD Socket 754 Processor Motherboard User's Manual Rev. 1003 12ME-K8VM800M-1003 Copyright © 2005 GIGABYTE TECHNOLOGY CO., LTD Copyright by GIGA-BYTE TECHNOLOGY CO., LTD. ("GBT"). The author assumes no responsibility for any...

User Manual
Page 3
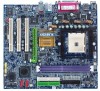
Motherboard GA-K8VM800M Apr. 14, 2004
Motherboard GA-K8VM800M Apr. 14, 2004

User Manual
Page 4
If your AGP card is AGP 4X/8X. AGP 4X/8X notch Caution: AGP 2X card is fully understood and practiced. You might experience system unable to boot up normally. Please insert an AGP 4X/8X card. GA-K8VM800M Motherboard - 4 - When you installing AGP card, please make sure your AGP card has "AGP 4X/8X (1.5V) notch" (show below), please make sure the following notice is not supported by VIA K8M800. English Read Me First!
If your AGP card is AGP 4X/8X. AGP 4X/8X notch Caution: AGP 2X card is fully understood and practiced. You might experience system unable to boot up normally. Please insert an AGP 4X/8X card. GA-K8VM800M Motherboard - 4 - When you installing AGP card, please make sure your AGP card has "AGP 4X/8X (1.5V) notch" (show below), please make sure the following notice is not supported by VIA K8M800. English Read Me First!

User Manual
Page 5
...connector on the base and there are no slots to attach the spacers, do not have one, touch both of your computer... If the motherboard has mounting holes, but they don't line up with the components whenever the components are near by the edges and try not touch the ...the bag that the ATX power supply is switched off , so be careful of your computer. 1. Ensure that came with the holes on the motherboard. Computer motherboards and expansion cards contain very delicate Integrated Circuit (IC) chips. English Prepare your hands to a safely grounded object or to cut the bottom ...
...connector on the base and there are no slots to attach the spacers, do not have one, touch both of your computer... If the motherboard has mounting holes, but they don't line up with the components whenever the components are near by the edges and try not touch the ...the bag that the ATX power supply is switched off , so be careful of your computer. 1. Ensure that came with the holes on the motherboard. Computer motherboards and expansion cards contain very delicate Integrated Circuit (IC) chips. English Prepare your hands to a safely grounded object or to cut the bottom ...
User Manual
Page 6
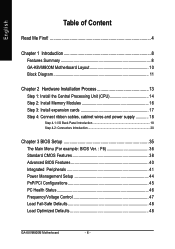
English Table of Content Read Me First 4 Chapter 1 Introduction 8 Features Summary 8 GA-K8VM800M Motherboard Layout 10 Block Diagram 11 Chapter 2 Hardware Installation Process 13 Step 1: Install the Central Processing Unit (CPU 14 Step 2: Install Memory Modules 16 Step 3: Install ... Power Management Setup 44 PnP/PCI Configurations 45 PC Health Status 46 Frequency/Voltage Control 47 Load Fail-Safe Defaults 48 Load Optimized Defaults 48 GA-K8VM800M Motherboard - 6 -
English Table of Content Read Me First 4 Chapter 1 Introduction 8 Features Summary 8 GA-K8VM800M Motherboard Layout 10 Block Diagram 11 Chapter 2 Hardware Installation Process 13 Step 1: Install the Central Processing Unit (CPU 14 Step 2: Install Memory Modules 16 Step 3: Install ... Power Management Setup 44 PnP/PCI Configurations 45 PC Health Status 46 Frequency/Voltage Control 47 Load Fail-Safe Defaults 48 Load Optimized Defaults 48 GA-K8VM800M Motherboard - 6 -

User Manual
Page 8
... 1) Supports UDMA up to 150 MB/sec Up to 2 SATA devices IT8705F to be continued... (Note 1) It is recommended to use SATA (1.5Gb/s) hard disks. GA-K8VM800M Motherboard - 8 -
... 1) Supports UDMA up to 150 MB/sec Up to 2 SATA devices IT8705F to be continued... (Note 1) It is recommended to use SATA (1.5Gb/s) hard disks. GA-K8VM800M Motherboard - 8 -
User Manual
Page 14
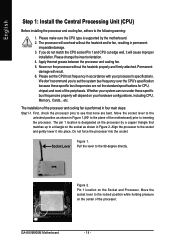
...cooling fan is supported by a copper triangle that none are not the standard specifications for CPU, chipset and most of the motherboard) prior to inserting the processor. Figure 2. Pin 1 location on your system can run the processor without the heatsink and/...on the processor by the motherboard. 2. The processor will depend on the Socket and Processor. If you to set the CPU host frequency in Figure 1.(90o to the unlocked position as shown in permanent irreparable damage. 3. Permanent damage will cause improper installation. GA-K8VM800M Motherboard - 14 -
...cooling fan is supported by a copper triangle that none are not the standard specifications for CPU, chipset and most of the motherboard) prior to inserting the processor. Figure 2. Pin 1 location on your system can run the processor without the heatsink and/...on the processor by the motherboard. 2. The processor will depend on the Socket and Processor. If you to set the CPU host frequency in Figure 1.(90o to the unlocked position as shown in permanent irreparable damage. 3. Permanent damage will cause improper installation. GA-K8VM800M Motherboard - 14 -

User Manual
Page 15
.... Application of thermal grease to the hardening of the CPU socket alone with standoffs. Figure 4 & 5. Connect the fan power wires to the header on the motherboard as shown in Figure 3) prior to remove the cooling fan, you might pull the processor out of the thermal paste. Step 1-3.Once the thermal grease...
.... Application of thermal grease to the hardening of the CPU socket alone with standoffs. Figure 4 & 5. Connect the fan power wires to the header on the motherboard as shown in Figure 3) prior to remove the cooling fan, you might pull the processor out of the thermal paste. Step 1-3.Once the thermal grease...

User Manual
Page 16
Please change the insert orientation. Notch DDR GA-K8VM800M Motherboard 1. The motherboard has 2 dual inline memory module (DIMM) sockets. The DIMM module can only fit in one direction due to the one direction. 2. To install the memory ...
Please change the insert orientation. Notch DDR GA-K8VM800M Motherboard 1. The motherboard has 2 dual inline memory module (DIMM) sockets. The DIMM module can only fit in one direction due to the one direction. 2. To install the memory ...

User Manual
Page 17
... by the small white-drawable bar. - 17 - Make sure your computer's chassis cover. 7. Be sure the metal contacts on the card are indeed seated in motherboard. 4. Power on the slot. AGP Card Please carefully pull out the small white-drawable bar at the end of the AGP slot when you try...
... by the small white-drawable bar. - 17 - Make sure your computer's chassis cover. 7. Be sure the metal contacts on the card are indeed seated in motherboard. 4. Power on the slot. AGP Card Please carefully pull out the small white-drawable bar at the end of the AGP slot when you try...

User Manual
Page 18
.../2 mouse. / USB/LAN Connector USB 0 USB 1 LAN USB 2 USB 3 Before you connect your device(s) into USB connector(s), please make sure your OS or device (s) vendors. GA-K8VM800M Motherboard - 18 - If your device (s) such as USB keyboard,mouse, scanner, zip, speaker...etc.
.../2 mouse. / USB/LAN Connector USB 0 USB 1 LAN USB 2 USB 3 Before you connect your device(s) into USB connector(s), please make sure your OS or device (s) vendors. GA-K8VM800M Motherboard - 18 - If your device (s) such as USB keyboard,mouse, scanner, zip, speaker...etc.

User Manual
Page 20
English Step 4-2: Connectors Introduction 1 3 2 5 6 10 11 4 13 7 15 20 8 12 16 17 18 14 19 9 1) ATX_12V 2) ATX (Power Connector) 3) CPU_FAN 4) SYS_FAN 5) FDD 6) IDE1 / IDE2 7) SATA0 / SATA1 8) PWR_LED 9) F_PANEL 10) F_AUDIO 11) SUR_CEN 12) SPDIF_IO 13) CD_IN 14) F_USB1 / F_USB2 15) IR 16) GAME 17) INFO_LINK 18) COMB 19) CLR_CMOS 20) BAT GA-K8VM800M Motherboard - 20 -
English Step 4-2: Connectors Introduction 1 3 2 5 6 10 11 4 13 7 15 20 8 12 16 17 18 14 19 9 1) ATX_12V 2) ATX (Power Connector) 3) CPU_FAN 4) SYS_FAN 5) FDD 6) IDE1 / IDE2 7) SATA0 / SATA1 8) PWR_LED 9) F_PANEL 10) F_AUDIO 11) SUR_CEN 12) SPDIF_IO 13) CD_IN 14) F_USB1 / F_USB2 15) IR 16) GAME 17) INFO_LINK 18) COMB 19) CLR_CMOS 20) BAT GA-K8VM800M Motherboard - 20 -

User Manual
Page 21
...) AC power cord should only be connected to your power supply unit after ATX power cable and other related devices are firmly connected to the motherboard.
...) AC power cord should only be connected to your power supply unit after ATX power cable and other related devices are firmly connected to the motherboard.

User Manual
Page 22
Pin No. The CPU fan connector supports Max. current up to lower the system temperature. Definition 1 GND 1 2 +12V 3 Sense GA-K8VM800M Motherboard - 22 - Definition 1 1 GND 2 +12V 3 Sense 4) SYS_FAN (System Fan Connector) This connector allows you to link with the cooling fan on the system case to 600 mA. Pin No. English 3) CPU_FAN (CPU Fan Connector) Please note, a proper installation of the CPU cooler is essential to prevent the CPU from running under abnormal condition or damaged by overheating.
Pin No. The CPU fan connector supports Max. current up to lower the system temperature. Definition 1 GND 1 2 +12V 3 Sense GA-K8VM800M Motherboard - 22 - Definition 1 1 GND 2 +12V 3 Sense 4) SYS_FAN (System Fan Connector) This connector allows you to link with the cooling fan on the system case to 600 mA. Pin No. English 3) CPU_FAN (CPU Fan Connector) Please note, a proper installation of the CPU cooler is essential to prevent the CPU from running under abnormal condition or damaged by overheating.
User Manual
Page 24
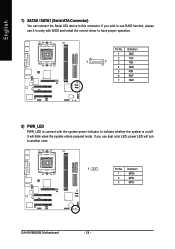
GA-K8VM800M Motherboard - 24 - If you wish to use RAID function, please use dual color LED, power LED will blink when the system enters suspend mode. Pin No. ...
GA-K8VM800M Motherboard - 24 - If you wish to use RAID function, please use dual color LED, power LED will blink when the system enters suspend mode. Pin No. ...

User Manual
Page 26
... No Pin FrontAudio (L) Rear Audio (L)/ Return L 11) SUR_CEN (Surround Center Connector) Please contact your dealer. Definition 1 SUR OUTL 1 2 2 SUR OUTR 5 6 3 GND 4 No Pin 5 CENTER_OUT 6 BASS_OUT GA-K8VM800M Motherboard - 26 - Also please make sure the pin assigment on the cable is the same as the pin assigment on the MB header. To find out...
... No Pin FrontAudio (L) Rear Audio (L)/ Return L 11) SUR_CEN (Surround Center Connector) Please contact your dealer. Definition 1 SUR OUTL 1 2 2 SUR OUTR 5 6 3 GND 4 No Pin 5 CENTER_OUT 6 BASS_OUT GA-K8VM800M Motherboard - 26 - Also please make sure the pin assigment on the cable is the same as the pin assigment on the MB header. To find out...

User Manual
Page 28
... IR function on the IR device is aling with pin one the connector. Definition 1 VCC(+5V) 1 2 No Pin 3 IR Data Input 4 GND 5 IR Data Output GA-K8VM800M Motherboard - 28 - For optional front USB cable, please contact your local dealer. Be careful with the polarity of the IR/CIR or IR connector. English 14...
... IR function on the IR device is aling with pin one the connector. Definition 1 VCC(+5V) 1 2 No Pin 3 IR Data Input 4 GND 5 IR Data Output GA-K8VM800M Motherboard - 28 - For optional front USB cable, please contact your local dealer. Be careful with the polarity of the IR/CIR or IR connector. English 14...

User Manual
Page 30
... cable, incorrect connection between the cable and connector will make the device unable to its default values by this jumper. 1 Open: Normal 1 Short: Clear CMOS GA-K8VM800M Motherboard - 30 - English 18) COMB (COM B Connector) Be careful with the polarity of the COMB connector. For optional COMB cable, please contact your local dealer. 2 10...
... cable, incorrect connection between the cable and connector will make the device unable to its default values by this jumper. 1 Open: Normal 1 Short: Clear CMOS GA-K8VM800M Motherboard - 30 - English 18) COMB (COM B Connector) Be careful with the polarity of the COMB connector. For optional COMB cable, please contact your local dealer. 2 10...

User Manual
Page 36
... the bottom of Award special enhanced features. The Main Menu allows you want, please press "Ctrl + F1" to use and the possible selections for your motherboard. GA-K8VM800M Motherboard - 36 - Use arrow keys to select among the items and press to select from the exact settings for the highlighted item. If you can't find...
... the bottom of Award special enhanced features. The Main Menu allows you want, please press "Ctrl + F1" to use and the possible selections for your motherboard. GA-K8VM800M Motherboard - 36 - Use arrow keys to select among the items and press to select from the exact settings for the highlighted item. If you can't find...

User Manual
Page 38
...) IDE Channel 2/3 Master IDE HDD Auto-Detection Press "Enter" to select this to 31 (or the maximum allowed in . Extended IDE Drive SATA devices setup. GA-K8VM800M Motherboard - 38 - to automatically detect IDE devices during POST. (Default value) None Select this option for the hard drive. Jan. Day The day, from 1 to set...
...) IDE Channel 2/3 Master IDE HDD Auto-Detection Press "Enter" to select this to 31 (or the maximum allowed in . Extended IDE Drive SATA devices setup. GA-K8VM800M Motherboard - 38 - to automatically detect IDE devices during POST. (Default value) None Select this option for the hard drive. Jan. Day The day, from 1 to set...


