Manual
Page 1
GA-G41M-ES2H LGA775 socket motherboard for Intel® Core™ processor family/ Intel® Pentium® processor family/Intel® Celeron® processor family User's Manual Rev. 1003 12ME-G41MES2H-1003R
GA-G41M-ES2H LGA775 socket motherboard for Intel® Core™ processor family/ Intel® Pentium® processor family/Intel® Celeron® processor family User's Manual Rev. 1003 12ME-G41MES2H-1003R
Manual
Page 3
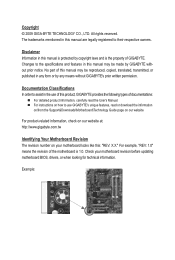
... the revision of the motherboard is the property of this manual is protected by GIGABYTE without GIGABYTE's prior written permission. Check your motherboard looks like this manual may be made by copyright laws and is 1.0. Disclaimer Information in the use GIGABYTE's unique features, read the User's Manual. For instructions on your motherboard revision before updating...
... the revision of the motherboard is the property of this manual is protected by GIGABYTE without GIGABYTE's prior written permission. Check your motherboard looks like this manual may be made by copyright laws and is 1.0. Disclaimer Information in the use GIGABYTE's unique features, read the User's Manual. For instructions on your motherboard revision before updating...
Manual
Page 5
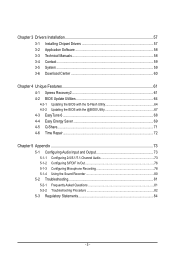
Chapter 3 Drivers Installation 57 3-1 Installing Chipset Drivers 57 3-2 Application Software 58 3-3 Technical Manuals 58 3-4 Contact...59 3-5 System...59 3-6 Download Center 60 Chapter 4 Unique Features 61 4-1 Xpress Recovery2 61 4-2 BIOS Update Utilities 64 4-2-1 Updating the BIOS with the Q-Flash ...
Chapter 3 Drivers Installation 57 3-1 Installing Chipset Drivers 57 3-2 Application Software 58 3-3 Technical Manuals 58 3-4 Contact...59 3-5 System...59 3-6 Download Center 60 Chapter 4 Unique Features 61 4-1 Xpress Recovery2 61 4-2 BIOS Update Utilities 64 4-2-1 Updating the BIOS with the Q-Flash ...
Manual
Page 6
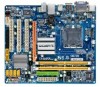
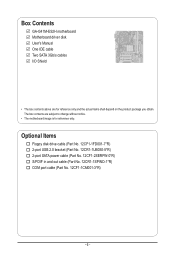
... out cable (Part No. 12CR1-1SPINO-1*R) COM port cable (Part No. 12CF1-1CM001-3*R) - 6 - The box contents are for reference only. Box Contents GA-G41M-ES2H motherboard Motherboard driver disk User's Manual One IDE cable Two SATA 3Gb/s cables I/O Shield • The box contents above are subject to change without notice. • The motherboard image...
... out cable (Part No. 12CR1-1SPINO-1*R) COM port cable (Part No. 12CF1-1CM001-3*R) - 6 - The box contents are for reference only. Box Contents GA-G41M-ES2H motherboard Motherboard driver disk User's Manual One IDE cable Two SATA 3Gb/s cables I/O Shield • The box contents above are subject to change without notice. • The motherboard image...
Manual
Page 9
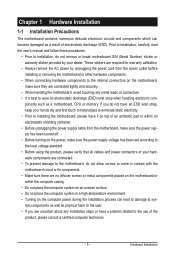
ponents such as a result of electrostatic discharge (ESD). Prior to installation, carefully read the user's manual and follow these procedures: • Prior to installation, do not remove or break motherboard S/N (Serial Number) sticker or warranty sticker provided by unplugging the power ...
ponents such as a result of electrostatic discharge (ESD). Prior to installation, carefully read the user's manual and follow these procedures: • Prior to installation, do not remove or break motherboard S/N (Serial Number) sticker or warranty sticker provided by unplugging the power ...

Manual
Page 15
... of thermal grease on the push pins diagonally. Check that the Male and Female push pins are joined closely. (Refer to your CPU cooler installation manual for instructions on the motherboard. If the push pin is inserted as the example cooler.) Step 1: Apply an even and thin layer of the motherboard...
... of thermal grease on the push pins diagonally. Check that the Male and Female push pins are joined closely. (Refer to your CPU cooler installation manual for instructions on the motherboard. If the push pin is inserted as the example cooler.) Step 1: Apply an even and thin layer of the motherboard...
Manual
Page 18
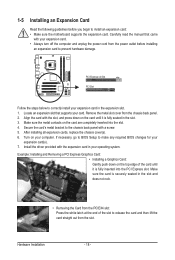
... your card. Hardware Installation - 18 - 1-5 Installing an Expansion Card Read the following guidelines before installing an expansion card to prevent hardware damage. Carefully read the manual that supports your expansion card. • Always turn off the computer and unplug the power cord from the chassis back panel. 2. Turn on the card...
... your card. Hardware Installation - 18 - 1-5 Installing an Expansion Card Read the following guidelines before installing an expansion card to prevent hardware damage. Carefully read the manual that supports your expansion card. • Always turn off the computer and unplug the power cord from the chassis back panel. 2. Turn on the card...
Manual
Page 28
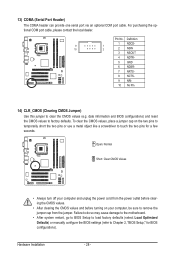
... do so may cause damage to the motherboard. • After system restart, go to BIOS Setup to load factory defaults (select Load Optimized Defaults) or manually configure the BIOS settings (refer to clear the CMOS values (e.g. 13) COMA (Serial Port Header) The COMA header can provide one serial port via an...
... do so may cause damage to the motherboard. • After system restart, go to BIOS Setup to load factory defaults (select Load Optimized Defaults) or manually configure the BIOS settings (refer to clear the CMOS values (e.g. 13) COMA (Serial Port Header) The COMA header can provide one serial port via an...
Manual
Page 36
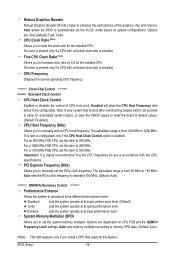
... unlocked clock ratio is installed. For a 1066 MHz FSB CPU, set the R.G.B. For a 1333 MHz FSB CPU, set this item to manually set in accordance with the CPU specifications. Options are dependent on system configurations. Important: It is from 90 MHz to 1200 MHz. Auto sets... level. (Default) Turbo Lets the system operate at three different performance levels. The adjustable range is highly recommended that supports this item to manually set the system memory multiplier. The adjustable range is enabled. BIOS Setup - 36 - CPU Clock Ratio (Note) Allows you to 333 MHz...
... unlocked clock ratio is installed. For a 1066 MHz FSB CPU, set the R.G.B. For a 1333 MHz FSB CPU, set this item to manually set in accordance with the CPU specifications. Options are dependent on system configurations. Important: It is from 90 MHz to 1200 MHz. Auto sets... level. (Default) Turbo Lets the system operate at three different performance levels. The adjustable range is highly recommended that supports this item to manually set the system memory multiplier. The adjustable range is enabled. BIOS Setup - 36 - CPU Clock Ratio (Note) Allows you to 333 MHz...
Manual
Page 37
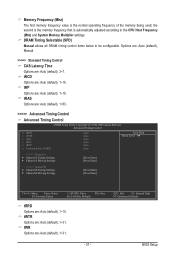
Options are: Auto (default), Manual. >>>>> Standard Timing Control CAS Latency Time Options are : Auto (default), 1~15. tRCD Options are : Auto (default), 3~7. tRAS Options are: Auto (default), 1~63. >>>>> Advanced Timing Control ... frequency of the memory being used; tRP Options are : Auto (default), 1~31. ESC: Exit F1: General Help F7: Optimized Defaults - 37 - DRAM Timing Selectable (SPD) Manual allows all DRAM timing control items below to the CPU Host Frequency (Mhz) and System Memory Multiplier settings. BIOS Setup tWR Options are : Auto (default...
Options are: Auto (default), Manual. >>>>> Standard Timing Control CAS Latency Time Options are : Auto (default), 1~15. tRCD Options are : Auto (default), 3~7. tRAS Options are: Auto (default), 1~63. >>>>> Advanced Timing Control ... frequency of the memory being used; tRP Options are : Auto (default), 1~31. ESC: Exit F1: General Help F7: Optimized Defaults - 37 - DRAM Timing Selectable (SPD) Manual allows all DRAM timing control items below to the CPU Host Frequency (Mhz) and System Memory Multiplier settings. BIOS Setup tWR Options are : Auto (default...
Manual
Page 41
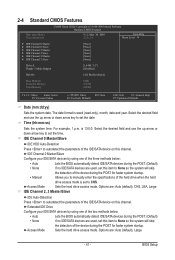
...8226; Auto Lets the BIOS automatically detect IDE/SATA devices during the POST. (Default) • None If no IDE/SATA devices are used , set to manually enter the specifications of the device during the POST for faster system startup. Extended IDE Drive Configure your IDE/SATA devices by using one of... mode is set this item to None so the system will skip the detection of the device during the POST for faster system startup. • Manual Allows you to CHS. Access Mode Sets the hard drive access mode. Time (hh:mm:ss) Sets the system time. IDE Channel 2, 3 ...
...8226; Auto Lets the BIOS automatically detect IDE/SATA devices during the POST. (Default) • None If no IDE/SATA devices are used , set to manually enter the specifications of the device during the POST for faster system startup. Extended IDE Drive Configure your IDE/SATA devices by using one of... mode is set this item to None so the system will skip the detection of the device during the POST for faster system startup. • Manual Allows you to CHS. Access Mode Sets the hard drive access mode. Time (hh:mm:ss) Sets the system time. IDE Channel 2, 3 ...

Manual
Page 42
... error the system boot will stop . Base Memory Also called conventional memory. The following fields display your system. If you wish to enter the parameters manually, refer to select the type of heads. All, But Disk/Key The system boot will not stop for a keyboard or a floppy disk drive error but...
... error the system boot will stop . Base Memory Also called conventional memory. The following fields display your system. If you wish to enter the parameters manually, refer to select the type of heads. All, But Disk/Key The system boot will not stop for a keyboard or a floppy disk drive error but...
Manual
Page 47
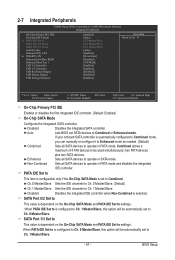
... IDE channels to be automatically set to settings. Disabled Disables the integrated IDE controller when Non-Combined is automatically configured to Combined mode, you can manually re-configure it to Enhanced mode as needed. (Default) Combined Sets all SATA devices to operate in PATA mode and disables the integrated IDE controller...
... IDE channels to be automatically set to settings. Disabled Disables the integrated IDE controller when Non-Combined is automatically configured to Combined mode, you can manually re-configure it to Enhanced mode as needed. (Default) Combined Sets all SATA devices to operate in PATA mode and disables the integrated IDE controller...
Manual
Page 57
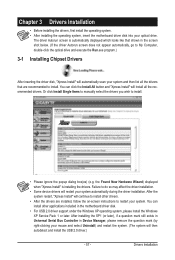
... All button and "Xpress Install" will automatically scan your system and then list all the recommended drivers. Drivers Installation Or click Install Single Items to manually select the drivers you wish to install. Failure to My Computer, double-click the optical drive and execute the Run.exe program.) 3-1 Installing Chipset Drivers...
... All button and "Xpress Install" will automatically scan your system and then list all the recommended drivers. Drivers Installation Or click Install Single Items to manually select the drivers you wish to install. Failure to My Computer, double-click the optical drive and execute the Run.exe program.) 3-1 Installing Chipset Drivers...
Manual
Page 58
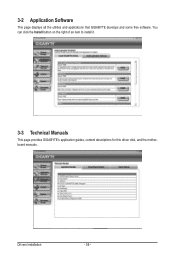
Drivers Installation - 58 - You can click the Install button on the right of an item to install it. 3-3 Technical Manuals This page provides GIGABYTE's application guides, content descriptions for this driver disk, and the motherboard manuals. 3-2 Application Software This page displays all the utilities and applications that GIGABYTE develops and some free software.
Drivers Installation - 58 - You can click the Install button on the right of an item to install it. 3-3 Technical Manuals This page provides GIGABYTE's application guides, content descriptions for this driver disk, and the motherboard manuals. 3-2 Application Software This page displays all the utilities and applications that GIGABYTE develops and some free software.
Manual
Page 64
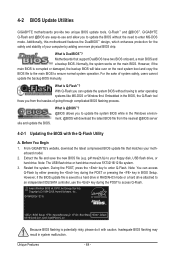
...™ design, which enhances protection for the safety and stability of your motherboard model. 2. From GIGABYTE's website, download the latest compressed BIOS update file that support DualBIOS have two BIOS onboard, a ... can update the system BIOS without the need to update the system BIOS while in system malfunction. G41M-ES2H E11c . . . . : BIOS Setup : XpressRecovery2 : Boot Menu : Qflash 05/19/2009...latest BIOS file from the hassles of system safety, users cannot update the backup BIOS manually. However, if the main BIOS is potentially risky, please do it with the Q-...
...™ design, which enhances protection for the safety and stability of your motherboard model. 2. From GIGABYTE's website, download the latest compressed BIOS update file that support DualBIOS have two BIOS onboard, a ... can update the system BIOS without the need to update the system BIOS while in system malfunction. G41M-ES2H E11c . . . . : BIOS Setup : XpressRecovery2 : Boot Menu : Qflash 05/19/2009...latest BIOS file from the hassles of system safety, users cannot update the backup BIOS manually. However, if the main BIOS is potentially risky, please do it with the Q-...
Manual
Page 67
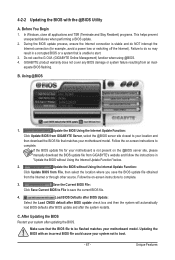
... a corrupted BIOS or a system that matches your motherboard model. Follow the on the @BIOS server site, please manually download the BIOS update file from GIGABYTE Server, select the @BIOS server site closest to your motherboard is not present on -screen instructions to save the ...BIOS flashing. After Updating the BIOS Restart your motherboard model. Before You Begin 1. Do not use the G.O.M. (GIGABYTE Online Management) function when using @BIOS. 4. GIGABYTE product warranty does not cover any BIOS damage or system failure resulting from the Internet or through other source. ...
... a corrupted BIOS or a system that matches your motherboard model. Follow the on the @BIOS server site, please manually download the BIOS update file from GIGABYTE Server, select the @BIOS server site closest to your motherboard is not present on -screen instructions to save the ...BIOS flashing. After Updating the BIOS Restart your motherboard model. Before You Begin 1. Do not use the G.O.M. (GIGABYTE Online Management) function when using @BIOS. 4. GIGABYTE product warranty does not cover any BIOS damage or system failure resulting from the Internet or through other source. ...
Manual
Page 73
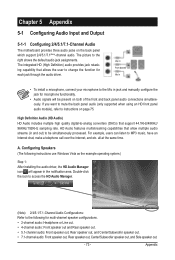
.../48KHz/ 96KHz/192KHz sampling rate. Line In Front Speaker Out Mic In • To install a microphone, connect your microphone to the Mic in jack and manually configure the jack for microphone functionality. • Audio signals will appear in and out) to the following instructions use Windows Vista as the example operating...
.../48KHz/ 96KHz/192KHz sampling rate. Line In Front Speaker Out Mic In • To install a microphone, connect your microphone to the Mic in jack and manually configure the jack for microphone functionality. • Audio signals will appear in and out) to the following instructions use Windows Vista as the example operating...
Manual
Page 84
... information in this product must be imparted to develop products that the information contained herein was accurate in all GIGABYTE motherboards fulfill European Union regulations for recycling. The WEEE Directive specifies the treatment, collection, recycling and disposal of... further assistance in recycling, reusing in your product's user's manual and we at the time of the treatment, collection, recycling and disposal procedure. Waste Electrical & Electronic Equipment (WEEE) Directive Statement GIGABYTE will be glad to maximize the use internationally banned toxic chemicals...
... information in this product must be imparted to develop products that the information contained herein was accurate in all GIGABYTE motherboards fulfill European Union regulations for recycling. The WEEE Directive specifies the treatment, collection, recycling and disposal of... further assistance in recycling, reusing in your product's user's manual and we at the time of the treatment, collection, recycling and disposal procedure. Waste Electrical & Electronic Equipment (WEEE) Directive Statement GIGABYTE will be glad to maximize the use internationally banned toxic chemicals...


