Manual
Page 3
...in this manual are legally registered to their respective owners. For product-related information, check on our website at: http://www.gigabyte.com.tw Identifying Your Motherboard Revision The revision number on our website. For example, "REV: 1.0" means the revision of ...© 2009 GIGA-BYTE TECHNOLOGY CO., LTD. Changes to use GIGABYTE's unique features, read or download the information on/from the Support&Downloads\Motherboard\Technology Guide page on your motherboard revision before updating motherboard BIOS, drivers, or when looking for technical information. Example:
...in this manual are legally registered to their respective owners. For product-related information, check on our website at: http://www.gigabyte.com.tw Identifying Your Motherboard Revision The revision number on our website. For example, "REV: 1.0" means the revision of ...© 2009 GIGA-BYTE TECHNOLOGY CO., LTD. Changes to use GIGABYTE's unique features, read or download the information on/from the Support&Downloads\Motherboard\Technology Guide page on your motherboard revision before updating motherboard BIOS, drivers, or when looking for technical information. Example:
Manual
Page 5
... 57 3-1 Installing Chipset Drivers 57 3-2 Application Software 58 3-3 Technical Manuals 58 3-4 Contact...59 3-5 System...59 3-6 Download Center 60 Chapter 4 Unique Features 61 4-1 Xpress Recovery2 61 4-2 BIOS Update Utilities 64 4-2-1 ...
... 57 3-1 Installing Chipset Drivers 57 3-2 Application Software 58 3-3 Technical Manuals 58 3-4 Contact...59 3-5 System...59 3-6 Download Center 60 Chapter 4 Unique Features 61 4-1 Xpress Recovery2 61 4-2 BIOS Update Utilities 64 4-2-1 ...
Manual
Page 6
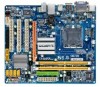
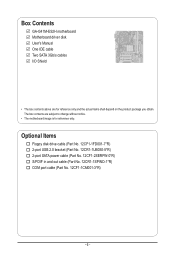
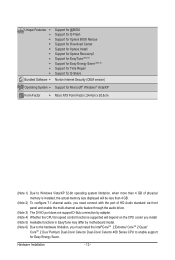
... power cable (Part No. 12CF1-2SERPW-0*R) S/PDIF in and out cable (Part No. 12CR1-1SPINO-1*R) COM port cable (Part No. 12CF1-1CM001-3*R) - 6 - Box Contents GA-G41M-ES2H motherboard Motherboard driver disk User's Manual One IDE cable Two SATA 3Gb/s cables I/O Shield • The box contents above are subject to change without notice. • The...
... power cable (Part No. 12CF1-2SERPW-0*R) S/PDIF in and out cable (Part No. 12CR1-1SPINO-1*R) COM port cable (Part No. 12CF1-1CM001-3*R) - 6 - Box Contents GA-G41M-ES2H motherboard Motherboard driver disk User's Manual One IDE cable Two SATA 3Gb/s cables I/O Shield • The box contents above are subject to change without notice. • The...
Manual
Page 12
... 7.1-channel audio, you need connect with the port of HD Audio standard via front panel and enable the multi-channel audio feature through the audio driver. (Note 3) The DVI-D port does not support D-Sub connection by adapter. (Note 4) Whether the CPU fan speed control function is supported will depend on the...
... 7.1-channel audio, you need connect with the port of HD Audio standard via front panel and enable the multi-channel audio feature through the audio driver. (Note 3) The DVI-D port does not support D-Sub connection by adapter. (Note 4) Whether the CPU fan speed control function is supported will depend on the...
Manual
Page 18
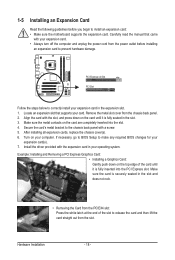
.... After installing all expansion cards, replace the chassis cover(s). 6. Locate an expansion slot that came with the expansion card in the expansion slot. 1. Install the driver provided with your computer. PCI Express x4 Slot PCI Slot Follow the steps below to the chassis back panel with the slot, and press down...
.... After installing all expansion cards, replace the chassis cover(s). 6. Locate an expansion slot that came with the expansion card in the expansion slot. 1. Install the driver provided with your computer. PCI Express x4 Slot PCI Slot Follow the steps below to the chassis back panel with the slot, and press down...

Manual
Page 20
.... Use this jack. The following describes the states of HD Audio standard via front panel and enable the multi-channel audio feature through the audio driver. In addition, under this configuration, the BIOS Setup and POST screens can be used to this port for USB devices such as an optical drive...
.... Use this jack. The following describes the states of HD Audio standard via front panel and enable the multi-channel audio feature through the audio driver. In addition, under this configuration, the BIOS Setup and POST screens can be used to this port for USB devices such as an optical drive...
Manual
Page 32
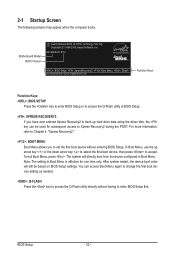
...BIOS v6.00PG, An Energy Star Ally Copyright (C) 1984-2009, Award Software, Inc. In Boot Menu, use the up hard drive data using the driver disk, the key can access Boot Menu again to change the first boot device setting as needed. : Q-FLASH Press the key to access the ... BIOS Setup. After system restart, the device boot order will directly boot from the device configured in BIOS Setup. : XPRESS RECOVERY2 If you to accept. G41M-ES2H E11c . . . . : BIOS Setup : XpressRecovery2 : Boot Menu : Qflash 05/19/2009-G41-ICH7-7A69PG0YC-00 Function Keys Function Keys: : BIOS SETUP Press the ...
...BIOS v6.00PG, An Energy Star Ally Copyright (C) 1984-2009, Award Software, Inc. In Boot Menu, use the up hard drive data using the driver disk, the key can access Boot Menu again to change the first boot device setting as needed. : Q-FLASH Press the key to access the ... BIOS Setup. After system restart, the device boot order will directly boot from the device configured in BIOS Setup. : XPRESS RECOVERY2 If you to accept. G41M-ES2H E11c . . . . : BIOS Setup : XpressRecovery2 : Boot Menu : Qflash 05/19/2009-G41-ICH7-7A69PG0YC-00 Function Keys Function Keys: : BIOS SETUP Press the ...
Manual
Page 57
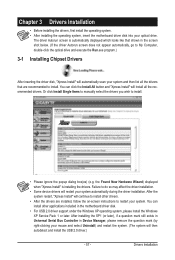
... your mouse and select Uninstall) and restart the system. (The system will continue to install other applications included in the screen shot below. (If the driver Autorun screen does not appear automatically, go to My Computer, double-click the optical drive and execute the Run.exe program.) 3-1 Installing Chipset...
... your mouse and select Uninstall) and restart the system. (The system will continue to install other applications included in the screen shot below. (If the driver Autorun screen does not appear automatically, go to My Computer, double-click the optical drive and execute the Run.exe program.) 3-1 Installing Chipset...
Manual
Page 58
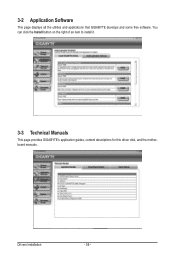
Drivers Installation - 58 - You can click the Install button on the right of an item to install it. 3-3 Technical Manuals This page provides GIGABYTE's application guides, content descriptions for this driver disk, and the motherboard manuals. 3-2 Application Software This page displays all the utilities and applications that GIGABYTE develops and some free software.
Drivers Installation - 58 - You can click the Install button on the right of an item to install it. 3-3 Technical Manuals This page provides GIGABYTE's application guides, content descriptions for this driver disk, and the motherboard manuals. 3-2 Application Software This page displays all the utilities and applications that GIGABYTE develops and some free software.
Manual
Page 59
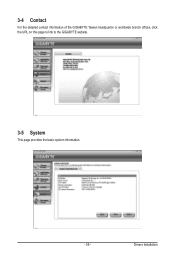
3-4 Contact For the detailed contact information of the GIGABYTE Taiwan headquarter or worldwide branch offices, click the URL on this page to link to the GIGABYTE website. 3-5 System This page provides the basic system information. - 59 - Drivers Installation
3-4 Contact For the detailed contact information of the GIGABYTE Taiwan headquarter or worldwide branch offices, click the URL on this page to link to the GIGABYTE website. 3-5 System This page provides the basic system information. - 59 - Drivers Installation
Manual
Page 60
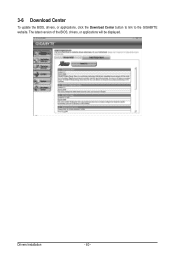
3-6 Download Center To update the BIOS, drivers, or applications, click the Download Center button to link to the GIGABYTE website. Drivers Installation - 60 - The latest version of the BIOS, drivers, or applications will be displayed.
3-6 Download Center To update the BIOS, drivers, or applications, click the Download Center button to link to the GIGABYTE website. Drivers Installation - 60 - The latest version of the BIOS, drivers, or applications will be displayed.

Manual
Page 61
... hard drives are attached to the first IDE and the first SATA connectors, the hard drive on your system soon after the operating system and drivers are attached to the first and second SATA connectors, the hard drive on the amount of data). • It is recommended to back up your...
... hard drives are attached to the first IDE and the first SATA connectors, the hard drive on your system soon after the operating system and drivers are attached to the first and second SATA connectors, the hard drive on the amount of data). • It is recommended to back up your...

Manual
Page 62
... GB or more is no enough unallocated space, Xpress Recovery2 cannot save the backup file to store the backup image file. Boot from the motherboard driver disk to start backing up your desktop and select Manage. Step 3: When partitioning your hard drive. Step 1: Select BACKUP to access Xpress Recovery2 for the...
... GB or more is no enough unallocated space, Xpress Recovery2 cannot save the backup file to store the backup image file. Boot from the motherboard driver disk to start backing up your desktop and select Manage. Step 3: When partitioning your hard drive. Step 1: Select BACKUP to access Xpress Recovery2 for the...
Manual
Page 71
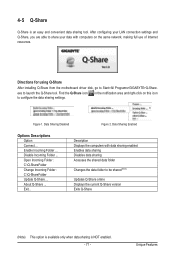
Directions for using Q-Share After installing Q-Share from the motherboard driver disk, go to configure the data sharing settings. in the notification area and right-click on the same...Q-Share Q-Share is NOT enabled. - 71 - Disable Incoming Folder ... About Q-Share ... Exit... Unique Features Find the Q-Share icon to Start>All Programs>GIGABYTE>Q-Share. Open Incoming Folder : C:\Q-ShareFolder Change Incoming Folder : C:\Q-ShareFolder Update Q-Share ... Data Sharing Enabled Options Descriptions Option Connect ... exe to be shared (Note...
Directions for using Q-Share After installing Q-Share from the motherboard driver disk, go to configure the data sharing settings. in the notification area and right-click on the same...Q-Share Q-Share is NOT enabled. - 71 - Disable Incoming Folder ... About Q-Share ... Exit... Unique Features Find the Q-Share icon to Start>All Programs>GIGABYTE>Q-Share. Open Incoming Folder : C:\Q-ShareFolder Change Incoming Folder : C:\Q-ShareFolder Update Q-Share ... Data Sharing Enabled Options Descriptions Option Connect ... exe to be shared (Note...
Manual
Page 73
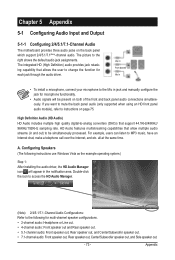
...audio (only supported when using an HD front panel audio module), refer to change the function for each jack through the audio driver. For example, users can listen to the right shows the default audio jack assignments. The integrated HD (High Definition) audio provides...Note) 2/4/5.1/7.1-Channel Audio Configurations: Refer to the following instructions use Windows Vista as the example operating system.) Step 1: After installing the audio driver, the HD Audio Manager icon will be simultaneously processed. The picture to MP3 music, have an Internet chat, make a telephone call over ...
...audio (only supported when using an HD front panel audio module), refer to change the function for each jack through the audio driver. For example, users can listen to the right shows the default audio jack assignments. The integrated HD (High Definition) audio provides...Note) 2/4/5.1/7.1-Channel Audio Configurations: Refer to the following instructions use Windows Vista as the example operating system.) Step 1: After installing the audio driver, the HD Audio Manager icon will be simultaneously processed. The picture to MP3 music, have an Internet chat, make a telephone call over ...
Manual
Page 78
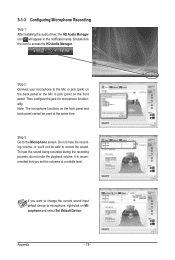
5-1-3 Configuring Microphone Recording Step 1: After installing the audio driver, the HD Audio Manager icon will appear in jack (pink) on Microphone and select Set Default Device. Then configure the jack for microphone functionality. It ...
5-1-3 Configuring Microphone Recording Step 1: After installing the audio driver, the HD Audio Manager icon will appear in jack (pink) on Microphone and select Set Default Device. Then configure the jack for microphone functionality. It ...
Manual
Page 81
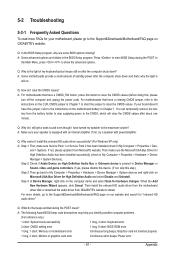
...speaker is present in Device Manager or Sound, video, and game controllers. Then install the onboard HD audio driver from the motherboard driver disk or download the audio driver from GIGABYTE's website to the CMOS, which will clear the CMOS values after the computer shuts down ? Q: In... 1. Press to the instructions on GIGABYTE's website. Q: How do I still get a weak sound even though I install the onboard HD audio driver successfully? (For Windows XP only) A: Step 1: First, make sure the Microsoft UAA Bus Driver for "onboard HD audio driver." A: Make sure your board doesn...
...speaker is present in Device Manager or Sound, video, and game controllers. Then install the onboard HD audio driver from the motherboard driver disk or download the audio driver from GIGABYTE's website to the CMOS, which will clear the CMOS values after the computer shuts down ? Q: In... 1. Press to the instructions on GIGABYTE's website. Q: How do I still get a weak sound even though I install the onboard HD audio driver successfully? (For Windows XP only) A: Step 1: First, make sure the Microsoft UAA Bus Driver for "onboard HD audio driver." A: Make sure your board doesn...


