Manual
Page 11
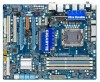
... header 1 x front panel header 1 x front panel audio header 1 x CD In connector 1 x S/PDIF In header 1 x S/PDIF Out header 2 x USB 2.0/1.1 headers 1 x IEEE 1394a header 1 x serial port header 1 x clearing CMOS jumper 1 x PS/2 keyboard port 1 x PS/2 mouse port 1 x coaxial S/PDIF Out connector 1 x optical S/PDIF Out connector 2 x IEEE 1394a ports 8 x USB 2.0/1.1 ports 1 x RJ-45 port 6 x audio jacks...
... header 1 x front panel header 1 x front panel audio header 1 x CD In connector 1 x S/PDIF In header 1 x S/PDIF Out header 2 x USB 2.0/1.1 headers 1 x IEEE 1394a header 1 x serial port header 1 x clearing CMOS jumper 1 x PS/2 keyboard port 1 x PS/2 mouse port 1 x coaxial S/PDIF Out connector 1 x optical S/PDIF Out connector 2 x IEEE 1394a ports 8 x USB 2.0/1.1 ports 1 x RJ-45 port 6 x audio jacks...

Manual
Page 31
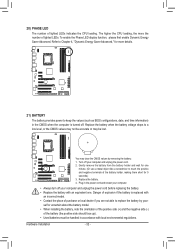
...GND 6 NDSR- 7 NRTS- 8 NCTS- 9 NRI- 10 No Pin 19) CLR_CMOS (Clearing CMOS Jumper) Use this jumper to factory defaults. date information and BIOS configurations) and reset the CMOS values to clear the CMOS values (e.g. To clear the CMOS values, place a jumper cap on your computer, be sure to remove the jumper cap from... - 31 - Hardware Installation Open: Normal Short: Clear CMOS Values • Always turn off your computer and unplug the power cord from the power outlet before clearing the CMOS values. • After clearing the CMOS values and before turning on the two pins to ...
...GND 6 NDSR- 7 NRTS- 8 NCTS- 9 NRI- 10 No Pin 19) CLR_CMOS (Clearing CMOS Jumper) Use this jumper to factory defaults. date information and BIOS configurations) and reset the CMOS values to clear the CMOS values (e.g. To clear the CMOS values, place a jumper cap on your computer, be sure to remove the jumper cap from... - 31 - Hardware Installation Open: Normal Short: Clear CMOS Values • Always turn off your computer and unplug the power cord from the power outlet before clearing the CMOS values. • After clearing the CMOS values and before turning on the two pins to ...
Manual
Page 32
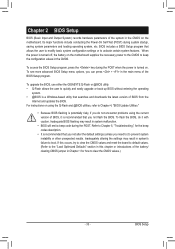
... Advanced," for 5 seconds.) 3. Gently remove the battery from the battery holder and wait for one . Refer to a low level, or the CMOS values may not be accurate or may clear the CMOS values by your computer and unplug the power cord. 2. self or uncertain about the battery model. • When installing the battery... - The higher the CPU loading, the more details. 21) BATTERY The battery provides power to replace the battery by removing the battery: 1. Plug in the CMOS when the computer is replaced with local environmental regulations.
... Advanced," for 5 seconds.) 3. Gently remove the battery from the battery holder and wait for one . Refer to a low level, or the CMOS values may not be accurate or may clear the CMOS values by your computer and unplug the power cord. 2. self or uncertain about the battery model. • When installing the battery... - The higher the CPU loading, the more details. 21) BATTERY The battery provides power to replace the battery by removing the battery: 1. Plug in the CMOS when the computer is replaced with local environmental regulations.
Manual
Page 33
... (POST) during the POST. To see more advanced BIOS Setup menu options, you not flash the BIOS. To upgrade the BIOS, use either the GIGABYTE Q-Flash or @BIOS utility. • Q-Flash allows the user to quickly and easily upgrade or back up BIOS without entering the operating system. &#... allows the user to modify basic system configuration settings or to the "Load Optimized Defaults" section in this chapter or introductions of the battery/ clearing CMOS jumper in the main menu of BIOS from the Internet and updates the BIOS. Chapter 2 BIOS Setup BIOS (Basic Input and Output System)...
... (POST) during the POST. To see more advanced BIOS Setup menu options, you not flash the BIOS. To upgrade the BIOS, use either the GIGABYTE Q-Flash or @BIOS utility. • Q-Flash allows the user to quickly and easily upgrade or back up BIOS without entering the operating system. &#... allows the user to modify basic system configuration settings or to the "Load Optimized Defaults" section in this chapter or introductions of the battery/ clearing CMOS jumper in the main menu of BIOS from the Internet and updates the BIOS. Chapter 2 BIOS Setup BIOS (Basic Input and Output System)...
Manual
Page 37
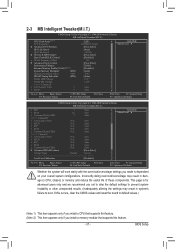
If this occurs, clear the CMOS values and reset the board ...appears only if you made is dependent on your overall system configurations. BIOS Setup 2-3 MB Intelligent Tweaker(M.I.T.) CMOS Setup Utility-Copyright (C) 1984-2009 Award Software MB Intelligent Tweaker(M.I.T.) CPU Clock Ratio (Note 1) CPU ... Previous Values +/-/PU/PD: Value F10: Save F6: Fail-Safe Defaults ESC: Exit F1: General Help F7: Optimized Defaults CMOS Setup Utility-Copyright (C) 1984-2009 Award Software MB Intelligent Tweaker(M.I.T.) x tRP 7 Auto x tRAS 20 Auto x Command Rate(CMD...
If this occurs, clear the CMOS values and reset the board ...appears only if you made is dependent on your overall system configurations. BIOS Setup 2-3 MB Intelligent Tweaker(M.I.T.) CMOS Setup Utility-Copyright (C) 1984-2009 Award Software MB Intelligent Tweaker(M.I.T.) CPU Clock Ratio (Note 1) CPU ... Previous Values +/-/PU/PD: Value F10: Save F6: Fail-Safe Defaults ESC: Exit F1: General Help F7: Optimized Defaults CMOS Setup Utility-Copyright (C) 1984-2009 Award Software MB Intelligent Tweaker(M.I.T.) x tRP 7 Auto x tRAS 20 Auto x Command Rate(CMD...

Manual
Page 41
... and North Bridge clock. Note: System stability varies, depending on system components, when system instability occurs after overclocking, please wait for automated system reboot, or clear the CMOS values to reset the board to default values. (Default: Disabled) BCLK Frequency(Mhz) Allows you to set the CPU base clock. Turbo Increases CPU...
... and North Bridge clock. Note: System stability varies, depending on system components, when system instability occurs after overclocking, please wait for automated system reboot, or clear the CMOS values to reset the board to default values. (Default: Disabled) BCLK Frequency(Mhz) Allows you to set the CPU base clock. Turbo Increases CPU...
Manual
Page 57
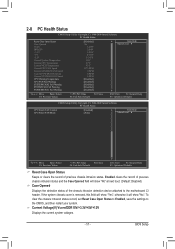
... Enter: Select F5: Previous Values +/-/PU/PD: Value F10: Save F6: Fail-Safe Defaults ESC: Exit F1: General Help F7: Optimized Defaults CMOS Setup Utility-Copyright (C) 1984-2009 Award Software PC Health Status CPU Smart FAN Control CPU Smart FAN Mode [Enabled] [Auto] Item Help Menu Level...+/-/PU/PD: Value F10: Save F6: Fail-Safe Defaults ESC: Exit F1: General Help F7: Optimized Defaults Reset Case Open Status Keeps or clears the record of previous chassis intrusion status and the Case Opened field will show "No" at next boot. (Default: Disabled) Case Opened Displays...
... Enter: Select F5: Previous Values +/-/PU/PD: Value F10: Save F6: Fail-Safe Defaults ESC: Exit F1: General Help F7: Optimized Defaults CMOS Setup Utility-Copyright (C) 1984-2009 Award Software PC Health Status CPU Smart FAN Control CPU Smart FAN Mode [Enabled] [Auto] Item Help Menu Level...+/-/PU/PD: Value F10: Save F6: Fail-Safe Defaults ESC: Exit F1: General Help F7: Optimized Defaults Reset Case Open Status Keeps or clears the record of previous chassis intrusion status and the Case Opened field will show "No" at next boot. (Default: Disabled) Case Opened Displays...
Manual
Page 59
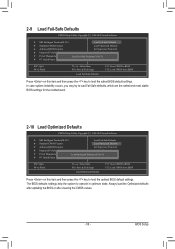
.../N&)?ENxit Setup Exit Without Saving ESC: Quit F8: Q-Flash Select Item F10: Save & Exit Setup Load Optimized Defaults F11: Save CMOS to BIOS F12: Load CMOS from BIOS Press on this item and then press the key to operate in optimum state. Always load the Optimized defaults after updating... the BIOS or after clearing the CMOS values. - 59 - In case system instability occurs, you may try to load Fail-Safe defaults, which are the safest and most stable...
.../N&)?ENxit Setup Exit Without Saving ESC: Quit F8: Q-Flash Select Item F10: Save & Exit Setup Load Optimized Defaults F11: Save CMOS to BIOS F12: Load CMOS from BIOS Press on this item and then press the key to operate in optimum state. Always load the Optimized defaults after updating... the BIOS or after clearing the CMOS values. - 59 - In case system instability occurs, you may try to load Fail-Safe defaults, which are the safest and most stable...
Manual
Page 60
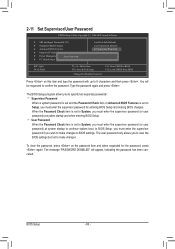
... (or user password) at system startup and when entering BIOS Setup. The message "PASSWORD DISABLED" will be requested to confirm the password. To clear the password, press on this item and type the password with up to 8 characters and then press . You will appear, indicating the password ...Exit Setup Exit Without Saving ESC: Quit F8: Q-Flash Select Item F10: Save & Exit Setup Change/Set/Disable Password F11: Save CMOS to BIOS F12: Load CMOS from BIOS Press on the password item and when requested for entering BIOS Setup and making BIOS changes. User Password When the Password...
... (or user password) at system startup and when entering BIOS Setup. The message "PASSWORD DISABLED" will be requested to confirm the password. To clear the password, press on this item and type the password with up to 8 characters and then press . You will appear, indicating the password ...Exit Setup Exit Without Saving ESC: Quit F8: Q-Flash Select Item F10: Save & Exit Setup Change/Set/Disable Password F11: Save CMOS to BIOS F12: Load CMOS from BIOS Press on the password item and when requested for entering BIOS Setup and making BIOS changes. User Password When the Password...
Manual
Page 109
... 1 long, 2 short: Monitor or graphics card error Continuous short beeps: Power error - 109 - Appendix For motherboards that have a clearing CMOS jumper, refer to the Support&Downloads\Motherboards\FAQ page on the computer name and select Scan for High Definition Audio has been installed successfully ... on High Definition Audio Bus or Unknown device is equipped with power/amplifier. If not, please update it from GIGABYTE's website to the CMOS, which will clear the CMOS values after the computer shuts down and that's why the light is still on. Q: Why do I install...
... 1 long, 2 short: Monitor or graphics card error Continuous short beeps: Power error - 109 - Appendix For motherboards that have a clearing CMOS jumper, refer to the Support&Downloads\Motherboards\FAQ page on the computer name and select Scan for High Definition Audio has been installed successfully ... on High Definition Audio Bus or Unknown device is equipped with power/amplifier. If not, please update it from GIGABYTE's website to the CMOS, which will clear the CMOS values after the computer shuts down and that's why the light is still on. Q: Why do I install...


