
Manual
Page 3
....tw Identifying Your Motherboard Revision The revision number on how to use of this product, GIGABYTE provides the following types of documentations: For quick set-up of this manual may be reproduced, copied, translated, transmitted, or published in this manual are legally registered to assist in this manual is protected ...
....tw Identifying Your Motherboard Revision The revision number on how to use of this product, GIGABYTE provides the following types of documentations: For quick set-up of this manual may be reproduced, copied, translated, transmitted, or published in this manual are legally registered to assist in this manual is protected ...
Manual
Page 4
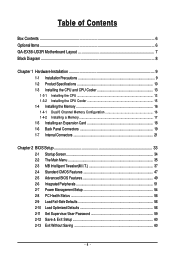
Table of Contents Box Contents ...6 OptionalItems ...6 GA-EX58-UD3R Motherboard Layout 7 Block Diagram ...8 Chapter 1 Hardware Installation 9 1-1 Installation Precautions 9 1-2 Product Specifications 10 1-3 Installing the CPU and CPU Cooler 13 1-3-1 Installing the CPU 13 1-3-2 Installing the ... 2-5 Advanced BIOS Features 49 2-6 IntegratedPeripherals 51 2-7 Power Management Setup 54 2-8 PC Health Status 56 2-9 Load Fail-Safe Defaults 58 2-10 Load Optimized Defaults 58 2-11 Set Supervisor/User Password 59 2-12 Save & Exit Setup 60 2-13 Exit Without Saving 60 - 4 -
Table of Contents Box Contents ...6 OptionalItems ...6 GA-EX58-UD3R Motherboard Layout 7 Block Diagram ...8 Chapter 1 Hardware Installation 9 1-1 Installation Precautions 9 1-2 Product Specifications 10 1-3 Installing the CPU and CPU Cooler 13 1-3-1 Installing the CPU 13 1-3-2 Installing the ... 2-5 Advanced BIOS Features 49 2-6 IntegratedPeripherals 51 2-7 Power Management Setup 54 2-8 PC Health Status 56 2-9 Load Fail-Safe Defaults 58 2-10 Load Optimized Defaults 58 2-11 Set Supervisor/User Password 59 2-12 Save & Exit Setup 60 2-13 Exit Without Saving 60 - 4 -
Manual
Page 9
... the motherboard, make sure the power supply has been turned off. • Before turning on the motherboard, make sure the power supply voltage has been set according to wear an electrostatic discharge (ESD) wrist strap when handling electronic components such as a result of your dealer.
... the motherboard, make sure the power supply has been turned off. • Before turning on the motherboard, make sure the power supply voltage has been set according to wear an electrostatic discharge (ESD) wrist strap when handling electronic components such as a result of your dealer.
Manual
Page 13
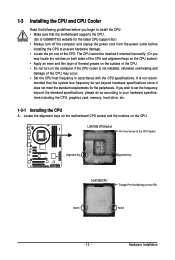
...begin to install the CPU: • Make sure that the system bus frequency be inserted if oriented incorrectly. (Or you wish to set beyond the standard specifications, please do so according to your hardware specifications including the CPU, graphics card, memory, hard drive, etc. 1-3-1... Installing the CPU A. mended that the motherboard supports the CPU. (Go to GIGABYTE's website for the peripherals. The CPU cannot be set the frequency beyond hardware specifications since it does not meet the standard requirements for the latest CPU support list.) &#...
...begin to install the CPU: • Make sure that the system bus frequency be inserted if oriented incorrectly. (Or you wish to set beyond the standard specifications, please do so according to your hardware specifications including the CPU, graphics card, memory, hard drive, etc. 1-3-1... Installing the CPU A. mended that the motherboard supports the CPU. (Go to GIGABYTE's website for the peripherals. The CPU cannot be set the frequency beyond hardware specifications since it does not meet the standard requirements for the latest CPU support list.) &#...

Manual
Page 20
...a headphone or 2-channel speaker. Microphones must be reconfigured to perform different functions via the audio software. Refer to the instructions on setting up a 2/4/5.1/ 7.1-channel audio configuration in jack. Rear Speaker Out Jack (Black) Use this jack. Use this audio jack for line...jack to connect center/subwoofer speakers in a 5.1/7.1-channel audio configuration. In addition to the default speakers settings, the ~ audio jacks can be connected to the default Mic in jack ( ). GA-EX58-UD3R Motherboard - 20 - Line In Jack (Blue) The default line in jack. Center/Subwoofer Speaker ...
...a headphone or 2-channel speaker. Microphones must be reconfigured to perform different functions via the audio software. Refer to the instructions on setting up a 2/4/5.1/ 7.1-channel audio configuration in jack. Rear Speaker Out Jack (Black) Use this jack. Use this audio jack for line...jack to connect center/subwoofer speakers in a 5.1/7.1-channel audio configuration. In addition to the default speakers settings, the ~ audio jacks can be connected to the default Mic in jack ( ). GA-EX58-UD3R Motherboard - 20 - Line In Jack (Blue) The default line in jack. Center/Subwoofer Speaker ...
Manual
Page 24
... devices (for example, master or slave). (For information about configuring master/slave settings for the IDE devices, read the instructions from the device manufacturers.) 39 1 40 2 GA-EX58-UD3R Motherboard - 24 - If you wish to connect two IDE devices, remember to set the jumpers and the cabling according to the role of floppy disk drives...
... devices (for example, master or slave). (For information about configuring master/slave settings for the IDE devices, read the instructions from the device manufacturers.) 39 1 40 2 GA-EX58-UD3R Motherboard - 24 - If you wish to connect two IDE devices, remember to set the jumpers and the cabling according to the role of floppy disk drives...
Manual
Page 32
.... • After system restart, go to BIOS Setup to load factory defaults (select Load Optimized Defaults) or manually configure the BIOS settings (refer to touch the two pins for more the number of lighted LEDs indicates the CPU loading. date information and BIOS configurations) and... two pins or use a metal object like a screwdriver to Chapter 2, "BIOS Setup," for BIOS configurations). 23) PHASE LED The number of lighted LEDs. GA-EX58-UD3R Motherboard - 32 - To clear the CMOS values, place a jumper cap on your computer, be sure to Chapter 4, "Dynamic Energy Saver Advanced," for a...
.... • After system restart, go to BIOS Setup to load factory defaults (select Load Optimized Defaults) or manually configure the BIOS settings (refer to touch the two pins for more the number of lighted LEDs indicates the CPU loading. date information and BIOS configurations) and... two pins or use a metal object like a screwdriver to Chapter 2, "BIOS Setup," for BIOS configurations). 23) PHASE LED The number of lighted LEDs. GA-EX58-UD3R Motherboard - 32 - To clear the CMOS values, place a jumper cap on your computer, be sure to Chapter 4, "Dynamic Energy Saver Advanced," for a...

Manual
Page 33
...and downloads the latest version of the BIOS Setup program. BIOS includes a BIOS Setup program that allows the user to modify basic system configuration settings or to Chapter 4, "BIOS Update Utilities." • Because BIOS flashing is potentially risky, if you do it is recommended that you need... to) to keep the configuration values in system's failure to clear the CMOS values.) - 33 - To upgrade the BIOS, use either the GIGABYTE Q-Flash or @BIOS utility. • Q-Flash allows the user to quickly and easily upgrade or back up BIOS without entering the operating system. ...
...and downloads the latest version of the BIOS Setup program. BIOS includes a BIOS Setup program that allows the user to modify basic system configuration settings or to Chapter 4, "BIOS Update Utilities." • Because BIOS flashing is potentially risky, if you do it is recommended that you need... to) to keep the configuration values in system's failure to clear the CMOS values.) - 33 - To upgrade the BIOS, use either the GIGABYTE Q-Flash or @BIOS utility. • Q-Flash allows the user to quickly and easily upgrade or back up BIOS without entering the operating system. ...

Manual
Page 34
...be used for one time only. GA-EX58-UD3R Motherboard - 34 - To show the BIOS POST screen. In Boot Menu, use the up hard drive data using the driver disk, the key can access Boot Menu again to change the first boot device setting as needed. : Q-FLASH Press the... key to enter BIOS Setup first. Note: The setting in Boot Menu. The LOGO Screen (Default) B. 2-1 Startup Screen The following screens may appear when the computer boots. A. EX58-UD3R F1b . . . . : BIOS Setup : XpressRecovery2 : Boot Menu : Qflash 11/21/2008-X58-ICH10-7A89QG0AC-00 Function ...
...be used for one time only. GA-EX58-UD3R Motherboard - 34 - To show the BIOS POST screen. In Boot Menu, use the up hard drive data using the driver disk, the key can access Boot Menu again to change the first boot device setting as needed. : Q-FLASH Press the... key to enter BIOS Setup first. Note: The setting in Boot Menu. The LOGO Screen (Default) B. 2-1 Startup Screen The following screens may appear when the computer boots. A. EX58-UD3R F1b . . . . : BIOS Setup : XpressRecovery2 : Boot Menu : Qflash 11/21/2008-X58-ICH10-7A89QG0AC-00 Function ...
Manual
Page 35
... BIOS Features Integrated Peripherals Power Management Setup PC Health Status Load Fail-Safe Defaults Load Optimized Defaults Set Supervisor Password Set User Password Save & Exit Setup Exit Without Saving ESC: Quit F8: Q-Flash Select Item F10: Save & Exit Setup F11:... block on the right (submenus only) Restore the previous BIOS settings for the current submenus Load the Fail-Safe BIOS default settings for the current submenus Load the Optimized BIOS default settings for the current submenus Access the Q-Flash utility Display system information...
... BIOS Features Integrated Peripherals Power Management Setup PC Health Status Load Fail-Safe Defaults Load Optimized Defaults Set Supervisor Password Set User Password Save & Exit Setup Exit Without Saving ESC: Quit F8: Q-Flash Select Item F10: Save & Exit Setup F11:... block on the right (submenus only) Restore the previous BIOS settings for the current submenus Load the Fail-Safe BIOS default settings for the current submenus Load the Optimized BIOS default settings for the current submenus Access the Q-Flash utility Display system information...
Manual
Page 36
...unstable and you have loaded the BIOS default settings, you to restrict access to the system and BIOS Setup. An user password only allows you to restrict access to the system and BIOS Setup. You can also carry out this task.) GA-EX58-UD3R Motherboard - 36 - It allows you to... view the BIOS settings but not to make changes in BIOS Setup. Set User Password Change, set , or disable password. The Functions of the and keys (For ...
...unstable and you have loaded the BIOS default settings, you to restrict access to the system and BIOS Setup. An user password only allows you to restrict access to the system and BIOS Setup. You can also carry out this task.) GA-EX58-UD3R Motherboard - 36 - It allows you to... view the BIOS settings but not to make changes in BIOS Setup. Set User Password Change, set , or disable password. The Functions of the and keys (For ...
Manual
Page 37
...Save F6: Fail-Safe Defaults ESC: Exit F1: General Help F7: Optimized Defaults Whether the system will work stably with the overclock/overvoltage settings you install a memory module that supports this feature. (Note 2) This item appears only if you made is for advanced users only and... we recommend you not to alter the default settings to prevent system instability or other unexpected results. (Inadequately altering the settings may result in system's failure to boot. This page is dependent on your overall system configurations.
...Save F6: Fail-Safe Defaults ESC: Exit F1: General Help F7: Optimized Defaults Whether the system will work stably with the overclock/overvoltage settings you install a memory module that supports this feature. (Note 2) This item appears only if you made is for advanced users only and... we recommend you not to alter the default settings to prevent system instability or other unexpected results. (Inadequately altering the settings may result in system's failure to boot. This page is dependent on your overall system configurations.

Manual
Page 39
...Allows you to enable specific streams between the IOH and ICH. (Default: Enabled) (Note) This item appears only if you to set the UnCore frequency. BIOS Setup With virtualization, one computer system can dynamically and effectively lower the CPU voltage and core frequency to run... chipset detects that supports this feature. - 39 - Options are : Auto (default), x36, x44, x48, Slow Mode. Isochronous Support Determines whether to set the QPI Link speed. Options are : Auto (default), x12~x48. CPU Thermal Monitor (Note) Enables or disables Intel CPU Thermal Monitor function, a ...
...Allows you to enable specific streams between the IOH and ICH. (Default: Enabled) (Note) This item appears only if you to set the UnCore frequency. BIOS Setup With virtualization, one computer system can dynamically and effectively lower the CPU voltage and core frequency to run... chipset detects that supports this feature. - 39 - Options are : Auto (default), x36, x44, x48, Slow Mode. Isochronous Support Determines whether to set the QPI Link speed. Options are : Auto (default), x12~x48. CPU Thermal Monitor (Note) Enables or disables Intel CPU Thermal Monitor function, a ...

Manual
Page 40
...CPU frequency by 7% or 9% depending on CPU loading. Full Thrust Increases CPU frequency by 9% or 11% depending on CPU loading. GA-EX58-UD3R Motherboard - 40 - This item is configurable only if the Base Clock(BCLK) Control option is highly dependent on your system hardware ... Clock Control Base Clock(BCLK) Control x BCLK Frequency (Mhz) PCI Express Frequency (Mhz) C.I .A.2 allows your system bus to manually set the PCIe clock frequency. Note: System stability varies, depending on system components, when system instability occurs after overclocking, please wait for automated ...
...CPU frequency by 7% or 9% depending on CPU loading. Full Thrust Increases CPU frequency by 9% or 11% depending on CPU loading. GA-EX58-UD3R Motherboard - 40 - This item is configurable only if the Base Clock(BCLK) Control option is highly dependent on your system hardware ... Clock Control Base Clock(BCLK) Control x BCLK Frequency (Mhz) PCI Express Frequency (Mhz) C.I .A.2 allows your system bus to manually set the PCIe clock frequency. Note: System stability varies, depending on system components, when system instability occurs after overclocking, please wait for automated ...

Manual
Page 41
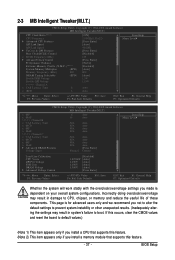
...BIOS Setup Options are : 0ps~750ps. (Default: 0ps) IOH Clock Skew Allows you to set the CPU clock prior to adjust the amplitude of the PCI Express and North Bridge clock. CPU Clock Skew ...Selectable (SPD) Profile DDR Voltage Profile QPI Voltage >>>>> Channel A Channel A Timing Settings Channel A Turnaround Settings >>>>> Channel B Channel B Timing Settings Channel B Turnaround Settings >>>>> Channel C Channel C Timing Settings Channel C Turnaround Settings [Turbo] [Disabled] [Auto] 800 [Auto] 1.5V 1.15V [Press Enter] [Press ...
...BIOS Setup Options are : 0ps~750ps. (Default: 0ps) IOH Clock Skew Allows you to set the CPU clock prior to adjust the amplitude of the PCI Express and North Bridge clock. CPU Clock Skew ...Selectable (SPD) Profile DDR Voltage Profile QPI Voltage >>>>> Channel A Channel A Timing Settings Channel A Turnaround Settings >>>>> Channel B Channel B Timing Settings Channel B Turnaround Settings >>>>> Channel C Channel C Timing Settings Channel C Turnaround Settings [Turbo] [Disabled] [Auto] 800 [Auto] 1.5V 1.15V [Press Enter] [Press ...
Manual
Page 42
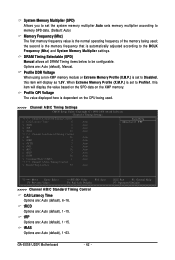
...) The first memory frequency value is the normal operating frequency of the memory being used ; ESC: Exit F1: General Help F7: Optimized Defaults GA-EX58-UD3R Motherboard - 42 - When Extreme Memory Profile (X.M.P.) is set to Profile1, this item will display the value based on the SPD data on the CPU being used . >>>>> Channel A/B/C Timing...
...) The first memory frequency value is the normal operating frequency of the memory being used ; ESC: Exit F1: General Help F7: Optimized Defaults GA-EX58-UD3R Motherboard - 42 - When Extreme Memory Profile (X.M.P.) is set to Profile1, this item will display the value based on the SPD data on the CPU being used . >>>>> Channel A/B/C Timing...
Manual
Page 43
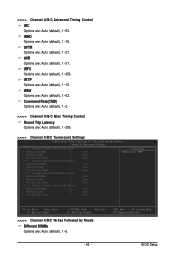
... Rate(CMD) Options are: Auto (default), 1~2. >>>>> Channel A/B/C Misc Timing Control Round Trip Latency Options are: Auto (default), 1~255. >>>>> Channel A/B/C Turnaround Settings CMOS Setup Utility-Copyright (C) 1984-2008 Award Software Channel A Turnaround Settings >>>>> Channel A Writes Followed by Reads x Different DIMMs 7 x Different Ranks 7 x On The Same Rank 4 >>>>> Channel A Reads Followed by Writes x Different DIMMs...
... Rate(CMD) Options are: Auto (default), 1~2. >>>>> Channel A/B/C Misc Timing Control Round Trip Latency Options are: Auto (default), 1~255. >>>>> Channel A/B/C Turnaround Settings CMOS Setup Utility-Copyright (C) 1984-2008 Award Software Channel A Turnaround Settings >>>>> Channel A Writes Followed by Reads x Different DIMMs 7 x Different Ranks 7 x On The Same Rank 4 >>>>> Channel A Reads Followed by Writes x Different DIMMs...
Manual
Page 45
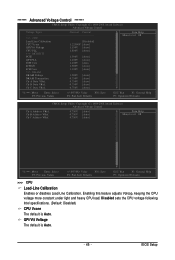
... ESC: Exit F1: General Help F7: Optimized Defaults CMOS Setup Utility-Copyright (C) 1984-2008 Award Software Advanced Voltage Control Ch-A Address VRef. BIOS Setup Disabled sets the CPU voltage following Intel specifications. (Default: Disabled) CPU Vcore The default is Auto. - 45 - Ch-B Address VRef. Enabling this feature adjusts Vdroop, keeping the...
... ESC: Exit F1: General Help F7: Optimized Defaults CMOS Setup Utility-Copyright (C) 1984-2008 Award Software Advanced Voltage Control Ch-A Address VRef. BIOS Setup Disabled sets the CPU voltage following Intel specifications. (Default: Disabled) CPU Vcore The default is Auto. - 45 - Ch-B Address VRef. Enabling this feature adjusts Vdroop, keeping the...
Manual
Page 47
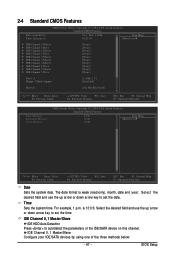
... F10: Save F6: Fail-Safe Defaults ESC: Exit F1: General Help F7: Optimized Defaults Date Sets the system date. Select the desired field and use the up arrow or down arrow key to set the time. Time Sets the system time. Select the desired field and use the up arrow or down arrow...
... F10: Save F6: Fail-Safe Defaults ESC: Exit F1: General Help F7: Optimized Defaults Date Sets the system date. Select the desired field and use the up arrow or down arrow key to set the time. Time Sets the system time. Select the desired field and use the up arrow or down arrow...

Manual
Page 48
... a non-fatal error the system boot will be reserved for the MS-DOS operating system. Extended Memory The amount of the currently installed hard drive. GA-EX58-UD3R Motherboard - 48 - IDE Channel 2, 3 Master, IDE Channel 4, 5 Master/Slave IDE Auto-Detection Press to autodetect the parameters of the IDE/SATA...None so the system will skip the detection of the device during the POST for an error during the POST for any error. Access Mode Sets the hard drive access mode. Options are : Auto (default), CHS, LBA, Large. Cylinder Number of sectors. Head Number of floppy disk...
... a non-fatal error the system boot will be reserved for the MS-DOS operating system. Extended Memory The amount of the currently installed hard drive. GA-EX58-UD3R Motherboard - 48 - IDE Channel 2, 3 Master, IDE Channel 4, 5 Master/Slave IDE Auto-Detection Press to autodetect the parameters of the IDE/SATA...None so the system will skip the detection of the device during the POST for an error during the POST for any error. Access Mode Sets the hard drive access mode. Options are : Auto (default), CHS, LBA, Large. Cylinder Number of sectors. Head Number of floppy disk...


