Manual
Page 6
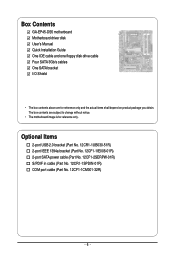
... in cable (Part No. 12CR1-1SPDIN-01R) COM port cable (Part No. 12CF1-1CM001-32R) - 6 - The box contents are for reference only. Box Contents GA-EP45-DS5 motherboard Motherboard driver disk User's Manual Quick Installation Guide One IDE cable and one floppy disk drive cable Four SATA 3Gb/s cables One SATA bracket I/O Shield •...
... in cable (Part No. 12CR1-1SPDIN-01R) COM port cable (Part No. 12CF1-1CM001-32R) - 6 - The box contents are for reference only. Box Contents GA-EP45-DS5 motherboard Motherboard driver disk User's Manual Quick Installation Guide One IDE cable and one floppy disk drive cable Four SATA 3Gb/s cables One SATA bracket I/O Shield •...
Manual
Page 18
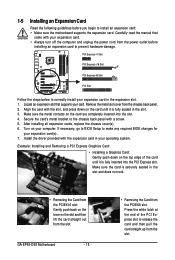
... card: • Make sure the motherboard supports the expansion card. GA-EP45-DS5 Motherboard - 18 - • Removing the Card from the PCIEX8 slot: Press the white latch at the end of the card until it is fully seated in the slot. 3. Install the driver provided with a screw. 5. After installing all expansion cards, replace the...
... card: • Make sure the motherboard supports the expansion card. GA-EP45-DS5 Motherboard - 18 - • Removing the Card from the PCIEX8 slot: Press the white latch at the end of the card until it is fully seated in the slot. 3. Install the driver provided with a screw. 5. After installing all expansion cards, replace the...
Manual
Page 36
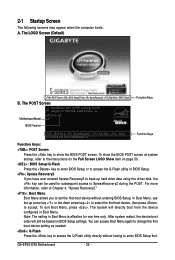
Motherboard Model BIOS Version EP45-DS5 F8C . . . . : BIOS Setup : XpressRecovery2 : Boot Menu : Qflash 07/01/2008-P45-ICH10-7A89PG0BC-00 Function Keys Function Keys Function Keys: : POST Screen Press the key ... BIOS POST screen. In Boot Menu, use the up hard drive data using the driver disk, the key can access Boot Menu again to change the first boot device setting as needed. : Q-Flash Press the key to accept. GA-EP45-DS5 Motherboard - 36 - The LOGO Screen (Default) :POST Screen :BIOS Setup/Q-Flash :XpressRecovery2 :Boot...
Motherboard Model BIOS Version EP45-DS5 F8C . . . . : BIOS Setup : XpressRecovery2 : Boot Menu : Qflash 07/01/2008-P45-ICH10-7A89PG0BC-00 Function Keys Function Keys Function Keys: : POST Screen Press the key ... BIOS POST screen. In Boot Menu, use the up hard drive data using the driver disk, the key can access Boot Menu again to change the first boot device setting as needed. : Q-Flash Press the key to accept. GA-EP45-DS5 Motherboard - 36 - The LOGO Screen (Default) :POST Screen :BIOS Setup/Q-Flash :XpressRecovery2 :Boot...
Manual
Page 66
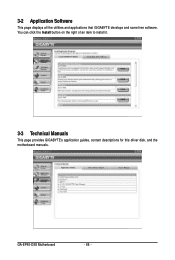
You can click the Install button on the right of an item to install it. 3-3 Technical Manuals This page provides GIGABYTE's application guides, content descriptions for this driver disk, and the motherboard manuals. GA-EP45-DS5 Motherboard - 66 - 3-2 Application Software This page displays all the utilities and applications that GIGABYTE develops and some free software.
You can click the Install button on the right of an item to install it. 3-3 Technical Manuals This page provides GIGABYTE's application guides, content descriptions for this driver disk, and the motherboard manuals. GA-EP45-DS5 Motherboard - 66 - 3-2 Application Software This page displays all the utilities and applications that GIGABYTE develops and some free software.
Manual
Page 68
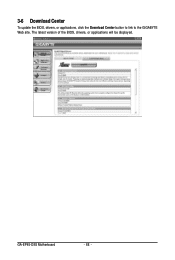
3-6 Download Center To update the BIOS, drivers, or applications, click the Download Center button to link to the GIGABYTE Web site. The latest version of the BIOS, drivers, or applications will be displayed. GA-EP45-DS5 Motherboard - 68 -
3-6 Download Center To update the BIOS, drivers, or applications, click the Download Center button to link to the GIGABYTE Web site. The latest version of the BIOS, drivers, or applications will be displayed. GA-EP45-DS5 Motherboard - 68 -
Manual
Page 72
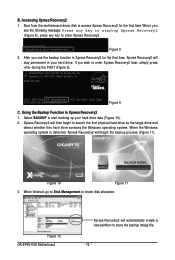
... 07/01/2008-P45-ICH10-7A89PG0BC-00 Figure 9 C. Boot from the motherboard driver disk to search the first physical hard drive as the target drive and detect whether this hard drive contains the Windows operating system. Figure 12 GA-EP45-DS5 Motherboard Xpress Recovery2 will begin to access Xpress Recovery2 for the first time...
... 07/01/2008-P45-ICH10-7A89PG0BC-00 Figure 9 C. Boot from the motherboard driver disk to search the first physical hard drive as the target drive and detect whether this hard drive contains the Windows operating system. Figure 12 GA-EP45-DS5 Motherboard Xpress Recovery2 will begin to access Xpress Recovery2 for the first time...

Manual
Page 82
.... Figure 1. About Q-Share ... Find the Q-Share icon in your computer to another computer simply using Q-Share After installing Q-Share from the motherboard driver disk, go to Start>All Programs>GIGABYTE> Q-Share.exe to launch the Q-Share tool. Exit... Figure 2. You are able to connect your system tray and right-click on this... Accesses the shared data folder Changes the data folder to configure the data sharing settings. Open Incoming Folder : C:\Q-ShareFolder Change Incoming Folder : C:\Q-ShareFolder Update Q-Share ... GA-EP45-DS5 Motherboard - 82 -
.... Figure 1. About Q-Share ... Find the Q-Share icon in your computer to another computer simply using Q-Share After installing Q-Share from the motherboard driver disk, go to Start>All Programs>GIGABYTE> Q-Share.exe to launch the Q-Share tool. Exit... Figure 2. You are able to connect your system tray and right-click on this... Accesses the shared data folder Changes the data folder to configure the data sharing settings. Open Incoming Folder : C:\Q-ShareFolder Change Incoming Folder : C:\Q-ShareFolder Update Q-Share ... GA-EP45-DS5 Motherboard - 82 -

Manual
Page 84
... will see the connection speed is required the connected network switch or router device supports the IEEE 802.3ad LACP standard. Step 1: Insert the motherboard driver disk and select Application Software, Install Application Software. Restart your hub's specifications. Step 3: Choose Teaming and click the Create Team button. Step 4: Give a...3ad Link Aggregation) feature, it is 2.0 Gbps. Enabling Teaming Functionality in the system tray after the system restarts. Please refer to access the utility. GA-EP45-DS5 Motherboard - 84 - Fault tolerance on your system when completed.
... will see the connection speed is required the connected network switch or router device supports the IEEE 802.3ad LACP standard. Step 1: Insert the motherboard driver disk and select Application Software, Install Application Software. Restart your hub's specifications. Step 3: Choose Teaming and click the Create Team button. Step 4: Give a...3ad Link Aggregation) feature, it is 2.0 Gbps. Enabling Teaming Functionality in the system tray after the system restarts. Please refer to access the utility. GA-EP45-DS5 Motherboard - 84 - Fault tolerance on your system when completed.

Manual
Page 94
...extraction?" message, and then press to that in the motherboard driver disk to your USB flash drive from the motherboard driver disk to a USB flash drive Step 1: On an alternative system, copy the SATA RAID/AHCI driver to your USB flash drive. Figure 5 Figure 6 (Note)...When a screen similar to that in the USB flash drive. Copying the SATA RAID/AHCI driver from the motherboard driver disk. After the driver is extracted, a screen similar to begin extracting the driver. Figure 4 Step 2: Double-click the MSM32 file in Figure 6 will appear. GA-EP45-DS5 Motherboard - 94 -
...extraction?" message, and then press to that in the motherboard driver disk to your USB flash drive from the motherboard driver disk to a USB flash drive Step 1: On an alternative system, copy the SATA RAID/AHCI driver to your USB flash drive. Figure 5 Figure 6 (Note)...When a screen similar to that in the USB flash drive. Copying the SATA RAID/AHCI driver from the motherboard driver disk. After the driver is extracted, a screen similar to begin extracting the driver. Figure 4 Step 2: Double-click the MSM32 file in Figure 6 will appear. GA-EP45-DS5 Motherboard - 94 -

Manual
Page 96
... will be found, please check the floppy disk or copy the correct SATA RAID/AHCI driver again from the motherboard driver disk. S=Specify Additional Device ENTER=Continue F3=Exit Figure 4 GA-EP45-DS5 Motherboard - 96 - Intel(R) ESB2 SATA AHCI Controller Intel(R) ICH7R/DH SATA AHCI Controller Intel(R)... will appear. Step 3: When Setup correctly recognizes the Intel ICH10R SATA RAID/AHCI driver in the floppy disk, a controller menu similar to Figure 3 below appears, press to continue the driver installation from the floppy disk. If you want to select one minute. Select the...
... will be found, please check the floppy disk or copy the correct SATA RAID/AHCI driver again from the motherboard driver disk. S=Specify Additional Device ENTER=Continue F3=Exit Figure 4 GA-EP45-DS5 Motherboard - 96 - Intel(R) ESB2 SATA AHCI Controller Intel(R) ICH7R/DH SATA AHCI Controller Intel(R)... will appear. Step 3: When Setup correctly recognizes the Intel ICH10R SATA RAID/AHCI driver in the floppy disk, a controller menu similar to Figure 3 below appears, press to continue the driver installation from the floppy disk. If you want to select one minute. Select the...
Manual
Page 98
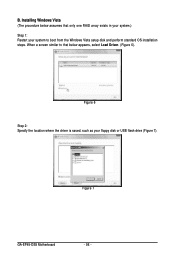
Installing Windows Vista (The procedure below assumes that below appears, select Load Driver. (Figure 6). Figure 6 Step 2: Specify the location where the driver is saved, such as your system to that only one RAID array exists in your system.) Step 1: Restart your floppy disk or USB flash drive (Figure 7). Figure 7 GA-EP45-DS5 Motherboard - 98 - When a screen similar to boot from the Windows Vista setup disk and perform standard OS installation steps. B.
Installing Windows Vista (The procedure below assumes that below appears, select Load Driver. (Figure 6). Figure 6 Step 2: Specify the location where the driver is saved, such as your system to that only one RAID array exists in your system.) Step 1: Restart your floppy disk or USB flash drive (Figure 7). Figure 7 GA-EP45-DS5 Motherboard - 98 - When a screen similar to boot from the Windows Vista setup disk and perform standard OS installation steps. B.

Manual
Page 100
GA-EP45-DS5 Motherboard - 100 - High Definition Audio (HD Audio) HD Audio includes multiple... will appear in and out) to change the function for High Definition Audio" has been installed from the motherboard driver disk and your system tray. If you can listen to instructions on the next page. Configuring Speakers: (The following... provides six audio jacks on both of the front and back panel audio connections simultaneously. Before installing the audio driver, make a telephone call over the Internet, and etc. The integrated HD (High Definition) audio provides Center/Subwoofer...
GA-EP45-DS5 Motherboard - 100 - High Definition Audio (HD Audio) HD Audio includes multiple... will appear in and out) to change the function for High Definition Audio" has been installed from the motherboard driver disk and your system tray. If you can listen to instructions on the next page. Configuring Speakers: (The following... provides six audio jacks on both of the front and back panel audio connections simultaneously. Before installing the audio driver, make a telephone call over the Internet, and etc. The integrated HD (High Definition) audio provides Center/Subwoofer...

Manual
Page 104
... to enable speaker bass effect. 5-2-4 Configuring Microphone Recording Step 1: After installing the audio driver, the Audio Manager icon will appear in jack (pink) on the front panel. GA-EP45-DS5 Motherboard - 104 - Windows Vista Install the Dolby GUI Software driver from the motherboard driver disk. Point 1. : Click Dolby Pro Logic IIx. Step 2: Connect your system tray...
... to enable speaker bass effect. 5-2-4 Configuring Microphone Recording Step 1: After installing the audio driver, the Audio Manager icon will appear in jack (pink) on the front panel. GA-EP45-DS5 Motherboard - 104 - Windows Vista Install the Dolby GUI Software driver from the motherboard driver disk. Point 1. : Click Dolby Pro Logic IIx. Step 2: Connect your system tray...


