
Manual
Page 4
... Contents...6 Optional Items...6 GA-EP41T-USB3 Motherboard Layout 7 GA-EP41T-USB3 Motherboard Block Diagram 8 Chapter 1 Hardware Installation 9 1-1 Installation Precautions 9 1-2 Product Specifications 10 1-3 Installing the CPU and CPU Cooler 13 1-3-1 Installing the CPU 13 1-3-2 Installing the CPU Cooler 15 1-4 Installing the Memory 16 1-4-1 Dual Channel Memory Configuration 16 1-4-2 Installing a Memory 17 1-5 Installing an Expansion Card 18 1-6 Back Panel...
... Contents...6 Optional Items...6 GA-EP41T-USB3 Motherboard Layout 7 GA-EP41T-USB3 Motherboard Block Diagram 8 Chapter 1 Hardware Installation 9 1-1 Installation Precautions 9 1-2 Product Specifications 10 1-3 Installing the CPU and CPU Cooler 13 1-3-1 Installing the CPU 13 1-3-2 Installing the CPU Cooler 15 1-4 Installing the Memory 16 1-4-1 Dual Channel Memory Configuration 16 1-4-2 Installing a Memory 17 1-5 Installing an Expansion Card 18 1-6 Back Panel...

Manual
Page 13
...the following guidelines before installing the CPU to set beyond the standard specifications, please do so according to your hardware specifications including the CPU, graphics card, memory, hard drive, etc. 1-3-1 Installing the CPU A. LGA775 CPU Socket Alignment Key LGA775 CPU Alignment Key Pin One Corner of the CPU...cord from the power outlet before you begin to install the CPU: • Make sure that the motherboard supports the CPU. (Go to GIGABYTE's website for the latest CPU support list.) • Always turn on the computer if the CPU cooler is not recommended that the system ...
...the following guidelines before installing the CPU to set beyond the standard specifications, please do so according to your hardware specifications including the CPU, graphics card, memory, hard drive, etc. 1-3-1 Installing the CPU A. LGA775 CPU Socket Alignment Key LGA775 CPU Alignment Key Pin One Corner of the CPU...cord from the power outlet before you begin to install the CPU: • Make sure that the motherboard supports the CPU. (Go to GIGABYTE's website for the latest CPU support list.) • Always turn on the computer if the CPU cooler is not recommended that the system ...

Manual
Page 18
...Express x1 Slot PCI Express x16 Slot PCI Slot Follow the steps below to correctly install your expansion card(s). 7. Example: Installing and Removing a PCI Express x16 Graphics Card: • Installing a Graphics Card: Gently push down on your operating system. Locate an expansion slot that came with the slot,... slot. 1. If necessary, go to BIOS Setup to make any required BIOS changes for your expansion card in your computer. Carefully read the manual that supports your expansion card. • Always turn off the computer and unplug the power cord from the power outlet before you...
...Express x1 Slot PCI Express x16 Slot PCI Slot Follow the steps below to correctly install your expansion card(s). 7. Example: Installing and Removing a PCI Express x16 Graphics Card: • Installing a Graphics Card: Gently push down on your operating system. Locate an expansion slot that came with the slot,... slot. 1. If necessary, go to BIOS Setup to make any required BIOS changes for your expansion card in your computer. Carefully read the manual that supports your expansion card. • Always turn off the computer and unplug the power cord from the power outlet before you...

Manual
Page 27
... supports digital S/PDIF In and can connect to certain expansion cards like graphics cards and sound cards. For example, some graphics cards may require you wish to connect an HDMI display to the graphics card and have digital audio output from your motherboard to your motherboard... GND 13) SPDIF_O (S/PDIF Out Header) This header supports digital S/PDIF Out and connects a S/PDIF digital audio cable (provided by expansion cards) for your expansion card. For information about connecting the S/PDIF digital audio cable, carefully read the manual for digital audio output from your graphics...
... supports digital S/PDIF In and can connect to certain expansion cards like graphics cards and sound cards. For example, some graphics cards may require you wish to connect an HDMI display to the graphics card and have digital audio output from your motherboard to your motherboard... GND 13) SPDIF_O (S/PDIF Out Header) This header supports digital S/PDIF Out and connects a S/PDIF digital audio cable (provided by expansion cards) for your expansion card. For information about connecting the S/PDIF digital audio cable, carefully read the manual for digital audio output from your graphics...

Manual
Page 46
... image file to the hard drive. PCI Sets the PCI graphics card as the first display. (Default) PEG Sets the PCI Express graphics card as the system boots up. Delay For HDD (Secs) Allows you to determine whether to display the GIGABYTE Logo at system startup. If the system BIOS is from the...
... image file to the hard drive. PCI Sets the PCI graphics card as the first display. (Default) PEG Sets the PCI Express graphics card as the system boots up. Delay For HDD (Secs) Allows you to determine whether to display the GIGABYTE Logo at system startup. If the system BIOS is from the...
Manual
Page 48
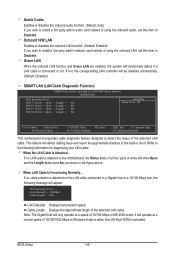
Onboard H/W LAN Enables or disables the onboard LAN function. (Default: Enabled) If you wish to install a 3rd party add-in audio card instead of using the onboard LAN, set this item to Disabled. Refer to detect the status of the attached LAN cable. BIOS Setup - 48 - Part1...activated. If no LAN cable is connected or not. If not, the corresponding LAN controller will operate at a speed of 10/100 Mbps in network card instead of using the onboard audio, set this item to Disabled. Cable Length Displays the approximate length of wires will appear: Start detecting at Port...
Onboard H/W LAN Enables or disables the onboard LAN function. (Default: Enabled) If you wish to install a 3rd party add-in audio card instead of using the onboard LAN, set this item to Disabled. Refer to detect the status of the attached LAN cable. BIOS Setup - 48 - Part1...activated. If no LAN cable is connected or not. If not, the corresponding LAN controller will operate at a speed of 10/100 Mbps in network card instead of using the onboard audio, set this item to Disabled. Cable Length Displays the approximate length of wires will appear: Start detecting at Port...

Manual
Page 61
... only back up your system data and perform restoration of it. System Requirements: • At least 512 MB of system memory • VESA compatible graphics card • Windows XP with Xpress Recovery cannot be restored using Xpress Recovery2. • USB hard drives are installed. • The amount of data and hard...
... only back up your system data and perform restoration of it. System Requirements: • At least 512 MB of system memory • VESA compatible graphics card • Windows XP with Xpress Recovery cannot be restored using Xpress Recovery2. • USB hard drives are installed. • The amount of data and hard...
Manual
Page 68
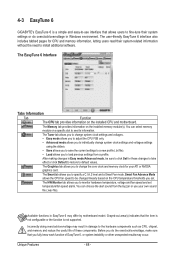
... components. Grayed-out area(s) indicates that the item is not configurable or the function is a simple and easy-to-use your ATI or NVIDIA graphics card. The user-friendly EasyTune 6 interface also includes tabbed pages for your own sound file (.wav file). 4-3 EasyTune...
... components. Grayed-out area(s) indicates that the item is not configurable or the function is a simple and easy-to-use your ATI or NVIDIA graphics card. The user-friendly EasyTune 6 interface also includes tabbed pages for your own sound file (.wav file). 4-3 EasyTune...

Manual
Page 76
.... 1. Click OK to complete. (Note) If you have connected a S/PDIF digital audio cable (provided by expansion cards) to the 2-pin S/PDIF Out header (SPDIF_O) on the motherboard to output digital audio to your expansion card, you can transmit audio signals to configure further settings, such as the sample rate and bit depth...
.... 1. Click OK to complete. (Note) If you have connected a S/PDIF digital audio cable (provided by expansion cards) to the 2-pin S/PDIF Out header (SPDIF_O) on the motherboard to output digital audio to your expansion card, you can transmit audio signals to configure further settings, such as the sample rate and bit depth...
Manual
Page 80
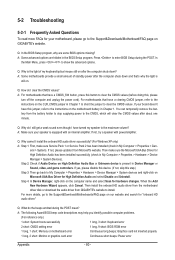
... 1 long, 9 short: BIOS ROM error 1 long, 1 short: Memory or motherboard error Continuous long beeps: Graphics card not inserted properly 1 long, 2 short: Monitor or graphics card error Continuous short beeps: Power error Appendix - 80 - For motherboards that have a CMOS_SW button, press this button to... in the BIOS Setup program. When the Add New Hardware Wizard appears, click Cancel. Step 2: Check if Audio Device on GIGABYTE's website. 5-2 Troubleshooting 5-2-1 Frequently Asked Questions To read more details, go to the Support&Downloads\Motherboards\FAQ page on Microsoft UAA...
... 1 long, 9 short: BIOS ROM error 1 long, 1 short: Memory or motherboard error Continuous long beeps: Graphics card not inserted properly 1 long, 2 short: Monitor or graphics card error Continuous short beeps: Power error Appendix - 80 - For motherboards that have a CMOS_SW button, press this button to... in the BIOS Setup program. When the Add New Hardware Wizard appears, click Cancel. Step 2: Check if Audio Device on GIGABYTE's website. 5-2 Troubleshooting 5-2-1 Frequently Asked Questions To read more details, go to the Support&Downloads\Motherboards\FAQ page on Microsoft UAA...

Manual
Page 81
...- Make sure the motherboard does not short-circuit with the chassis or other metal objects. The problem is verified and solved. Insert the graphics card. Yes Isolate the short circuit. Is the power connector of the CPU cooler connected to the CPU securely. Yes The problem is verified and ...solved. No Correctly insert the memory into the memory socket. Make sure the graphics card is installed properly on the memory slot. Secure the CPU cooler No on the power to start the computer. Appendix Remove all peripherals, ...
...- Make sure the motherboard does not short-circuit with the chassis or other metal objects. The problem is verified and solved. Insert the graphics card. Yes Isolate the short circuit. Is the power connector of the CPU cooler connected to the CPU securely. Yes The problem is verified and ...solved. No Correctly insert the memory into the memory socket. Make sure the graphics card is installed properly on the memory slot. Secure the CPU cooler No on the power to start the computer. Appendix Remove all peripherals, ...

Manual
Page 82
Yes Check if there is display on , is the CPU cooler running? No The graphics card, expansion slot, or monitor might fail. Select "Load Fail-Safe Defaults" (or "Load Optimized Defaults"). Select "Save & Exit Setup" to see if the device works ...
Yes Check if there is display on , is the CPU cooler running? No The graphics card, expansion slot, or monitor might fail. Select "Load Fail-Safe Defaults" (or "Load Optimized Defaults"). Select "Save & Exit Setup" to see if the device works ...


