Manual
Page 4
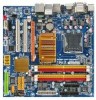
Installing the Infineon TPM Driver and the Smart TPM Utility Before you 'll be directed to install. Some motherboard driver disks include the Smart TPM utility in "Xpress Install." Installing the Smart TPM Utility Click the tab at the bottom of the left... install all of Smart TPM to install the Infineon TPM driver and the Smart TPM utility altogether. - 4 - Installing the Infineon TPM Driver Insert the GIGABYTE motherboard driver disk. 2. Click the Install All button and "Xpress Install" will automatically scan your system and list all of the autorun screen and you use...
Installing the Infineon TPM Driver and the Smart TPM Utility Before you 'll be directed to install. Some motherboard driver disks include the Smart TPM utility in "Xpress Install." Installing the Smart TPM Utility Click the tab at the bottom of the left... install all of Smart TPM to install the Infineon TPM driver and the Smart TPM utility altogether. - 4 - Installing the Infineon TPM Driver Insert the GIGABYTE motherboard driver disk. 2. Click the Install All button and "Xpress Install" will automatically scan your system and list all of the autorun screen and you use...

Manual
Page 7
... encrypted TPM User Password in . If more than one USB flash drive at the same time. Before creating a Bluetooth cell phone key, make sure your motherboard includes a Bluetooth receiver and turn on the search and Bluetooth functions on your cell phone for pairing with your cell phone. Then select the USB...
... encrypted TPM User Password in . If more than one USB flash drive at the same time. Before creating a Bluetooth cell phone key, make sure your motherboard includes a Bluetooth receiver and turn on the search and Bluetooth functions on your cell phone for pairing with your cell phone. Then select the USB...

Manual
Page 19
...'t display your Bluetooth-enabled cell phone, click Refresh to let Smart TPM re-detect the device.) Before creating a Bluetooth cell phone key, make sure your motherboard includes a Bluetooth receiver and turn off or reset your computer when a USB key is being created. • If you enter the TPM User Password incorrectly...
...'t display your Bluetooth-enabled cell phone, click Refresh to let Smart TPM re-detect the device.) Before creating a Bluetooth cell phone key, make sure your motherboard includes a Bluetooth receiver and turn off or reset your computer when a USB key is being created. • If you enter the TPM User Password incorrectly...
Manual
Page 3
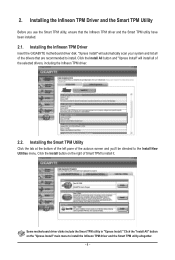
Method 1: Insert the GIGABYTE motherboard driver disk. Click the Install All button. "Xpress Install" will automatically scan your system. Install the GIGABYTE Ultra TPM utility. - 3 - Method 2: To individually install the Infineon TPM driver and the GIGABYTE Ultra TPM utility, go to the Install Single Items menu and ...the right of the selected drivers, including the Infineon TPM driver and the GIGABYTE Ultra TPM utility. "Xpress Install" will install all the drivers that the Infineon TPM driver and the GIGABYTE Ultra TPM utility have been installed in your system and list all of...
Method 1: Insert the GIGABYTE motherboard driver disk. Click the Install All button. "Xpress Install" will automatically scan your system. Install the GIGABYTE Ultra TPM utility. - 3 - Method 2: To individually install the Infineon TPM driver and the GIGABYTE Ultra TPM utility, go to the Install Single Items menu and ...the right of the selected drivers, including the Infineon TPM driver and the GIGABYTE Ultra TPM utility. "Xpress Install" will install all the drivers that the Infineon TPM driver and the GIGABYTE Ultra TPM utility have been installed in your system and list all of...

Manual
Page 1
GA-EG45M-DS2H LGA775 socket motherboard for Intel® CoreTM processor family/ Intel® Pentium® processor family/Intel® Celeron® processor family User's Manual Rev.1003 12ME-EG45MD2H-1003R
GA-EG45M-DS2H LGA775 socket motherboard for Intel® CoreTM processor family/ Intel® Pentium® processor family/Intel® Celeron® processor family User's Manual Rev.1003 12ME-EG45MD2H-1003R

Manual
Page 2
Motherboard GA-EG45M-DS2H Jun. 7, 2008 Motherboard GA-EG45M-DS2H Jun. 7, 2008
Motherboard GA-EG45M-DS2H Jun. 7, 2008 Motherboard GA-EG45M-DS2H Jun. 7, 2008
Manual
Page 3
... the exclu- sive global distributor of this manual may be reproduced, copied, translated, transmitted, or published in this product, GIGABYTE provides the following types of documentations: „ For quick set-up of the motherboard is 1.0. For example, "REV: 1.0" means the revision of the product, read the Quick Installation Guide included with the...
... the exclu- sive global distributor of this manual may be reproduced, copied, translated, transmitted, or published in this product, GIGABYTE provides the following types of documentations: „ For quick set-up of the motherboard is 1.0. For example, "REV: 1.0" means the revision of the product, read the Quick Installation Guide included with the...

Manual
Page 4
Table of Contents Box Contents ...6 OptionalItems...6 GA-EG45M-DS2H Motherboard Layout 7 Block Diagram...8 Chapter 1 Hardware Installation 9 1-1 Installation Precautions 9 1-2 Product Specifications 10 1-3 Installing the CPU and CPU Cooler 13 1-3-1 Installing the CPU 13 1-3-2 Installing the CPU ...
Table of Contents Box Contents ...6 OptionalItems...6 GA-EG45M-DS2H Motherboard Layout 7 Block Diagram...8 Chapter 1 Hardware Installation 9 1-1 Installation Precautions 9 1-2 Product Specifications 10 1-3 Installing the CPU and CPU Cooler 13 1-3-1 Installing the CPU 13 1-3-2 Installing the CPU ...

Manual
Page 6
Box Contents GA-EG45M-DS2H motherboard Motherboard driver disk User's Manual Quick Installation Guide One IDE cable and one floppy disk drive cable Two SATA 3Gb/s cables I/O Shield • The box contents above are subject to change without notice. • The motherboard image is for reference only and the actual items shall depend on product package you...
Box Contents GA-EG45M-DS2H motherboard Motherboard driver disk User's Manual Quick Installation Guide One IDE cable and one floppy disk drive cable Two SATA 3Gb/s cables I/O Shield • The box contents above are subject to change without notice. • The motherboard image is for reference only and the actual items shall depend on product package you...

Manual
Page 7
IT8718 GA-EG45M-DS2H Motherboard Layout KB_USB ATX_12V VGA DVI OPTICAL HDMI Level Shifter Level Shifter LGA775 PHASE LED TPM IC (Note) LPT FDD GA-EG45M-DS2H CPU_FAN USB 1394 ESATA LAN USB BAT Intel® G45 F_AUDIO AUDIO SYS_FAN PCIEX4 PCI1 RTL 8111C PCI2 SPDIF_O CD_IN CODEC SPDIF_I PCIEX1 M_BIOS B_BIOS TSB43AB23 COMA F1_1394 F_USB3 F_USB1 Intel® ICH10R SATA2_2SATA2_0 F_USB2 SATA2_3 SATA2_1 SATA2_4 IT8213 CLR_CMOS IDE DDR2_1 DDR2_2 DDR2_3 DDR2_4 F_PANEL ATX PWR_LED CI (Note) This feature is optional due to different regional policy. - 7 -
IT8718 GA-EG45M-DS2H Motherboard Layout KB_USB ATX_12V VGA DVI OPTICAL HDMI Level Shifter Level Shifter LGA775 PHASE LED TPM IC (Note) LPT FDD GA-EG45M-DS2H CPU_FAN USB 1394 ESATA LAN USB BAT Intel® G45 F_AUDIO AUDIO SYS_FAN PCIEX4 PCI1 RTL 8111C PCI2 SPDIF_O CD_IN CODEC SPDIF_I PCIEX1 M_BIOS B_BIOS TSB43AB23 COMA F1_1394 F_USB3 F_USB1 Intel® ICH10R SATA2_2SATA2_0 F_USB2 SATA2_3 SATA2_1 SATA2_4 IT8213 CLR_CMOS IDE DDR2_1 DDR2_2 DDR2_3 DDR2_4 F_PANEL ATX PWR_LED CI (Note) This feature is optional due to different regional policy. - 7 -

Manual
Page 9
...can become damaged as a result of the product, please consult a certified computer technician. - 9 - If you do not remove or break motherboard S/N (Serial Number) sticker or warranty sticker provided by your hands dry and first touch a metal object to eliminate static electricity. • ... is best to installation, do not have an ESD wrist strap, keep your dealer. Chapter 1 Hardware Installation 1-1 Installation Precautions The motherboard contains numerous delicate electronic circuits and components which can lead to damage to system components as well as physical harm to the user. ...
...can become damaged as a result of the product, please consult a certified computer technician. - 9 - If you do not remove or break motherboard S/N (Serial Number) sticker or warranty sticker provided by your hands dry and first touch a metal object to eliminate static electricity. • ... is best to installation, do not have an ESD wrist strap, keep your dealer. Chapter 1 Hardware Installation 1-1 Installation Precautions The motherboard contains numerous delicate electronic circuits and components which can lead to damage to system components as well as physical harm to the user. ...

Manual
Page 10
...Intel® Pentium® Dual-Core processo/Intel® Celeron® processor in the LGA 775 package (Go to GIGABYTE's website for the latest CPU support list.) Š L2 cache varies with CPU Š 1600(O.C.)/1333/1066/800 ...(Note 1) Š Dual channel memory architecture Š Support for DDR2 1066(O.C.)/800/667 MHz memory modules (Go to GIGABYTE's website for the latest memory support list.) Š Integrated in the North Bridge Š Realtek ALC889A codec Š ... back panel, 1 via the IEEE 1394 bracket connected to the internal IEEE 1394 header) GA-EG45M-DS2H Motherboard - 10 -
...Intel® Pentium® Dual-Core processo/Intel® Celeron® processor in the LGA 775 package (Go to GIGABYTE's website for the latest CPU support list.) Š L2 cache varies with CPU Š 1600(O.C.)/1333/1066/800 ...(Note 1) Š Dual channel memory architecture Š Support for DDR2 1066(O.C.)/800/667 MHz memory modules (Go to GIGABYTE's website for the latest memory support list.) Š Integrated in the North Bridge Š Realtek ALC889A codec Š ... back panel, 1 via the IEEE 1394 bracket connected to the internal IEEE 1394 header) GA-EG45M-DS2H Motherboard - 10 -

Manual
Page 12
... 4) Whether the CPU fan speed control function is supported will depend on the CPU cooler you install. (Note 5) Available functions in EasyTune may differ by motherboard model. (Note 6) This feature is optional due to different regional policy. GA-EG45M-DS2H Motherboard - 12 -
... 4) Whether the CPU fan speed control function is supported will depend on the CPU cooler you install. (Note 5) Available functions in EasyTune may differ by motherboard model. (Note 6) This feature is optional due to different regional policy. GA-EG45M-DS2H Motherboard - 12 -

Manual
Page 13
... the power outlet before installing the CPU to prevent hardware damage. • Locate the pin one of the CPU. mended that the motherboard supports the CPU. (Go to GIGABYTE's website for the peripherals. LGA775 CPU Socket Alignment Key LGA 775 CPU Alignment Key Pin One Corner of thermal grease on the computer... on the CPU. If you may occur. • Set the CPU host frequency in accordance with the CPU specifications. Locate the alignment keys on the motherboard CPU socket and the notches on the CPU - 13 -
... the power outlet before installing the CPU to prevent hardware damage. • Locate the pin one of the CPU. mended that the motherboard supports the CPU. (Go to GIGABYTE's website for the peripherals. LGA775 CPU Socket Alignment Key LGA 775 CPU Alignment Key Pin One Corner of thermal grease on the computer... on the CPU. If you may occur. • Set the CPU host frequency in accordance with the CPU specifications. Locate the alignment keys on the motherboard CPU socket and the notches on the CPU - 13 -
Manual
Page 14
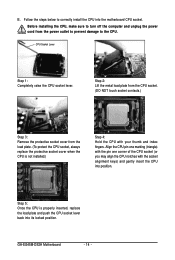
... index fingers. Step 5: Once the CPU is not installed.) Step 4: Hold the CPU with the socket alignment keys) and gently insert the CPU into the motherboard CPU socket. GA-EG45M-DS2H Motherboard - 14 - Follow the steps below to the CPU.
... index fingers. Step 5: Once the CPU is not installed.) Step 4: Hold the CPU with the socket alignment keys) and gently insert the CPU into the motherboard CPU socket. GA-EG45M-DS2H Motherboard - 14 - Follow the steps below to the CPU.

Manual
Page 15
..., the installation is to install.) Step 3: Place the cooler atop the CPU, aligning the four push pins through the pin holes on the motherboard. Push down each push pin. Direction of the Arrow Sign on the Male Push Pin Male Push Pin The Top of Female Push Pin Female... the CPU cooler and CPU may damage the CPU. - 15 - Step 6: Finally, attach the power connector of the motherboard. Step 4: You should hear a "click" when pushing down on the motherboard. Hardware Installation If the push pin is inserted as the example cooler.) Step 1: Apply an even and thin layer of...
..., the installation is to install.) Step 3: Place the cooler atop the CPU, aligning the four push pins through the pin holes on the motherboard. Push down each push pin. Direction of the Arrow Sign on the Male Push Pin Male Push Pin The Top of Female Push Pin Female... the CPU cooler and CPU may damage the CPU. - 15 - Step 6: Finally, attach the power connector of the motherboard. Step 4: You should hear a "click" when pushing down on the motherboard. Hardware Installation If the push pin is inserted as the example cooler.) Step 1: Apply an even and thin layer of...

Manual
Page 16
... memory of the memory. DS/SS - - GA-EG45M-DS2H Motherboard - 16 - Enabling Dual Channel memory mode will automatically detect the specifications and capacity of the same capacity, brand, speed, and chips be used . (Go to GIGABYTE's website for optimum performance. Dual Channel mode cannot... four DDR2 memory sockets are unable to insert the memory, switch the direction. 1-4-1 Dual Channel Memory Configuration This motherboard provides four DDR2 memory sockets and supports Dual Channel Technology. Intel® Flex Memory Technology offers greater flexibility to ...
... memory of the memory. DS/SS - - GA-EG45M-DS2H Motherboard - 16 - Enabling Dual Channel memory mode will automatically detect the specifications and capacity of the same capacity, brand, speed, and chips be used . (Go to GIGABYTE's website for optimum performance. Dual Channel mode cannot... four DDR2 memory sockets are unable to insert the memory, switch the direction. 1-4-1 Dual Channel Memory Configuration This motherboard provides four DDR2 memory sockets and supports Dual Channel Technology. Intel® Flex Memory Technology offers greater flexibility to ...

Manual
Page 17
... sure to install DDR2 DIMMs on the socket. Spread the retaining clips at both ends of the memory module. Place the memory module on this motherboard. Step 2: The clips at both ends of the memory, push down on the top edge of the socket will snap into the memory socket. Follow...
... sure to install DDR2 DIMMs on the socket. Spread the retaining clips at both ends of the memory module. Place the memory module on this motherboard. Step 2: The clips at both ends of the memory, push down on the top edge of the socket will snap into the memory socket. Follow...
Manual
Page 18
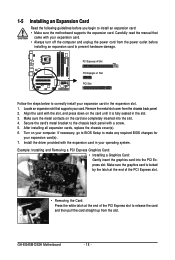
...the end of the PCI Express slot to prevent hardware damage. Locate an expansion slot that came with the expansion card in the slot. 3. GA-EG45M-DS2H Motherboard - 18 - Example: Installing and Removing a PCI Express Graphics Card: • Installing a Graphics Card: Gently insert the graphics card into ... x4 Slot PCI Express x1 Slot PCI Slot Follow the steps below to install an expansion card: • Make sure the motherboard supports the expansion card. 1-5 Installing an Expansion Card Read the following guidelines before installing an expansion card to release the card and...
...the end of the PCI Express slot to prevent hardware damage. Locate an expansion slot that came with the expansion card in the slot. 3. GA-EG45M-DS2H Motherboard - 18 - Example: Installing and Removing a PCI Express Graphics Card: • Installing a Graphics Card: Gently insert the graphics card into ... x4 Slot PCI Express x1 Slot PCI Slot Follow the steps below to install an expansion card: • Make sure the motherboard supports the expansion card. 1-5 Installing an Expansion Card Read the following guidelines before installing an expansion card to release the card and...

Manual
Page 20
...7600 GT NVIDIA Geforce 7900 GT NVIDIA Geforce 7950GX2 NVIDIA Geforce 7900 GTX NVIDIA Geforce 8800 GTX NVIDIA Geforce 8600 GTS Maker GIGABYTE GIGABYTE GIGABYTE GIGABYTE GIGABYTE GIGABYTE GIGABYTE GIGABYTE GIGABYTE GIGABYTE GIGABYTE GIGABYTE GIGABYTE GIGABYTE GIGABYTE GIGABYTE GIGABYTE GIGABYTE GIGABYTE GIGABYTE ASUS ASUS Leadtek MSI ELSA ELSA NVIDIA NVIDIA NVIDIA NVIDIA Model Name GV-NX65128DE GV-NX71G512P8-RH GV-NX73G128D-RH GV-.../TD/128 WinFast PX6600GT TDH NX6800GT-TD256E GLADIAC 760GT GLADIAC 790GT P502/P602 NVIDIA 7900GTX NVIDIA 8800GTX NVIDIA 8600GTS GA-EG45M-DS2H Motherboard - 20 -
...7600 GT NVIDIA Geforce 7900 GT NVIDIA Geforce 7950GX2 NVIDIA Geforce 7900 GTX NVIDIA Geforce 8800 GTX NVIDIA Geforce 8600 GTS Maker GIGABYTE GIGABYTE GIGABYTE GIGABYTE GIGABYTE GIGABYTE GIGABYTE GIGABYTE GIGABYTE GIGABYTE GIGABYTE GIGABYTE GIGABYTE GIGABYTE GIGABYTE GIGABYTE GIGABYTE GIGABYTE GIGABYTE GIGABYTE ASUS ASUS Leadtek MSI ELSA ELSA NVIDIA NVIDIA NVIDIA NVIDIA Model Name GV-NX65128DE GV-NX71G512P8-RH GV-NX73G128D-RH GV-.../TD/128 WinFast PX6600GT TDH NX6800GT-TD256E GLADIAC 760GT GLADIAC 790GT P502/P602 NVIDIA 7900GTX NVIDIA 8800GTX NVIDIA 8600GTS GA-EG45M-DS2H Motherboard - 20 -


