
Manual
Page 3
... the following types of GIGABYTE branded motherboards. The logo is 1.0. GIGABYTE UNITED INC. sive global distributor of documentations: „ For detailed product information, carefully read or download the information on/from the Support\Motherboard\Technology Guide page on your motherboard revision before updating motherboard BIOS, drivers, or when looking for technical information. Example...
... the following types of GIGABYTE branded motherboards. The logo is 1.0. GIGABYTE UNITED INC. sive global distributor of documentations: „ For detailed product information, carefully read or download the information on/from the Support\Motherboard\Technology Guide page on your motherboard revision before updating motherboard BIOS, drivers, or when looking for technical information. Example...
Manual
Page 5
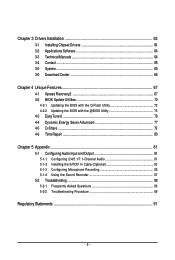
... 63 3-1 Installing Chipset Drivers 63 3-2 Applications Software 64 3-3 Technical Manuals 64 3-4 Contact ...65 3-5 System ...65 3-6 Download Center 66 Chapter 4 Unique Features 67 4-1 Xpress Recovery2 67 4-2 BIOS Update Utilities 72 4-2-1 ...
... 63 3-1 Installing Chipset Drivers 63 3-2 Applications Software 64 3-3 Technical Manuals 64 3-4 Contact ...65 3-5 System ...65 3-6 Download Center 66 Chapter 4 Unique Features 67 4-1 Xpress Recovery2 67 4-2 BIOS Update Utilities 72 4-2-1 ...

Manual
Page 6
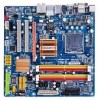
... port cable (Part No. 12CF1-1CM001-32R) LPT port cable (Part No. 12CF1-1LP001-01R) - 6 - The box contents are for reference only. Box Contents GA-EG43M-S2H motherboard Motherboard driver disk User's Manual Quick Installation Guide One IDE cable and one floppy disk drive cable Two SATA 3Gb/s cables I/O Shield • The box contents...
... port cable (Part No. 12CF1-1CM001-32R) LPT port cable (Part No. 12CF1-1LP001-01R) - 6 - The box contents are for reference only. Box Contents GA-EG43M-S2H motherboard Motherboard driver disk User's Manual Quick Installation Guide One IDE cable and one floppy disk drive cable Two SATA 3Gb/s cables I/O Shield • The box contents...

Manual
Page 18
...sure the metal contacts on your expansion card in the slot. 3. Make sure the graphics card is fully seated in the expansion slot. 1. GA-EG43M-S2H Motherboard - 18 - Locate an expansion slot that came with the slot, and press down on the card until it is locked by the... graphics card into the slot. 4. If necessary, go to BIOS Setup to make any required BIOS changes for your operating system. Install the driver provided with a screw. 5. 1-5 Installing an Expansion Card Read the following guidelines before installing an expansion card to prevent hardware damage. Secure the...
...sure the metal contacts on your expansion card in the slot. 3. Make sure the graphics card is fully seated in the expansion slot. 1. GA-EG43M-S2H Motherboard - 18 - Locate an expansion slot that came with the slot, and press down on the card until it is locked by the... graphics card into the slot. 4. If necessary, go to BIOS Setup to make any required BIOS changes for your operating system. Install the driver provided with a screw. 5. 1-5 Installing an Expansion Card Read the following guidelines before installing an expansion card to prevent hardware damage. Secure the...

Manual
Page 19
...When using an add-on graphics card, please first delete the onboard graphics driver before installing the driver for the add-on graphics card. Hardware Installation Graphics Chip ATI Radeon X1300 ...HD3450 (PCIE 2.0) ATI Radeon HD3650 (PCIE 2.0) ATI Radeon X600 XT ATI Radeon X700 Pro ATI Radeon X800 XT Maker GIGABYTE GIGABYTE GIGABYTE GIGABYTE GIGABYTE GIGABYTE GIGABYTE GIGABYTE GIGABYTE GIGABYTE GIGABYTE GIGABYTE GIGABYTE GIGABYTE GIGABYTE GIGABYTE GIGABYTE GIGABYTE GIGABYTE MSI ASUS ASUS Model Name GV-RX13128D-RH GV-RX155256D-RH GV-RX16P256DE-RH GV-RX16T256V-RH GV-RX165P256D-RH GV-RX165T256D...
...When using an add-on graphics card, please first delete the onboard graphics driver before installing the driver for the add-on graphics card. Hardware Installation Graphics Chip ATI Radeon X1300 ...HD3450 (PCIE 2.0) ATI Radeon HD3650 (PCIE 2.0) ATI Radeon X600 XT ATI Radeon X700 Pro ATI Radeon X800 XT Maker GIGABYTE GIGABYTE GIGABYTE GIGABYTE GIGABYTE GIGABYTE GIGABYTE GIGABYTE GIGABYTE GIGABYTE GIGABYTE GIGABYTE GIGABYTE GIGABYTE GIGABYTE GIGABYTE GIGABYTE GIGABYTE GIGABYTE MSI ASUS ASUS Model Name GV-RX13128D-RH GV-RX155256D-RH GV-RX16P256DE-RH GV-RX16T256V-RH GV-RX165P256D-RH GV-RX165T256D...

Manual
Page 38
...restart, the device boot order will directly boot from the device configured in Boot Menu. GA-EG43M-S2H Motherboard - 38 - For more information, refer to Chapter 4, "Xpress Recovery2." :...< > or the down arrow key< > to select the first boot device, then press to XpressRecovery2 during the POST. EG43M-S2H F4 . . . . : BIOS Setup/Q-Flash : XpressRecovery2 : Boot Menu : Qflash 07/18/2008-G43-ICH10-7A89PG08C-00...used for one time only. In Boot Menu, use the up hard drive data using the motherboard driver disk, the key can be based on BIOS Setup settings. Note: The setting in BIOS Setup. ...
...restart, the device boot order will directly boot from the device configured in Boot Menu. GA-EG43M-S2H Motherboard - 38 - For more information, refer to Chapter 4, "Xpress Recovery2." :...< > or the down arrow key< > to select the first boot device, then press to XpressRecovery2 during the POST. EG43M-S2H F4 . . . . : BIOS Setup/Q-Flash : XpressRecovery2 : Boot Menu : Qflash 07/18/2008-G43-ICH10-7A89PG08C-00...used for one time only. In Boot Menu, use the up hard drive data using the motherboard driver disk, the key can be based on BIOS Setup settings. Note: The setting in BIOS Setup. ...

Manual
Page 53
Set this option to Disabled if you wish to install operating systems that allows the storage driver to enable advanced Serial ATA features such as Native Command Queuing and hot plug. Disabled Disables RAID for the SATA controllers and configures the SATA ...
Set this option to Disabled if you wish to install operating systems that allows the storage driver to enable advanced Serial ATA features such as Native Command Queuing and hot plug. Disabled Disables RAID for the SATA controllers and configures the SATA ...

Manual
Page 63
...Hardware Wizard) displayed when "Xpress Install" is automatically displayed which looks like that shown in the screen shot below. (If the driver Autorun screen does not appear automatically, go to My Computer, double-click the optical drive and execute the Run.exe program.) 3-1 Installing Chipset...Windows XP as the example operating system.) • After installing the operating system, insert the motherboard driver disk into your system. Or click Single Install to manually select the drivers you wish to install. You can click the Install All button and "Xpress Install" will install all...
...Hardware Wizard) displayed when "Xpress Install" is automatically displayed which looks like that shown in the screen shot below. (If the driver Autorun screen does not appear automatically, go to My Computer, double-click the optical drive and execute the Run.exe program.) 3-1 Installing Chipset...Windows XP as the example operating system.) • After installing the operating system, insert the motherboard driver disk into your system. Or click Single Install to manually select the drivers you wish to install. You can click the Install All button and "Xpress Install" will install all...

Manual
Page 64
3-2 Applications Software This page displays all the tools and applications that GIGABYTE develops and some free software. You can click the Install button on the right of an item to install it. 3-3 Technical Manuals This page provides GIGABYTE's application guides, content descriptions for this driver disk, and the motherboard manuals. GA-EG43M-S2H Motherboard - 64 -
3-2 Applications Software This page displays all the tools and applications that GIGABYTE develops and some free software. You can click the Install button on the right of an item to install it. 3-3 Technical Manuals This page provides GIGABYTE's application guides, content descriptions for this driver disk, and the motherboard manuals. GA-EG43M-S2H Motherboard - 64 -

Manual
Page 65
Or read the last page of the motherboard manual to the GIGABYTE Web site. Drivers Installation 3-4 Contact Click the URL on this page to link to check the contact information for the Taiwan headquarter or worldwide branch offices. 3-5 System This page provides the basic system information. - 65 -
Or read the last page of the motherboard manual to the GIGABYTE Web site. Drivers Installation 3-4 Contact Click the URL on this page to link to check the contact information for the Taiwan headquarter or worldwide branch offices. 3-5 System This page provides the basic system information. - 65 -
Manual
Page 66
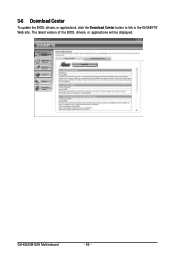
3-6 Download Center To update the BIOS, drivers, or applications, click the Download Center button to link to the GIGABYTE Web site. The latest version of the BIOS, drivers, or applications will be displayed. GA-EG43M-S2H Motherboard - 66 -
3-6 Download Center To update the BIOS, drivers, or applications, click the Download Center button to link to the GIGABYTE Web site. The latest version of the BIOS, drivers, or applications will be displayed. GA-EG43M-S2H Motherboard - 66 -

Manual
Page 67
... be restored using Xpress Recovery2. • USB hard drives are not supported. Xpress Recovery2 can back up your system soon after the operating system and drivers are different utilities. Unique Features
... be restored using Xpress Recovery2. • USB hard drives are not supported. Xpress Recovery2 can back up your system soon after the operating system and drivers are different utilities. Unique Features

Manual
Page 70
Boot from the motherboard driver disk to enter Xpress Recovery2. . . Xpress Recovery2 ...Figure 8 2. When finished, go to Disk Management to start backing up your hard drive. Figure 12 GA-EG43M-S2H Motherboard Xpress Recovery2 will begin to startup XpressRecovery2..... Figure 10 Figure 11 3. Award Modular BIOS v6.00PG...1984-2008, Award Software, Inc. B. Accessing Xpress Recovery2 1. After you wish to store the backup image file. - 70 - EG43M-S2H F4 . . . . : BIOS Setup/Q-Flash : XpressRecovery2 : Boot Menu : Qflash 07/18/2008-G43-ICH10-7A89PG08C-00 Figure...
Boot from the motherboard driver disk to enter Xpress Recovery2. . . Xpress Recovery2 ...Figure 8 2. When finished, go to Disk Management to start backing up your hard drive. Figure 12 GA-EG43M-S2H Motherboard Xpress Recovery2 will begin to startup XpressRecovery2..... Figure 10 Figure 11 3. Award Modular BIOS v6.00PG...1984-2008, Award Software, Inc. B. Accessing Xpress Recovery2 1. After you wish to store the backup image file. - 70 - EG43M-S2H F4 . . . . : BIOS Setup/Q-Flash : XpressRecovery2 : Boot Menu : Qflash 07/18/2008-G43-ICH10-7A89PG08C-00 Figure...

Manual
Page 79
... Internet resources. Figure 1. Exit... Figure 2. Data Sharing Disabled Options Descriptions Option Connect ... Directions for using Q-Share After installing Q-Share from the motherboard driver disk, go to Start>All Programs>GIGABYTE> Q-Share.exe to be shared (Note) Updates Q-Share online Displays the current Q-Share version Exits Q-Share (Note) This option is available only...
... Internet resources. Figure 1. Exit... Figure 2. Data Sharing Disabled Options Descriptions Option Connect ... Directions for using Q-Share After installing Q-Share from the motherboard driver disk, go to Start>All Programs>GIGABYTE> Q-Share.exe to be shared (Note) Updates Q-Share online Displays the current Q-Share version Exits Q-Share (Note) This option is available only...

Manual
Page 81
.... Configuring Speakers: (The following for each jack through the audio driver. Before installing the audio driver, make sure the "Microsoft UAA Bus driver for High Definition Audio" has been installed from the motherboard driver disk and your operating system has been updated with the latest Service... A. If you can listen to the following instructions use Windows XP as the example operating system.) Step 1: After installing the audio driver, the Audio Manager icon will appear in jack and manually configure the jack for microphone functionality. • Audio signals will be present ...
.... Configuring Speakers: (The following for each jack through the audio driver. Before installing the audio driver, make sure the "Microsoft UAA Bus driver for High Definition Audio" has been installed from the motherboard driver disk and your operating system has been updated with the latest Service... A. If you can listen to the following instructions use Windows XP as the example operating system.) Step 1: After installing the audio driver, the Audio Manager icon will appear in jack and manually configure the jack for microphone functionality. • Audio signals will be present ...

Manual
Page 85
Step 2: Connect your microphone to the Mic in jack (pink) on the back panel or the Mic in jack (pink) on the front panel and back panel cannot be used at the same time. Appendix Doubleclick the icon to access the Audio Control Panel. Then configure the jack for microphone functionality. Note: The microphone functions on the front panel. 5-1-3 Configuring Microphone Recording Step 1: After installing the audio driver, the Audio Manager icon will appear in your system tray and click it to open the volume control panel. - 85 - Step 3: Locate the Volume icon in your system tray.
Step 2: Connect your microphone to the Mic in jack (pink) on the back panel or the Mic in jack (pink) on the front panel and back panel cannot be used at the same time. Appendix Doubleclick the icon to access the Audio Control Panel. Then configure the jack for microphone functionality. Note: The microphone functions on the front panel. 5-1-3 Configuring Microphone Recording Step 1: After installing the audio driver, the Audio Manager icon will appear in your system tray and click it to open the volume control panel. - 85 - Step 3: Locate the Volume icon in your system tray.


