Manual
Page 3
...Motherboard\Technology Guide page on your motherboard revision before updating motherboard BIOS, drivers, or when looking for technical information. Copyright © 2008 GIGA-BYTE TECHNOLOGY CO., LTD. Changes to use GIGABYTE's unique features, read the User's Manual. For instructions... on how to the specifications and features in this product, GIGABYTE provides the following types of GIGABYTE. All rights reserved. For product-related information, check on our website at: http://www.gigabyte.com.tw Identifying Your Motherboard Revision The revision number on our...
...Motherboard\Technology Guide page on your motherboard revision before updating motherboard BIOS, drivers, or when looking for technical information. Copyright © 2008 GIGA-BYTE TECHNOLOGY CO., LTD. Changes to use GIGABYTE's unique features, read the User's Manual. For instructions... on how to the specifications and features in this product, GIGABYTE provides the following types of GIGABYTE. All rights reserved. For product-related information, check on our website at: http://www.gigabyte.com.tw Identifying Your Motherboard Revision The revision number on our...
Manual
Page 5
... 63 3-1 Installing Chipset Drivers 63 3-2 Application Software 64 3-3 Technical Manuals 64 3-4 Contact ...65 3-5 System ...65 3-6 Download Center 66 Chapter 4 Unique Features 67 4-1 Xpress Recovery2 67 4-2 BIOS Update Utilities 72 4-2-1 ...
... 63 3-1 Installing Chipset Drivers 63 3-2 Application Software 64 3-3 Technical Manuals 64 3-4 Contact ...65 3-5 System ...65 3-6 Download Center 66 Chapter 4 Unique Features 67 4-1 Xpress Recovery2 67 4-2 BIOS Update Utilities 72 4-2-1 ...
Manual
Page 6
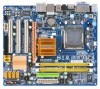
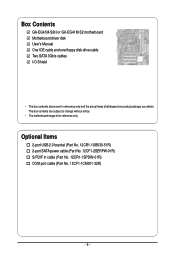
Box Contents GA-EG41M-S2H or GA-EG41M-S2 motherboard Motherboard driver disk User's Manual One IDE cable and one floppy disk drive cable Two SATA 3Gb/s cables I/O Shield • The box contents above are subject to ...
Box Contents GA-EG41M-S2H or GA-EG41M-S2 motherboard Motherboard driver disk User's Manual One IDE cable and one floppy disk drive cable Two SATA 3Gb/s cables I/O Shield • The box contents above are subject to ...
Manual
Page 18
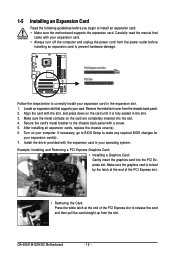
... Graphics Card: • Installing a Graphics Card: Gently insert the graphics card into the slot. 4. Install the driver provided with the slot, and press down on the card are completely inserted into the PCI Express slot. GA-EG41M-S2H/S2 Motherboard - 18 - 1-5 Installing an Expansion Card Read the following guidelines before installing an expansion card...
... Graphics Card: • Installing a Graphics Card: Gently insert the graphics card into the slot. 4. Install the driver provided with the slot, and press down on the card are completely inserted into the PCI Express slot. GA-EG41M-S2H/S2 Motherboard - 18 - 1-5 Installing an Expansion Card Read the following guidelines before installing an expansion card...
Manual
Page 19
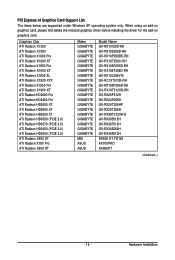
...Radeon HD3450 (PCIE 2.0) ATI Radeon HD3650 (PCIE 2.0) ATI Radeon X600 XT ATI Radeon X700 Pro ATI Radeon X800 XT Maker GIGABYTE GIGABYTE GIGABYTE GIGABYTE GIGABYTE GIGABYTE GIGABYTE GIGABYTE GIGABYTE GIGABYTE GIGABYTE GIGABYTE GIGABYTE GIGABYTE GIGABYTE GIGABYTE GIGABYTE GIGABYTE GIGABYTE MSI ASUS ASUS Model Name GV-RX13128D-RH GV-RX155256D-RH GV-RX16P256DE-RH GV-RX16T256V-RH GV-RX165P256D-RH GV-RX165T256D-RH... system only. When using an add-on graphics card, please first delete the onboard graphics driver before installing the driver for the add-on graphics card. Hardware Installation
...Radeon HD3450 (PCIE 2.0) ATI Radeon HD3650 (PCIE 2.0) ATI Radeon X600 XT ATI Radeon X700 Pro ATI Radeon X800 XT Maker GIGABYTE GIGABYTE GIGABYTE GIGABYTE GIGABYTE GIGABYTE GIGABYTE GIGABYTE GIGABYTE GIGABYTE GIGABYTE GIGABYTE GIGABYTE GIGABYTE GIGABYTE GIGABYTE GIGABYTE GIGABYTE GIGABYTE MSI ASUS ASUS Model Name GV-RX13128D-RH GV-RX155256D-RH GV-RX16P256DE-RH GV-RX16T256V-RH GV-RX165P256D-RH GV-RX165T256D-RH... system only. When using an add-on graphics card, please first delete the onboard graphics driver before installing the driver for the add-on graphics card. Hardware Installation
Manual
Page 36
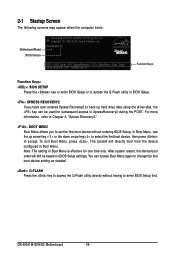
EG41M-S2H D1 . . . . : BIOS Setup : XpressRecovery2 : Boot Menu : Qflash 09/23/2008-G41-ICH7-7A89PG0XC-00 Function Keys Function ...the first boot device without having to XpressRecovery2 during the POST. In Boot Menu, use the up hard drive data using the driver disk, the key can access Boot Menu again to change the first boot device setting as needed. : Q-FLASH Press the...Copyright (C) 1984-2008, Award Software, Inc. 2-1 Startup Screen The following screens may appear when the computer boots. GA-EG41M-S2H/S2 Motherboard - 36 - You can be based on BIOS Setup settings.
EG41M-S2H D1 . . . . : BIOS Setup : XpressRecovery2 : Boot Menu : Qflash 09/23/2008-G41-ICH7-7A89PG0XC-00 Function Keys Function ...the first boot device without having to XpressRecovery2 during the POST. In Boot Menu, use the up hard drive data using the driver disk, the key can access Boot Menu again to change the first boot device setting as needed. : Q-FLASH Press the...Copyright (C) 1984-2008, Award Software, Inc. 2-1 Startup Screen The following screens may appear when the computer boots. GA-EG41M-S2H/S2 Motherboard - 36 - You can be based on BIOS Setup settings.
Manual
Page 63
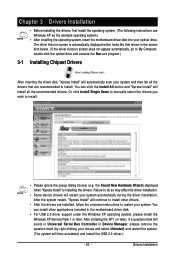
..., go to My Computer, double-click the optical drive and execute the Run.exe program.) 3-1 Installing Chipset Drivers After inserting the driver disk, "Xpress Install" will continue to install other applications included in Device Manager, please remove the question mark... instructions to install. After the system restart, "Xpress Install" will automatically scan your optical drive. Chapter 3 Drivers Installation • Before installing the drivers, first install the operating system. (The following instructions use Windows XP as the example operating system.) •...
..., go to My Computer, double-click the optical drive and execute the Run.exe program.) 3-1 Installing Chipset Drivers After inserting the driver disk, "Xpress Install" will continue to install other applications included in Device Manager, please remove the question mark... instructions to install. After the system restart, "Xpress Install" will automatically scan your optical drive. Chapter 3 Drivers Installation • Before installing the drivers, first install the operating system. (The following instructions use Windows XP as the example operating system.) •...
Manual
Page 64
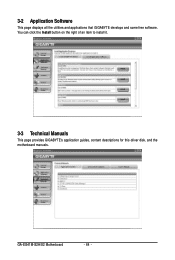
GA-EG41M-S2H/S2 Motherboard - 64 - You can click the Install button on the right of an item to install it. 3-3 Technical Manuals This page provides GIGABYTE's application guides, content descriptions for this driver disk, and the motherboard manuals. 3-2 Application Software This page displays all the utilities and applications that GIGABYTE develops and some free software.
GA-EG41M-S2H/S2 Motherboard - 64 - You can click the Install button on the right of an item to install it. 3-3 Technical Manuals This page provides GIGABYTE's application guides, content descriptions for this driver disk, and the motherboard manuals. 3-2 Application Software This page displays all the utilities and applications that GIGABYTE develops and some free software.
Manual
Page 65
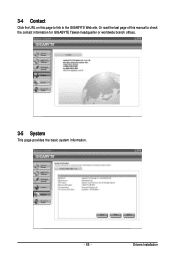
Or read the last page of this page to link to check the contact information for GIGABYTE Taiwan headquarter or worldwide branch offices. 3-5 System This page provides the basic system information. - 65 - Drivers Installation 3-4 Contact Click the URL on this manual to the GIGABYTE Web site.
Or read the last page of this page to link to check the contact information for GIGABYTE Taiwan headquarter or worldwide branch offices. 3-5 System This page provides the basic system information. - 65 - Drivers Installation 3-4 Contact Click the URL on this manual to the GIGABYTE Web site.

Manual
Page 66
GA-EG41M-S2H/S2 Motherboard - 66 - 3-6 Download Center To update the BIOS, drivers, or applications, click the Download Center button to link to the GIGABYTE Web site. The latest version of the BIOS, drivers, or applications will be displayed.
GA-EG41M-S2H/S2 Motherboard - 66 - 3-6 Download Center To update the BIOS, drivers, or applications, click the Download Center button to link to the GIGABYTE Web site. The latest version of the BIOS, drivers, or applications will be displayed.
Manual
Page 67
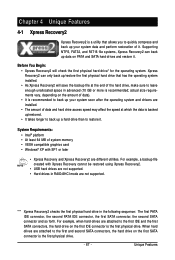
... back up/restore the first physical hard drive that allows you to quickly compress and back up your system soon after the operating system and drivers are different utilities. actual size requirements vary, depending on the amount of data). • It is the first physical drive. - 67 - System Requirements: • Intel...
... back up/restore the first physical hard drive that allows you to quickly compress and back up your system soon after the operating system and drivers are different utilities. actual size requirements vary, depending on the amount of data). • It is the first physical drive. - 67 - System Requirements: • Intel...
Manual
Page 70
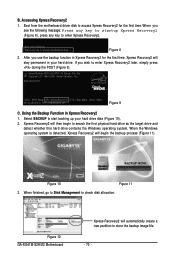
...time, Xpress Recovery2 will automatically create a new partition to enter Xpress Recovery2 later, simply press during the POST (Figure 9). Figure 12 GA-EG41M-S2H/S2 Motherboard Xpress Recovery2 will stay permanent in Xpress Recovery2 1. When you see the following message: Press any key to startup Xpress Recovery2... When finished, go to Disk Management to enter Xpress Recovery2. . . Figure 10 Figure 11 3. Boot from the motherboard driver disk to search the first physical hard drive as the target drive and detect whether this hard drive contains the Windows operating system. B.
...time, Xpress Recovery2 will automatically create a new partition to enter Xpress Recovery2 later, simply press during the POST (Figure 9). Figure 12 GA-EG41M-S2H/S2 Motherboard Xpress Recovery2 will stay permanent in Xpress Recovery2 1. When you see the following message: Press any key to startup Xpress Recovery2... When finished, go to Disk Management to enter Xpress Recovery2. . . Figure 10 Figure 11 3. Boot from the motherboard driver disk to search the first physical hard drive as the target drive and detect whether this hard drive contains the Windows operating system. B.
Manual
Page 79
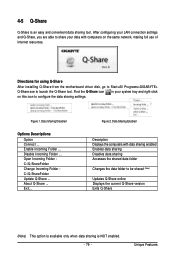
Directions for using Q-Share After installing Q-Share from the motherboard driver disk, go to Start>All Programs>GIGABYTE> Q-Share.exe to share your system tray and right-click on the same network, making full use of Internet resources. Open Incoming Folder : C:\Q-ShareFolder Change ...
Directions for using Q-Share After installing Q-Share from the motherboard driver disk, go to Start>All Programs>GIGABYTE> Q-Share.exe to share your system tray and right-click on the same network, making full use of Internet resources. Open Incoming Folder : C:\Q-ShareFolder Change ...
Manual
Page 81
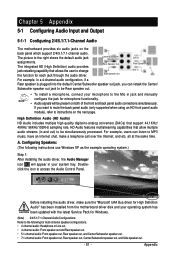
... To install a microphone, connect your operating system has been updated with the latest Service Pack for each jack through the audio driver. Configuring Speakers: (The following for microphone functionality. • Audio signals will appear in your system tray. Appendix The picture ...: Front speaker out, Rear speaker out, Center/Subwoofer speaker out, and Side speaker out. - 81 - A. Before installing the audio driver, make a telephone call over the Internet, and etc. Doubleclick the icon to change the function for Windows. (Note) 2/4/5.1/7.1-Channel Audio Configurations...
... To install a microphone, connect your operating system has been updated with the latest Service Pack for each jack through the audio driver. Configuring Speakers: (The following for microphone functionality. • Audio signals will appear in your system tray. Appendix The picture ...: Front speaker out, Rear speaker out, Center/Subwoofer speaker out, and Side speaker out. - 81 - A. Before installing the audio driver, make a telephone call over the Internet, and etc. Doubleclick the icon to change the function for Windows. (Note) 2/4/5.1/7.1-Channel Audio Configurations...
Manual
Page 84
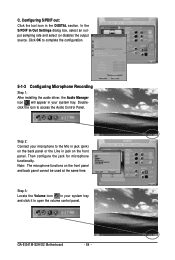
...select (or disable) the output source. Step 2: Connect your microphone to complete the configuration. 5-1-3 Configuring Microphone Recording Step 1: After installing the audio driver, the Audio Manager icon will appear in your system tray. Then configure the jack for microphone functionality. Click OK to the Mic in jack (...cannot be used at the same time. Note: The microphone functions on the back panel or the Line in the DIGITAL section. GA-EG41M-S2H/S2 Motherboard - 84 - Step 3: Locate the Volume icon in your system tray and click it to access the Audio Control Panel.
...select (or disable) the output source. Step 2: Connect your microphone to complete the configuration. 5-1-3 Configuring Microphone Recording Step 1: After installing the audio driver, the Audio Manager icon will appear in your system tray. Then configure the jack for microphone functionality. Click OK to the Mic in jack (...cannot be used at the same time. Note: The microphone functions on the back panel or the Line in the DIGITAL section. GA-EG41M-S2H/S2 Motherboard - 84 - Step 3: Locate the Volume icon in your system tray and click it to access the Audio Control Panel.


