
Manual
Page 3
... © 2008 GIGA-BYTE TECHNOLOGY CO., LTD. For product-related information, check on our website at: http://www.gigabyte.com.tw Identifying Your Motherboard Revision The revision number on our website. The trademarks mentioned in this manual are legally registered to use... GIGABYTE's unique features, read or download the information on/from the Support\Motherboard\Technology Guide page on your motherboard revision before updating motherboard BIOS, drivers, or when looking for technical information. All rights reserved...
... © 2008 GIGA-BYTE TECHNOLOGY CO., LTD. For product-related information, check on our website at: http://www.gigabyte.com.tw Identifying Your Motherboard Revision The revision number on our website. The trademarks mentioned in this manual are legally registered to use... GIGABYTE's unique features, read or download the information on/from the Support\Motherboard\Technology Guide page on your motherboard revision before updating motherboard BIOS, drivers, or when looking for technical information. All rights reserved...

Manual
Page 5
... 59 3-1 Installing Chipset Drivers 59 3-2 Application Software 60 3-3 Technical Manuals 60 3-4 Contact ...61 3-5 System ...61 3-6 Download Center 62 Chapter 4 Unique Features 63 4-1 Xpress Recovery2 63 4-2 BIOS ... ...76 Chapter 5 Appendix ...77 5-1 Configuring SATA Hard Drive(s 77 5-1-1 Configuring the Onboard SATA Controller 77 5-1-2 Making a SATA RAID/AHCI Driver Diskette 82 5-1-3 Installing the SATA RAID/AHCI Driver and Operating System 84 5-2 ConfiguringAudio Input and Output 90 5-2-1 Configuring 2/4/5.1/7.1-Channel Audio 90 5-2-2 Installing the S/PDIF In and Out Cable (Optional...
... 59 3-1 Installing Chipset Drivers 59 3-2 Application Software 60 3-3 Technical Manuals 60 3-4 Contact ...61 3-5 System ...61 3-6 Download Center 62 Chapter 4 Unique Features 63 4-1 Xpress Recovery2 63 4-2 BIOS ... ...76 Chapter 5 Appendix ...77 5-1 Configuring SATA Hard Drive(s 77 5-1-1 Configuring the Onboard SATA Controller 77 5-1-2 Making a SATA RAID/AHCI Driver Diskette 82 5-1-3 Installing the SATA RAID/AHCI Driver and Operating System 84 5-2 ConfiguringAudio Input and Output 90 5-2-1 Configuring 2/4/5.1/7.1-Channel Audio 90 5-2-2 Installing the S/PDIF In and Out Cable (Optional...

Manual
Page 6
Box Contents GA-E7AUM-DS2H motherboard Motherboard driver disk User's Manual Quick Installation Guide One IDE cable and one floppy disk drive cable Two SATA 3Gb/s cables I/O Shield • The box contents above ...
Box Contents GA-E7AUM-DS2H motherboard Motherboard driver disk User's Manual Quick Installation Guide One IDE cable and one floppy disk drive cable Two SATA 3Gb/s cables I/O Shield • The box contents above ...
Manual
Page 18
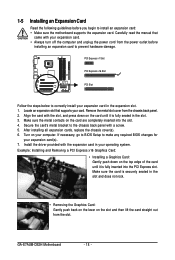
Install the driver provided with the slot, and press down on the top edge of the card until it is securely seated in the slot. 3. Make sure the ... BIOS Setup to make any required BIOS changes for your expansion card in your computer. Make sure the card is fully inserted into the slot. 4. GA-E7AUM-DS2H Motherboard - 18 - After installing all expansion cards, replace the chassis cover(s). 6. Secure the card's metal bracket to install an expansion card: • Make sure the...
Install the driver provided with the slot, and press down on the top edge of the card until it is securely seated in the slot. 3. Make sure the ... BIOS Setup to make any required BIOS changes for your expansion card in your computer. Make sure the card is fully inserted into the slot. 4. GA-E7AUM-DS2H Motherboard - 18 - After installing all expansion cards, replace the chassis cover(s). 6. Secure the card's metal bracket to install an expansion card: • Make sure the...

Manual
Page 19
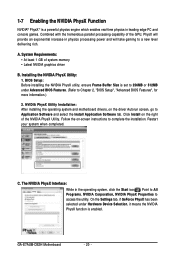
... multiple displays. - 19 - This makes motherboard GPU and graphics card operate independently to install the graphics card driver if the motherboard chipset driver has been installed. System Requirements: • Hybrid SLI-enabled motherboard and graphics card (Go to NVIDIA's website...your mouse over the icon to disable Hybrid SLI. Hardware Installation A. Driver Installation: Insert the motherboard driver disk and select Installing Chipset Drivers. Pause your system after the motherboard driver installation. Hybrid SLI Mode Confirmation: The Hybrid SLI icon appears in the...
... multiple displays. - 19 - This makes motherboard GPU and graphics card operate independently to install the graphics card driver if the motherboard chipset driver has been installed. System Requirements: • Hybrid SLI-enabled motherboard and graphics card (Go to NVIDIA's website...your mouse over the icon to disable Hybrid SLI. Hardware Installation A. Driver Installation: Insert the motherboard driver disk and select Installing Chipset Drivers. Pause your system after the motherboard driver installation. Hybrid SLI Mode Confirmation: The Hybrid SLI icon appears in the...
Manual
Page 20
A. Follow the on the driver Autorun screen, go to Application Software and select the Install Application Software tab. The NVIDIA PhysX Interface: While in leading edge PC and console games. GA-E7AUM-DS2H Motherboard - 20 - BIOS Setup: Before installing the NVIDIA PhysX utility...system, click the Start icon . Restart your system when completed. NVIDIA PhysX Utility Installation: After installing the operating system and motherboard drivers, on -screen instructions to a new level delivering rich. Point to All Programs, NVIDIA Corporation, NVIDIA PhysX Properties to Chapter ...
A. Follow the on the driver Autorun screen, go to Application Software and select the Install Application Software tab. The NVIDIA PhysX Interface: While in leading edge PC and console games. GA-E7AUM-DS2H Motherboard - 20 - BIOS Setup: Before installing the NVIDIA PhysX utility...system, click the Start icon . Restart your system when completed. NVIDIA PhysX Utility Installation: After installing the operating system and motherboard drivers, on -screen instructions to a new level delivering rich. Point to All Programs, NVIDIA Corporation, NVIDIA PhysX Properties to Chapter ...
Manual
Page 36
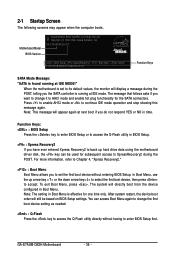
GA-E7AUM-DS2H D22 . . . . : BIOS Setup : XpressRecovery2 : Boot Menu : Qflash 10/07/2008-MCP7A-7A610G01C-00 Function Keys ... Q-Flash utility directly without entering BIOS Setup. In Boot Menu, use the up hard drive data using the motherboard driver disk, the key can access Boot Menu again to change it to enter BIOS Setup first. When the motherboard is... Menu. After system restart, the device boot order will display a message during the POST. GA-E7AUM-DS2H Motherboard - 36 - Press to enable AHCI mode or to continue IDE mode operation and stop showing this message again.
GA-E7AUM-DS2H D22 . . . . : BIOS Setup : XpressRecovery2 : Boot Menu : Qflash 10/07/2008-MCP7A-7A610G01C-00 Function Keys ... Q-Flash utility directly without entering BIOS Setup. In Boot Menu, use the up hard drive data using the motherboard driver disk, the key can access Boot Menu again to change it to enter BIOS Setup first. When the motherboard is... Menu. After system restart, the device boot order will display a message during the POST. GA-E7AUM-DS2H Motherboard - 36 - Press to enable AHCI mode or to continue IDE mode operation and stop showing this message again.

Manual
Page 48
... integrated SATA controller. Advanced Host Controller Interface (AHCI) is an interface specification that allows the storage driver to detect USB storage devices, including USB flash drives and USB hard drives during the POST. (Default: Enabled) GA-E7AUM-DS2H Motherboard - 48 - USB Keyboard Support Allows USB keyboard to be used in MS-DOS. (Default: Disabled...
... integrated SATA controller. Advanced Host Controller Interface (AHCI) is an interface specification that allows the storage driver to detect USB storage devices, including USB flash drives and USB hard drives during the POST. (Default: Enabled) GA-E7AUM-DS2H Motherboard - 48 - USB Keyboard Support Allows USB keyboard to be used in MS-DOS. (Default: Disabled...
Manual
Page 59
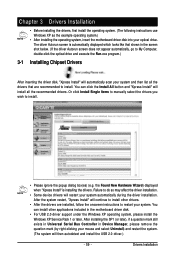
... and restart the system. (The system will continue to install other applications included in the screen shot below. (If the driver Autorun screen does not appear automatically, go to My Computer, double-click the optical drive and execute the Run.exe program.) 3-1 Installing... use Windows XP as the example operating system.) • After installing the operating system, insert the motherboard driver disk into your system and then list all the recommended drivers. the Found New Hardware Wizard) displayed when "Xpress Install" is automatically displayed which looks like that are ...
... and restart the system. (The system will continue to install other applications included in the screen shot below. (If the driver Autorun screen does not appear automatically, go to My Computer, double-click the optical drive and execute the Run.exe program.) 3-1 Installing... use Windows XP as the example operating system.) • After installing the operating system, insert the motherboard driver disk into your system and then list all the recommended drivers. the Found New Hardware Wizard) displayed when "Xpress Install" is automatically displayed which looks like that are ...

Manual
Page 60
You can click the Install button on the right of an item to install it. 3-3 Technical Manuals This page provides GIGABYTE's application guides, content descriptions for this driver disk, and the motherboard manuals. GA-E7AUM-DS2H Motherboard - 60 - 3-2 Application Software This page displays all the utilities and applications that GIGABYTE develops and some free software.
You can click the Install button on the right of an item to install it. 3-3 Technical Manuals This page provides GIGABYTE's application guides, content descriptions for this driver disk, and the motherboard manuals. GA-E7AUM-DS2H Motherboard - 60 - 3-2 Application Software This page displays all the utilities and applications that GIGABYTE develops and some free software.

Manual
Page 61
Drivers Installation Or read the last page of this page to link to check the contact information for GIGABYTE Taiwan headquarter or worldwide branch offices. 3-5 System This page provides the basic system information. - 61 - 3-4 Contact Click the URL on this manual to the GIGABYTE Web site.
Drivers Installation Or read the last page of this page to link to check the contact information for GIGABYTE Taiwan headquarter or worldwide branch offices. 3-5 System This page provides the basic system information. - 61 - 3-4 Contact Click the URL on this manual to the GIGABYTE Web site.
Manual
Page 62
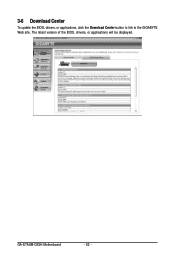
The latest version of the BIOS, drivers, or applications will be displayed. GA-E7AUM-DS2H Motherboard - 62 - 3-6 Download Center To update the BIOS, drivers, or applications, click the Download Center button to link to the GIGABYTE Web site.
The latest version of the BIOS, drivers, or applications will be displayed. GA-E7AUM-DS2H Motherboard - 62 - 3-6 Download Center To update the BIOS, drivers, or applications, click the Download Center button to link to the GIGABYTE Web site.

Manual
Page 63
... hard drive on the amount of data). • It is recommended to quickly compress and back up your system soon after the operating system and drivers are installed. • The amount of data and hard drive access speed may affect the speed at the end of the hard drive, make sure...
... hard drive on the amount of data). • It is recommended to quickly compress and back up your system soon after the operating system and drivers are installed. • The amount of data and hard drive access speed may affect the speed at the end of the hard drive, make sure...
Manual
Page 66
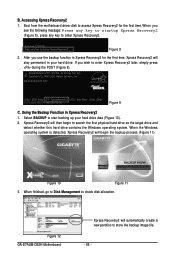
...: XpressRecovery2 : Boot Menu : Qflash 10/07/2008-MCP7A-7A610G01C-00 Figure 9 C. Select BACKUP to check disk allocation. Figure 8 2. Figure 12 GA-E7AUM-DS2H Motherboard Xpress Recovery2 will begin to enter Xpress Recovery2. . . When the Windows operating system is detected, Xpress Recovery2 will automatically create a new partition to...this hard drive contains the Windows operating system. Figure 10 Figure 11 3. B. Boot from the motherboard driver disk to access Xpress Recovery2 for the first time, Xpress Recovery2 will then begin the backup process (Figure 11).
...: XpressRecovery2 : Boot Menu : Qflash 10/07/2008-MCP7A-7A610G01C-00 Figure 9 C. Select BACKUP to check disk allocation. Figure 8 2. Figure 12 GA-E7AUM-DS2H Motherboard Xpress Recovery2 will begin to enter Xpress Recovery2. . . When the Windows operating system is detected, Xpress Recovery2 will automatically create a new partition to...this hard drive contains the Windows operating system. Figure 10 Figure 11 3. B. Boot from the motherboard driver disk to access Xpress Recovery2 for the first time, Xpress Recovery2 will then begin the backup process (Figure 11).

Manual
Page 75
... making complicated settings. Find the Q-Share icon in your computer to another computer simply using Q-Share After installing Q-Share from the motherboard driver disk, go to Start>All Programs>GIGABYTE> Q-Share.exe to be shared (Note) Updates Q-Share online Displays the current Q-Share version Exits Q-Share (Note) This option is available only...
... making complicated settings. Find the Q-Share icon in your computer to another computer simply using Q-Share After installing Q-Share from the motherboard driver disk, go to Start>All Programs>GIGABYTE> Q-Share.exe to be shared (Note) Updates Q-Share online Displays the current Q-Share version Exits Q-Share (Note) This option is available only...

Manual
Page 77
...mode in your computer Attach one hard drive. • An empty formatted floppy disk. • Windows Vista/XP setup disk. • Motherboard driver disk. 5-1-1 Configuring the Onboard SATA Controller A. Installing SATA hard drive(s) in RAID BIOS. (Note 1) D. Configure a RAID array in your... computer. Install the SATA RAID/AHCI driver and operating system. (Note 2) Before you use two hard drives with identical model and capacity). Chapter 5 Appendix 5-1 Configuring SATA Hard Drive...
...mode in your computer Attach one hard drive. • An empty formatted floppy disk. • Windows Vista/XP setup disk. • Motherboard driver disk. 5-1-1 Configuring the Onboard SATA Controller A. Installing SATA hard drive(s) in RAID BIOS. (Note 1) D. Configure a RAID array in your... computer. Install the SATA RAID/AHCI driver and operating system. (Note 2) Before you use two hard drives with identical model and capacity). Chapter 5 Appendix 5-1 Configuring SATA Hard Drive...

Manual
Page 81
...;] Select [B] Set Bootable [N] New Array [ENTER] Detail Figure 6 To read more information about the RAID array, press to the installation of the SATA controller driver and operating system. - 81 -
...;] Select [B] Set Bootable [N] New Array [ENTER] Detail Figure 6 To read more information about the RAID array, press to the installation of the SATA controller driver and operating system. - 81 -

Manual
Page 82
... your optical drive (example: D:\>). Boot from the motherboard driver disk to install the SATA controller driver during the Windows setup process. GA-E7AUM-DS2H Motherboard Figure 3 - 82 - Once at the A:\> prompt, change to exit when finished. Select the controller driver by pressing the corresponding letter from the motherboard driver disk to the floppy disk. Step 1: Insert the...
... your optical drive (example: D:\>). Boot from the motherboard driver disk to install the SATA controller driver during the Windows setup process. GA-E7AUM-DS2H Motherboard Figure 3 - 82 - Once at the A:\> prompt, change to exit when finished. Select the controller driver by pressing the corresponding letter from the motherboard driver disk to the floppy disk. Step 1: Insert the...

Manual
Page 83
...Appendix When a screen similar to that in the motherboard driver disk to begin extracting the driver. Copying the SATA RAID/AHCI driver from the motherboard driver disk to a USB flash drive Step 1: On an alternative system, copy the SATA RAID/AHCI driver to your USB flash drive. Step 2: Figure 4 Double... (Figure 4) located in the BootDrv folder in Figure 6 will appear. message, and then press to your USB flash drive from the motherboard driver disk. Figure 5 Figure 6 (Note) In RAID mode, copy the N7ARV32 file for Windows Vista 32-bit operating system or N7ARV64 for Windows...
...Appendix When a screen similar to that in the motherboard driver disk to begin extracting the driver. Copying the SATA RAID/AHCI driver from the motherboard driver disk to a USB flash drive Step 1: On an alternative system, copy the SATA RAID/AHCI driver to your USB flash drive. Step 2: Figure 4 Double... (Figure 4) located in the BootDrv folder in Figure 6 will appear. message, and then press to your USB flash drive from the motherboard driver disk. Figure 5 Figure 6 (Note) In RAID mode, copy the N7ARV32 file for Windows Vista 32-bit operating system or N7ARV64 for Windows...

Manual
Page 84
... S. * If you need to install a third party SCSI or RAID driver. Windows Setup Press F6 if you do not want to manually specify an adapter. S=Specify Additional Device ENTER=Continue F3=Exit Figure 2 GA-E7AUM-DS2H Motherboard - 84 - A. Figure 1 Step 2: When a screen similar to... that you have prepared the SATA RAID/AHCI driver diskette and configured the required BIOS settings, you are ready to install Windows...
... S. * If you need to install a third party SCSI or RAID driver. Windows Setup Press F6 if you do not want to manually specify an adapter. S=Specify Additional Device ENTER=Continue F3=Exit Figure 2 GA-E7AUM-DS2H Motherboard - 84 - A. Figure 1 Step 2: When a screen similar to... that you have prepared the SATA RAID/AHCI driver diskette and configured the required BIOS settings, you are ready to install Windows...


