Manual
Page 4
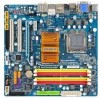
Table of Contents Box Contents ...6 OptionalItems ...6 GA-E7AUM-DS2H Motherboard Layout 7 Block Diagram ...8 Chapter 1 Hardware Installation 9 1-1 Installation Precautions 9 1-2 Product Specifications 10 1-3 Installing the CPU and CPU Cooler 13 1-3-1 Installing the CPU 13 1-3-2 Installing the CPU Cooler 15 1-4 Installing the Memory 16 1-4-1 Dual Channel Memory Configuration 16 1-4-2 Installing a Memory 17 1-5 Installing an Expansion Card 18 1-6 Enabling the NVIDIA...
Table of Contents Box Contents ...6 OptionalItems ...6 GA-E7AUM-DS2H Motherboard Layout 7 Block Diagram ...8 Chapter 1 Hardware Installation 9 1-1 Installation Precautions 9 1-2 Product Specifications 10 1-3 Installing the CPU and CPU Cooler 13 1-3-1 Installing the CPU 13 1-3-2 Installing the CPU Cooler 15 1-4 Installing the Memory 16 1-4-1 Dual Channel Memory Configuration 16 1-4-2 Installing a Memory 17 1-5 Installing an Expansion Card 18 1-6 Enabling the NVIDIA...

Manual
Page 8
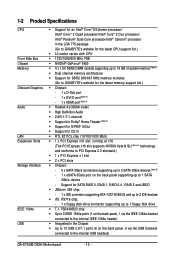
...) JMicron 368 1 PCI Express x1 ATA-133/100/66/33 IDE Channel PCI Bus TSB43AB23 2 IEEE 1394a Host Interface DDR2 800/667 MHz Dual Channel Memory NVIDIA® GeForce 9400 6 SATA 3Gb/s 12 USB Ports RTL 8211CL LAN RJ45 LPC BUS IT8718 CODEC Dual BIOS Floppy COM Port PS/2 KB or...
...) JMicron 368 1 PCI Express x1 ATA-133/100/66/33 IDE Channel PCI Bus TSB43AB23 2 IEEE 1394a Host Interface DDR2 800/667 MHz Dual Channel Memory NVIDIA® GeForce 9400 6 SATA 3Gb/s 12 USB Ports RTL 8211CL LAN RJ45 LPC BUS IT8718 CODEC Dual BIOS Floppy COM Port PS/2 KB or...

Manual
Page 9
... the power supply has been turned off. • Before turning on the computer power during the installation process can become damaged as a motherboard, CPU or memory. If you are connected tightly and securely. • When handling the motherboard, avoid touching any installation steps or have an ESD wrist strap, keep your...
... the power supply has been turned off. • Before turning on the computer power during the installation process can become damaged as a motherboard, CPU or memory. If you are connected tightly and securely. • When handling the motherboard, avoid touching any installation steps or have an ESD wrist strap, keep your...
Manual
Page 10
... bracket connected to the internal IEEE 1394a header) Integrated in the LGA 775 package (Go to GIGABYTE's website for the latest CPU support list.) L2 cache varies with CPU 1333/1066/... 4 x 1.8V DDR2 DIMM sockets supporting up to 16 GB of system memory (Note 1) Dual channel memory architecture Support for DDR2 800/667 MHz memory modules (Go to GIGABYTE's website for the latest memory support list.) Chipset: - 1 x D-Sub port - 1 x DVI...on the back panel supporting up to the internal USB headers) GA-E7AUM-DS2H Motherboard - 10 -
... bracket connected to the internal IEEE 1394a header) Integrated in the LGA 775 package (Go to GIGABYTE's website for the latest CPU support list.) L2 cache varies with CPU 1333/1066/... 4 x 1.8V DDR2 DIMM sockets supporting up to 16 GB of system memory (Note 1) Dual channel memory architecture Support for DDR2 800/667 MHz memory modules (Go to GIGABYTE's website for the latest memory support list.) Chipset: - 1 x D-Sub port - 1 x DVI...on the back panel supporting up to the internal USB headers) GA-E7AUM-DS2H Motherboard - 10 -
Manual
Page 12
GA-E7AUM-DS2H Motherboard - 12 - BIOS Unique Features Bundled Software Operating System Form Factor 2 x 8 Mbit flash Use of licensed AWARD BIOS Support for DualBIOSTM ... Form Factor; 24.4cm x 24.4cm (Note 1) Due to Windows Vista/XP 32-bit operating system limitation, when more than 4 GB of physical memory is installed, the actual memory size displayed will be less than 4 GB. (Note 2) The DVI-D port does not support D-Sub connection by adapter. (Note 3) Simultaneous output for DVI...
GA-E7AUM-DS2H Motherboard - 12 - BIOS Unique Features Bundled Software Operating System Form Factor 2 x 8 Mbit flash Use of licensed AWARD BIOS Support for DualBIOSTM ... Form Factor; 24.4cm x 24.4cm (Note 1) Due to Windows Vista/XP 32-bit operating system limitation, when more than 4 GB of physical memory is installed, the actual memory size displayed will be less than 4 GB. (Note 2) The DVI-D port does not support D-Sub connection by adapter. (Note 3) Simultaneous output for DVI...

Manual
Page 13
... and the notches on the computer if the CPU cooler is not recom- mended that the motherboard supports the CPU. (Go to GIGABYTE's website for the peripherals. If you wish to set beyond the standard specifications, please do so according to your hardware specifications including ...the CPU, graphics card, memory, hard drive, etc. 1-3-1 Installing the CPU A. The CPU cannot be set the frequency beyond hardware specifications since it does not meet ...
... and the notches on the computer if the CPU cooler is not recom- mended that the motherboard supports the CPU. (Go to GIGABYTE's website for the peripherals. If you wish to set beyond the standard specifications, please do so according to your hardware specifications including ...the CPU, graphics card, memory, hard drive, etc. 1-3-1 Installing the CPU A. The CPU cannot be set the frequency beyond hardware specifications since it does not meet ...
Manual
Page 16
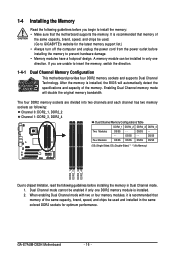
...guidelines before you are divided into two channels and each channel has two memory sockets as following guidelines before installing the memory to GIGABYTE's website for optimum performance. After the memory is installed. 2. Dual Channel mode cannot be installed in Dual Channel mode...mode with two or four memory modules, it is recommended that memory of the same capacity, brand, speed, and chips be used . (Go to prevent hardware damage. • Memory modules have a foolproof design. GA-E7AUM-DS2H Motherboard - 16 - It is recommended that memory of the same capacity, ...
...guidelines before you are divided into two channels and each channel has two memory sockets as following guidelines before installing the memory to GIGABYTE's website for optimum performance. After the memory is installed. 2. Dual Channel mode cannot be installed in Dual Channel mode...mode with two or four memory modules, it is recommended that memory of the same capacity, brand, speed, and chips be used . (Go to prevent hardware damage. • Memory modules have a foolproof design. GA-E7AUM-DS2H Motherboard - 16 - It is recommended that memory of the same capacity, ...

Manual
Page 17
... fit in one direction. Spread the retaining clips at both ends of the memory module. Follow the steps below to the memory module. As indicated in the memory sockets. 1-4-2 Installing a Memory Before installing a memory module , make sure to turn off the computer and unplug the power cord... from the power outlet to prevent damage to correctly install your memory modules in the picture on...
... fit in one direction. Spread the retaining clips at both ends of the memory module. Follow the steps below to the memory module. As indicated in the memory sockets. 1-4-2 Installing a Memory Before installing a memory module , make sure to turn off the computer and unplug the power cord... from the power outlet to prevent damage to correctly install your memory modules in the picture on...

Manual
Page 19
.... • Set iGPU Frame Buffer Control to Manual. • Set Frame Buffer Size to 256MB or 512MB. (Refer to see the current mode of system memory • Windows Vista operating system • Latest NVIDIA graphics driver • System BIOS that the Hybrid SLI-ready graphics card be installed after the motherboard...
.... • Set iGPU Frame Buffer Control to Manual. • Set Frame Buffer Size to 256MB or 512MB. (Refer to see the current mode of system memory • Windows Vista operating system • Latest NVIDIA graphics driver • System BIOS that the Hybrid SLI-ready graphics card be installed after the motherboard...
Manual
Page 20
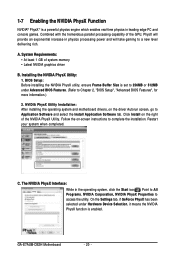
...Software tab. Installing the NVIDIA PhysX Utility: 1. Follow the on the driver Autorun screen, go to Chapter 2, "BIOS Setup", "Advanced BIOS Features", for more information.) 2. GA-E7AUM-DS2H Motherboard - 20 - A. Restart your system when completed. C. 1-7 Enabling the NVIDIA PhysX Function NVIDIA® PhysXTM is a powerful physics engine which enables real-time physics in... Buffer Size is enabled. The NVIDIA PhysX Interface: While in the operating system, click the Start icon . Click Install on the right of system memory • Latest NVIDIA graphics driver B.
...Software tab. Installing the NVIDIA PhysX Utility: 1. Follow the on the driver Autorun screen, go to Chapter 2, "BIOS Setup", "Advanced BIOS Features", for more information.) 2. GA-E7AUM-DS2H Motherboard - 20 - A. Restart your system when completed. C. 1-7 Enabling the NVIDIA PhysX Function NVIDIA® PhysXTM is a powerful physics engine which enables real-time physics in... Buffer Size is enabled. The NVIDIA PhysX Interface: While in the operating system, click the Start icon . Click Install on the right of system memory • Latest NVIDIA graphics driver B.
Manual
Page 22
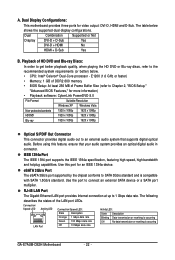
...1394 port supports the IEEE 1394a specification, featuring high speed, high bandwidth and hotplug capabilities. E1200 (1.6 GHz or faster) • Memory: 1 GB of DDR2 800 memory • BIOS Setup: At least 256 MB of Frame Buffer Size (refer to Chapter 2, "BIOS Setup," "Advanced BIOS Features... dual display configurations. RJ-45 LAN Port The Gigabit Ethernet LAN port provides Internet connection at up to SATA 3Gb/s standard and is occurring GA-E7AUM-DS2H Motherboard - 22 - A. The table below . • CPU: Intel® Celeron® Dual-Core processor - Use this feature, ensure...
...1394 port supports the IEEE 1394a specification, featuring high speed, high bandwidth and hotplug capabilities. E1200 (1.6 GHz or faster) • Memory: 1 GB of DDR2 800 memory • BIOS Setup: At least 256 MB of Frame Buffer Size (refer to Chapter 2, "BIOS Setup," "Advanced BIOS Features... dual display configurations. RJ-45 LAN Port The Gigabit Ethernet LAN port provides Internet connection at up to SATA 3Gb/s standard and is occurring GA-E7AUM-DS2H Motherboard - 22 - A. The table below . • CPU: Intel® Celeron® Dual-Core processor - Use this feature, ensure...

Manual
Page 38
You can also carry out this task.) GA-E7AUM-DS2H Motherboard - 38 - It allows you can also carry out this task.) Exit Without Saving Abandon all the power-saving functions. PnP/PCI Configurations ... password. First enter the profile name (to erase the default profile name, use this function to load the BIOS settings from BIOS If your CPU, memory, etc. Standard CMOS Features Use this menu to configure the system time and date, hard drive types, floppy disk drive types, and the type...
You can also carry out this task.) GA-E7AUM-DS2H Motherboard - 38 - It allows you can also carry out this task.) Exit Without Saving Abandon all the power-saving functions. PnP/PCI Configurations ... password. First enter the profile name (to erase the default profile name, use this function to load the BIOS settings from BIOS If your CPU, memory, etc. Standard CMOS Features Use this menu to configure the system time and date, hard drive types, floppy disk drive types, and the type...
Manual
Page 39
... to prevent system instability or other unexpected results. (Inadequately altering the settings may result in system's failure to CPU, chipset, or memory and reduce the useful life of these components. Auto BIOS will work stably with the FSB speed. FSB - If this feature. ...MHz Actual MEM (DDR), Mhz Setting [Auto] Auto Auto 800.0 Auto 800.0 Current Value 800.0 800.0 Item Help Menu Level Memory Timing Setting Robust Graphics Booster x VGA Core Clock CPU Clock Ratio (Note) ******** System Voltage Optimized System Voltage Control x DDR2 Voltage Control x FSB Voltage...
... to prevent system instability or other unexpected results. (Inadequately altering the settings may result in system's failure to CPU, chipset, or memory and reduce the useful life of these components. Auto BIOS will work stably with the FSB speed. FSB - If this feature. ...MHz Actual MEM (DDR), Mhz Setting [Auto] Auto Auto 800.0 Auto 800.0 Current Value 800.0 800.0 Item Help Menu Level Memory Timing Setting Robust Graphics Booster x VGA Core Clock CPU Clock Ratio (Note) ******** System Voltage Optimized System Voltage Control x DDR2 Voltage Control x FSB Voltage...

Manual
Page 40
... F6: Fail-Safe Defaults ESC: Exit F1: General Help F7: Optimized Defaults Memory Timing Setting Expert allows all Timing mode below to maually set to 1400 MHz. GA-E7AUM-DS2H Motherboard - 40 - Command Per Clock (CMD) Options are: Auto (default), 1 clock, 2 clock. ** Advanced Memory Settings ** tRRD Options are : Auto (default), 1~31. This item is configurable...
... F6: Fail-Safe Defaults ESC: Exit F1: General Help F7: Optimized Defaults Memory Timing Setting Expert allows all Timing mode below to maually set to 1400 MHz. GA-E7AUM-DS2H Motherboard - 40 - Command Per Clock (CMD) Options are: Auto (default), 1 clock, 2 clock. ** Advanced Memory Settings ** tRRD Options are : Auto (default), 1~31. This item is configurable...

Manual
Page 41
.... (Default) +0.1V ~ +0.2V Increases chipset voltage by 0.1V to manually set the system voltages as required. (Default) +0.1V ~ +0.7V Increases memory voltage by 0.1V or 0.2V. Normal CPU Vcore Displays the normal operating voltage of the chipset. Manual allows all voltage control items below to be... that supports this feature. - 41 - BIOS Setup CPU Clock Ratio (Note) Allows you to 0.3V at 0.1V increment. Normal Supplies the memory voltage as required. Chipset Voltage Control Allows you to set the voltage of your CPU or reduce the useful life of the graphics chip and...
.... (Default) +0.1V ~ +0.2V Increases chipset voltage by 0.1V to manually set the system voltages as required. (Default) +0.1V ~ +0.7V Increases memory voltage by 0.1V or 0.2V. Normal CPU Vcore Displays the normal operating voltage of the chipset. Manual allows all voltage control items below to be... that supports this feature. - 41 - BIOS Setup CPU Clock Ratio (Note) Allows you to 0.3V at 0.1V increment. Normal Supplies the memory voltage as required. Chipset Voltage Control Allows you to set the voltage of your CPU or reduce the useful life of the graphics chip and...

Manual
Page 42
... will skip the detection of the device during the POST for faster system startup. Access Mode Sets the hard drive access mode. GA-E7AUM-DS2H Motherboard - 42 - IDE Channel 0, 1 Master/Slave IDE HDD Auto-Detection Press to CHS. Extended IDE Drive Configure your IDE... [None] [None] [None] [None] [None] [None] Drive A Floppy 3 Mode Support [1.44M, 3.5"] [Disabled] Halt On [All, But Keyboard] Base Memory Extended Memory 640K 510M Move Enter: Select F5: Previous Values +/-/PU/PD: Value F10: Save F6: Fail-Safe Defaults ESC: Exit F1: General Help F7: Optimized Defaults...
... will skip the detection of the device during the POST for faster system startup. Access Mode Sets the hard drive access mode. GA-E7AUM-DS2H Motherboard - 42 - IDE Channel 0, 1 Master/Slave IDE HDD Auto-Detection Press to CHS. Extended IDE Drive Configure your IDE... [None] [None] [None] [None] [None] [None] Drive A Floppy 3 Mode Support [1.44M, 3.5"] [Disabled] Halt On [All, But Keyboard] Base Memory Extended Memory 640K 510M Move Enter: Select F5: Previous Values +/-/PU/PD: Value F10: Save F6: Fail-Safe Defaults ESC: Exit F1: General Help F7: Optimized Defaults...

Manual
Page 43
...of cylinders. Floppy 3 Mode Support Allows you to None. BIOS Setup Cylinder Number of sectors. Extended Memory The amount of the currently installed hard drive. Capacity Approximate capacity of extended memory. - 43 - If you wish to enter the parameters manually, refer to selects the type of heads.... Options are determined by the BIOS POST. Memory These fields are read-only and are : Disabled (default), Drive A. Typically, 640 KB will not stop for a floppy disk ...
...of cylinders. Floppy 3 Mode Support Allows you to None. BIOS Setup Cylinder Number of sectors. Extended Memory The amount of the currently installed hard drive. Capacity Approximate capacity of extended memory. - 43 - If you wish to enter the parameters manually, refer to selects the type of heads.... Options are determined by the BIOS POST. Memory These fields are read-only and are : Disabled (default), Drive A. Typically, 640 KB will not stop for a floppy disk ...

Manual
Page 44
... the Init Diplay First setting. (Note) This item is from the onboard VGA or a PCI Express graphics card and to 3 (Note) No-Execute Memory Protect (Note) CPU Enhanced Halt (C1E) (Note) C2/C2E State Support (Note) x C4/C4E State Support (Note) CPU Thermal Monitor 2(TM2)... installed. Enabled allows the BIOS to automatically detect whether the current display is present only if you install a CPU that supports this feature. GA-E7AUM-DS2H Motherboard - 44 - This item is automatically set to Enabled when a Hybrid SLI-supported graphics card is enabled. 2-5 Advanced BIOS Features CMOS...
... the Init Diplay First setting. (Note) This item is from the onboard VGA or a PCI Express graphics card and to 3 (Note) No-Execute Memory Protect (Note) CPU Enhanced Halt (C1E) (Note) C2/C2E State Support (Note) x C4/C4E State Support (Note) CPU Thermal Monitor 2(TM2)... installed. Enabled allows the BIOS to automatically detect whether the current display is present only if you install a CPU that supports this feature. GA-E7AUM-DS2H Motherboard - 44 - This item is automatically set to Enabled when a Hybrid SLI-supported graphics card is enabled. 2-5 Advanced BIOS Features CMOS...

Manual
Page 45
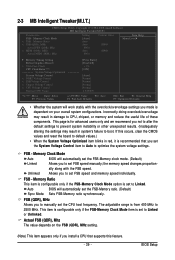
... item is automatically set to Manual when Hybrid SLI is enabled.) Frame Buffer Size Frame buffer size is the total amount of system memory allocated solely for selection when Hybrid SLI is installed. iGPU Frame Buffer Control Determines whether to manually set to Always Enable when Hybrid SLI...install a CPU that supports this item to Manual. After configuring this menu when finished. BIOS Setup MS-DOS, for example, will use only this memory for entering the BIOS Setup program. (Note) This item is required every time the system boots, or only when you wish to accept. Use ...
... item is automatically set to Manual when Hybrid SLI is enabled.) Frame Buffer Size Frame buffer size is the total amount of system memory allocated solely for selection when Hybrid SLI is installed. iGPU Frame Buffer Control Determines whether to manually set to Always Enable when Hybrid SLI...install a CPU that supports this item to Manual. After configuring this menu when finished. BIOS Setup MS-DOS, for example, will use only this memory for entering the BIOS Setup program. (Note) This item is required every time the system boots, or only when you wish to accept. Use ...

Manual
Page 46
...; CPU Thermal Monitor (TM2) function, a CPU overheating protection function. This feature only works for legacy operating system such as Windows NT4.0. (Default: Disabled) No-Execute Memory Protect (Note) Enables or disables Intel® Execute Disable Bit function. Enabled Enables all CPU cores and multi-threading function when using an Intel®... Technology) capability of your system to report read/write errors of the hard drive and to decrease average power consumption and heat production. (Default: Enabled) GA-E7AUM-DS2H Motherboard - 46 - HDD S.M.A.R.T.
...; CPU Thermal Monitor (TM2) function, a CPU overheating protection function. This feature only works for legacy operating system such as Windows NT4.0. (Default: Disabled) No-Execute Memory Protect (Note) Enables or disables Intel® Execute Disable Bit function. Enabled Enables all CPU cores and multi-threading function when using an Intel®... Technology) capability of your system to report read/write errors of the hard drive and to decrease average power consumption and heat production. (Default: Enabled) GA-E7AUM-DS2H Motherboard - 46 - HDD S.M.A.R.T.


