
Manual
Page 19
... support multiple displays. - 19 - This makes motherboard GPU and graphics card operate independently to install the graphics card driver if the motherboard chipset driver has been installed. A. BIOS Setup: Enter BIOS Setup to set the following items under the Advanced BIOS Features menu...want to see the current mode of system memory • Windows Vista operating system • Latest NVIDIA graphics driver • System BIOS that the Hybrid SLI-ready graphics card be installed after the motherboard driver installation. Restart your mouse over the icon to disable Hybrid...
... support multiple displays. - 19 - This makes motherboard GPU and graphics card operate independently to install the graphics card driver if the motherboard chipset driver has been installed. A. BIOS Setup: Enter BIOS Setup to set the following items under the Advanced BIOS Features menu...want to see the current mode of system memory • Windows Vista operating system • Latest NVIDIA graphics driver • System BIOS that the Hybrid SLI-ready graphics card be installed after the motherboard driver installation. Restart your mouse over the icon to disable Hybrid...
Manual
Page 59
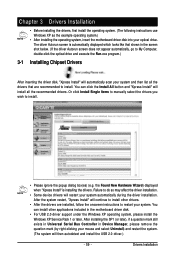
... mouse and select Uninstall) and restart the system. (The system will restart your system and then list all the recommended drivers. Chapter 3 Drivers Installation • Before installing the drivers, first install the operating system. (The following instructions use Windows XP as the example operating system.) • After installing the operating system, insert the motherboard...
... mouse and select Uninstall) and restart the system. (The system will restart your system and then list all the recommended drivers. Chapter 3 Drivers Installation • Before installing the drivers, first install the operating system. (The following instructions use Windows XP as the example operating system.) • After installing the operating system, insert the motherboard...

Manual
Page 63
System Requirements: • Intel® platform • At least 64 MB of system memory • VESA compatible graphics card • Windows® XP with Xpress Recovery cannot be restored using Xpress Recovery2. • USB hard drives are not supported. • Hard drives in RAID/AHCI mode ... back up/restore the first physical hard drive that allows you to quickly compress and back up your system soon after the operating system and drivers are attached to the first IDE and the first SATA connectors, the hard drive on the amount of data). • It is recommended to back...
System Requirements: • Intel® platform • At least 64 MB of system memory • VESA compatible graphics card • Windows® XP with Xpress Recovery cannot be restored using Xpress Recovery2. • USB hard drives are not supported. • Hard drives in RAID/AHCI mode ... back up/restore the first physical hard drive that allows you to quickly compress and back up your system soon after the operating system and drivers are attached to the first IDE and the first SATA connectors, the hard drive on the amount of data). • It is recommended to back...
Manual
Page 66
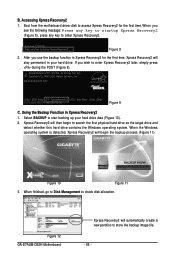
...as the target drive and detect whether this hard drive contains the Windows operating system. GA-E7AUM-DS2H D22 . . . . : BIOS Setup : XpressRecovery2 : Boot Menu : Qflash 10/07/2008-MCP7A-7A610G01C-00 Figure 9 C. Boot from the motherboard driver disk to enter Xpress Recovery2. . . Figure 8 2. Boot...for the first time. When finished, go to Disk Management to store the backup image file. - 66 - Figure 12 GA-E7AUM-DS2H Motherboard Xpress Recovery2 will then begin the backup process (Figure 11). Xpress Recovery2 will automatically create a new partition to check...
...as the target drive and detect whether this hard drive contains the Windows operating system. GA-E7AUM-DS2H D22 . . . . : BIOS Setup : XpressRecovery2 : Boot Menu : Qflash 10/07/2008-MCP7A-7A610G01C-00 Figure 9 C. Boot from the motherboard driver disk to enter Xpress Recovery2. . . Figure 8 2. Boot...for the first time. When finished, go to Disk Management to store the backup image file. - 66 - Figure 12 GA-E7AUM-DS2H Motherboard Xpress Recovery2 will then begin the backup process (Figure 11). Xpress Recovery2 will automatically create a new partition to check...

Manual
Page 77
...drive(s) in your computer. Configure SATA controller mode in RAID BIOS. (Note 1) D. Make a floppy disk containing the SATA RAID/AHCI driver. (Note 2) E. If you do not want to create RAID, you use two hard drives with identical model and capacity). Appendix Install... . Then connect the power connector from your computer Attach one hard drive. • An empty formatted floppy disk. • Windows Vista/XP setup disk. • Motherboard driver disk. 5-1-1 Configuring the Onboard SATA Controller A. Install SATA hard drive(s) in your power supply to the hard drive. (Note ...
...drive(s) in your computer. Configure SATA controller mode in RAID BIOS. (Note 1) D. Make a floppy disk containing the SATA RAID/AHCI driver. (Note 2) E. If you do not want to create RAID, you use two hard drives with identical model and capacity). Appendix Install... . Then connect the power connector from your computer Attach one hard drive. • An empty formatted floppy disk. • Windows Vista/XP setup disk. • Motherboard driver disk. 5-1-1 Configuring the Onboard SATA Controller A. Install SATA hard drive(s) in your power supply to the hard drive. (Note ...

Manual
Page 82
...insert the blank formatted disk. GA-E7AUM-DS2H Motherboard Figure 3 - 82 - Once at the A:\> prompt, change to your optical drive folder, double click the MENU.exe file in Figure 2. At the D:\> prompt, type the following two commands. 5-1-2 Making a SATA RAID/AHCI Driver Diskette (Required for AHCI and...a blank formatted floppy disk. Press to the floppy disk. From your optical drive (example: D:\>). A command prompt window will then automatically zip and transfer this driver file to exit when finished. For example, in the menu in your USB flash drive and then extract it (...
...insert the blank formatted disk. GA-E7AUM-DS2H Motherboard Figure 3 - 82 - Once at the A:\> prompt, change to your optical drive folder, double click the MENU.exe file in Figure 2. At the D:\> prompt, type the following two commands. 5-1-2 Making a SATA RAID/AHCI Driver Diskette (Required for AHCI and...a blank formatted floppy disk. Press to the floppy disk. From your optical drive (example: D:\>). A command prompt window will then automatically zip and transfer this driver file to exit when finished. For example, in the menu in your USB flash drive and then extract it (...

Manual
Page 83
... flash drive. Appendix Copying the SATA RAID/AHCI driver from the motherboard driver disk to a USB flash drive Step 1: On an alternative system, copy the SATA RAID/AHCI driver to your USB flash drive. For example, to install the Windows Vista 32-bit operating system(Note) on the ... (Note) In RAID mode, copy the N7ARV32 file for Windows Vista 32-bit operating system or N7ARV64 for Windows Vista 64-bit. - 83 - After the driver is extracted, a screen similar to begin extracting the driver. In AHCI mode, copy the N7ASV32 file for Windows Vista 32-bit operating system or N7ASV64 for...
... flash drive. Appendix Copying the SATA RAID/AHCI driver from the motherboard driver disk to a USB flash drive Step 1: On an alternative system, copy the SATA RAID/AHCI driver to your USB flash drive. For example, to install the Windows Vista 32-bit operating system(Note) on the ... (Note) In RAID mode, copy the N7ARV32 file for Windows Vista 32-bit operating system or N7ARV64 for Windows Vista 64-bit. - 83 - After the driver is extracted, a screen similar to begin extracting the driver. In AHCI mode, copy the N7ASV32 file for Windows Vista 32-bit operating system or N7ASV64 for...

Manual
Page 84
... Additional Device ENTER=Continue F3=Exit Figure 2 GA-E7AUM-DS2H Motherboard - 84 - Figure 1 Step 2: When a screen similar to that you have prepared the SATA RAID/AHCI driver diskette and configured the required BIOS settings, you do not want to install a 3rd party SCSI or RAID driver" (Figure 1). A. Windows Setup Setup could not determine the type of...
... Additional Device ENTER=Continue F3=Exit Figure 2 GA-E7AUM-DS2H Motherboard - 84 - Figure 1 Step 2: When a screen similar to that you have prepared the SATA RAID/AHCI driver diskette and configured the required BIOS settings, you do not want to install a 3rd party SCSI or RAID driver" (Figure 1). A. Windows Setup Setup could not determine the type of...

Manual
Page 85
...to specify additional mass storage devices for use with Windows, press ENTER. NVIDIA RAID Driver (required) NVIDIA nForce Storage Controller (required) ENTER=Select F3=Exit Figure 3 Windows Setup Setup will load support for the following mass storage device(s): NVIDIA RAID Driver (required) * To specify additional SCSI adapters, ... 3. The screen will return to previous screen as shown in Figure 3 may differ according to the RAID or AHCI driver you will appear. Windows Setup You have any device support disks from the following list, or press ESC to return to the previous screen. Use...
...to specify additional mass storage devices for use with Windows, press ENTER. NVIDIA RAID Driver (required) NVIDIA nForce Storage Controller (required) ENTER=Select F3=Exit Figure 3 Windows Setup Setup will load support for the following mass storage device(s): NVIDIA RAID Driver (required) * To specify additional SCSI adapters, ... 3. The screen will return to previous screen as shown in Figure 3 may differ according to the RAID or AHCI driver you will appear. Windows Setup You have any device support disks from the following list, or press ESC to return to the previous screen. Use...

Manual
Page 86
...on your computer. To repair a Windows XP installation using Recovery Console, press R. To quit Setup without installing Windows XP, press F3. When the screen as shown below appears, press to continue the driver installation from a mass storage device ...Driver (required) NVIDIA nForce Storage Controller (required) * To specify additional SCSI adapters, CD-ROM drives, or special disk controllers for use with Windows, including those for use with the Windows XP installation. Enter= Continue R=Repair F3=Exit Figure 6 GA-E7AUM-DS2H Motherboard - 86 - To set up Windows...
...on your computer. To repair a Windows XP installation using Recovery Console, press R. To quit Setup without installing Windows XP, press F3. When the screen as shown below appears, press to continue the driver installation from a mass storage device ...Driver (required) NVIDIA nForce Storage Controller (required) * To specify additional SCSI adapters, CD-ROM drives, or special disk controllers for use with Windows, including those for use with the Windows XP installation. Enter= Continue R=Repair F3=Exit Figure 6 GA-E7AUM-DS2H Motherboard - 86 - To set up Windows...

Manual
Page 87
B. When a screen similar to boot from the Windows Vista setup disk and perform standard OS installation steps. Appendix Installing Windows Vista (The procedure below assumes that only one RAID array exists in your system.) Step 1: Restart your floppy disk or USB flash drive (Figure 8). Figure 7 Step 2: Specify the location where the driver is saved, such as your system to that below appears (RAID hard drive(s) will not be detected at this stage), select Load Driver. (Figure 7). Figure 8 - 87 -
B. When a screen similar to boot from the Windows Vista setup disk and perform standard OS installation steps. Appendix Installing Windows Vista (The procedure below assumes that only one RAID array exists in your system.) Step 1: Restart your floppy disk or USB flash drive (Figure 8). Figure 7 Step 2: Specify the location where the driver is saved, such as your system to that below appears (RAID hard drive(s) will not be detected at this stage), select Load Driver. (Figure 7). Figure 8 - 87 -

Manual
Page 90
... the default audio jack assignments. GA-E7AUM-DS2H Motherboard - 90 - If you can listen to change the function for each jack through the audio driver. Configuring Speakers: (The following for microphone functionality. • Audio signals will appear in your operating system has been updated with the latest Service Pack for Windows. (Note) 2/4/5.1/7.1-Channel Audio Configurations...
... the default audio jack assignments. GA-E7AUM-DS2H Motherboard - 90 - If you can listen to change the function for each jack through the audio driver. Configuring Speakers: (The following for microphone functionality. • Audio signals will appear in your operating system has been updated with the latest Service Pack for Windows. (Note) 2/4/5.1/7.1-Channel Audio Configurations...

Manual
Page 93
... Dolby Virtual Speaker allows 2-channel stereo content to get only 2-channel playback output (from any sound from analog speakers or headphone. - 93 - Windows XP After installing the audio driver, at the center bottom of the Audio Control Panel, you with more controls over the onboard audio. 2. DOLBY DIGITAL LIVE: If your speaker...
... Dolby Virtual Speaker allows 2-channel stereo content to get only 2-channel playback output (from any sound from analog speakers or headphone. - 93 - Windows XP After installing the audio driver, at the center bottom of the Audio Control Panel, you with more controls over the onboard audio. 2. DOLBY DIGITAL LIVE: If your speaker...

Manual
Page 94
... system tray. Point 1. : Click Dolby Pro Logic IIx. GA-E7AUM-DS2H Motherboard - 94 - Step 3: Locate the Volume icon in jack (pink) on the front panel and back panel cannot be used at the same time. Windows Vista Install the Dolby GUI Software driver from the motherboard driver disk. Then configure the jack for a 7.1-channel surround sound...
... system tray. Point 1. : Click Dolby Pro Logic IIx. GA-E7AUM-DS2H Motherboard - 94 - Step 3: Locate the Volume icon in jack (pink) on the front panel and back panel cannot be used at the same time. Windows Vista Install the Dolby GUI Software driver from the motherboard driver disk. Then configure the jack for a 7.1-channel surround sound...


