Manual
Page 4
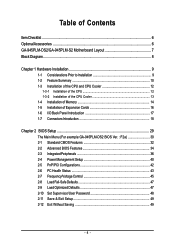
...GA-945PLM-DS2/GA-945PLM-S2 Motherboard Layout 7 Block Diagram ...8 Chapter 1 Hardware Installation 9 1-1 Considerations Prior to Installation 9 1-2 Feature Summary 10 1-3 Installation of the CPU and CPU Cooler 12 1-3-1 Installation of the CPU 12 1-3-2 Installation of the CPU Cooler 13 1-4 Installation of Memory 14 1-5 Installation of Expansion Cards 16 1-6 I/O Back Panel Introduction 17 1-7 Connectors Introduction 18 Chapter 2 BIOS... Setup 29 The Main Menu (For example:GA-945PLM-DS2 BIOS Ver. : F2a 30 2-1 Standard CMOS Features 32 2-2 Advanced BIOS Features 34 2-3...
...GA-945PLM-DS2/GA-945PLM-S2 Motherboard Layout 7 Block Diagram ...8 Chapter 1 Hardware Installation 9 1-1 Considerations Prior to Installation 9 1-2 Feature Summary 10 1-3 Installation of the CPU and CPU Cooler 12 1-3-1 Installation of the CPU 12 1-3-2 Installation of the CPU Cooler 13 1-4 Installation of Memory 14 1-5 Installation of Expansion Cards 16 1-6 I/O Back Panel Introduction 17 1-7 Connectors Introduction 18 Chapter 2 BIOS... Setup 29 The Main Menu (For example:GA-945PLM-DS2 BIOS Ver. : F2a 30 2-1 Standard CMOS Features 32 2-2 Advanced BIOS Features 34 2-3...
Manual
Page 7
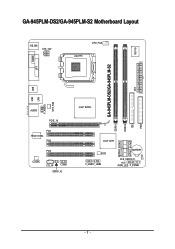
GA-945PLM-DS2/GA-945PLM-S2 Motherboard Layout IT8718 KB_MS ATX_12V CPU_FAN LGA775 COMA LPT GA-945PLM-DS2/GA-945PLM-S2 DDRII1 DDRII2 IDE ATX FDD USB LAN USB SYS_FAN F_AUDIO AUDIO PCIE_16 PCI1 RTL8110SC PCI2 PCI3 CODEC CD_IN COMB SPDIF_IO Intel® 945PL SATAII0 SATAII2 SATAII1 SATAII3 Intel® ICH7 BIOS F_USB1 F_USB2 BATTERY CLR_CMOS CI PWR_LED F_PANEL - 7 -
GA-945PLM-DS2/GA-945PLM-S2 Motherboard Layout IT8718 KB_MS ATX_12V CPU_FAN LGA775 COMA LPT GA-945PLM-DS2/GA-945PLM-S2 DDRII1 DDRII2 IDE ATX FDD USB LAN USB SYS_FAN F_AUDIO AUDIO PCIE_16 PCI1 RTL8110SC PCI2 PCI3 CODEC CD_IN COMB SPDIF_IO Intel® 945PL SATAII0 SATAII2 SATAII1 SATAII3 Intel® ICH7 BIOS F_USB1 F_USB2 BATTERY CLR_CMOS CI PWR_LED F_PANEL - 7 -
Manual
Page 12
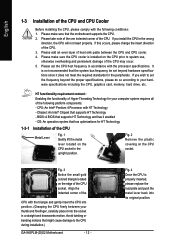
If you wish to the CPU during installation.) GA-945PLM-(D)S2 Motherboard - 12 - Please make sure that supports HT Technology and has it into its original position. It is not recommended that supports HT Technology - Chipset: ... the following platform components: - Please add an even layer of the CPU Metal Lever Fig. 1 Gently lift the metal lever located on the CPU socket. BIOS: A BIOS that the motherboard supports the CPU. 2. OS: An operation system that might cause damage to set the CPU host frequency in accordance with the triangle...
If you wish to the CPU during installation.) GA-945PLM-(D)S2 Motherboard - 12 - Please make sure that supports HT Technology and has it into its original position. It is not recommended that supports HT Technology - Chipset: ... the following platform components: - Please add an even layer of the CPU Metal Lever Fig. 1 Gently lift the metal lever located on the CPU socket. BIOS: A BIOS that the motherboard supports the CPU. 2. OS: An operation system that might cause damage to set the CPU host frequency in accordance with the triangle...
Manual
Page 14
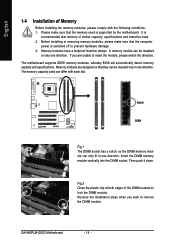
.... The memory capacity used can be used is switched off to insert the module, please switch the direction. The motherboard supports DDRII memory modules, whereby BIOS will automatically detect memory capacity and specifications. It is recommended that the computer power is supported by the motherboard. GA-945PLM-(D)S2 Motherboard - 14 -
.... The memory capacity used can be used is switched off to insert the module, please switch the direction. The motherboard supports DDRII memory modules, whereby BIOS will automatically detect memory capacity and specifications. It is recommended that the computer power is supported by the motherboard. GA-945PLM-(D)S2 Motherboard - 14 -
Manual
Page 16
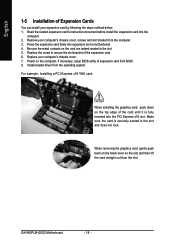
... card, push down on the computer, if necessary, setup BIOS utility of expansion card from the operating system. Be sure the metal contacts on the slot and then lift the card straight out from the slot. GA-945PLM-(D)S2 Motherboard - 16 - Remove your expansion card by following the... steps outlined below: 1. Install related driver from BIOS. 8. When removing the graphics card, gently push back on the black lever on the...
... card, push down on the computer, if necessary, setup BIOS utility of expansion card from the operating system. Be sure the metal contacts on the slot and then lift the card straight out from the slot. GA-945PLM-(D)S2 Motherboard - 16 - Remove your expansion card by following the... steps outlined below: 1. Install related driver from BIOS. 8. When removing the graphics card, gently push back on the black lever on the...
Manual
Page 30
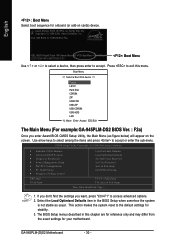
... settings for your motherboard. If you don't find the settings you enter Award BIOS CMOS Setup Utility, the Main Menu (as usual. GA-945PLM-(D)S2 Motherboard - 30 - CMOS Setup Utility-Copyright (C) 1984-2006 Award Software ` Standard CMOS Features ` Advanced BIOS Features ` Integrated Peripherals ` Power Management Setup ` PnP/PCI Configurations ` PC...Hard Disk CDROM ZIP USB-FDD USB-ZIP USB-CDROM USB-HDD LAN KL:Move Enter :Accept ESC:Exit The Main Menu (For example:GA-945PLM-DS2 BIOS Ver. : F2a) Once you want, press "Ctrl+F1" to accept or enter the sub-menu. Use arrow keys to select among...
... settings for your motherboard. If you don't find the settings you enter Award BIOS CMOS Setup Utility, the Main Menu (as usual. GA-945PLM-(D)S2 Motherboard - 30 - CMOS Setup Utility-Copyright (C) 1984-2006 Award Software ` Standard CMOS Features ` Advanced BIOS Features ` Integrated Peripherals ` Power Management Setup ` PnP/PCI Configurations ` PC...Hard Disk CDROM ZIP USB-FDD USB-ZIP USB-CDROM USB-HDD LAN KL:Move Enter :Accept ESC:Exit The Main Menu (For example:GA-945PLM-DS2 BIOS Ver. : F2a) Once you want, press "Ctrl+F1" to accept or enter the sub-menu. Use arrow keys to select among...

Manual
Page 32
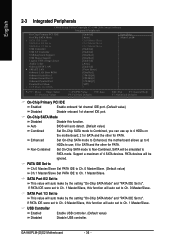
... and allow for the hard drive. For example, 1 p.m. Through Dec. IDE Channel 0 Master/Slave IDE devices setup. GA-945PLM-(D)S2 Motherboard - 32 - The time is , , , . You can use one of the two methods: • Auto Allows BIOS to automatically detect IDE/SATA devices during POST(default) • None Select this option for faster system...
... and allow for the hard drive. For example, 1 p.m. Through Dec. IDE Channel 0 Master/Slave IDE devices setup. GA-945PLM-(D)S2 Motherboard - 32 - The time is , , , . You can use one of the two methods: • Auto Allows BIOS to automatically detect IDE/SATA devices during POST(default) • None Select this option for faster system...
Manual
Page 34
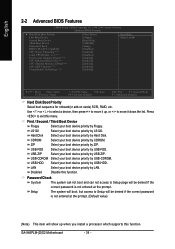
...: Exit F1: General Help F7: Optimized Defaults Hard Disk Boot Priority Select boot sequence for onboard(or add-on cards) SCSI, RAID, etc. GA-945PLM-(D)S2 Motherboard - 34 - Use < > or < > to select a device, then press to move it up when you install a processor which supports...boot device priority by USB-HDD. Capability CPU Hyper-Threading (Note) Limit CPUID Max. English 2-2 Advanced BIOS Features CMOS Setup Utility-Copyright (C) 1984-2006 Award Software Advanced BIOS Features ` Hard Disk Boot Priority First Boot Device Second Boot Device Third Boot Device Password Check HDD ...
...: Exit F1: General Help F7: Optimized Defaults Hard Disk Boot Priority Select boot sequence for onboard(or add-on cards) SCSI, RAID, etc. GA-945PLM-(D)S2 Motherboard - 34 - Use < > or < > to select a device, then press to move it up when you install a processor which supports...boot device priority by USB-HDD. Capability CPU Hyper-Threading (Note) Limit CPUID Max. English 2-2 Advanced BIOS Features CMOS Setup Utility-Copyright (C) 1984-2006 Award Software Advanced BIOS Features ` Hard Disk Boot Priority First Boot Device Second Boot Device Third Boot Device Password Check HDD ...
Manual
Page 36
... set to Ch. 0 Master/Slave, this function will auto make by the setting "On-Chip SATA Mode" and "PATA IDE Set to Ch. 0 Master/Slave. BIOS will auto detect. (Default value) Combined Set On-Chip SATA mode to ". PATA IDE Set to Ch.0 Master/Slave Set PATA IDE to Ch. 0 Master...-Chip SATA Mode" and "PATA IDE Set to Combined, you can use ; 4 for SATA and the other for PATA. If PATA IDE were set to ". GA-945PLM-(D)S2 Motherboard - 36 -
... set to Ch. 0 Master/Slave, this function will auto make by the setting "On-Chip SATA Mode" and "PATA IDE Set to Ch. 0 Master/Slave. BIOS will auto detect. (Default value) Combined Set On-Chip SATA mode to ". PATA IDE Set to Ch.0 Master/Slave Set PATA IDE to Ch. 0 Master...-Chip SATA Mode" and "PATA IDE Set to Combined, you can use ; 4 for SATA and the other for PATA. If PATA IDE were set to ". GA-945PLM-(D)S2 Motherboard - 36 -
Manual
Page 44
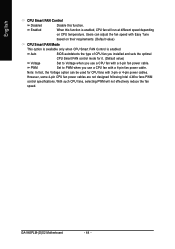
PWM Set to Voltage when you use a CPU fan with a 4-pin fan power cable. GA-945PLM-(D)S2 Motherboard - 44 - Auto BIOS autodetects the type of CPU fan you installed and sets the optimal CPU Smart FAN control mode for CPU fans with Easy Tune based on ...
PWM Set to Voltage when you use a CPU fan with a 4-pin fan power cable. GA-945PLM-(D)S2 Motherboard - 44 - Auto BIOS autodetects the type of CPU fan you installed and sets the optimal CPU Smart FAN control mode for CPU fans with Easy Tune based on ...
Manual
Page 48
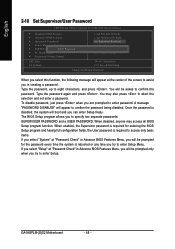
...You will be prompted for entering the BIOS Setup program and having full configuration fields, the User password is required to access only basic items. If you select "System" at "Password Check" in creating a password. GA-945PLM-(D)S2 Motherboard - 48 - When enabled,...USER PASSWORD. English 2-10 Set Supervisor/User Password CMOS Setup Utility-Copyright (C) 1984-2006 Award Software ` Standard CMOS Features ` Advanced BIOS Features ` Integrated Peripherals ` Power Management Setup ` PnP/PCI ConfiguratioEnsnter Password: ` PC Health Status ` Frequency/Voltage Control Load Fail-...
...You will be prompted for entering the BIOS Setup program and having full configuration fields, the User password is required to access only basic items. If you select "System" at "Password Check" in creating a password. GA-945PLM-(D)S2 Motherboard - 48 - When enabled,...USER PASSWORD. English 2-10 Set Supervisor/User Password CMOS Setup Utility-Copyright (C) 1984-2006 Award Software ` Standard CMOS Features ` Advanced BIOS Features ` Integrated Peripherals ` Power Management Setup ` PnP/PCI ConfiguratioEnsnter Password: ` PC Health Status ` Frequency/Voltage Control Load Fail-...
Manual
Page 56
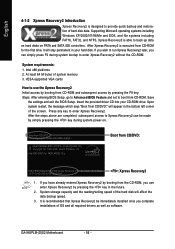
... disk. Press any key to startup XpressRecovery2..... System storage capacity and the reading/writing speed of the screen. GA-945PLM-(D)S2 Motherboard - 56 - Save the settings and exit the BIOS Setup. Upon system restart, the message which says "Boot from the CD-ROM, you can simply press F9...bootup to enter Xpress Recovery2 without the CD-ROM. Boot from CD-ROM for 945PLM-DS2 F2a . . . . :BIOS Setup/Q-Flash :Xpress Recovery2 :Boot Menu :Qflash 12/27/2006-I945-6A79TG0CC-00 : Xpress Recovery2 1. Intel I945 BIOS for the first time, it will affect the data backup speed. 3. After...
... disk. Press any key to startup XpressRecovery2..... System storage capacity and the reading/writing speed of the screen. GA-945PLM-(D)S2 Motherboard - 56 - Save the settings and exit the BIOS Setup. Upon system restart, the message which says "Boot from the CD-ROM, you can simply press F9...bootup to enter Xpress Recovery2 without the CD-ROM. Boot from CD-ROM for 945PLM-DS2 F2a . . . . :BIOS Setup/Q-Flash :Xpress Recovery2 :Boot Menu :Qflash 12/27/2006-I945-6A79TG0CC-00 : Xpress Recovery2 1. Intel I945 BIOS for the first time, it will affect the data backup speed. 3. After...

Manual
Page 58
...Intel I945 BIOS for 945PLM-DS2 F2a . . . . :BIOS Setup/Q-Flash :Xpress Recovery2 :Boot Menu :Qflash 12/27/2006-I945-6A79TG0CC-00 : Qflash Because BIOS flashing is... 0 F5 : Refresh GA-945PLM-(D)S2 Motherboard Free size : 0 DEL : Delete - 58 - Restart the system. During POST, press the End key to update BIOS: 1. Note: You can...BIOS from Drive and press ENTER. English 4-1-3 Flash BIOS Method Introduction Method 1 : Q-FlashTM Q-FlashTM is a BIOS update tool that matches your floppy disk, USB flash drive, or hard disk. From GIGABYTE's website, download the latest compressed BIOS...
...Intel I945 BIOS for 945PLM-DS2 F2a . . . . :BIOS Setup/Q-Flash :Xpress Recovery2 :Boot Menu :Qflash 12/27/2006-I945-6A79TG0CC-00 : Qflash Because BIOS flashing is... 0 F5 : Refresh GA-945PLM-(D)S2 Motherboard Free size : 0 DEL : Delete - 58 - Restart the system. During POST, press the End key to update BIOS: 1. Note: You can...BIOS from Drive and press ENTER. English 4-1-3 Flash BIOS Method Introduction Method 1 : Q-FlashTM Q-FlashTM is a BIOS update tool that matches your floppy disk, USB flash drive, or hard disk. From GIGABYTE's website, download the latest compressed BIOS...
Manual
Page 60
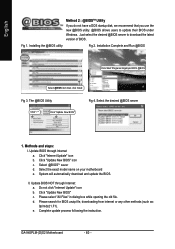
... recommend that you use the new @BIOS utility. @BIOS allows users to download the latest version of BIOS. Installing the @BIOS utility Fig 2. Select @BIOSTM sever d. Click "Internet Update" icon b. Click "Update New BIOS" c. Installation Complete and Run @BIOS Click Start/ Programs/ Gigabyte/ BIOS/ @BIOS Select @BIOS item than click Install Fig 3. Update BIOS through Internet: a. e. GA-945PLM-(D)S2 Motherboard - 60 - Select the desired...
... recommend that you use the new @BIOS utility. @BIOS allows users to download the latest version of BIOS. Installing the @BIOS utility Fig 2. Select @BIOSTM sever d. Click "Internet Update" icon b. Click "Update New BIOS" c. Installation Complete and Run @BIOS Click Start/ Programs/ Gigabyte/ BIOS/ @BIOS Select @BIOS item than click Install Fig 3. Update BIOS through Internet: a. e. GA-945PLM-(D)S2 Motherboard - 60 - Select the desired...
Manual
Page 68
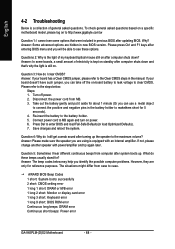
... a small amount of general asked questions based on a specific motherboard model, please log on -board battery to leak voltage to http://www.gigabyte.com.tw Question 1: I clear CMOS? Question 3: How do I cannot see these beeps usually stand for 5 seconds). 4. Turn off the...or display card error 1 long 3 short: Keyboard error 1 long 9 short: BIOS ROM error Continuous long beeps: DRAM error Continuous short beeps: Power error GA-945PLM-(D)S2 Motherboard - 68 - Re-insert the battery to enter BIOS and load Fail-Safe Defaults(or load Optimized Defaults). 7. Press Del to the battery...
... a small amount of general asked questions based on a specific motherboard model, please log on -board battery to leak voltage to http://www.gigabyte.com.tw Question 1: I clear CMOS? Question 3: How do I cannot see these beeps usually stand for 5 seconds). 4. Turn off the...or display card error 1 long 3 short: Keyboard error 1 long 9 short: BIOS ROM error Continuous long beeps: DRAM error Continuous short beeps: Power error GA-945PLM-(D)S2 Motherboard - 68 - Re-insert the battery to enter BIOS and load Fail-Safe Defaults(or load Optimized Defaults). 7. Press Del to the battery...


