Manual
Page 5
Chapter 3 Install Drivers 49 3-1 Install Chipset Drivers 49 3-2 SoftwareApplications 50 3-3 Driver CD Information 50 3-4 Hardware Information 51 3-5 Contact Us ...51 Chapter 4 Appendix 53 4-1 Unique Software Utilities 53 4-1-1 EasyTune 5 Introduction 53 4-1-2 Xpress Recovery2 Introduction 54 4-1-3 Flash BIOS Method Introduction 56 4-1-4 2- / 4- / 6- / 8- Channel Audio Function Introduction 60 4-2 Troubleshooting 65 - 5 -
Chapter 3 Install Drivers 49 3-1 Install Chipset Drivers 49 3-2 SoftwareApplications 50 3-3 Driver CD Information 50 3-4 Hardware Information 51 3-5 Contact Us ...51 Chapter 4 Appendix 53 4-1 Unique Software Utilities 53 4-1-1 EasyTune 5 Introduction 53 4-1-2 Xpress Recovery2 Introduction 54 4-1-3 Flash BIOS Method Introduction 56 4-1-4 2- / 4- / 6- / 8- Channel Audio Function Introduction 60 4-2 Troubleshooting 65 - 5 -
Manual
Page 16
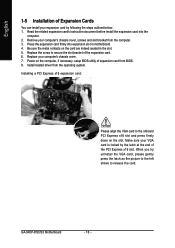
...VGA card to release the card. Make sure your expansion card by the latch at the end of the expansion card. 6. Install related driver from the computer. 3. Power on the computer, if necessary, setup BIOS utility of Expansion Cards You can install your VGA card is ...the picture to the left shows to the onboard PCI Express x16 slot and press firmly down on the card are indeed seated in motherboard. 4. GA-945P-DS3/S3 Motherboard - 16 - English 1-5 Installation of expansion card from BIOS. 8. Read the related expansion card's instruction document before install the expansion...
...VGA card to release the card. Make sure your expansion card by the latch at the end of the expansion card. 6. Install related driver from the computer. 3. Power on the computer, if necessary, setup BIOS utility of Expansion Cards You can install your VGA card is ...the picture to the left shows to the onboard PCI Express x16 slot and press firmly down on the card are indeed seated in motherboard. 4. GA-945P-DS3/S3 Motherboard - 16 - English 1-5 Installation of expansion card from BIOS. 8. Read the related expansion card's instruction document before install the expansion...
Manual
Page 17
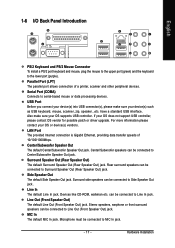
... jack. have a standard USB interface. For more information please contact your OS does not support USB controller, please contact OS vendor for possible patch or driver upgrade. Surround Speaker Out (Rear Speaker Out) The default Surround Speaker Out (Rear Speaker Out) jack. Center/Subwoofer Speaker Out The default Center/Subwoofer Speaker...
... jack. have a standard USB interface. For more information please contact your OS does not support USB controller, please contact OS vendor for possible patch or driver upgrade. Surround Speaker Out (Rear Speaker Out) The default Surround Speaker Out (Rear Speaker Out) jack. Center/Subwoofer Speaker Out The default Center/Subwoofer Speaker...
Manual
Page 22
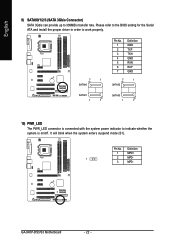
... system power indicator to 300MB/s transfer rate. Definition 1 MPD+ 1 2 MPD- 3 MPD- GA-945P-DS3/S3 Motherboard - 22 - Pin No. It will blink when the system enters suspend mode (S1). Please refer to the BIOS setting for the Serial ATA and install the proper driver in order to work properly. 7 1 SATAII0 Pin No. 1 2 3 4 5 6 7 Definition GND...
... system power indicator to 300MB/s transfer rate. Definition 1 MPD+ 1 2 MPD- 3 MPD- GA-945P-DS3/S3 Motherboard - 22 - Pin No. It will blink when the system enters suspend mode (S1). Please refer to the BIOS setting for the Serial ATA and install the proper driver in order to work properly. 7 1 SATAII0 Pin No. 1 2 3 4 5 6 7 Definition GND...
Manual
Page 24
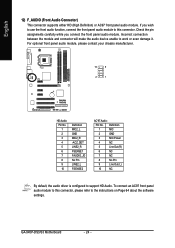
... No Pin LINE2_L FSENSE2 AC'97 Audio: Pin No. GA-945P-DS3/S3 Motherboard - 24 - If you connect the front panel audio module. Definition 1 MIC 2 GND 3 MIC Power 4 NC 5 Line Out (R) 6 NC 7 NC 8 No Pin 9 Line Out (L) 10 NC By default, the audio driver is configured to this connector, please refer to work or...
... No Pin LINE2_L FSENSE2 AC'97 Audio: Pin No. GA-945P-DS3/S3 Motherboard - 24 - If you connect the front panel audio module. Definition 1 MIC 2 GND 3 MIC Power 4 NC 5 Line Out (R) 6 NC 7 NC 8 No Pin 9 Line Out (L) 10 NC By default, the audio driver is configured to this connector, please refer to work or...

Manual
Page 49
... you want and press "install" followed the item; System will auto start and show a question mark "?" For USB2.0 driver support under "Device Manager". If not, please double click the CD-ROM device icon in "Universal Serial Bus controller" under Windows ...use Windows Service Pack. After install Windows Service Pack, it will continue to install. Please pick the item that recommended to install other drivers. Install Drivers After restarting your system the "Xpress Install" will show the installation guide. Please remove the question mark and restart the system (System will...
... you want and press "install" followed the item; System will auto start and show a question mark "?" For USB2.0 driver support under "Device Manager". If not, please double click the CD-ROM device icon in "Universal Serial Bus controller" under Windows ...use Windows Service Pack. After install Windows Service Pack, it will continue to install. Please pick the item that recommended to install other drivers. Install Drivers After restarting your system the "Xpress Install" will show the installation guide. Please remove the question mark and restart the system (System will...
Manual
Page 50
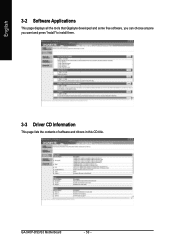
English 3-2 Software Applications This page displays all the tools that Gigabyte developed and some free software, you can choose anyone you want and press "install" to install them. 3-3 Driver CD Information This page lists the contents of software and drivers in this CD-title. GA-945P-DS3/S3 Motherboard - 50 -
English 3-2 Software Applications This page displays all the tools that Gigabyte developed and some free software, you can choose anyone you want and press "install" to install them. 3-3 Driver CD Information This page lists the contents of software and drivers in this CD-title. GA-945P-DS3/S3 Motherboard - 50 -
Manual
Page 51
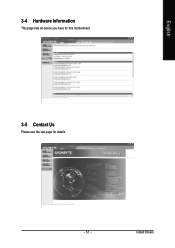
English 3-4 Hardware Information This page lists all device you have for this motherboard. 3-5 Contact Us Please see the last page for details. - 51 - Install Drivers
English 3-4 Hardware Information This page lists all device you have for this motherboard. 3-5 Contact Us Please see the last page for details. - 51 - Install Drivers
Manual
Page 54
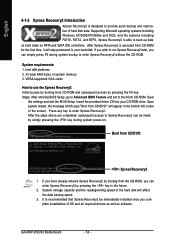
... System storage capacity and the reading/writing speed of the hard disk will appear in the bottom left corner of OS and all required drivers as well as software. It is executed from CD-ROM and subsequent access by pressing the key in your CD-ROM drive. Insert ... and restoration of system memory 3. English 4-1-2 Xpress Recovery2 Introduction Xpress Recovery2 is able to back up data on hard disks on . . . Intel x86 platforms 2. GA-945P-DS3/S3 Motherboard . . . . - 54 - Intel P945 BIOS for the first time, it will stay permanent in the future. 2. If you wish to run ...
... System storage capacity and the reading/writing speed of the hard disk will appear in the bottom left corner of OS and all required drivers as well as software. It is executed from CD-ROM and subsequent access by pressing the key in your CD-ROM drive. Insert ... and restoration of system memory 3. English 4-1-2 Xpress Recovery2 Introduction Xpress Recovery2 is able to back up data on hard disks on . . . Intel x86 platforms 2. GA-945P-DS3/S3 Motherboard . . . . - 54 - Intel P945 BIOS for the first time, it will stay permanent in the future. 2. If you wish to run ...
Manual
Page 55
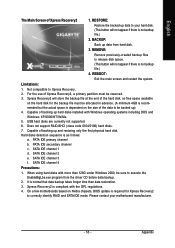
... compatible to Xpress Recovery. 2. Capable of backing up data to execute the EnableBigLba.exe program from hard disk. 3. Capable of backing up data from the driver CD before data backup. 2. Hard disks detection sequence is no backup file.) 4. PATA IDE secondary channel c . SATA IDE channel 3 f.
... compatible to Xpress Recovery. 2. Capable of backing up data to execute the EnableBigLba.exe program from hard disk. 3. Capable of backing up data from the driver CD before data backup. 2. Hard disks detection sequence is no backup file.) 4. PATA IDE secondary channel c . SATA IDE channel 3 f.
Manual
Page 60
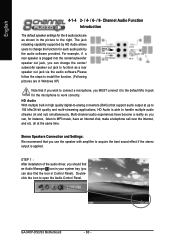
STEP 1 : After installation of the audio driver, you should find the icon in your system tray (you MUST connect it to work correctly. For example, if a rear speaker is plugged into the ... Side Speaker Out Line In Line Out (Front Speaker Out) Mic In Note that you can also find an Audio Manager icon in Control Panel). GA-945P-DS3/S3 Motherboard . . . . - 60 - Channel Audio Function Introduction The default speaker settings for the 6 audio jacks are as a rear speaker out jack via the audio software...
STEP 1 : After installation of the audio driver, you should find the icon in your system tray (you MUST connect it to work correctly. For example, if a rear speaker is plugged into the ... Side Speaker Out Line In Line Out (Front Speaker Out) Mic In Note that you can also find an Audio Manager icon in Control Panel). GA-945P-DS3/S3 Motherboard . . . . - 60 - Channel Audio Function Introduction The default speaker settings for the 6 audio jacks are as a rear speaker out jack via the audio software...

Manual
Page 61
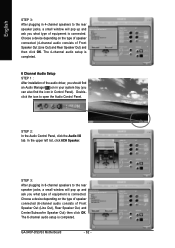
... Out jack, a small window will pop up and ask you what type of equipment is completed. 4 Channel Audio Setup STEP 1 : After installation of the audio driver, you should find an Audio Manager icon in your system tray (you can also find the icon in Control Panel). STEP 2: In the Audio Control...
... Out jack, a small window will pop up and ask you what type of equipment is completed. 4 Channel Audio Setup STEP 1 : After installation of the audio driver, you should find an Audio Manager icon in your system tray (you can also find the icon in Control Panel). STEP 2: In the Audio Control...
Manual
Page 62
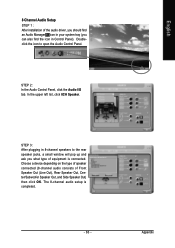
Doubleclick the icon to the rear speaker jacks, a small window will pop up and ask you what type of equipment is connected. GA-945P-DS3/S3 Motherboard . . . . - 62 - STEP 2: In the Audio Control Panel, click the Audio I/O tab. Choose a device depending on the type of speaker ... Center/Subwoofer Speaker Out) then click OK. The 4-channel audio setup is completed. 6 Channel Audio Setup STEP 1 : After installation of the audio driver, you should find the icon in Control Panel). In the upper left list, click 6CH Speaker. The 6-channel audio setup is completed. Choose a device...
Doubleclick the icon to the rear speaker jacks, a small window will pop up and ask you what type of equipment is connected. GA-945P-DS3/S3 Motherboard . . . . - 62 - STEP 2: In the Audio Control Panel, click the Audio I/O tab. Choose a device depending on the type of speaker ... Center/Subwoofer Speaker Out) then click OK. The 4-channel audio setup is completed. 6 Channel Audio Setup STEP 1 : After installation of the audio driver, you should find the icon in Control Panel). In the upper left list, click 6CH Speaker. The 6-channel audio setup is completed. Choose a device...
Manual
Page 63
... Out, and Side Speaker Out) then click OK. Appendix English The 8-channel audio setup is connected. 8 Channel Audio Setup STEP 1 : After installation of the audio driver, you should find the icon in Control Panel).
... Out, and Side Speaker Out) then click OK. Appendix English The 8-channel audio setup is connected. 8 Channel Audio Setup STEP 1 : After installation of the audio driver, you should find the icon in Control Panel).


