User Manual
Page 1
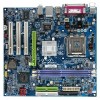
GA-8VM800M Intel® Pentium® 4 Processor Motherboard User's Manual Rev. 1002 12ME-8VM800M-1002R * The WEEE marking on the product indicates this product must not be disposed of with user's other household waste and must be handed over to a designated collection point for the recycling of waste electrical and electronic equipment!! * The WEEE marking applies only in European Union's member states.
GA-8VM800M Intel® Pentium® 4 Processor Motherboard User's Manual Rev. 1002 12ME-8VM800M-1002R * The WEEE marking on the product indicates this product must not be disposed of with user's other household waste and must be handed over to a designated collection point for the recycling of waste electrical and electronic equipment!! * The WEEE marking applies only in European Union's member states.
User Manual
Page 2
Motherboard GA-8VM800M Nov. 28, 2005 Motherboard GA-8VM800M Nov. 28, 2005
Motherboard GA-8VM800M Nov. 28, 2005 Motherboard GA-8VM800M Nov. 28, 2005

User Manual
Page 4
Table of Contents GA-8VM800M Motherboard Layout 6 Block Diagram ...7 Chapter 1 Hardware Installation 9 1-1 Considerations Prior to Installation 9 1-2 Feature Summary 10 1-3 Installation of the CPU and Heatsink 12 1-3-1 Installation of the CPU 12 1-3-2 ...
Table of Contents GA-8VM800M Motherboard Layout 6 Block Diagram ...7 Chapter 1 Hardware Installation 9 1-1 Considerations Prior to Installation 9 1-2 Feature Summary 10 1-3 Installation of the CPU and Heatsink 12 1-3-1 Installation of the CPU 12 1-3-2 ...

User Manual
Page 9
.... 5. Please make sure there are uncertain about any metal leads or connectors. 3. Hardware Installation When handling the motherboard, avoid touching any installation steps or have these items on an uneven surface. 7. Prior to installation, please do not...screws to come in the provided manual. 3. Product determined to be an unofficial Gigabyte product. - 9 - English Chapter 1 Hardware Installation 1-1 Considerations Prior to Installation Preparing Your Computer The motherboard contains numerous delicate electronic circuits and components which can lead to damage to system ...
.... 5. Please make sure there are uncertain about any metal leads or connectors. 3. Hardware Installation When handling the motherboard, avoid touching any installation steps or have these items on an uneven surface. 7. Prior to installation, please do not...screws to come in the provided manual. 3. Product determined to be an unofficial Gigabyte product. - 9 - English Chapter 1 Hardware Installation 1-1 Considerations Prior to Installation Preparing Your Computer The motherboard contains numerous delicate electronic circuits and components which can lead to damage to system ...
User Manual
Page 10
... ; MIC In Š Supports 2 / 4 / 6 channel audio Š CD In connection Š IT8705 Š CPU fan speed detection Š System voltage detection Š CPU temperature detection GA-8VM800M Motherboard - 10 -
... ; MIC In Š Supports 2 / 4 / 6 channel audio Š CD In connection Š IT8705 Š CPU fan speed detection Š System voltage detection Š CPU temperature detection GA-8VM800M Motherboard - 10 -
User Manual
Page 11
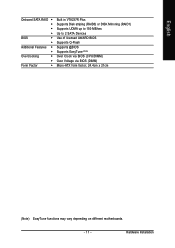
English Onboard SATA RAID Š Š Š Š BIOS Š Š Additional Features Š Š Overclocking Š Š Form Factor Š Built in VT8237R Plus Supports Disk striping (RAID0) or DISK Mirroring (RAID1) Supports UDMA up to 150 MB/sec Up to 2 SATA Devices Use of licensed AWARD BIOS Supports Q-Flash Supports @BIOS Supports EasyTune (Note) Over Clock via BIOS (CPU/DIMM) Over Voltage via BIOS (DIMM) Micro-ATX form factor; 24.4cm x 21cm (Note) EasyTune functions may vary depending on different motherboards. - 11 - Hardware Installation
English Onboard SATA RAID Š Š Š Š BIOS Š Š Additional Features Š Š Overclocking Š Š Form Factor Š Built in VT8237R Plus Supports Disk striping (RAID0) or DISK Mirroring (RAID1) Supports UDMA up to 150 MB/sec Up to 2 SATA Devices Use of licensed AWARD BIOS Supports Q-Flash Supports @BIOS Supports EasyTune (Note) Over Clock via BIOS (CPU/DIMM) Over Voltage via BIOS (DIMM) Micro-ATX form factor; 24.4cm x 21cm (Note) EasyTune functions may vary depending on different motherboards. - 11 - Hardware Installation

User Manual
Page 12
... add an even layer of the CPU and gently press the metal lever back into its original position. Chipset: An VIA Chipset that the motherboard supports the CPU. 2. The CPU will not insert properly. It is marked one indented corner of the CPU. Fig. 2 A gold-...the system bus frequency be set beyond the proper specifications, please do so according to system use extra care when installing the CPU. GA-8VM800M Motherboard - 12 - Please set the frequency beyond hardware specifications since it does not meet the required standards for your hardware specifications including the ...
... add an even layer of the CPU and gently press the metal lever back into its original position. Chipset: An VIA Chipset that the motherboard supports the CPU. 2. The CPU will not insert properly. It is marked one indented corner of the CPU. Fig. 2 A gold-...the system bus frequency be set beyond the proper specifications, please do so according to system use extra care when installing the CPU. GA-8VM800M Motherboard - 12 - Please set the frequency beyond hardware specifications since it does not meet the required standards for your hardware specifications including the ...
User Manual
Page 13
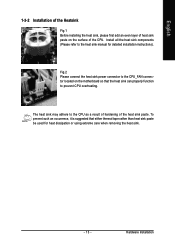
... sink paste. English 1-3-2 Installation of the Heatsink Fig.1 Before installing the heat sink, please first add an even layer of heat sink paste on the motherboard so that either thermal tape rather than heat sink paste be used for detailed installation instructions). To prevent such an occurrence, it is suggested that...
... sink paste. English 1-3-2 Installation of the Heatsink Fig.1 Before installing the heat sink, please first add an even layer of heat sink paste on the motherboard so that either thermal tape rather than heat sink paste be used for detailed installation instructions). To prevent such an occurrence, it is suggested that...
User Manual
Page 14
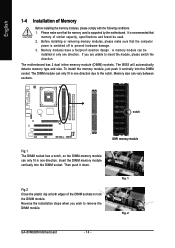
...specifications and brand be installed in one direction. The DIMM module can be used is supported by the motherboard. DDR memory module Fig.2 Close the plastic clip at both edges of Memory Before installing the memory ...1. Memory modules have a foolproof insertion design. If you wish to insert the module, please switch the direction. The motherboard has 2 dual inline memory module (DIMM) sockets. notch Fig.1 The DIMM socket has a notch, so the DIMM... only one direction due to prevent hardware damage. 3. Fig. 1 Fig. 2 GA-8VM800M Motherboard - 14 -
...specifications and brand be installed in one direction. The DIMM module can be used is supported by the motherboard. DDR memory module Fig.2 Close the plastic clip at both edges of Memory Before installing the memory ...1. Memory modules have a foolproof insertion design. If you wish to insert the module, please switch the direction. The motherboard has 2 dual inline memory module (DIMM) sockets. notch Fig.1 The DIMM socket has a notch, so the DIMM... only one direction due to prevent hardware damage. 3. Fig. 1 Fig. 2 GA-8VM800M Motherboard - 14 -
User Manual
Page 15
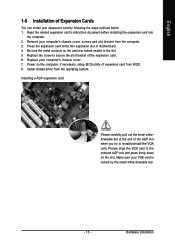
... of expansion card from the operating system. Make sure your computer's chassis cover. 7. Be sure the metal contacts on the card are indeed seated in motherboard. 4. Replace your VGA card is locked by following the steps outlined below: 1. Installing a AGP expansion card: Please carefully pull out the small whitedrawable bar at...
... of expansion card from the operating system. Make sure your computer's chassis cover. 7. Be sure the metal contacts on the card are indeed seated in motherboard. 4. Replace your VGA card is locked by following the steps outlined below: 1. Installing a AGP expansion card: Please carefully pull out the small whitedrawable bar at...
User Manual
Page 16
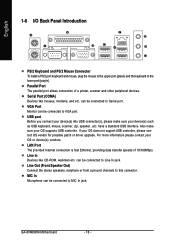
... please contact your OS does not support USB controller, please contact OS vendor for possible patch or driver upgrade. can be connected to VGA port. GA-8VM800M Motherboard - 16 - VGA Port Monitor can be connected to Serial port. Line In Devices like mouses, modems, and etc. English 1-6 I/O Back Panel Introduction PS/2 Keyboard and...
... please contact your OS does not support USB controller, please contact OS vendor for possible patch or driver upgrade. can be connected to VGA port. GA-8VM800M Motherboard - 16 - VGA Port Monitor can be connected to Serial port. Line In Devices like mouses, modems, and etc. English 1-6 I/O Back Panel Introduction PS/2 Keyboard and...
User Manual
Page 18
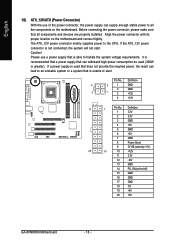
...or greater). Align the power connector with its proper location on /off) 15 GND 16 GND 17 GND 18 -5V 19 +5V 20 +5V GA-8VM800M Motherboard - 18 - The ATX_12V power connector mainly supplies power to the CPU. If the ATX_12V power connector is not connected, the system will not start ...5V 7 GND 8 Power Good 9 5V SB (stand by +5V) 20 10 10 +12V 11 3.3V 12 -12V 13 GND 14 PS_ON(soft on the motherboard and connect tightly. Pin No. English 1/2) ATX_12V/ATX (Power Connector) With the use a power supply that is able to handle the system voltage requirements. Before...
...or greater). Align the power connector with its proper location on /off) 15 GND 16 GND 17 GND 18 -5V 19 +5V 20 +5V GA-8VM800M Motherboard - 18 - The ATX_12V power connector mainly supplies power to the CPU. If the ATX_12V power connector is not connected, the system will not start ...5V 7 GND 8 Power Good 9 5V SB (stand by +5V) 20 10 10 +12V 11 3.3V 12 -12V 13 GND 14 PS_ON(soft on the motherboard and connect tightly. Pin No. English 1/2) ATX_12V/ATX (Power Connector) With the use a power supply that is able to handle the system voltage requirements. Before...
User Manual
Page 20
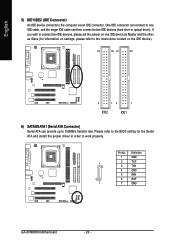
... (Serial ATA Connector) Serial ATA can provide up to the computer via an IDE connector. Pin No. Definition 1 GND 2 TXP 1 3 TXN 4 GND 5 RXN 6 RXP 7 7 GND GA-8VM800M Motherboard - 20 -
... (Serial ATA Connector) Serial ATA can provide up to the computer via an IDE connector. Pin No. Definition 1 GND 2 TXP 1 3 TXN 4 GND 5 RXN 6 RXP 7 7 GND GA-8VM800M Motherboard - 20 -
User Manual
Page 22
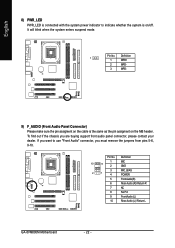
... audio panel connector, please contact your dealer. Definition 1 MIC 10 9 2 GND 3 2 1 4 MIC_BIAS POWER 5 FrontAudio(R) 6 Rear Audio (R)/ Return R 7 NC 8 No Pin 9 FrontAudio (L) 10 Rear Audio (L)/ Return L GA-8VM800M Motherboard - 22 - Pin No. If you want to indicate whether the system is the same as the pin assigment on /off. It will blink when the...
... audio panel connector, please contact your dealer. Definition 1 MIC 10 9 2 GND 3 2 1 4 MIC_BIAS POWER 5 FrontAudio(R) 6 Rear Audio (R)/ Return R 7 NC 8 No Pin 9 FrontAudio (L) 10 Rear Audio (L)/ Return L GA-8VM800M Motherboard - 22 - Pin No. If you want to indicate whether the system is the same as the pin assigment on /off. It will blink when the...
User Manual
Page 24
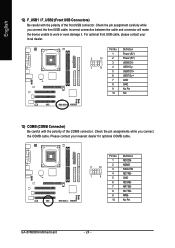
... (COMB Connector) Be careful with the polarity of the COMB connector. Definition 1 NDCDB- 2 10 2 NSINB 3 NSOUTB 1 9 4 NDTRB- 5 GND 6 NDSRB- 7 NRTSB- 8 NCTSB- 9 NRIB- 10 No Pin GA-8VM800M Motherboard - 24 - Check the pin assignments while you connect the front USB cable, incorrect connection between the cable and connector will make the device unable to...
... (COMB Connector) Be careful with the polarity of the COMB connector. Definition 1 NDCDB- 2 10 2 NSINB 3 NSOUTB 1 9 4 NDTRB- 5 GND 6 NDSRB- 7 NRTSB- 8 NCTSB- 9 NRIB- 10 No Pin GA-8VM800M Motherboard - 24 - Check the pin assignments while you connect the front USB cable, incorrect connection between the cable and connector will make the device unable to...

User Manual
Page 26
English GA-8VM800M Motherboard - 26 -
English GA-8VM800M Motherboard - 26 -
User Manual
Page 27
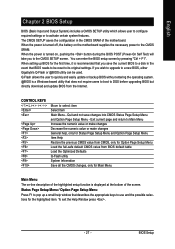
... Q-Flash allows the user to quickly and easily update or backup BIOS without entering the operating system. @BIOS is turned off, the battery on the motherboard supplies the necessary power to pop up BIOS for the highlighted item. English Chapter 2 BIOS Setup BIOS (Basic Input and Output System) includes a CMOS... Menu The on , pushing the button during the BIOS POST (Power-On Self Test) will take you wish to upgrade to a new BIOS, either Gigabyte's Q-Flash or @BIOS utility can enter the BIOS setup screen by pressing "Ctrl + F1". The CMOS SETUP saves the configuration in the event that...
... Q-Flash allows the user to quickly and easily update or backup BIOS without entering the operating system. @BIOS is turned off, the battery on the motherboard supplies the necessary power to pop up BIOS for the highlighted item. English Chapter 2 BIOS Setup BIOS (Basic Input and Output System) includes a CMOS... Menu The on , pushing the button during the BIOS POST (Power-On Self Test) will take you wish to upgrade to a new BIOS, either Gigabyte's Q-Flash or @BIOS utility can enter the BIOS setup screen by pressing "Ctrl + F1". The CMOS SETUP saves the configuration in the event that...

User Manual
Page 28
... Defaults Set Supervisor Password Set User Password Save & Exit Setup Exit Without Saving KLJI: Select Item F10: Save & Exit Setup Time, Date, Hard Disk Type... GA-8VM800M Motherboard - 28 - If you can't find the setting you enter Award BIOS CMOS Setup Utility, the Main Menu (as usual. This action makes the system reset...
... Defaults Set Supervisor Password Set User Password Save & Exit Setup Exit Without Saving KLJI: Select Item F10: Save & Exit Setup Time, Date, Hard Disk Type... GA-8VM800M Motherboard - 28 - If you can't find the setting you enter Award BIOS CMOS Setup Utility, the Main Menu (as usual. This action makes the system reset...
User Manual
Page 30
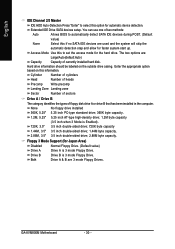
...-sided drive; 2.88M byte capacity. You can use one of two methods: Auto Allows BIOS to set the access mode for faster system start up. GA-8VM800M Motherboard - 30 -
...-sided drive; 2.88M byte capacity. You can use one of two methods: Auto Allows BIOS to set the access mode for faster system start up. GA-8VM800M Motherboard - 30 -
User Manual
Page 31
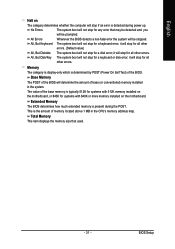
.... All, But Keyboard The system boot will determine the amount of the base memory is typically 512K for systems with 512K memory installed on the motherboard, or 640K for systems with 640K or more memory installed on The category determines whether the computer will stop for all other errors. Memory The... all other errors. (Default value) All, But Diskette The system boot will stop if an error is present during power up. English Halt on the motherboard.
.... All, But Keyboard The system boot will determine the amount of the base memory is typically 512K for systems with 512K memory installed on the motherboard, or 640K for systems with 640K or more memory installed on The category determines whether the computer will stop for all other errors. Memory The... all other errors. (Default value) All, But Diskette The system boot will stop if an error is present during power up. English Halt on the motherboard.


