Manual
Page 1
GA-8N-SLI Royal/ GA-8N-SLI Pro/ GA-8N-SLI Intel® Pentium® Processor Extreme Edition Intel® Pentium® D / Pentium® 4 LGA775 Processor Motherboard User's Manual Rev. 1004 12ME-8NSLIRO-1004
GA-8N-SLI Royal/ GA-8N-SLI Pro/ GA-8N-SLI Intel® Pentium® Processor Extreme Edition Intel® Pentium® D / Pentium® 4 LGA775 Processor Motherboard User's Manual Rev. 1004 12ME-8NSLIRO-1004
Manual
Page 5
... to read or download the information you need. The trademarks mentioned in the manual are subject to change without Gigabyte's prior written permission. No part of this product, Gigabyte has categorized the user manual in the following: „ For quick installation, please refer to assist in... any form or by any means without prior notice. For more product details, please click onto Gigabyte's website at www.gigabyte.com.tw All rights reserved...
... to read or download the information you need. The trademarks mentioned in the manual are subject to change without Gigabyte's prior written permission. No part of this product, Gigabyte has categorized the user manual in the following: „ For quick installation, please refer to assist in... any form or by any means without prior notice. For more product details, please click onto Gigabyte's website at www.gigabyte.com.tw All rights reserved...

Manual
Page 11
When handling the motherboard, avoid touching any hardware, please first carefully read the information in the user manual. 3. These stickers are no leftover screws or metal components placed on the motherboard or within a electrostatic shielding ...harm to the installation of uncertified components. 5. Instances of violating the conditions recommended in the provided manual. 3. Installation Notices 1. English Chapter 1 Hardware Installation 1-1 Considerations Prior to be an unofficial Gigabyte product. - 11 - Thus, prior to the use of the motherboard or any metal leads...
When handling the motherboard, avoid touching any hardware, please first carefully read the information in the user manual. 3. These stickers are no leftover screws or metal components placed on the motherboard or within a electrostatic shielding ...harm to the installation of uncertified components. 5. Instances of violating the conditions recommended in the provided manual. 3. Installation Notices 1. English Chapter 1 Hardware Installation 1-1 Considerations Prior to be an unofficial Gigabyte product. - 11 - Thus, prior to the use of the motherboard or any metal leads...
Manual
Page 15
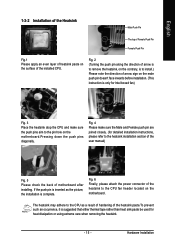
... using extreme care when removing the heatsink. - 15 - Fig. 6 Finally, please attach the power connector of the heatsink to the heatsink installation section of the user manual) Fig. 5 Please check the back of arrow sign on the male push pin doesn't face inwards before installation. (This instruction is complete. Hardware Installation Fig...
... using extreme care when removing the heatsink. - 15 - Fig. 6 Finally, please attach the power connector of the heatsink to the heatsink installation section of the user manual) Fig. 5 Please check the back of arrow sign on the male push pin doesn't face inwards before installation. (This instruction is complete. Hardware Installation Fig...
Manual
Page 38
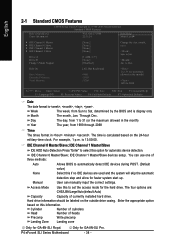
...00:00. The four options are used and the system will skip the automatic detection step and allow for automatic device detection. Only for GA-8N-SLI Royal. IDE Channel 0 Master/Slave; Access Mode Use this option for faster system start up. Through Dec. to Dec. Enter the ...Write precomp Landing Zone Landing zone Only for GA-8N-SLI Pro. The time is display only Month The month, Jan. Week The week, from 1999 through 2098 Time The times format in the month) < Ye a r > 1999 to 31 (or maximum allowed in . Manual User can use one of three methods: Auto...
...00:00. The four options are used and the system will skip the automatic detection step and allow for automatic device detection. Only for GA-8N-SLI Royal. IDE Channel 0 Master/Slave; Access Mode Use this option for faster system start up. Through Dec. to Dec. Enter the ...Write precomp Landing Zone Landing zone Only for GA-8N-SLI Pro. The time is display only Month The month, Jan. Week The week, from 1999 through 2098 Time The times format in the month) < Ye a r > 1999 to 31 (or maximum allowed in . Manual User can use one of three methods: Auto...
Manual
Page 81
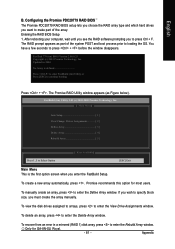
... your computer, wait until you see the RAID software prompting you enter the FastBuild Setup. To create a new array automatically, press . To manually create an array, press to enter the View Drive Assignments window. To view the disk drives assigned to arrays, press to enter the Define ...This is defined Press to enter FastBuild (tm) Utility or Press [ESC] to press Ctrl + F. Only for most users. Entering the RAID BIOS Setup 1. Promise recommends this option for GA-8N-SLI Royal. - 81 - English B. If you wish to specify block size, you want to make part of the ...
... your computer, wait until you see the RAID software prompting you enter the FastBuild Setup. To create a new array automatically, press . To manually create an array, press to enter the View Drive Assignments window. To view the disk drives assigned to arrays, press to enter the Define ...This is defined Press to enter FastBuild (tm) Utility or Press [ESC] to press Ctrl + F. Only for most users. Entering the RAID BIOS Setup 1. Promise recommends this option for GA-8N-SLI Royal. - 81 - English B. If you wish to specify block size, you want to make part of the ...
Manual
Page 83
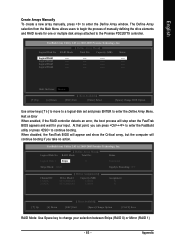
... Menu allows users to begin the process of manually defining the drive elements and RAID levels for your selection between Stripe (RAID 0) or Mirror (RAID 1) - 83 - Logical Disk4 ---- ---- ----- ---- English Create Arrays Manually To create a new array manually, press to... Promise Technology, Inc. [ Define Array Menu] Logical Disk No RAID Mode Total Drv Status Logical Disk 1 Stripe 0 Functional Stripe Block: 64KB Gigabyte Rounding: OFF Channel:ID 1:SATA 2:SATA [ Drives Assignments] ] Drive Model ST3120026AS ST3120026AS Capacity (MB) 120034 120034 Assignment N N [ ] Up...
... Menu allows users to begin the process of manually defining the drive elements and RAID levels for your selection between Stripe (RAID 0) or Mirror (RAID 1) - 83 - Logical Disk4 ---- ---- ----- ---- English Create Arrays Manually To create a new array manually, press to... Promise Technology, Inc. [ Define Array Menu] Logical Disk No RAID Mode Total Drv Status Logical Disk 1 Stripe 0 Functional Stripe Block: 64KB Gigabyte Rounding: OFF Channel:ID 1:SATA 2:SATA [ Drives Assignments] ] Drive Model ST3120026AS ST3120026AS Capacity (MB) 120034 120034 Assignment N N [ ] Up...
Manual
Page 84
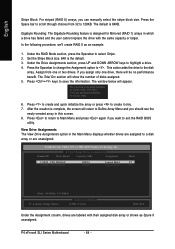
... (RAID 1) arrays in which a drive has failed and the user cannot replace the drive with their assigned disk array or shown as an example. 1. Gigabyte Rounding: The Gigabyte Rounding feature is 64KB. Under the RAID Mode section, press the...displays whether drives are assigned to 128KB. Press the Space bar to Define Array Menu and you can manually select the stripe block size. Assign from 32 to a disk array or are labeled with the same ... [ Keys Available] ] [CTRL-Y] Save [ESC] Exit Under the Assignment column, drives are unassigned. P4 nForce4 SLI Series Motherboard - 84 -
... (RAID 1) arrays in which a drive has failed and the user cannot replace the drive with their assigned disk array or shown as an example. 1. Gigabyte Rounding: The Gigabyte Rounding feature is 64KB. Under the RAID Mode section, press the...displays whether drives are assigned to 128KB. Press the Space bar to Define Array Menu and you can manually select the stripe block size. Assign from 32 to a disk array or are labeled with the same ... [ Keys Available] ] [CTRL-Y] Save [ESC] Exit Under the Assignment column, drives are unassigned. P4 nForce4 SLI Series Motherboard - 84 -

Manual
Page 2
...rear of the SATA hard drive and the other end to available SATA port(s) on the motherboard. SATA Configurations (P4 nForce4 SLI series) - 2 - If there are more than one SATA controller on your motherboard, you use two hard drives with identical...SLI) Åé ¤¤ ¤å To configure SATA hard drive(s), follow the steps below: (1) Install SATA hard drive(s) in your system. (2) Configure SATA controller mode and boot sequence in BIOS Setup. (3)* Configure RAID set BIOS boot sequence for the connector. If you may refer to the motherboard user's manual...
...rear of the SATA hard drive and the other end to available SATA port(s) on the motherboard. SATA Configurations (P4 nForce4 SLI series) - 2 - If there are more than one SATA controller on your motherboard, you use two hard drives with identical...SLI) Åé ¤¤ ¤å To configure SATA hard drive(s), follow the steps below: (1) Install SATA hard drive(s) in your system. (2) Configure SATA controller mode and boot sequence in BIOS Setup. (3)* Configure RAID set BIOS boot sequence for the connector. If you may refer to the motherboard user's manual...


