Gigabyte MX31-BS0 Support and Manuals
Get Help and Manuals for this Gigabyte item
View All Support Options Below
Free Gigabyte MX31-BS0 manuals!
Problems with Gigabyte MX31-BS0?
Ask a Question
Free Gigabyte MX31-BS0 manuals!
Problems with Gigabyte MX31-BS0?
Ask a Question
Popular Gigabyte MX31-BS0 Manual Pages
Manual - Page 6

... interface 2.1. Update BIOS through free download). [5] Setup TFTP server for Windows client PC (e.g. GIGA -BYTE TECHNOLOGY CO., LTD.
2. Preparation
[1] Get BIOS image file "image.RBU" of target system. [2] Make sure target system BMC is live. [3] Get BMC IP address of target system. [4] Download TFTP service application for Linux client PC (Please users set up their...
Manual - Page 8
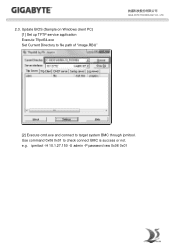
Update BIOS (Sample on Windows client PC) [1] Set up TFTP service application Execute Tftpd64.exe Set Current Directory to file path of "image.RBU"
GIGA -BYTE TECHNOLOGY CO., LTD.
[2] Execute cmd.exe and connect to check connect BMC is success or not. Use command 0x06 0x01 to target system BMC through ipmitool. e.g. ipmitool -H 10.1.27.150 -U admin -P password raw 0x06 0x01 2.3.
Manual - Page 10
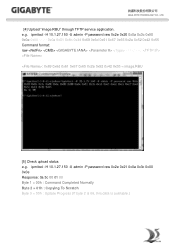
...password raw 0x2e 0x20 0x0a 0x3c 0x00 0x0e 0x00 0x00 0x0a 0x01 0x1b 0x34 0x69 0x6d 0x61 0x67 0x65 0x2e 0x52 0x42 0x55 Command format: raw : 0x69 0x6d 0x61 0x67 0x65 0x2e 0x52 0x42 0x55 = image.RBU
[5] Check upload status e.g. e.g. GIGA -BYTE TECHNOLOGY CO., LTD.
[4] Upload "image.RBU" through TFTP service... application. ipmitool -H 10.1.27.150 -U admin -P password raw ...
Manual - Page 2

... Content Management System Console Overview 9 Enter Gigabyte Content Management System Console 10 Properties ...10 Configuration ...11
Network...11 Network Security ...12 Security ...13
Users ...14 Services ...15 IPMI ...16 Time Setting ...18 Language ...19 Sessions ...20 LDAP ...21 Updates ...22 Utilities ...23 Server Information ...24 General Setting...24 Power Control ...25 Power Consumption...
Manual - Page 7

Go to DynamicBmcDhcp or Static. 5. Select Server Management. 3. Save and Exit. 6. Define Configuration Address source to BIOS setup menu. 2. The BMC IP Address will appear on the IPv4 Address parameter.
6 Gigabyte Content Management Network Configuration
Please follow the instruction to enable the console redirection function. 1. Select BMC network Configuration 4.
Manual - Page 10
... , you change the root password.
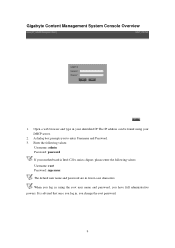
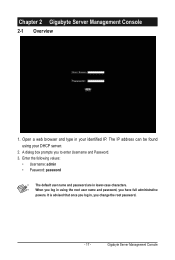
9 The IP address can be found using the root user name and password, you to enter Username and Password. 3. Gigabyte Content Management System Console Overview
1. It is Intel C20x series chipset, please enter the following values:
Username: admin Password: password If your motherboard is advised that once you log in your DHCP server.
2.
Manual - Page 2
...http://b2b.gigabyte.com
You are legally registered to the specifications and features in this manual may be made by any form or by GIGABYTE without GIGABYTE's prior ...reseller.b2b.gigabyte.com
https://www.facebook.com/gigabyteserver No part of documentations:
For detailed product information, carefully read the User's Guide. The trademarks mentioned in this manual are ...
Manual - Page 10
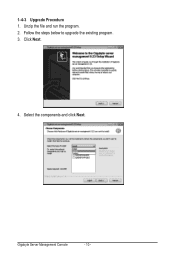
Unzip the file and run the program. 2. Click Next.
4.
1-4-3 Upgrade Procedure 1. Select the components and click Next. Follow the steps below to upgrade the existing program. 3. Gigabyte Server Management Console
- 10 -
Manual - Page 11
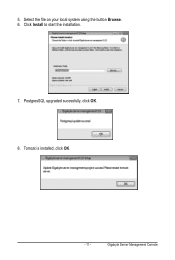
Click Install to start the installation.
7. Tomcat is installed, click OK.
- 11 - PostgresSQL upgraded sucessfully, click OK. 8.
Select the file on your local system using the button Browse. 6. Gigabyte Server Management Console 5.
Manual - Page 13
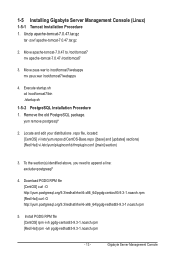
..../startup.sh
1-5-2 PostgreSQL Installation Procedure 1. Locate and edit your distributions .repo file, located: [CentOS] vi /etc/yum.repos.d/CentOS-Base.repo ([base] and [updates] sections) [Red Hat.../pgdg-redhat93-9.3-1.noarch.rpm
5. 1-5 Installing Gigabyte Server Management Console (Linux)
1-5-1 Tomcat Installation Procedure 1. Gigabyte Server Management Console Unzip apache-tomcat-7.0.47....
Manual - Page 14
...service service postgresql-9.3 start
4.
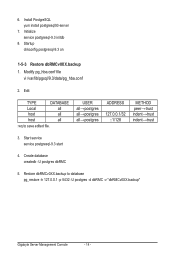
Restore dbRMCv0XX.backup to save edited file. Startup chkconfig postgresql-9.3 on
1-5-3 Restore dbRMCv0XX.backup 1. USER all→postgres all→postgres all
:wq to database pg_restore -h 127.0.0.1 -p 5432 -U postgres -d dbRMC -v "dbRMCv0XX.backup"
Gigabyte Server... Management Console
- 14 - Initialize service postgresql...
Manual - Page 16

rpm
Initialize: /usr/pgsql-9.3/postgresql93-setup initdb
Gigabyte Server Management Console
- 16 - 1-5-5 Login Gigabyte Server Management Console 1. Enter Database User Name postgres • This utility supported CentOS 6.3 or later version. • PostgreSQL must be execute in root authority. • In Fedora 19, you have to install package in the following: Locate and edit your ...
Manual - Page 17
...the following values:
• Username: admin • Password: password
• The default user name and password are in , you to enter Username and Password. 3. Gigabyte Server Management Console
It is advised that once you log in lower-case characters. • When you have full administrative
powers. Chapter 2 Gigabyte Server Management Console
2-1 Overview
1. The IP address can...
Manual - Page 18
...
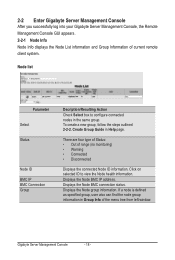
After you successfully log into your Gigabyte Server Management Console, the Remote Management Console GUI appears. 2-2-1 Node Info Node Info displays the Node List information and Group Information of range (no monitoring) • Warning • Connected • Disconnected
Displays the connected Node ID information. Create Group Guide in Help page.
Displays the Node...
Manual - Page 1
... setting) 2-3 Close: ME update mode.
6
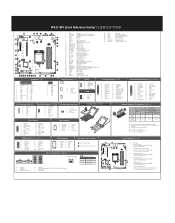
S3 Power On Select Jumper
1-2 Close: Stop an initial power on when BMC is supported at the fastest common frequency. Mixing ECC and non-ECC UDIMMs anywhere on the platform is not
supported. 1 and 2 DPC is not ready.
2-3 Close: Keep initial power on. (Default setting) MX31-BS0 Quick Reference Guide
42...
Gigabyte MX31-BS0 Reviews
We have not received any reviews for Gigabyte yet.