Gigabyte GA-P65A-UD3 Support and Manuals
Get Help and Manuals for this Gigabyte item
View All Support Options Below
Free Gigabyte GA-P65A-UD3 manuals!
Problems with Gigabyte GA-P65A-UD3?
Ask a Question
Free Gigabyte GA-P65A-UD3 manuals!
Problems with Gigabyte GA-P65A-UD3?
Ask a Question
Popular Gigabyte GA-P65A-UD3 Manual Pages
Manual - Page 1
GA-P65A-UD3
LGA1155 socket motherboard for Intel® Core™ i7 processors/ Intel® Core™ i5 processors/Intel® Core™ i3 processors/ Intel® Pentium® processors/Intel® Celeron® processors
User's Manual
Rev. 1001 12ME-P65AUD3-1001R
Manual - Page 2
Motherboard GA-P65A-UD3
Nov. 30, 2010
Motherboard GA-P65A-UD3
Nov. 30, 2010
Manual - Page 4
Table of Contents
Box Contents...6 Optional Items...6 GA-P65A-UD3 Motherboard Layout 7 GA-P65A-UD3 Motherboard Block Diagram 8
Chapter 1 Hardware Installation 9 1-1 Installation Precautions 9 1-2 Product Specifications 10 1-3 Installing the CPU and CPU Cooler 13
1-3-1 Installing the CPU 13 1-3-2 Installing the CPU Cooler 15 1-4 Installing the Memory 16 1-4-1 Dual Channel Memory ...
Manual - Page 6
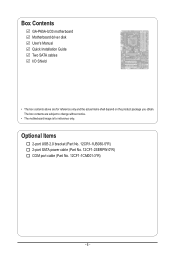
Optional Items
2-port USB 2.0 bracket (Part No. 12CR1-1UB030-5*R) 2-port SATA power cable (Part No. 12CF1-2SERPW-0*R) COM port cable (Part No. 12CF1-1CM001-3*R)
- 6 - Box Contents
GA-P65A-UD3 motherboard Motherboard driver disk User's Manual Quick Installation Guide Two SATA cables I/O Shield
• The box contents above are subject to change without notice.
• The motherboard image is for...
Manual - Page 7
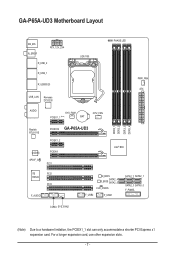
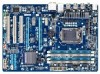
... Motherboard Layout
KB_MS R_SPDIF
ATX_12V_2X4
R_USB_2
LGA1155
PHASE LED
R_USB_1 R_USB30/20
USB_LAN
Renesas D720200
PWR_FAN ATX
AUDIO
SYS_FAN1
PCIEX1_1 (Note)
BAT
CPU_FAN
DDR3_1 DDR3_2 DDR3_3 DDR3_4
Realtek RTL8111E
PCIEX16 GA-P65A-UD3
PCIEX1_2
CODEC SPDIF_O
PCIEX4 PCI1
Intel® B65
iTE
PCI2
IT8728
PCI3
F_AUDIO
M_BIOS
B_BIOS
SATA2_4 SATA2_5
CLR_CMOS
F_USB2
F_USB1...
Manual - Page 8
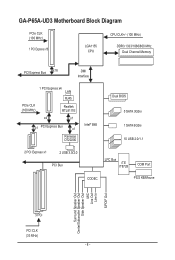
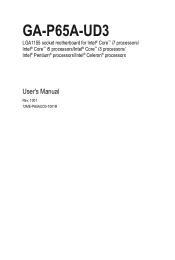
GA-P65A-UD3 Motherboard Block Diagram
PCIe CLK (100 MHz)
1 PCI Express x16
LGA1155 CPU
CPU CLK+/- (100 MHz)
DDR3 1333/1066/800 MHz Dual Channel Memory
PCI Express Bus x16
DMI Interface
1 PCI Express x4 LAN
RJ45
PCIe CLK (100 MHz)
Realtek RTL8111E
x4
x1
x1 PCI Express Bus
x1
Renesas D720200
Intel® B65
Dual...
Manual - Page 18

...Carefully read the manual that supports your card. If necessary, go to BIOS Setup to release the card and then pull the card straight up from the chassis back panel. 2. Hardware Installation
- 18 ...metal contacts on the card until it is securely seated in the slot. 3. After installing all expansion cards, replace the chassis cover(s). 6. Make sure the card is fully seated in the slot ...
Manual - Page 28
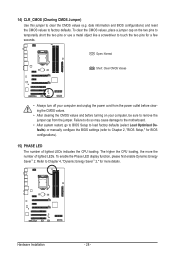
... damage to the motherboard.
• After system restart, go to BIOS Setup to load factory defaults (select Load Optimized Defaults) or manually configure the BIOS settings (refer to Chapter 2, "BIOS Setup," for BIOS configurations).
15) PHASE LED The number of lighted LEDs. Hardware Installation
- 28 - 14) CLR_CMOS (Clearing CMOS Jumper) Use this jumper to factory...
Manual - Page 35
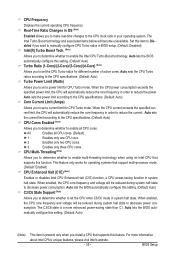
...Setup Auto sets the CPU Turbo ratios according to the CPU specifications. (Default: Auto) Turbo Power Limit (Watts)
Allows you to determine whether to let the CPU enter C3/C6 mode in system halt state. Auto lets the BIOS automatically configure this item to Disabled if you want to manually... CPU clock ratio in OS (Note)
Enabled allows you install a CPU that supports this function.
Manual - Page 40
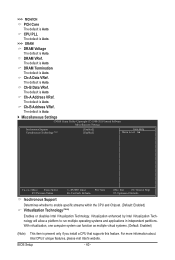
...Miscellaneous Settings
CMOS Setup Utility-Copyright (C) 1984-2010 Award Software Miscellaneous Settings
Isochronous Support ...specific streams within the CPU and Chipset. (Default: Enabled) Virtualization Technology (Note)
Enables or disables Intel Virtualization Technology. >>> MCH/ICH
PCH Core The default is Auto. DRAM VRef. The default is present only if you install a CPU that supports...
Manual - Page 55

... "Xpress Install" is automatically displayed which looks like that are recommended to automatically install the utilities. Click Yes to install. Or click No if you wish to install new GIGABYTE utilities. Failure to install on the Application Software page later.
• For USB 2.0 driver support under the Windows XP operating system, please install the Windows XP Service Pack 1 or...
Manual - Page 72
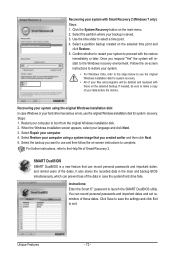
...deleted and replaced with those on -screen instructions to restore ...passwords and important dates, and remind users of Smart Recovery 2. Restart your hard drive has serious errors, use the original Windows installation disk for system recovery. Select Repair your computer using the original Windows installation disk: In case Windows or your computer to exit. Click Save to save the settings...
Manual - Page 77
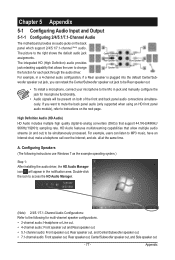
...supported when using an HD front panel audio module), refer to instructions on the back
panel which support 2/4/5.1/7.1-channel (Note) audio. If you can listen to the following instructions use Windows 7 as the example operating system.)
Step 1: After installing the audio driver...that allow multiple audio streams (in jack and manually configure the jack for microphone functionality.
• ...
Manual - Page 80
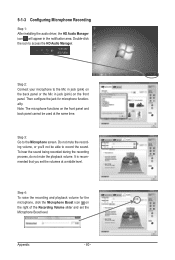
...icon to the Microphone screen.
Do not mute the recording volume, or you set the Microphone Boost level. It is recommended that you 'll not be ...right of the Recording Volume slider and set the volumes at the same time.
Step 2: Connect your microphone to record the sound. 5-1-3 Configuring Microphone Recording
Step 1: After installing the audio driver, the HD Audio Manager icon will ...
Manual - Page 83
... Audio Bus or Unknown device is
still on GIGABYTE's website. A: The following Award BIOS beep code descriptions may help you identify possible computer problems.
(For reference only.)
1 short: System boots successfully
2 short: CMOS setting error
1 long, 9 short: BIOS ROM error
1 long, 1 short: Memory or motherboard error
Continuous long beeps: Graphics card not inserted properly...
Gigabyte GA-P65A-UD3 Reviews
We have not received any reviews for Gigabyte yet.