Manual
Page 16
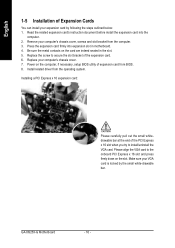
... your computer's chassis cover. 7. Be sure the metal contacts on the computer, if necessary, setup BIOS utility of the expansion card. 6. Install related driver from the computer. 3. GA-8I925X-G Motherboard - 16 - Read the related expansion card's instruction document before install the expansion card into expansion slot in the slot. 5. Please align the VGA...
... your computer's chassis cover. 7. Be sure the metal contacts on the computer, if necessary, setup BIOS utility of the expansion card. 6. Install related driver from the computer. 3. GA-8I925X-G Motherboard - 16 - Read the related expansion card's instruction document before install the expansion card into expansion slot in the slot. 5. Please align the VGA...
Manual
Page 48
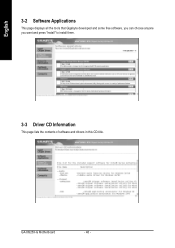
English 3-2 Software Applications This page displays all the tools that Gigabyte developed and some free software, you can choose anyone you want and press "install" to install them. 3-3 Driver CD Information This page lists the contents of software and drivers in this CD-title. GA-8I925X-G Motherboard - 48 -
English 3-2 Software Applications This page displays all the tools that Gigabyte developed and some free software, you can choose anyone you want and press "install" to install them. 3-3 Driver CD Information This page lists the contents of software and drivers in this CD-title. GA-8I925X-G Motherboard - 48 -
Manual
Page 52
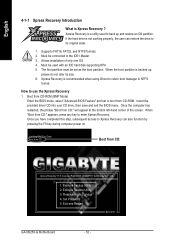
... its original state. 1. Execute Restore Utility 3. Must be used to its size. 6. How to the IDE1 Master 3. Insert the provided driver CD into your CD drive, then save and exit the BIOS menu. Set Password 5. Xpress Recovery is a utility used with an IDE ...GIGABYTE Technology CO. , Ltd. 1. Remove Backup Image 4. Verifying DMI Pool Data Boot from CD: Boot from CD-ROM (BMP Mode) Enter the BIOS menu, select "Advanced BIOS Feature" and set as the boot partition. Execute Backup Utility 2. Allows installation of the screen. Exit and Restart Build 2011 GA-8I925X...
... its original state. 1. Execute Restore Utility 3. Must be used to its size. 6. How to the IDE1 Master 3. Insert the provided driver CD into your CD drive, then save and exit the BIOS menu. Set Password 5. Xpress Recovery is a utility used with an IDE ...GIGABYTE Technology CO. , Ltd. 1. Remove Backup Image 4. Verifying DMI Pool Data Boot from CD: Boot from CD-ROM (BMP Mode) Enter the BIOS menu, select "Advanced BIOS Feature" and set as the boot partition. Execute Backup Utility 2. Allows installation of the screen. Exit and Restart Build 2011 GA-8I925X...
Manual
Page 72
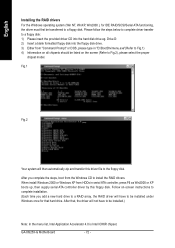
...formatted floppy disk into the hard disk drive eg. After you add a new hard drive to a RAID array, the RAID driver will have to Fig.2), please select the proper chipset model. GA-8I925X-G Motherboard - 72 - After that hard drive. When install Windows 2000 or Windows XP from HDDs in "D:\BootDrv\menu.exe... "Command Prompt" or DOS, please type in serial ATA controller, press F6 as Win2000 or XP boots up, then supply serial ATA controller driver by this driver file to the floppy disk. Fig.1 Fig.2 (Note) Your system will not have to be installed under Windows once for IDE RAID/SCSI...
...formatted floppy disk into the hard disk drive eg. After you add a new hard drive to a RAID array, the RAID driver will have to Fig.2), please select the proper chipset model. GA-8I925X-G Motherboard - 72 - After that hard drive. When install Windows 2000 or Windows XP from HDDs in "D:\BootDrv\menu.exe... "Command Prompt" or DOS, please type in serial ATA controller, press F6 as Win2000 or XP boots up, then supply serial ATA controller driver by this driver file to the floppy disk. Fig.1 Fig.2 (Note) Your system will not have to be installed under Windows once for IDE RAID/SCSI...
Manual
Page 74
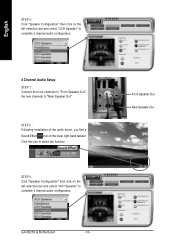
... to "Rear Speaker Out". English STEP 3: Click "Speaker Configuration" then click on the left selection bar and select "4CH Speaker" to complete 4 channel audio configuration. GA-8I925X-G Motherboard - 74 - STEP 2 : Following installation of the audio driver, you find a Sound Effect icon on the lower right hand taskbar.
... to "Rear Speaker Out". English STEP 3: Click "Speaker Configuration" then click on the left selection bar and select "4CH Speaker" to complete 4 channel audio configuration. GA-8I925X-G Motherboard - 74 - STEP 2 : Following installation of the audio driver, you find a Sound Effect icon on the lower right hand taskbar.
Manual
Page 76
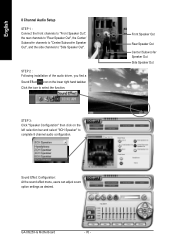
... complete 8 channel audio configuration. STEP 2 : Following installation of the audio driver, you find a Sound Effect icon on the left selection bar and select "8CH Speaker" to select the function. Front Speaker Out Rear Speaker Out Center/Subwoofer Speaker Out Side Speaker Out GA-8I925X-G Motherboard - 76 - STEP 3: Click "Speaker Configuration" then click on...
... complete 8 channel audio configuration. STEP 2 : Following installation of the audio driver, you find a Sound Effect icon on the left selection bar and select "8CH Speaker" to select the function. Front Speaker Out Rear Speaker Out Center/Subwoofer Speaker Out Side Speaker Out GA-8I925X-G Motherboard - 76 - STEP 3: Click "Speaker Configuration" then click on...
