Manual
Page 12
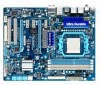
... slot. Hardware Installation - 12 - When PCIEX8 is to be installed, be sure to install it in the DDR3_3 and DDR3_4 memory sockets. (Note 3) For optimum performance, if only one PCI Express graphics card is populated with a PCI Express graphics card, the PCIEX16 slot will operate at up to Windows 32-bit...
... slot. Hardware Installation - 12 - When PCIEX8 is to be installed, be sure to install it in the DDR3_3 and DDR3_4 memory sockets. (Note 3) For optimum performance, if only one PCI Express graphics card is populated with a PCI Express graphics card, the PCIEX16 slot will operate at up to Windows 32-bit...
Manual
Page 16
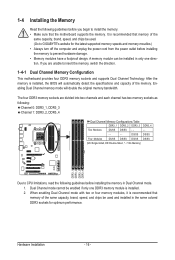
... Dual Channel memory mode will automatically detect the specifications and capacity of the same capacity, brand, speed, and chips be used . (Go to GIGABYTE's website for optimum performance. It is recommended that memory of the memory. After the memory is installed, the BIOS will double the original memory bandwidth. Dual Channel mode...
... Dual Channel memory mode will automatically detect the specifications and capacity of the same capacity, brand, speed, and chips be used . (Go to GIGABYTE's website for optimum performance. It is recommended that memory of the memory. After the memory is installed, the BIOS will double the original memory bandwidth. Dual Channel mode...

Manual
Page 21
... Mic in devices such as an optical drive, walkman, etc. Use this audio jack for a headphone or 2-channel speaker. This jack can be used to perform different functions via the audio software. Only microphones still MUST be connected to the default Mic in jack ( ). Microphones must be connected to this jack...
... Mic in devices such as an optical drive, walkman, etc. Use this audio jack for a headphone or 2-channel speaker. This jack can be used to perform different functions via the audio software. Only microphones still MUST be connected to the default Mic in jack ( ). Microphones must be connected to this jack...

Manual
Page 27
... keeps blinking when the sys- S1 Blinking tem is operating. Press the reset switch to restart the computer if the computer freezes and fails to perform a normal restart. • CI (Chassis Intrusion Header, Gray): Connects to the chassis intrusion switch/sensor on the chassis to the reset switch on the chassis...
... keeps blinking when the sys- S1 Blinking tem is operating. Press the reset switch to restart the computer if the computer freezes and fails to perform a normal restart. • CI (Chassis Intrusion Header, Gray): Connects to the chassis intrusion switch/sensor on the chassis to the reset switch on the chassis...
Manual
Page 36
... system/CPU temperature, system voltage and fan speed, etc. Load Fail-Safe Defaults Fail-Safe defaults are factory settings for the most stable, minimal-performance system operations. Load Optimized Defaults Optimized defaults are factory settings for optimal-performance system operations. Set Supervisor Password Change, set , or disable password.
... system/CPU temperature, system voltage and fan speed, etc. Load Fail-Safe Defaults Fail-Safe defaults are factory settings for the most stable, minimal-performance system operations. Load Optimized Defaults Optimized defaults are factory settings for optimal-performance system operations. Set Supervisor Password Change, set , or disable password.
Manual
Page 41
... to set the system voltages as required. (Default) 1.350V ~ 2.400V The adjustable range is from 1.350V to increase memory performance and stability. (Default: Enabled) Channel interleave Enables or disables memory channel interleaving. DRAM Voltage Control Allows you to 3.100V. Note...: Increasing memory voltage may result in damage to the memory or reduce the useful life of the memory to increase memory performance and stability. (Default: Enabled) ******** System Voltage Optimized ******** System Voltage Control Determines whether to simultaneously access different banks of...
... to set the system voltages as required. (Default) 1.350V ~ 2.400V The adjustable range is from 1.350V to increase memory performance and stability. (Default: Enabled) Channel interleave Enables or disables memory channel interleaving. DRAM Voltage Control Allows you to 3.100V. Note...: Increasing memory voltage may result in damage to the memory or reduce the useful life of the memory to increase memory performance and stability. (Default: Enabled) ******** System Voltage Optimized ******** System Voltage Control Determines whether to simultaneously access different banks of...

Manual
Page 46
Use the up or down arrow key to select a device and press to display the GIGABYTE Logo at system startup. Options are: Floppy, LS120, Hard Disk, CDROM, ZIP, USB-FDD, USB-ZIP, USB-CDROM, USB-HDD, Legacy LAN, Disabled. Capability Enables ... Technology) capability of the monitor display from the installed PCI graphics card or the PCI Express graphics card. Away Mode allows the system to silently perform unattended tasks while in a low-power mode that appears off. (Default: Disabled) Full Screen LOGO Show Allows you enter BIOS Setup. If the system BIOS...
Use the up or down arrow key to select a device and press to display the GIGABYTE Logo at system startup. Options are: Floppy, LS120, Hard Disk, CDROM, ZIP, USB-FDD, USB-ZIP, USB-CDROM, USB-HDD, Legacy LAN, Disabled. Capability Enables ... Technology) capability of the monitor display from the installed PCI graphics card or the PCI Express graphics card. Away Mode allows the system to silently perform unattended tasks while in a low-power mode that appears off. (Default: Disabled) Full Screen LOGO Show Allows you enter BIOS Setup. If the system BIOS...
Manual
Page 61
..., Xpress Recovery2 can only back up/restore the first physical hard drive that allows you to quickly compress and back up your system data and perform restoration of data and hard drive access speed may affect the speed at the end of system memory • VESA compatible graphics card • Windows...
..., Xpress Recovery2 can only back up/restore the first physical hard drive that allows you to quickly compress and back up your system data and perform restoration of data and hard drive access speed may affect the speed at the end of system memory • VESA compatible graphics card • Windows...
Manual
Page 67
... the Current BIOS File: Click Save Current BIOS to File to save the BIOS update file obtained from GIGABYTE Server, select the @BIOS server site closest to your location and then download the BIOS file that matches...matches your system after the system restarts. C. Updating the BIOS with the @BIOS Utility A. Do not use the G.O.M. (GIGABYTE Online Management) function when using @BIOS. 4. Using @BIOS 1. Make sure that is stable and do so may result ... and TSR (Terminate and Stay Resident) programs. This helps prevent unexpected failures when performing a BIOS update. 2.
... the Current BIOS File: Click Save Current BIOS to File to save the BIOS update file obtained from GIGABYTE Server, select the @BIOS server site closest to your location and then download the BIOS file that matches...matches your system after the system restarts. C. Updating the BIOS with the @BIOS Utility A. Do not use the G.O.M. (GIGABYTE Online Management) function when using @BIOS. 4. Using @BIOS 1. Make sure that is stable and do so may result ... and TSR (Terminate and Stay Resident) programs. This helps prevent unexpected failures when performing a BIOS update. 2.
Manual
Page 68
...provides information on the next reboot to allow the system to work with the optimum configurations tested to let the CPU reach the best overclocking performance. • Save allows you to save the current settings to a new profile (.txt file). • Load allows you to monitor ... take effect or click Default to restore to default values. The Graphics tab allows you to specify a Smart Fan mode. 4-3 EasyTune 6 GIGABYTE's EasyTune 6 is a simple and easy-to-use interface that allows users to fine-tune their system-related information without the need to install...
...provides information on the next reboot to allow the system to work with the optimum configurations tested to let the CPU reach the best overclocking performance. • Save allows you to save the current settings to a new profile (.txt file). • Load allows you to monitor ... take effect or click Default to restore to default values. The Graphics tab allows you to specify a Smart Fan mode. 4-3 EasyTune 6 GIGABYTE's EasyTune 6 is a simple and easy-to-use interface that allows users to fine-tune their system-related information without the need to install...

Manual
Page 69
...above data is able to provide exceptional power savings and enhanced power efficiency without sacrificing computing performance. Actual results may vary depending on testing method. - 69 - Actual performance may vary based on motherboard model. • CPU Power and Power Scores are for ...reference only. Featuring an advanced proprietary software design, GIGABYTE Easy Energy Saver is for reference only. The Easy Energy ...
...above data is able to provide exceptional power savings and enhanced power efficiency without sacrificing computing performance. Actual results may vary depending on testing method. - 69 - Actual performance may vary based on motherboard model. • CPU Power and Power Scores are for ...reference only. Featuring an advanced proprietary software design, GIGABYTE Easy Energy Saver is for reference only. The Easy Energy ...

Manual
Page 70
... Stealth Mode, the system continues to make any changes or completely close the application. (Note 1) Maximize system power saving with Dynamic CPU Frequency Function; system performance may be affected. (Note 2) 1: Normal Power Saving (default); 2: Advanced Power Saving; 3: Extreme Power Saving. (Note 3) The total amount of time since activating Easy Energy Saver...
... Stealth Mode, the system continues to make any changes or completely close the application. (Note 1) Maximize system power saving with Dynamic CPU Frequency Function; system performance may be affected. (Note 2) 1: Normal Power Saving (default); 2: Advanced Power Saving; 3: Extreme Power Saving. (Note 3) The total amount of time since activating Easy Energy Saver...

Manual
Page 72
... backup schedule Sets the percentage of the screen. If the computer is reached, the oldest backup will be performed at the bottom of hard drive space used for a long time, the backup will be performed on the size of the changed data files (Note 1) or copy files from a backup: To browse through...
... backup schedule Sets the percentage of the screen. If the computer is reached, the oldest backup will be performed at the bottom of hard drive space used for a long time, the backup will be performed on the size of the changed data files (Note 1) or copy files from a backup: To browse through...

Manual
Page 73
... may prepare only one end of the SATA signal cable to the rear of the SATA hard drive and the other end to ensure optimal performance, it is set to create RAID, you begin Please prepare: • At least two SATA hard drives (to available SATA port on this motherboard, the...
... may prepare only one end of the SATA signal cable to the rear of the SATA hard drive and the other end to ensure optimal performance, it is set to create RAID, you begin Please prepare: • At least two SATA hard drives (to available SATA port on this motherboard, the...

Manual
Page 81
...Non-RAID Non-RAID Confirm Creation [ RAID Disk Drive List ] [ Help ] Select RAID Level RAID 0 RAID 1 JBOD Data striped for performance Data mirrored for redundancy Data concatenated for the created RAID drive to be identified by system BIOS or OS. [fg]-Move Cursor [DEL,BS]-...cannot be set for creating an array (Figure 5). Create a RAID Array: In the main screen, press on the Create RAID Disk Drive item. Appendix Gigabyte Technology Corp. RAID Setup Utility v1.07.16G [ Create New RAID ] Name: Level: Disks: Block: Size: GRAID_ 0-Stripe Select Disk 128 KB...
...Non-RAID Non-RAID Confirm Creation [ RAID Disk Drive List ] [ Help ] Select RAID Level RAID 0 RAID 1 JBOD Data striped for performance Data mirrored for redundancy Data concatenated for the created RAID drive to be identified by system BIOS or OS. [fg]-Move Cursor [DEL,BS]-...cannot be set for creating an array (Figure 5). Create a RAID Array: In the main screen, press on the Create RAID Disk Drive item. Appendix Gigabyte Technology Corp. RAID Setup Utility v1.07.16G [ Create New RAID ] Name: Level: Disks: Block: Size: GRAID_ 0-Stripe Select Disk 128 KB...
Manual
Page 89
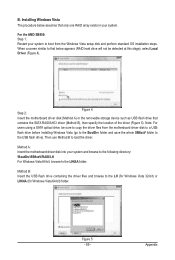
... files and browse to load the driver. Figure 5 - 89 - Appendix When a screen similar to copy the driver files from the Windows Vista setup disk and perform standard OS installation steps. Then use Method B to the LH (for Windows Vista 32-bit) or LH64A (for Windows Vista 64-bit) folder. Installing Windows...
... files and browse to load the driver. Figure 5 - 89 - Appendix When a screen similar to copy the driver files from the Windows Vista setup disk and perform standard OS installation steps. Then use Method B to the LH (for Windows Vista 32-bit) or LH64A (for Windows Vista 64-bit) folder. Installing Windows...
Manual
Page 91
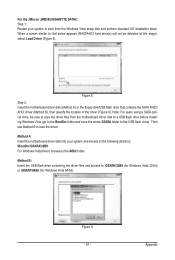
... the driver (Figure 9). Method B: Insert the USB flash drive containing the driver files and browse to load the driver. For the JMicron JMB362/GIGABYTE SATA2: Step 1: Restart your system and browse to the following directory: \BootDrv\GSATA\32Bit For Windows Vista 64-bit, browse to the 64Bit folder...drive that below appears (RAID/AHCI hard drive(s) will not be sure to copy the driver files from the Windows Vista setup disk and perform standard OS installation steps. Appendix Note: For users using a SATA optical drive, be detected at this stage), select Load Driver (Figure 8). Figure 9...
... the driver (Figure 9). Method B: Insert the USB flash drive containing the driver files and browse to load the driver. For the JMicron JMB362/GIGABYTE SATA2: Step 1: Restart your system and browse to the following directory: \BootDrv\GSATA\32Bit For Windows Vista 64-bit, browse to the 64Bit folder...drive that below appears (RAID/AHCI hard drive(s) will not be sure to copy the driver files from the Windows Vista setup disk and perform standard OS installation steps. Appendix Note: For users using a SATA optical drive, be detected at this stage), select Load Driver (Figure 8). Figure 9...

Manual
Page 94
Press again. [ Main Menu ] Create RAID Disk Drive Delete RAID Disk Drive Revert HDD to new hard drive in the operating system to perform the rebuild. • Rebuilding with a new one. When done, the status of the screen. Appendix - 94 - RAID Setup Utility v1.07.16G [ ... RAID Inside Non-RAID [ RAID Disk Drive List ] Model Name RDD0: GRAID RAID Level 1-Mirror Capacity 120 GB Status Degraded Members(HDDx) 0? Gigabyte Technology Corp. In the Main Menu block, select Rebuild Mirror Drive and press . Press to enter the utility. Use either the RAID setup utility ...
Press again. [ Main Menu ] Create RAID Disk Drive Delete RAID Disk Drive Revert HDD to new hard drive in the operating system to perform the rebuild. • Rebuilding with a new one. When done, the status of the screen. Appendix - 94 - RAID Setup Utility v1.07.16G [ ... RAID Inside Non-RAID [ RAID Disk Drive List ] Model Name RDD0: GRAID RAID Level 1-Mirror Capacity 120 GB Status Degraded Members(HDDx) 0? Gigabyte Technology Corp. In the Main Menu block, select Rebuild Mirror Drive and press . Press to enter the utility. Use either the RAID setup utility ...
Manual
Page 107
... party nor be used equipment must be prosecuted. We believe that the information contained herein was accurate in all respects at GIGABYTE are continuing our efforts to high-efficiency performance, all GIGABYTE motherboards fulfill European Union regulations for recycling, please contact your local government office, your waste equipment at the Customer Care number...
... party nor be used equipment must be prosecuted. We believe that the information contained herein was accurate in all respects at GIGABYTE are continuing our efforts to high-efficiency performance, all GIGABYTE motherboards fulfill European Union regulations for recycling, please contact your local government office, your waste equipment at the Customer Care number...

