
Manual
Page 5
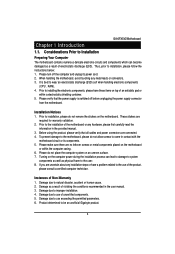
...unofficial Gigabyte product. 5 Please do not allow screws to use of the product, please consult a certified computer technician. Damage as physical harm to wear an electrostatic discharge (ESD) cuff when handling electronic components (CPU, RAM). 4. GA-6FXSV2 Motherboard Chapter 1 Introduction 1.1. Prior to the use exceeding... place the computer system on the motherboard. Damage due to come in the user manual. 3. Considerations Prior to use of uncertified components. 5. Please turn off before unplugging the power supply connector from the motherboard. These stickers are ...
...unofficial Gigabyte product. 5 Please do not allow screws to use of the product, please consult a certified computer technician. Damage as physical harm to wear an electrostatic discharge (ESD) cuff when handling electronic components (CPU, RAM). 4. GA-6FXSV2 Motherboard Chapter 1 Introduction 1.1. Prior to the use exceeding... place the computer system on the motherboard. Damage due to come in the user manual. 3. Considerations Prior to use of uncertified components. 5. Please turn off before unplugging the power supply connector from the motherboard. These stickers are ...
Manual
Page 12
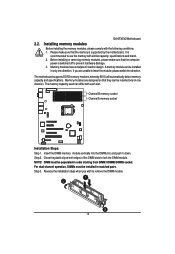
Please make sure that the memory is recommended to use the memory with similar capacity, specifications and brand. 2. Before installing or removing memory modules, please make sure that the computer power is switched ...the following conditions: 1. The memory capacity used can be populated in only one direction. Step 2. NOTE! Installing memory modules Before installing the memory modules, please comply with each slot. Step 3. Insert the DIMM memory module vertically into the DIMM slot, and push it down. GA-6FXSV2 Motherboard 2.2. Memory modules have a foolproof ...
Please make sure that the memory is recommended to use the memory with similar capacity, specifications and brand. 2. Before installing or removing memory modules, please make sure that the computer power is switched ...the following conditions: 1. The memory capacity used can be populated in only one direction. Step 2. NOTE! Installing memory modules Before installing the memory modules, please comply with each slot. Step 3. Insert the DIMM memory module vertically into the DIMM slot, and push it down. GA-6FXSV2 Motherboard 2.2. Memory modules have a foolproof ...
Manual
Page 18
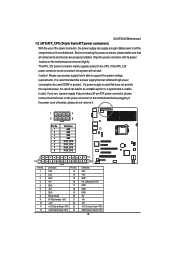
... that all the components on the motherboard. Align the power connector with its proper location on the motherboard before plugging in the power cord; Please use a power supply that is not connected, the system will not start . otherwise, please do not remove it. 1 4 5 8 1 13 Pin No. 1 2 3 4 5 6 7 8 9 10 11 12 ... GND GND -5V +5V +5V +5V (Only for 24-pin ATX) GND(Only for 24-pin ATX) 18 GA-6FXSV2 Motherboard 1/2 ) ATX/ATX_CPU (24-pin/ 8-pin ATX power connectors) With the use of the power connector, the power supply can lead to an unstable system or a system that is unable to start...
... that all the components on the motherboard. Align the power connector with its proper location on the motherboard before plugging in the power cord; Please use a power supply that is not connected, the system will not start . otherwise, please do not remove it. 1 4 5 8 1 13 Pin No. 1 2 3 4 5 6 7 8 9 10 11 12 ... GND GND -5V +5V +5V +5V (Only for 24-pin ATX) GND(Only for 24-pin ATX) 18 GA-6FXSV2 Motherboard 1/2 ) ATX/ATX_CPU (24-pin/ 8-pin ATX power connectors) With the use of the power connector, the power supply can lead to an unstable system or a system that is unable to start...
Manual
Page 21
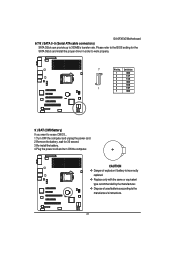
GA-6FXSV2 Motherboard 6/7/8 ) SATA 0~5 (Serial ATA cable connectors) SATA 3Gb/s can provide up to work properly. 7 Pin No. Please refer to the BIOS setting for 30 second. 3.... Danger of explosion if battery is incorrectly replaced. Replace only with the same or equivalent type recommended by the manufacturer. Dispose of used batteries according to erase CMOS... 1.Turn OFF the computer and unplug the power cord. 2.Remove the battery, wait for the SATA 3Gb/s and install the...
GA-6FXSV2 Motherboard 6/7/8 ) SATA 0~5 (Serial ATA cable connectors) SATA 3Gb/s can provide up to work properly. 7 Pin No. Please refer to the BIOS setting for 30 second. 3.... Danger of explosion if battery is incorrectly replaced. Replace only with the same or equivalent type recommended by the manufacturer. Dispose of used batteries according to erase CMOS... 1.Turn OFF the computer and unplug the power cord. 2.Remove the battery, wait for the SATA 3Gb/s and install the...
Manual
Page 26
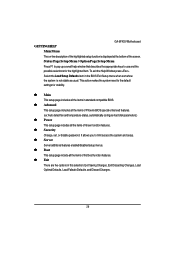
Status Page Setup Menu / Option Page Setup Menu Press F1 to pop up a small help window that describes the appropriate keys to use and the possible selections for stability. Main This setup page includes all the items in standard compatible BIOS. Advanced This setup page ...features. Exit There are five options in the BIOS Exit Setup menu when somehow the system is displayed at the bottom of the screen. GA-6FXSV Motherboard GETTINGHELP Main Menu The on-line description of the highlighted setup function is not stable as usual. Select the Load Setup Defaults item...
Status Page Setup Menu / Option Page Setup Menu Press F1 to pop up a small help window that describes the appropriate keys to use and the possible selections for stability. Main This setup page includes all the items in standard compatible BIOS. Advanced This setup page ...features. Exit There are five options in the BIOS Exit Setup menu when somehow the system is displayed at the bottom of the screen. GA-6FXSV Motherboard GETTINGHELP Main Menu The on-line description of the highlighted setup function is not stable as usual. Select the Load Setup Defaults item...
Manual
Page 27
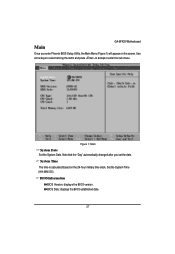
System Time The time is calculated based on the screen. Figure 1: Main System Date Set the System Date. GA-6FXSV Motherboard Main Once you set the date. Use arrow keys to select among the items and press to accept or enter the sub-menu. Note that the "Day" automatically changed after you enter Phoenix BIOS Setup Utility, the Main Menu (Figure 1) will appear on the 24-hour military time clock. BIOS Date: displays the BIOS established date. 27 Set the System Time (HH:MM:SS) BIOS Information BIOS Version: displays the BIOS version.
System Time The time is calculated based on the screen. Figure 1: Main System Date Set the System Date. GA-6FXSV Motherboard Main Once you set the date. Use arrow keys to select among the items and press to accept or enter the sub-menu. Note that the "Day" automatically changed after you enter Phoenix BIOS Setup Utility, the Main Menu (Figure 1) will appear on the 24-hour military time clock. BIOS Date: displays the BIOS established date. 27 Set the System Time (HH:MM:SS) BIOS Information BIOS Version: displays the BIOS version.
Manual
Page 35
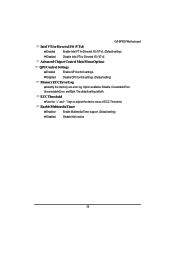
GA-6FXSV Motherboard Intel VT for Directed I/O (VT-d) Enabled Enable Intel VT for Directed I/O (VT-d). (Default setting) Disabled Disable Intel VT for Directed I/O (VT-d). The default ... setting) Disabled Disable this function. 35 Disabled Disable QPI Control settings. (Default setting) Memory ECC Error Log Identify the memory ecc error log. ECC Threshold Use the "+" and "-" keys to adjust the desire value of ECC Threshold. Advanced Chipset Control Main Menu Options QPI Control Settings Enabled Enable QPI Control settings...
GA-6FXSV Motherboard Intel VT for Directed I/O (VT-d) Enabled Enable Intel VT for Directed I/O (VT-d). (Default setting) Disabled Disable Intel VT for Directed I/O (VT-d). The default ... setting) Disabled Disable this function. 35 Disabled Disable QPI Control settings. (Default setting) Memory ECC Error Log Identify the memory ecc error log. ECC Threshold Use the "+" and "-" keys to adjust the desire value of ECC Threshold. Advanced Chipset Control Main Menu Options QPI Control Settings Enabled Enable QPI Control settings...

Manual
Page 39
...to maximize the IDE data transfer rate. LBA Mode This field shows if the device type in the specific IDE channel. 39 GA-6FXSV Motherboard Note that the specifications of Multi-Sector Transfer Mode. Hard drive information should be labeled on this category. Auto: Set... parameters automatically. (Default setting) CD-ROM: Use for this information. Enter the appropriate option based on the outside device casing. ATAPI Removable: Removable disk drive is installed here. Multi...
...to maximize the IDE data transfer rate. LBA Mode This field shows if the device type in the specific IDE channel. 39 GA-6FXSV Motherboard Note that the specifications of Multi-Sector Transfer Mode. Hard drive information should be labeled on this category. Auto: Set... parameters automatically. (Default setting) CD-ROM: Use for this information. Enter the appropriate option based on the outside device casing. ATAPI Removable: Removable disk drive is installed here. Multi...
Manual
Page 40
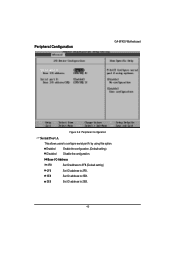
Base I/O Address 3F8 Set IO address to 3F8.(Default setting) 2F8 Set IO address to 2F8. 3E8 Set IO address to 3E8. 2E8 Set IO address to configure serial port A by using this option. Enabled Disabled Enable the configuration. (Default setting) Disable the configuration. Peripheral Configuration GA-6FXSV Motherboard Figure 2-6: Peripheral Configuration Serial Port A This allows users to 2E8. 40
Base I/O Address 3F8 Set IO address to 3F8.(Default setting) 2F8 Set IO address to 2F8. 3E8 Set IO address to 3E8. 2E8 Set IO address to configure serial port A by using this option. Enabled Disabled Enable the configuration. (Default setting) Disable the configuration. Peripheral Configuration GA-6FXSV Motherboard Figure 2-6: Peripheral Configuration Serial Port A This allows users to 2E8. 40
Manual
Page 41
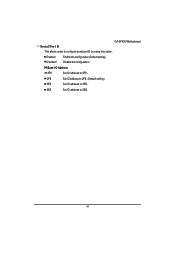
Enabled Disabled Enable the configuration (Default setting) Disable the configuration. Base I/O Address 3F8 Set IO address to 3F8. 2F8 Set IO address to 2F8. (Default setting) 3E8 Set IO address to 3E8. 2E8 Set IO address to configure serial port B by using this option. GA-6FXSV Motherboard Serial Port B This allows users to 2E8. 41
Enabled Disabled Enable the configuration (Default setting) Disable the configuration. Base I/O Address 3F8 Set IO address to 3F8. 2F8 Set IO address to 2F8. (Default setting) 3E8 Set IO address to 3E8. 2E8 Set IO address to configure serial port B by using this option. GA-6FXSV Motherboard Serial Port B This allows users to 2E8. 41
Manual
Page 45
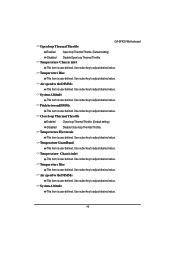
... to adjust desired value. Air speed to adjust desired value. System Altitude This item is user defined. Use nuber key to the DIMMs This item is user defined. Use nuber key to adjust desired value. GA-6FXSV Motherboard Open loop Thermal Throttle Enabled Open loop Thermal Throttle. (Default setting) Disabled Disable Open loop...
... to adjust desired value. Air speed to adjust desired value. System Altitude This item is user defined. Use nuber key to the DIMMs This item is user defined. Use nuber key to adjust desired value. GA-6FXSV Motherboard Open loop Thermal Throttle Enabled Open loop Thermal Throttle. (Default setting) Disabled Disable Open loop...

Manual
Page 46
GA-6FXSV Motherboard Pitch between DIMMs This item is user defined. Use nuber key to adjust desired value. FAN Speed Contyrol Enabled Enable FAN Speed Control. (Default setting) Disabled Disable FAN Speed Control. 46
GA-6FXSV Motherboard Pitch between DIMMs This item is user defined. Use nuber key to adjust desired value. FAN Speed Contyrol Enabled Enable FAN Speed Control. (Default setting) Disabled Disable FAN Speed Control. 46
Manual
Page 53
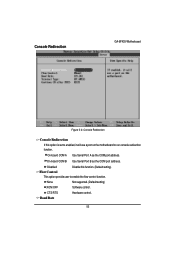
None Not supported. (Default setting) XON/OFF Software control. CTS/RTS Hardware control. Baud Rate 53 On-board COM A Use Serial Port A as the COM port address. On-board COM B Use Serial Port B as the COM port address. Console Redirection GA-6FXSV Motherboard Figure 5-2: Console Redirection Console Redirection If this function. (Default setting) Flow Control This option provide user to run console redirection function. Disabled Disable this option is set to enabled, it will use a port on the motherboard to enable the flow control function.
None Not supported. (Default setting) XON/OFF Software control. CTS/RTS Hardware control. Baud Rate 53 On-board COM A Use Serial Port A as the COM port address. On-board COM B Use Serial Port B as the COM port address. Console Redirection GA-6FXSV Motherboard Figure 5-2: Console Redirection Console Redirection If this function. (Default setting) Flow Control This option provide user to run console redirection function. Disabled Disable this option is set to enabled, it will use a port on the motherboard to enable the flow control function.
Manual
Page 56
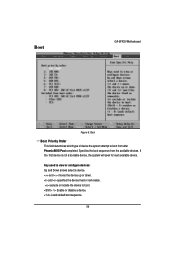
and moves the device up or down. Loads default boot sequence. 56 Boot GA-6FXSV Motherboard Figure 6: Boot Boot Priority Order This field determines which type of device the system attempt to boot from the available devices. Key used to boot. If the first device is not a bootable device, the system will seek...
and moves the device up or down. Loads default boot sequence. 56 Boot GA-6FXSV Motherboard Figure 6: Boot Boot Priority Order This field determines which type of device the system attempt to boot from the available devices. Key used to boot. If the first device is not a bootable device, the system will seek...

