
Manual
Page 8
...firmly into the computer. 2. Be sure the metal contacts on the computer, if necessary, setup BIOS utility of expansion card from BIOS. 8. Install related driver from the computer. 3. Read the related expansion card's instruction document before installing the expansion card into expansion slot in the slot. 5. English 1-4 Installation... slot bracket of Expansion Cards You can install your computer's chassis cover. 7. Replace your expansion card by following the steps outlined below: 1. GA-7CN700ID Motherboard - 8 - Power on the card are indeed seated in motherboard. 4.
...firmly into the computer. 2. Be sure the metal contacts on the computer, if necessary, setup BIOS utility of expansion card from BIOS. 8. Install related driver from the computer. 3. Read the related expansion card's instruction document before installing the expansion card into expansion slot in the slot. 5. English 1-4 Installation... slot bracket of Expansion Cards You can install your computer's chassis cover. 7. Replace your expansion card by following the steps outlined below: 1. GA-7CN700ID Motherboard - 8 - Power on the card are indeed seated in motherboard. 4.

Manual
Page 12
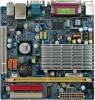
... for information on settings, please refer to 150MB/s transfer rate. Pin No. Definition 1 GND 7 1 2 TXP 3 TXN 4 GND 5 RXN 6 RXP 7 GND GA-7CN700ID Motherboard - 12 - English 2) IDE1 / IDE2 (IDE Connector) An IDE device connects to work properly. Before attaching the IDE cable, please take note of the foolproof... up to the instructions located on one IDE device as Master and the other as Slave (for the Serial ATA and install the proper driver in the IDE connector. 40 39 2 IDE1 1 IDE2 3) SATA1/SATA2 (Serial ATA Connector,) Serial ATA can then connect to two IDE...
... for information on settings, please refer to 150MB/s transfer rate. Pin No. Definition 1 GND 7 1 2 TXP 3 TXN 4 GND 5 RXN 6 RXP 7 GND GA-7CN700ID Motherboard - 12 - English 2) IDE1 / IDE2 (IDE Connector) An IDE device connects to work properly. Before attaching the IDE cable, please take note of the foolproof... up to the instructions located on one IDE device as Master and the other as Slave (for the Serial ATA and install the proper driver in the IDE connector. 40 39 2 IDE1 1 IDE2 3) SATA1/SATA2 (Serial ATA Connector,) Serial ATA can then connect to two IDE...


