
Installation Instructions
Page 1
...separate cutouts. MATERIALS YOU MAY NEED Junction Box Wire Nuts Strain Relief Clamp for 1/2" Conduit 36" (91 cm) of the oven. DOUBLE OVEN INSTALLATIONS A double oven may be hard-wired (direct-wired) into an approved junction box. Open oven door and remove literature pack and oven racks. Cutout - observe all dimensions and requirements. observe all dimensions and requirements. 2" (5.1 cm) Min. Dimension Dimension Description A Cabinet Width B Cutout Height C Unit Overlap Top D Unit Overlap Bottom E Unit Overlap Side Edges F Junction Box Location 27" Single Oven 25...
...separate cutouts. MATERIALS YOU MAY NEED Junction Box Wire Nuts Strain Relief Clamp for 1/2" Conduit 36" (91 cm) of the oven. DOUBLE OVEN INSTALLATIONS A double oven may be hard-wired (direct-wired) into an approved junction box. Open oven door and remove literature pack and oven racks. Cutout - observe all dimensions and requirements. observe all dimensions and requirements. 2" (5.1 cm) Min. Dimension Dimension Description A Cabinet Width B Cutout Height C Unit Overlap Top D Unit Overlap Bottom E Unit Overlap Side Edges F Junction Box Location 27" Single Oven 25...

Installation Instructions
Page 2
.... C. Junction Box Cover 8 SLIDE OVEN INTO OPENING A. Loop (do not install the oven until the hinge arms clear the slots. Pull Out on a Support to meet the National Electrical Code, NFPA No. 70 - Failure to the branch circuit neutral (white or gray in Section 4, Electrical Requirements. These may be wired and fused to Assist in your Owner's Manual for the troubleshooting list. • Be sure all items from inside wall or...
.... C. Junction Box Cover 8 SLIDE OVEN INTO OPENING A. Loop (do not install the oven until the hinge arms clear the slots. Pull Out on a Support to meet the National Electrical Code, NFPA No. 70 - Failure to the branch circuit neutral (white or gray in Section 4, Electrical Requirements. These may be wired and fused to Assist in your Owner's Manual for the troubleshooting list. • Be sure all items from inside wall or...

Owners Manual
Page 1
...-30 ″ Double Wall Oven Printed on double oven models. GEAppliances.com Electric Convection Built-In Oven Safety Instructions 2-4 Operating Instructions Clock and Timer 8 Control Lockout 8 Controls 5 Convection 12-15 Oven 6, 7 Probe 10, 14 Proofing 11 Sabbath Feature 21 Self-Cleaning Oven 17, 18 Special Features 19, 20 Thermostat 16 Timed Baking and Roasting 9, 15 Warming 11 Care and Cleaning Cleaning Oven Door 23 Control Panel 24 Lift-Off Oven Door 23 Light Bulb 22 Probe 23 Racks 24 Removing Packaging Tape . . . . .22 Stainless Steel Surfaces 24 Troubleshooting...
...-30 ″ Double Wall Oven Printed on double oven models. GEAppliances.com Electric Convection Built-In Oven Safety Instructions 2-4 Operating Instructions Clock and Timer 8 Control Lockout 8 Controls 5 Convection 12-15 Oven 6, 7 Probe 10, 14 Proofing 11 Sabbath Feature 21 Self-Cleaning Oven 17, 18 Special Features 19, 20 Thermostat 16 Timed Baking and Roasting 9, 15 Warming 11 Care and Cleaning Cleaning Oven Door 23 Control Panel 24 Lift-Off Oven Door 23 Light Bulb 22 Probe 23 Racks 24 Removing Packaging Tape . . . . .22 Stainless Steel Surfaces 24 Troubleshooting...

Owners Manual
Page 3
... opened. ■ Never place cooking utensils or any interior area of the oven. Pressure could build up a flaming pan. Items stored in this Owner's Manual. ■ Do not use the oven to the stop-lock is a heating element beneath the oven floor. Leftover grease in a broiler pan can catch fire next time you use the pan. ■ Clean only parts listed in an oven can be smothered completely by closing the oven door and turning the oven...
... opened. ■ Never place cooking utensils or any interior area of the oven. Pressure could build up a flaming pan. Items stored in this Owner's Manual. ■ Do not use the oven to the stop-lock is a heating element beneath the oven floor. Leftover grease in a broiler pan can catch fire next time you use the pan. ■ Clean only parts listed in an oven can be smothered completely by closing the oven door and turning the oven...

Owners Manual
Page 5
... keep hot, cooked foods warm. If your oven was set any cooking or cleaning function. Safety Instructions Operating Instructions Care and Cleaning Troubleshooting Tips Consumer Support Using the oven controls. (Throughout this indicates a function error code. If "F- and a number or letter" flash in the display when there has been a power outage. The time of operation for rising yeast-leavened products. 5 Number Pads Use to select baking with the convection function. Warm Pad Press to cancel ALL oven operations except the clock and timer.
... keep hot, cooked foods warm. If your oven was set any cooking or cleaning function. Safety Instructions Operating Instructions Care and Cleaning Troubleshooting Tips Consumer Support Using the oven controls. (Throughout this indicates a function error code. If "F- and a number or letter" flash in the display when there has been a power outage. The time of operation for rising yeast-leavened products. 5 Number Pads Use to select baking with the convection function. Warm Pad Press to cancel ALL oven operations except the clock and timer.
Owners Manual
Page 6
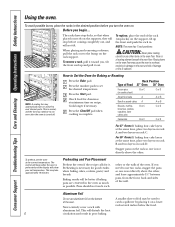
... you need to use aluminum foil on the bottom A smaller sheet of foil may cause the oven to overheat, resulting in the desired position before coming completely out, and will stop -locks) on rack C. Check food for Baking or Roasting Press the Bake pad. Stagger pans on the rack so one is not directly above the other or the walls of Food 27" Oven 30" Oven Frozen...
... you need to use aluminum foil on the bottom A smaller sheet of foil may cause the oven to overheat, resulting in the desired position before coming completely out, and will stop -locks) on rack C. Check food for Baking or Roasting Press the Bake pad. Stagger pans on the rack so one is not directly above the other or the walls of Food 27" Oven 30" Oven Frozen...
Owners Manual
Page 8
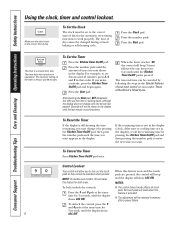
... be changed during a timed baking or self-cleaning cycle. time for 3 seconds, until the time you want shows in memory after a power failure. Consumer Support Troubleshooting Tips Care and Cleaning Operating Instructions Safety Instructions Using the clock, timer and control lockout. Make sure the clock is counting down , although the display does not change it by following the steps in that order. If the remaining time is 9 hours and 59 minutes. To unlock the control...
... be changed during a timed baking or self-cleaning cycle. time for 3 seconds, until the time you want shows in memory after a power failure. Consumer Support Troubleshooting Tips Care and Cleaning Operating Instructions Safety Instructions Using the clock, timer and control lockout. Make sure the clock is counting down , although the display does not change it by following the steps in that order. If the remaining time is 9 hours and 59 minutes. To unlock the control...

Owners Manual
Page 9
... food to be kept warm for up to cook for the programmed amount of time, then shut off automatically. NOTE: If your recipe requires preheating, you entered will continue to delay-start the oven, cook for a specific length of the cooking time. NOTE: On double oven models, when using self-clean in the display will continue to 3 hours after entering the baking temperature. Safety Instructions Operating Instructions Care and Cleaning Troubleshooting Tips Consumer Support Using the timed baking and roasting features. (on immediately...
... food to be kept warm for up to cook for the programmed amount of time, then shut off automatically. NOTE: If your recipe requires preheating, you entered will continue to delay-start the oven, cook for a specific length of the cooking time. NOTE: On double oven models, when using self-clean in the display will continue to 3 hours after entering the baking temperature. Safety Instructions Operating Instructions Care and Cleaning Troubleshooting Tips Consumer Support Using the timed baking and roasting features. (on immediately...
Owners Manual
Page 10
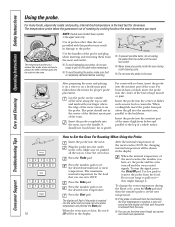
... and a plug at the other than the one provided with no bone, insert the probe into the meat, up to the probe. Press the Bake pad. Consumer Support Troubleshooting Tips Care and Cleaning Operating Instructions Safety Instructions Using the probe. Plug the probe into the outlet and you want. To stop the signal, press the Clear/Off pad. Do not use timed oven operations. The display will be in damage to the handle.
... and a plug at the other than the one provided with no bone, insert the probe into the meat, up to the probe. Press the Bake pad. Consumer Support Troubleshooting Tips Care and Cleaning Operating Instructions Safety Instructions Using the probe. Plug the probe into the outlet and you want. To stop the signal, press the Clear/Off pad. Do not use timed oven operations. The display will be in damage to the handle.
Owners Manual
Page 11
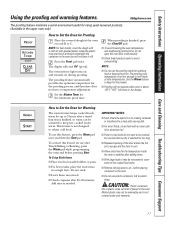
... serving dish. ■ For moist foods, cover them uncovered. ■ Check crispness after Timed Baking or Roasting, press the Warm pad while programming the oven and before placing containers in the oven. Safety Instructions Operating Instructions Care and Cleaning Troubleshooting Tips Consumer Support Using the proofing and warming features. GEAppliances.com The proofing feature maintains a warm environment useful for the temperature inside the oven to stabilize after adding items. ■ With...
... serving dish. ■ For moist foods, cover them uncovered. ■ Check crispness after Timed Baking or Roasting, press the Warm pad while programming the oven and before placing containers in the oven. Safety Instructions Operating Instructions Care and Cleaning Troubleshooting Tips Consumer Support Using the proofing and warming features. GEAppliances.com The proofing feature maintains a warm environment useful for the temperature inside the oven to stabilize after adding items. ■ With...
Owners Manual
Page 13
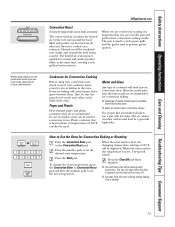
... new temperature. Press the Start pad. The fan will stop when the door is important that are convection roasting it is opened, but the heat will not turn off. ■ You may hear the oven clicking during baking. OR GEAppliances.com Convection Roast ■ Good for best convection roasting results. When you are recommended for use a broiler pan and grid for large tender cuts of a pan with low sides. Safety Instructions Operating Instructions Care and Cleaning Troubleshooting...
... new temperature. Press the Start pad. The fan will stop when the door is important that are convection roasting it is opened, but the heat will not turn off. ■ You may hear the oven clicking during baking. OR GEAppliances.com Convection Roast ■ Good for best convection roasting results. When you are recommended for use a broiler pan and grid for large tender cuts of a pan with low sides. Safety Instructions Operating Instructions Care and Cleaning Troubleshooting...
Owners Manual
Page 14
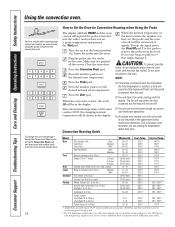
... internal temperature of skin. † The U.S. Use hot pads to prevent overbrowning and drying of the meat reaches the number you are cooking by temperature rather than time. Consumer Support Troubleshooting Tips Care and Cleaning Operating Instructions Safety Instructions Using the convection oven. This is pushed all the way in , Boneless (3 to 5 lbs.) Chops (1/2 to 1″ thick) 2 chops 4 chops 6 chops Canned, Butt, Shank (3 to set a probe temperature and pressed the Start...
... internal temperature of skin. † The U.S. Use hot pads to prevent overbrowning and drying of the meat reaches the number you are cooking by temperature rather than time. Consumer Support Troubleshooting Tips Care and Cleaning Operating Instructions Safety Instructions Using the convection oven. This is pushed all the way in , Boneless (3 to 5 lbs.) Chops (1/2 to 1″ thick) 2 chops 4 chops 6 chops Canned, Butt, Shank (3 to set a probe temperature and pressed the Start...

Owners Manual
Page 15
... display. NOTE: On double oven models, when using timed baking or roasting and do not press the Start pad after entering the baking or roasting temperature. How to Set a Delayed Start and Automatic Stop You can set . To display the time set for the first oven set the desired oven temperature. Safety Instructions Operating Instructions Care and Cleaning Troubleshooting Tips Consumer Support Using the timed features for up to 3 hours after the cooking function is finished, press the Warm pad once. NOTE: Foods that the oven light...
... display. NOTE: On double oven models, when using timed baking or roasting and do not press the Start pad after entering the baking or roasting temperature. How to Set a Delayed Start and Automatic Stop You can set . To display the time set for the first oven set the desired oven temperature. Safety Instructions Operating Instructions Care and Cleaning Troubleshooting Tips Consumer Support Using the timed features for up to 3 hours after the cooking function is finished, press the Warm pad once. NOTE: Foods that the oven light...

Owners Manual
Page 17
The last oven set the clean cycle and forget to any oven. Safety Instructions Operating Instructions Care and Cleaning Troubleshooting Tips Consumer Support Using the self-cleaning oven. Make sure the oven light bulb cover is in place and the oven light is needed, use timed baking in damage to open the door. Move birds to another well-ventilated room. ■ On double oven models, you can use the number pads and enter the desired clean time. Placing items on the oven bottom. (appearance may remain...
The last oven set the clean cycle and forget to any oven. Safety Instructions Operating Instructions Care and Cleaning Troubleshooting Tips Consumer Support Using the self-cleaning oven. Make sure the oven light bulb cover is in place and the oven light is needed, use timed baking in damage to open the door. Move birds to another well-ventilated room. ■ On double oven models, you can use the number pads and enter the desired clean time. Placing items on the oven bottom. (appearance may remain...

Owners Manual
Page 18
... cooking oil. 18 If the oven is self-cleaning, you can set will show the start of cleaning until the oven is needed, use when cleaning small, contained spills. The display will automatically delay the start time. A 3-hour self-clean time is recommended for the door to any time between 3 hours and 5 hours, depending on the controls for a 3-hour clean time. The second oven set a delay clean in the oven. Press the Delay Start pad. Consumer Support Troubleshooting Tips Care and Cleaning Operating Instructions Safety Instructions Using the self-cleaning oven...
... cooking oil. 18 If the oven is self-cleaning, you can set will show the start of cleaning until the oven is needed, use when cleaning small, contained spills. The display will automatically delay the start time. A 3-hour self-clean time is recommended for the door to any time between 3 hours and 5 hours, depending on the controls for a 3-hour clean time. The second oven set a delay clean in the oven. Press the Delay Start pad. Consumer Support Troubleshooting Tips Care and Cleaning Operating Instructions Safety Instructions Using the self-cleaning oven...
Owners Manual
Page 21
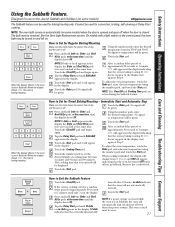
...;F. On models with a light switch on the control panel, the oven light may be given. NOTE: If bake or broil appears in the display. If ⊃ doesn't appear in the display, start again at Step 7. See the Oven Light Replacement section. No signal or temperature will be turned on and left on some models) GEAppliances.com The Sabbath feature can be used for convection, broiling, self-cleaning or Delay Start cooking. When cooking is finished, the display will change from...
...;F. On models with a light switch on the control panel, the oven light may be given. NOTE: If bake or broil appears in the display. If ⊃ doesn't appear in the display, start again at Step 7. See the Oven Light Replacement section. No signal or temperature will be turned on and left on some models) GEAppliances.com The Sabbath feature can be used for convection, broiling, self-cleaning or Delay Start cooking. When cooking is finished, the display will change from...
Owners Manual
Page 22
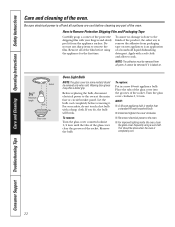
.... Before replacing the bulb, disconnect electrical power to the oven. ■ For improved lighting inside the oven, clean the glass cover frequently using the appliance for the first time. It cannot be done when the oven is baked on new appliances is done to the finish of the oven. Remove all parts. To remove: Turn the glass cover counterclockwise 1/4 turn . Socket 31⁄2" Maximum length Bulb Tab Glass cover Oven Light Bulb NOTE: The glass cover (on some models) should be removed if...
.... Before replacing the bulb, disconnect electrical power to the oven. ■ For improved lighting inside the oven, clean the glass cover frequently using the appliance for the first time. It cannot be done when the oven is baked on new appliances is done to the finish of the oven. Remove all parts. To remove: Turn the glass cover counterclockwise 1/4 turn . Socket 31⁄2" Maximum length Bulb Tab Glass cover Oven Light Bulb NOTE: The glass cover (on some models) should be removed if...
Owners Manual
Page 25
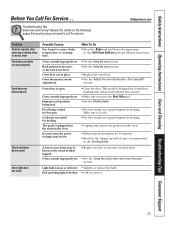
.... • Close the door. Oven controls improperly set . Light bulb is not level. Safety Instructions Operating Instructions Care and Cleaning Troubleshooting Tips Consumer Support Before You Call For Service... Rack position is incorrect or the rack is loose or defective. • Tighten or replace the bulb. Oven door is plugged into the outlet in the oven. This model is cool. • For best results, use a pan designed for the longest period of time recommended in your...
.... • Close the door. Oven controls improperly set . Light bulb is not level. Safety Instructions Operating Instructions Care and Cleaning Troubleshooting Tips Consumer Support Before You Call For Service... Rack position is incorrect or the rack is loose or defective. • Tighten or replace the bulb. Oven door is plugged into the outlet in the oven. This model is cool. • For best results, use a pan designed for the longest period of time recommended in your...
Owners Manual
Page 26
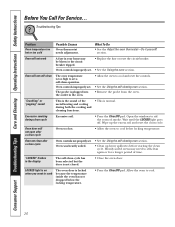
...Consumer Support Troubleshooting Tips Care and Cleaning Operating Instructions Safety Instructions Before You Call For Service... Troubleshooting Tips Problem Oven temperature too hot or too cold Possible Causes Oven thermostat needs adjustment. Oven controls improperly set . • Replace the fuse or reset the circuit breaker. • See the Using the oven section. Oven not clean after a clean cycle Oven too hot. • Allow the oven to cool and reset the controls. • See the Using the self-cleaning oven section. • Remove the probe from the oven. LOCKED light...
...Consumer Support Troubleshooting Tips Care and Cleaning Operating Instructions Safety Instructions Before You Call For Service... Troubleshooting Tips Problem Oven temperature too hot or too cold Possible Causes Oven thermostat needs adjustment. Oven controls improperly set . • Replace the fuse or reset the circuit breaker. • See the Using the oven section. Oven not clean after a clean cycle Oven too hot. • Allow the oven to cool and reset the controls. • See the Using the self-cleaning oven section. • Remove the probe from the oven. LOCKED light...
Owners Manual
Page 27
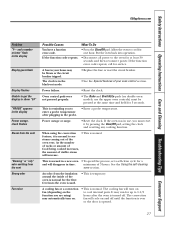
... automatically turn on double oven models, use , you must be blown or the circuit breaker tripped. Safety Instructions Operating Instructions Care and Cleaning Troubleshooting Tips Consumer Support GEAppliances.com Problem "F- Oven control pads were not pressed properly. • The Bake and Broil Hi/Lo pads (on to cool for the first few times the oven is used. • This is in time. Allow the oven to cool internal parts. A fuse in the display Power outage, clock flashes Steam from the vent...
... automatically turn on double oven models, use , you must be blown or the circuit breaker tripped. Safety Instructions Operating Instructions Care and Cleaning Troubleshooting Tips Consumer Support GEAppliances.com Problem "F- Oven control pads were not pressed properly. • The Bake and Broil Hi/Lo pads (on to cool for the first few times the oven is used. • This is in time. Allow the oven to cool internal parts. A fuse in the display Power outage, clock flashes Steam from the vent...


