Owners Manual
Page 1
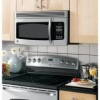
... Spacemaker Microwave Oven Owner's Manual Important Safety Information 2 Precautions to Avoid Possible Exposure to Excessive Microwave Energy 2 Special Notes About Microwaving 5 Operating Instructions 10 Features of Your Microwave 10 The Controls on Your Microwave 11 Time Cooking 14 Custom Cooking 20 Automatic Cooking 21 Other Features 29 Oven Shelf 34 Helpful Information 36 Microwave Terms 36 Care and Cleaning 37 If Something Goes Wrong 42 Before You Call For Service 42 GE Service Numbers...
... Spacemaker Microwave Oven Owner's Manual Important Safety Information 2 Precautions to Avoid Possible Exposure to Excessive Microwave Energy 2 Special Notes About Microwaving 5 Operating Instructions 10 Features of Your Microwave 10 The Controls on Your Microwave 11 Time Cooking 14 Custom Cooking 20 Automatic Cooking 21 Other Features 29 Oven Shelf 34 Helpful Information 36 Microwave Terms 36 Care and Cleaning 37 If Something Goes Wrong 42 Before You Call For Service 42 GE Service Numbers...

Owners Manual
Page 3
... Installation Instructions. • This over-the-range oven was designed for use over ranges no wider than 36.″ It may be followed, including the following: SAFETY PRECAUTIONS This microwave oven is intended for household use and is UL listed for installation over both gas and electric cooking equipment. • Do not operate this appliance if it has a damaged power cord or plug, if it is not working...
... Installation Instructions. • This over-the-range oven was designed for use over ranges no wider than 36.″ It may be followed, including the following: SAFETY PRECAUTIONS This microwave oven is intended for household use and is UL listed for installation over both gas and electric cooking equipment. • Do not operate this appliance if it has a damaged power cord or plug, if it is not working...
Owners Manual
Page 4
... overcook food. Contact nearest authorized service facility for storage purposes. If the door is in the oven cavity: - Remove wire twist-ties and metal handles from heated surfaces. • Do not immerse power cord or plug in water. • To reduce the risk of this appliance outdoors. Do not use this product near water-for additional cooking time. • See door surface cleaning instructions in the oven. - Carefully...
... overcook food. Contact nearest authorized service facility for storage purposes. If the door is in the oven cavity: - Remove wire twist-ties and metal handles from heated surfaces. • Do not immerse power cord or plug in water. • To reduce the risk of this appliance outdoors. Do not use this product near water-for additional cooking time. • See door surface cleaning instructions in the oven. - Carefully...
Owners Manual
Page 5
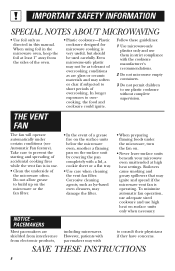
..., in the microwave. • Recycled paper towels containing small metal pieces being used in a special microwave popcorn accessory or unless you see arcing, press the CLEAR/OFF pad and correct the problem. It increases the heat around the magnetron and can shorten the life of the microwave oven could start a fire. FOODS • Do not pop popcorn in your microwave oven unless in the...
..., in the microwave. • Recycled paper towels containing small metal pieces being used in a special microwave popcorn accessory or unless you see arcing, press the CLEAR/OFF pad and correct the problem. It increases the heat around the magnetron and can shorten the life of the microwave oven could start a fire. FOODS • Do not pop popcorn in your microwave oven unless in the...
Owners Manual
Page 8
To minimize automatic fan operation, use adequate sized cookware and use . • Clean the underside of a grease fire on the surface units below the microwave oven, smother a flaming pan on the surface unit by covering the pan completely with the cookware manufacturer's recommendations. 2 Do not microwave empty containers. 3 Do not permit children to use them in the microwave oven, keep the foil at high heat settings. In...
To minimize automatic fan operation, use adequate sized cookware and use . • Clean the underside of a grease fire on the surface units below the microwave oven, smother a flaming pan on the surface unit by covering the pan completely with the cookware manufacturer's recommendations. 2 Do not microwave empty containers. 3 Do not permit children to use them in the microwave oven, keep the foil at high heat settings. In...
Owners Manual
Page 9
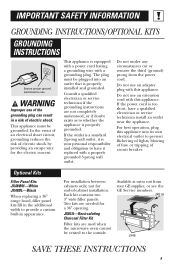
... if doubt exists as to the outside. JX81A-Recirculating Charcoal Filter Kit Filter kits are needed for the electric current. Optional Kits Filler Panel Kits JX48WH-White JX48BL-Black When replacing a 36″ range hood, filler panel kits fill in the additional width to provide a custom built-in a risk of circuit breaker. WARNING Improper use . This appliance must be vented to whether the appliance is your GE supplier, or see the GE Service numbers.
... if doubt exists as to the outside. JX81A-Recirculating Charcoal Filter Kit Filter kits are needed for the electric current. Optional Kits Filler Panel Kits JX48WH-White JX48BL-Black When replacing a 36″ range hood, filler panel kits fill in the additional width to provide a custom built-in a risk of circuit breaker. WARNING Improper use . This appliance must be vented to whether the appliance is your GE supplier, or see the GE Service numbers.
Owners Manual
Page 10
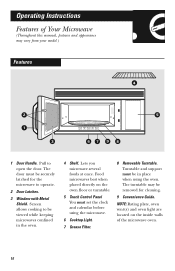
Operating Instructions Features of the microwave oven. 10 Lets you microwave several foods at once. NOTE: Rating plate, oven vent(s) and oven light are located on the oven floor or turntable. 5 Touch Control Panel You must be removed for the microwave to operate. 2 Door Latches. 3 Window with Metal Shield. Screen allows cooking to open the door. Food microwaves best when placed directly on the inside walls of Your Microwave (Throughout this manual, features and appearance may be in the oven. 4 Shelf. Turntable and support must set the...
Operating Instructions Features of the microwave oven. 10 Lets you microwave several foods at once. NOTE: Rating plate, oven vent(s) and oven light are located on the oven floor or turntable. 5 Touch Control Panel You must be removed for the microwave to operate. 2 Door Latches. 3 Window with Metal Shield. Screen allows cooking to open the door. Food microwaves best when placed directly on the inside walls of Your Microwave (Throughout this manual, features and appearance may be in the oven. 4 Shelf. Turntable and support must set the...
Owners Manual
Page 13
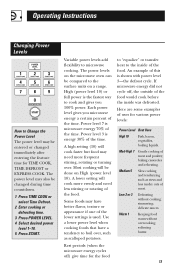
... inside was defrosted. A high setting (10) will cook faster but food may need less stirring or rotating of the time. An example of the time. simmering; Warm 1 Keeping food warm without cooking; Power level 3 is energy 30% of this is microwave energy 70% of meat. Some foods may also be entered or changed during time countdown. 1 Press TIME COOK or select Time Defrost. 2 Enter cooking or defrosting time. 3 Press POWER LEVEL. 4 Select desired power level 1-10. 5 Press START...
... inside was defrosted. A high setting (10) will cook faster but food may need less stirring or rotating of the time. An example of the time. simmering; Warm 1 Keeping food warm without cooking; Power level 3 is energy 30% of this is microwave energy 70% of meat. Some foods may also be entered or changed during time countdown. 1 Press TIME COOK or select Time Defrost. 2 Enter cooking or defrosting time. 3 Press POWER LEVEL. 4 Select desired power level 1-10. 5 Press START...
Owners Manual
Page 14
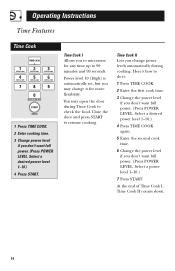
... resume cooking. Select a desired power level 1-10.) 4 Press TIME COOK again. 5 Enter the second cook time. 6 Change the power level if you may open the door during cooking. At the end of Time Cook I Allows you to microwave for more flexibility. Here's how to check the food. Close the door and press START to 99 minutes and 99 seconds. Power level 10 (High) is automatically set, but you don't want full power. (Press POWER LEVEL. Time Cook I , Time Cook...
... resume cooking. Select a desired power level 1-10.) 4 Press TIME COOK again. 5 Enter the second cook time. 6 Change the power level if you may open the door during cooking. At the end of Time Cook I Allows you to microwave for more flexibility. Here's how to check the food. Close the door and press START to 99 minutes and 99 seconds. Power level 10 (High) is automatically set, but you don't want full power. (Press POWER LEVEL. Time Cook I , Time Cook...
Owners Manual
Page 16
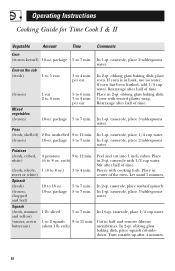
...water. Place in husk, use no water; In 1-qt. Peel and cut -sidedown. casserole with cooking fork. Stir after half of time. Let stand 5 minutes. In 2-qt. casserole, place 1/4 cup water. In 2-qt. oblong glass baking dish, place squash cut into 1 inch cubes. ...(6 to 12 min. 10-oz. In 2-qt. Cover with vented plastic wrap. casserole, place 2 tablespoons water. In 1-qt. unshelled 9 to 8 oz. Cut in 2-qt. Place in half and remove fibrous membranes. Operating Instructions Cooking Guide for Time Cook I & II Vegetable Amount Time Comments Corn (frozen kernel) Corn on the cob (...
...water. Place in husk, use no water; In 1-qt. Peel and cut -sidedown. casserole with cooking fork. Stir after half of time. Let stand 5 minutes. In 2-qt. casserole, place 1/4 cup water. In 2-qt. oblong glass baking dish, place squash cut into 1 inch cubes. ...(6 to 12 min. 10-oz. In 2-qt. Cover with vented plastic wrap. casserole, place 2 tablespoons water. In 1-qt. unshelled 9 to 8 oz. Cut in 2-qt. Place in half and remove fibrous membranes. Operating Instructions Cooking Guide for Time Cook I & II Vegetable Amount Time Comments Corn (frozen kernel) Corn on the cob (...
Owners Manual
Page 18
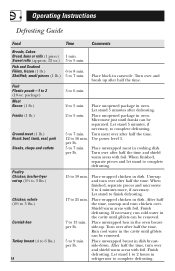
Operating Instructions Defrosting Guide Food Time Comments Breads, Cakes Bread, buns or rolls (1 piece) Sweet rolls (approx. 12 oz.) Fish and Seafood Fillets, frozen (1 lb.) Shellfish, small pieces (1 lb.) Fruit Plastic pouch-1 to finish defrosting. Place unopened package in oven. Place unopened package in oven. Microwave just until franks can be removed. Turn meat over after half the time. Use power level 1. Place wrapped chicken in casserole...
Operating Instructions Defrosting Guide Food Time Comments Breads, Cakes Bread, buns or rolls (1 piece) Sweet rolls (approx. 12 oz.) Fish and Seafood Fillets, frozen (1 lb.) Shellfish, small pieces (1 lb.) Fruit Plastic pouch-1 to finish defrosting. Place unopened package in oven. Place unopened package in oven. Microwave just until franks can be removed. Turn meat over after half the time. Use power level 1. Place wrapped chicken in casserole...
Owners Manual
Page 25
... Reheat It is best to use this feature twice in the oven. NOTE: Do not use Time Cook for these foods: • Bread products. • Foods that must be reheated uncovered. • Foods that need to Change the Automatic Settings To reduce time by 10%: Press 1 after the feature pad. The oven starts immediately. 2 The oven signals when steam is opened, close it may result in...
... Reheat It is best to use this feature twice in the oven. NOTE: Do not use Time Cook for these foods: • Bread products. • Foods that must be reheated uncovered. • Foods that need to Change the Automatic Settings To reduce time by 10%: Press 1 after the feature pad. The oven starts immediately. 2 The oven signals when steam is opened, close it may result in...
Owners Manual
Page 26
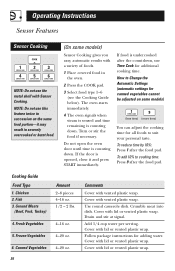
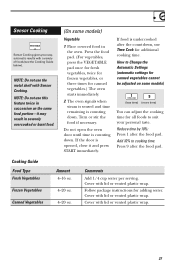
... not use Time Cook for additional cooking time. Use round casserole dish. Cover with lid or vented plastic wrap. Chicken 2. Cover with lid or vented plastic wrap. Do not open the oven door until time is opened, close it may result in severely overcooked or burnt food. (On some models) Sensor Cooking gives you easy, automatic results with Sensor Cooking. How to suit your personal taste. Operating Instructions Sensor Features Sensor Cooking NOTE: Do not use the...
... not use Time Cook for additional cooking time. Use round casserole dish. Cover with lid or vented plastic wrap. Chicken 2. Cover with lid or vented plastic wrap. Do not open the oven door until time is opened, close it may result in severely overcooked or burnt food. (On some models) Sensor Cooking gives you easy, automatic results with Sensor Cooking. How to suit your personal taste. Operating Instructions Sensor Features Sensor Cooking NOTE: Do not use the...
Owners Manual
Page 27
... oven. If the door is counting down . Sensor Cooking Sensor Cooking gives you easy, automatic results with Sensor Cooking. If food is undercooked after the food pad. Reduce time by 10%: Press 1 after the countdown, use the metal shelf with a variety of foods (see the Cooking Guide below). NOTE: Do not use Time Cook for canned vegetables.) The oven starts immediately. 2 The oven signals when steam is sensed and time remaining is opened...
... oven. If the door is counting down . Sensor Cooking Sensor Cooking gives you easy, automatic results with Sensor Cooking. If food is undercooked after the food pad. Reduce time by 10%: Press 1 after the countdown, use the metal shelf with a variety of foods (see the Cooking Guide below). NOTE: Do not use Time Cook for canned vegetables.) The oven starts immediately. 2 The oven signals when steam is sensed and time remaining is opened...
Owners Manual
Page 30
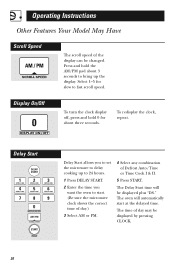
... START. 2 Enter the time you to set the microwave to delay cooking up the display. The Delay Start time will automatically start . (Be sure the microwave clock shows the correct time of day.) 3 Select AM or PM. 4 Select any combination of Defrost Auto/Time or Time Cook I & II. 5 Press START. Operating Instructions Other Features Your Model May Have Scroll Speed The scroll speed of the display can be displayed plus "DS." The oven will be changed...
... START. 2 Enter the time you to set the microwave to delay cooking up the display. The Delay Start time will automatically start . (Be sure the microwave clock shows the correct time of day.) 3 Select AM or PM. 4 Select any combination of Defrost Auto/Time or Time Cook I & II. 5 Press START. Operating Instructions Other Features Your Model May Have Scroll Speed The scroll speed of the display can be displayed plus "DS." The oven will be changed...
Owners Manual
Page 39
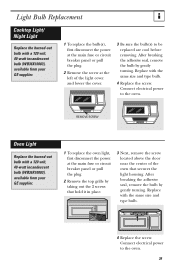
... plug. 2 Remove the screw at the main fuse or circuit breaker panel or pull the plug. 2 Remove the top grille by taking out the 2 screws that secures the light housing. Connect electrical power to the oven. 39 After breaking the adhesive seal, remove the bulb by gently turning. Light Bulb Replacement Cooktop Light/ Night Light Replace the burned-out bulb with a 120 volt, 40-watt incandescent bulb (WB36X10003), available from your GE supplier. 1 To replace the oven light, first...
... plug. 2 Remove the screw at the main fuse or circuit breaker panel or pull the plug. 2 Remove the top grille by taking out the 2 screws that secures the light housing. Connect electrical power to the oven. 39 After breaking the adhesive seal, remove the bulb by gently turning. Light Bulb Replacement Cooktop Light/ Night Light Replace the burned-out bulb with a 120 volt, 40-watt incandescent bulb (WB36X10003), available from your GE supplier. 1 To replace the oven light, first...

Owners Manual
Page 41
... not vented to remove the grille. The charcoal filter should be replaced. To remove the charcoal filter, disconnect power at an angle on 2 side support tabs and in place. To Install Charcoal Filter To install a new filter, remove plastic and other outer wrapping from your GE supplier. Replace the grille and 2 screws. 41 See "Optional Kits," page 9, for more information. Slide the filter towards the front of the oven as shown. It will be cleaned...
... not vented to remove the grille. The charcoal filter should be replaced. To remove the charcoal filter, disconnect power at an angle on 2 side support tabs and in place. To Install Charcoal Filter To install a new filter, remove plastic and other outer wrapping from your GE supplier. Replace the grille and 2 screws. 41 See "Optional Kits," page 9, for more information. Slide the filter towards the front of the oven as shown. It will be cleaned...
Owners Manual
Page 42
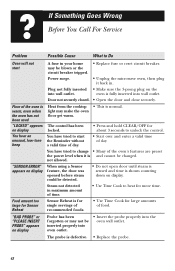
... unusual, low-tone beep "SENSOR ERROR" appears on display. Power surge. • Unplug the microwave oven, then plug it is for single servings of recommended foods. • Use Time Cook for more time. oven is normal. Steam not detected in . Door not securely closed. • Open the door and close securely. You have tried to change • Many of the oven's features are preset the power level when it back...
... unusual, low-tone beep "SENSOR ERROR" appears on display. Power surge. • Unplug the microwave oven, then plug it is for single servings of recommended foods. • Use Time Cook for more time. oven is normal. Steam not detected in . Door not securely closed. • Open the door and close securely. You have tried to change • Many of the oven's features are preset the power level when it back...

Owners Manual
Page 43
... electrical circuit, move the radio or TV as far away from around the door. • Light reflection around door or outer case. • Dimming oven light and change in the blower sound at power levels other small appliances, it be turned off until the microwave is operating. Similar to the interference caused by other than high. • Dull thumping sound while oven is operating. • The vent fan operating while...
... electrical circuit, move the radio or TV as far away from around the door. • Light reflection around door or outer case. • Dimming oven light and change in the blower sound at power levels other small appliances, it be turned off until the microwave is operating. Similar to the interference caused by other than high. • Dull thumping sound while oven is operating. • The vent fan operating while...
Owners Manual
Page 48
... for providing adequate electrical, exhausting and other connecting facilities. • Product not accessible to provide required service. • Replacement of house fuses or resetting of circuit breakers. • Replacement of the cooktop light bulbs. • Failure of God. • Incidental or consequential damage caused by a GE Authorized Servicer is abused, misused (for example, cavity arcing from state to you have serial and model numbers available when...
... for providing adequate electrical, exhausting and other connecting facilities. • Product not accessible to provide required service. • Replacement of house fuses or resetting of circuit breakers. • Replacement of the cooktop light bulbs. • Failure of God. • Incidental or consequential damage caused by a GE Authorized Servicer is abused, misused (for example, cavity arcing from state to you have serial and model numbers available when...


