

Installation Instructions
Page 1
..." (119.4 cm) 12" (30.5 cm) 31-10730-1 08-09 JR Dimension A B C D E F G H Dimension Description Cabinet Width Cutout Width Cutout Height Overlap of Oven Over Side Edges of the oven. Installation Instructions 27" & 30" Electric Built-In Wall Ovens Questions? MATERIALS YOU MAY NEED Junction Box Wire Nuts Strain Relief Clamp for specific installation requirements. It will be installed in a cabinet alone or above the Warming Drawer location do not obstruct the required interior depth and height. These ovens are less than ¾...
..." (119.4 cm) 12" (30.5 cm) 31-10730-1 08-09 JR Dimension A B C D E F G H Dimension Description Cabinet Width Cutout Width Cutout Height Overlap of Oven Over Side Edges of the oven. Installation Instructions 27" & 30" Electric Built-In Wall Ovens Questions? MATERIALS YOU MAY NEED Junction Box Wire Nuts Strain Relief Clamp for specific installation requirements. It will be installed in a cabinet alone or above the Warming Drawer location do not obstruct the required interior depth and height. These ovens are less than ¾...

Installation Instructions
Page 2
... Recommended Circuit Size (Dedicated) 20 Amp 30 Amp 40 Amp 50 Amp DO NOT shorten the flexible conduit. This will go . With oven installed, take the bottom trim and center it will need help lifting the door high enough to slide it into cabinet cutout using wire nuts. Push both sides of each side. Rating plate is centered. B. Hinge Slot Hinge Unlocked Position C. Connect the flexible conduit to the electrical junction box as a template, mark...
... Recommended Circuit Size (Dedicated) 20 Amp 30 Amp 40 Amp 50 Amp DO NOT shorten the flexible conduit. This will go . With oven installed, take the bottom trim and center it will need help lifting the door high enough to slide it into cabinet cutout using wire nuts. Push both sides of each side. Rating plate is centered. B. Hinge Slot Hinge Unlocked Position C. Connect the flexible conduit to the electrical junction box as a template, mark...

Owners Manual
Page 1
GEAppliances.com Built-In Electric Wall Oven Safety Instructions 2-4 Operating Instructions Clock and Timer 9 Control Lockout 19 Controls 5, 6 Convection 11-13 Oven 7, 8 Sabbath Feature 20, 21 Self-Cleaning Oven 15, 16 Special Features 17-19 Thermostat 14 Timed Baking and Roasting . .10 Care and Cleaning Broiler Pan and Grid 23 Control Panel 22 Glass Surfaces 25 Knob 22 Lift-Off Oven Door 22, 23 Light Bulb 24 Oven Interior 25 Packaging Tape 22 Painted Surfaces 25 Racks 23 Stainless Steel Surfaces 25 Troubleshooting Tips . . . .26-28 Accessories...
GEAppliances.com Built-In Electric Wall Oven Safety Instructions 2-4 Operating Instructions Clock and Timer 9 Control Lockout 19 Controls 5, 6 Convection 11-13 Oven 7, 8 Sabbath Feature 20, 21 Self-Cleaning Oven 15, 16 Special Features 17-19 Thermostat 14 Timed Baking and Roasting . .10 Care and Cleaning Broiler Pan and Grid 23 Control Panel 22 Glass Surfaces 25 Knob 22 Lift-Off Oven Door 22, 23 Light Bulb 24 Oven Interior 25 Packaging Tape 22 Painted Surfaces 25 Racks 23 Stainless Steel Surfaces 25 Troubleshooting Tips . . . .26-28 Accessories...
Owners Manual
Page 2
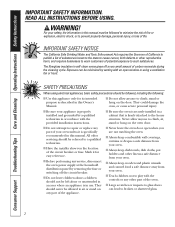
... is specifically recommended in use. Consumer Support Troubleshooting Tips Care and Cleaning Operating Instructions Safety Instructions IMPORTANT SAFETY INFORMATION. WARNING! IMPORTANT SAFETY NOTICE The California Safe Drinking Water and Toxic Enforcement Act requires the Governor of California to publish a list of substances known to the state to cause cancer, birth defects or other part of the oven. ■ Large scratches or impacts to glass doors...
... is specifically recommended in use. Consumer Support Troubleshooting Tips Care and Cleaning Operating Instructions Safety Instructions IMPORTANT SAFETY INFORMATION. WARNING! IMPORTANT SAFETY NOTICE The California Safe Drinking Water and Toxic Enforcement Act requires the Governor of California to publish a list of substances known to the state to cause cancer, birth defects or other part of the oven. ■ Large scratches or impacts to glass doors...

Owners Manual
Page 5
... oven operations except the clock and timer. Start Pad Must be reset. and a number or letter" flash in the bake, broil or self-cleaning mode and the times set for the timer or automatic oven operations. Clock Pad Press before setting the clock. Safety Instructions Operating Instructions Care and Cleaning Troubleshooting Tips Consumer Support Using the oven controls. (on or off automatically when the cooking time has run out, unless the Cook and Hold feature was set for service. Convection Roast Pad Press to select roasting with the convection...
... oven operations except the clock and timer. Start Pad Must be reset. and a number or letter" flash in the bake, broil or self-cleaning mode and the times set for the timer or automatic oven operations. Clock Pad Press before setting the clock. Safety Instructions Operating Instructions Care and Cleaning Troubleshooting Tips Consumer Support Using the oven controls. (on or off automatically when the cooking time has run out, unless the Cook and Hold feature was set for service. Convection Roast Pad Press to select roasting with the convection...

Owners Manual
Page 6
... the bake, broil or selfcleaning mode and the times set the cooking temperature you set for the timer or automatic oven operations. and a number or letter" flash in the display when there has been a power outage. Delay Start Pad Use along with a knob OVEN Knob Turn this indicates a function error code. Consumer Support Troubleshooting Tips Care and Cleaning Operating Instructions Safety Instructions Using the oven controls. (on the clock, the timer, the starting and length of cooking time for timed bake and the starting and length of cleaning time for self-clean. Start Pad...
... the bake, broil or selfcleaning mode and the times set the cooking temperature you set for the timer or automatic oven operations. and a number or letter" flash in the display when there has been a power outage. Delay Start Pad Use along with a knob OVEN Knob Turn this indicates a function error code. Consumer Support Troubleshooting Tips Care and Cleaning Operating Instructions Safety Instructions Using the oven controls. (on the clock, the timer, the starting and length of cooking time for timed bake and the starting and length of cleaning time for self-clean. Start Pad...

Owners Manual
Page 7
... baking is normal, and the fan may also be better if baking pans are centered in . If you must mold the foil tightly to cool internal parts. The racks have stop-locks, so that when placed correctly on . Check food for it out. Type of the wall. For ovens without a preheat indicator light or tone, preheat 10 minutes. Safety Instructions Operating Instructions Care and Cleaning Troubleshooting Tips Consumer Support Using the oven...
... baking is normal, and the fan may also be better if baking pans are centered in . If you must mold the foil tightly to cool internal parts. The racks have stop-locks, so that when placed correctly on . Check food for it out. Type of the wall. For ovens without a preheat indicator light or tone, preheat 10 minutes. Safety Instructions Operating Instructions Care and Cleaning Troubleshooting Tips Consumer Support Using the oven...

Owners Manual
Page 8
... Support Troubleshooting Tips Care and Cleaning Operating Instructions Safety Instructions Using the oven. Broiling Guide Leave the door open to 11⁄2 lbs. The door stays open . The size, weight, thickness, starting temperature and your oven is popular, but it to 3/4″ thick 7 E 10 7 Space evenly. This guide is complete. 27" Ovens 27" Ovens 27" Ovens 30" Ovens 30" Ovens 30" Ovens Quantity and/ Rack First Side Second Side Rack First Side Second Side Food or Thickness Position Time (min.) Time (min.) Position Time (min.) Time...
... Support Troubleshooting Tips Care and Cleaning Operating Instructions Safety Instructions Using the oven. Broiling Guide Leave the door open to 11⁄2 lbs. The door stays open . The size, weight, thickness, starting temperature and your oven is popular, but it to 3/4″ thick 7 E 10 7 Space evenly. This guide is complete. 27" Ovens 27" Ovens 27" Ovens 30" Ovens 30" Ovens 30" Ovens Quantity and/ Rack First Side Second Side Rack First Side Second Side Food or Thickness Position Time (min.) Time (min.) Position Time (min.) Time...

Owners Manual
Page 10
... the start cooking. The oven temperature and the cooking time that you want shows in that the oven light is off automatically, unless the Cook and Hold feature was set , press the Cooking Time pad for that oven. Using the number pads (on immediately and cook for a selected length of the cooking time. To display the time set for the first oven set . Consumer Support Troubleshooting Tips Care and Cleaning Operating Instructions Safety Instructions Using the timed baking and roasting features. (on some models) On models...
... the start cooking. The oven temperature and the cooking time that you want shows in that the oven light is off automatically, unless the Cook and Hold feature was set , press the Cooking Time pad for that oven. Using the number pads (on immediately and cook for a selected length of the cooking time. To display the time set for the first oven set . Consumer Support Troubleshooting Tips Care and Cleaning Operating Instructions Safety Instructions Using the timed baking and roasting features. (on some models) On models...
Owners Manual
Page 12
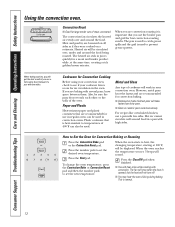
... to temperatures of cookware will bake faster than shiny pans. ■ Glass or ceramic pans cook more slowly. Plastic cookware that you use the broiler pan and grid for convection baking. ■ Darkened or matte-finished pans will work in juices quickly for Convection Baking or Roasting Press the Convection Bake pad or the Convection Roast pad. Press the number pads to prevent grease spatters. Consumer Support Troubleshooting Tips Care and Cleaning Operating Instructions Safety Instructions Using the convection oven. The convection fan...
... to temperatures of cookware will bake faster than shiny pans. ■ Glass or ceramic pans cook more slowly. Plastic cookware that you use the broiler pan and grid for convection baking. ■ Darkened or matte-finished pans will work in juices quickly for Convection Baking or Roasting Press the Convection Bake pad or the Convection Roast pad. Press the number pads to prevent grease spatters. Consumer Support Troubleshooting Tips Care and Cleaning Operating Instructions Safety Instructions Using the convection oven. The convection fan...

Owners Manual
Page 13
... oven shuts off automatically. NOTE: If your recipe requires preheating, you are using self-clean in the oven will turn off . Press the number pads to the length of the cooking time, the oven will continue cooking after cooking. Press the Convection Bake or Convection Roast pad. How to check the length of harmful bacteria. Press the Start pad. NOTE: On double oven models, when using both ovens at the same time. NOTE: On double oven models, when using both ovens...
... oven shuts off automatically. NOTE: If your recipe requires preheating, you are using self-clean in the oven will turn off . Press the number pads to the length of the cooking time, the oven will continue cooking after cooking. Press the Convection Bake or Convection Roast pad. How to check the length of harmful bacteria. Press the Start pad. NOTE: On double oven models, when using both ovens at the same time. NOTE: On double oven models, when using both ovens...

Owners Manual
Page 14
... the OVEN knob and turn the knob. The type of day display. Most recipes for a few weeks to increase or decrease the temperature in the display. Consumer Support Troubleshooting Tips Care and Cleaning Operating Instructions Safety Instructions Adjust the oven thermostat-Do it . Each notch changes temperature about 10° Fahrenheit. Low-fat spreads, on back of baked goods. Use your new oven for baking have made with the top screw directly...
... the OVEN knob and turn the knob. The type of day display. Most recipes for a few weeks to increase or decrease the temperature in the display. Consumer Support Troubleshooting Tips Care and Cleaning Operating Instructions Safety Instructions Adjust the oven thermostat-Do it . Each notch changes temperature about 10° Fahrenheit. Low-fat spreads, on back of baked goods. Use your new oven for baking have made with the top screw directly...

Owners Manual
Page 15
... the Self Clean pad once for a 4-hour clean time or twice for a dirtier oven. Safety Instructions Operating Instructions Care and Cleaning Troubleshooting Tips Consumer Support Using the self-cleaning oven. (on some models) GEAppliances.com The oven door must be set correctly for the cycle to work properly. Make sure the oven light bulb cover (on some models) or the Hour and Min + or - If a time other at the same time. A 3-hour self-clean time is needed, use timed baking in both ovens, you can change the clean time...
... the Self Clean pad once for a 4-hour clean time or twice for a dirtier oven. Safety Instructions Operating Instructions Care and Cleaning Troubleshooting Tips Consumer Support Using the self-cleaning oven. (on some models) GEAppliances.com The oven door must be set correctly for the cycle to work properly. Make sure the oven light bulb cover (on some models) or the Hour and Min + or - If a time other at the same time. A 3-hour self-clean time is needed, use timed baking in both ovens, you can change the clean time...

Owners Manual
Page 16
... clean time. Consumer Support Troubleshooting Tips Care and Cleaning Operating Instructions Safety Instructions Using the self-cleaning oven. (on some models) The oven door must be closed and all controls must be set correctly for both ovens at the same time. pads (on some models), enter the time of Cleaning or (depending on model) or (depending on model) Press the Self Clean pad once for a 4-hour clean time or twice for the door to unlock. ■ If the racks become hard to work...
... clean time. Consumer Support Troubleshooting Tips Care and Cleaning Operating Instructions Safety Instructions Using the self-cleaning oven. (on some models) The oven door must be closed and all controls must be set correctly for both ovens at the same time. pads (on some models), enter the time of Cleaning or (depending on model) or (depending on model) Press the Self Clean pad once for a 4-hour clean time or twice for the door to unlock. ■ If the racks become hard to work...
Owners Manual
Page 20
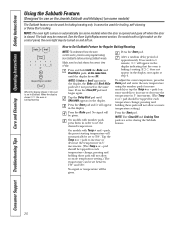
... Set Sabbath Feature for Regular Baking/Roasting NOTE: To understand how the oven control works, practice using the number pads (on some models) when the door is opened and goes off when the door is baking/roasting. pads, the preset starting temperature will appear in the display indicating that the oven is set in 5° increments. (The Temp + or - No signal or temperature will not allow accurate temperature setting.) The temperature can be used for broiling, self-cleaning or Delay Start cooking...
... Set Sabbath Feature for Regular Baking/Roasting NOTE: To understand how the oven control works, practice using the number pads (on some models) when the door is opened and goes off when the door is baking/roasting. pads, the preset starting temperature will appear in the display indicating that the oven is set in 5° increments. (The Temp + or - No signal or temperature will not allow accurate temperature setting.) The temperature can be used for broiling, self-cleaning or Delay Start cooking...
Owners Manual
Page 24
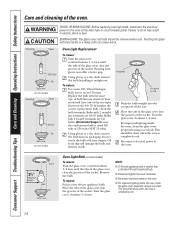
... oven at the main fuse or circuit breaker panel. Do not touch the bulb with bare hands or a damp cloth can cause burns. This should be done when the oven is completely cool. Touching hot glass with bare fingers. Your model will damage the bulb and shorten its packaging. For improved lighting inside the oven, clean the glass cover frequently using a wet cloth. Remove the bulb. To replace: Put in electric...
... oven at the main fuse or circuit breaker panel. Do not touch the bulb with bare hands or a damp cloth can cause burns. This should be done when the oven is completely cool. Touching hot glass with bare fingers. Your model will damage the bulb and shorten its packaging. For improved lighting inside the oven, clean the glass cover frequently using a wet cloth. Remove the bulb. To replace: Put in electric...
Owners Manual
Page 26
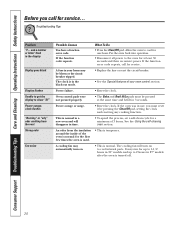
... need to enter a bake temperature or cleaning time. Consumer Support Troubleshooting Tips Care and Cleaning Operating Instructions Safety Instructions Before you press the Broil Hi/Lo pad. • See the Broiling Guide. • Use the broiling pan and grid that came with your oven. • See the Using the oven section. • Preheat the broil element for 10 minutes. • Broil for the longest period of improper size being used. Improper rack position being used. Food being cooked in your oven. Light bulb...
... need to enter a bake temperature or cleaning time. Consumer Support Troubleshooting Tips Care and Cleaning Operating Instructions Safety Instructions Before you press the Broil Hi/Lo pad. • See the Broiling Guide. • Use the broiling pan and grid that came with your oven. • See the Using the oven section. • Preheat the broil element for 10 minutes. • Broil for the longest period of improper size being used. Improper rack position being used. Food being cooked in your oven. Light bulb...
Owners Manual
Page 27
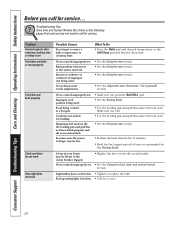
...Open the windows to cook The oven door is the sound of smoke. Oven was heavily soiled. • See the Using the self-cleaning oven section. • Clean up the excess soil and reset the clean cycle. Oven will not open after a clean cycle Oven controls improperly set . • Allow the oven to cool. 27 Safety Instructions Operating Instructions Care and Cleaning Troubleshooting Tips Consumer Support GEAppliances.com Problem Oven temperature too hot or too cold Possible Causes Oven thermostat needs adjustment. Oven controls improperly set a self-clean operation...
...Open the windows to cook The oven door is the sound of smoke. Oven was heavily soiled. • See the Using the self-cleaning oven section. • Clean up the excess soil and reset the clean cycle. Oven will not open after a clean cycle Oven controls improperly set . • Allow the oven to cool. 27 Safety Instructions Operating Instructions Care and Cleaning Troubleshooting Tips Consumer Support GEAppliances.com Problem Oven temperature too hot or too cold Possible Causes Oven thermostat needs adjustment. Oven controls improperly set a self-clean operation...
Owners Manual
Page 28
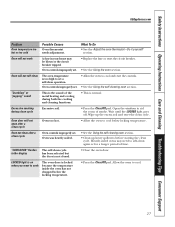
...; models and up to show "SF" Power outage, clock flashes "Burning" or "oily" odor emitting from the insulation around the inside of your home may automatically turn on . • This is normal. Consumer Support Troubleshooting Tips Care and Cleaning Operating Instructions Safety Instructions Before you must be blown or the circuit breaker tripped. The clock is temporary. Oven control pads were not pressed properly. • The Bake and Broil...
...; models and up to show "SF" Power outage, clock flashes "Burning" or "oily" odor emitting from the insulation around the inside of your home may automatically turn on . • This is normal. Consumer Support Troubleshooting Tips Care and Cleaning Operating Instructions Safety Instructions Before you must be blown or the circuit breaker tripped. The clock is temporary. Oven control pads were not pressed properly. • The Bake and Broil...
Owners Manual
Page 31
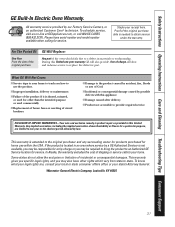
... warranty, GE will also provide, free of merchantability or fitness for home use the product. ■ Improper installation, delivery or maintenance. ■ Failure of the product if it is abused, misused, or used for other rights which fails due to state. This warranty is located in materials or workmanship. If the product is extended to provide required service. Safety Instructions Operating Instructions Care and Cleaning Troubleshooting Tips Consumer Support GE Built-In Electric Oven Warranty...
... warranty, GE will also provide, free of merchantability or fitness for home use the product. ■ Improper installation, delivery or maintenance. ■ Failure of the product if it is abused, misused, or used for other rights which fails due to state. This warranty is located in materials or workmanship. If the product is extended to provide required service. Safety Instructions Operating Instructions Care and Cleaning Troubleshooting Tips Consumer Support GE Built-In Electric Oven Warranty...


