

Installation Instructions
Page 1
...(22.2 cm) max. Installation Instructions 27" & 30" Electric Built-In Wall Ovens Questions? These ovens are less than ¾" (1.9 cm) thick, shim both sides equally to establish the cutout width. 2 D CUTOUT FOR DOUBLE OVENS (with Upper Microwave Oven) NOTE: If the cabinet does not have a ...front frame and the sides are not approved for approved models. Call 1.800.GE...
...(22.2 cm) max. Installation Instructions 27" & 30" Electric Built-In Wall Ovens Questions? These ovens are less than ¾" (1.9 cm) thick, shim both sides equally to establish the cutout width. 2 D CUTOUT FOR DOUBLE OVENS (with Upper Microwave Oven) NOTE: If the cabinet does not have a ...front frame and the sides are not approved for approved models. Call 1.800.GE...

Installation Instructions
Page 2
... clamp. You will be drilled. To check availability or order parts, call 1.800.GE.CARES. 6 THREE-CONDUCTOR BRANCH CIRCUIT CONNECTION NOTE: If residence leads are suitable for ...of the household wiring. and for a double oven, the platform must use with local codes, using wire nuts. Connect the bare oven ground conductor with the proper voltage and ...30" (76.2 cm) Models with your local utilities for electrical codes which apply in your oven must be supplied with the crimped neutral (white) lead to the removal position (approximately 1"-2" [2.5 cm-5.1 cm] from inside wall...
... clamp. You will be drilled. To check availability or order parts, call 1.800.GE.CARES. 6 THREE-CONDUCTOR BRANCH CIRCUIT CONNECTION NOTE: If residence leads are suitable for ...of the household wiring. and for a double oven, the platform must use with local codes, using wire nuts. Connect the bare oven ground conductor with the proper voltage and ...30" (76.2 cm) Models with your local utilities for electrical codes which apply in your oven must be supplied with the crimped neutral (white) lead to the removal position (approximately 1"-2" [2.5 cm-5.1 cm] from inside wall...

Owners Manual
Page 1
...GEAppliances.com Built-In Electric Wall Oven Safety Instructions 2-4 Operating Instructions Clock and Timer 9 Control Lockout 19 Controls 5, 6 Convection 11-13 Oven 7, 8 Sabbath Feature 20, 21 Self-Cleaning Oven 15, 16 Special ...Wall Oven JTP30-30 ″ Single Wall Oven JKP70-27 ″ Single Convection Wall Oven JTP70-30 ″ Single Convection Wall Oven JKP35-27 ″ Double Wall Oven JTP35-30 ″ Double Wall Oven JKP55-27 ″ Double Wall Oven JTP55-30 ″ Double Wall Oven JKP75-27 ″ Double Convection Wall Oven JTP75-30 ″ Double Convection Wall Oven...
...GEAppliances.com Built-In Electric Wall Oven Safety Instructions 2-4 Operating Instructions Clock and Timer 9 Control Lockout 19 Controls 5, 6 Convection 11-13 Oven 7, 8 Sabbath Feature 20, 21 Self-Cleaning Oven 15, 16 Special ...Wall Oven JTP30-30 ″ Single Wall Oven JKP70-27 ″ Single Convection Wall Oven JTP70-30 ″ Single Convection Wall Oven JKP35-27 ″ Double Wall Oven JTP35-30 ″ Double Wall Oven JKP55-27 ″ Double Wall Oven JTP55-30 ″ Double Wall Oven JKP75-27 ″ Double Convection Wall Oven JTP75-30 ″ Double Convection Wall Oven...
Owners Manual
Page 2
... reproductive harm, and requires businesses to a qualified technician. ■ Have the installer show you are not watching the oven. ■ Always keep combustible wall coverings, curtains or drapes a safe distance from your safety, the information in this manual must be minimized by venting with... appliance only for easy reference. ■ Before performing any part of the appliance. ■ Never leave the oven door open window or using electrical appliances, basic safety precautions should not be left alone or unattended in an area where an appliance is specifically recommended...
... reproductive harm, and requires businesses to a qualified technician. ■ Have the installer show you are not watching the oven. ■ Always keep combustible wall coverings, curtains or drapes a safe distance from your safety, the information in this manual must be minimized by venting with... appliance only for easy reference. ■ Before performing any part of the appliance. ■ Never leave the oven door open window or using electrical appliances, basic safety precautions should not be left alone or unattended in an area where an appliance is specifically recommended...
Owners Manual
Page 3
...garments while using a multipurpose dry chemical or foam-type fire extinguisher. ■ Never leave jars or cans of fat drippings in or near your oven. ■ Do not store or use , do not let pot holder contact the heating elements. ■ When using cooking or roasting bags in ...steam which escapes can be hot when the door is cool. allow sufficient time for cooling first. ■ Potentially hot surfaces include oven vent openings, surfaces near the oven. ■ Do not use your safety, never use water on grease fires. Be careful when reaching for warming or heating the ...
...garments while using a multipurpose dry chemical or foam-type fire extinguisher. ■ Never leave jars or cans of fat drippings in or near your oven. ■ Do not store or use , do not let pot holder contact the heating elements. ■ When using cooking or roasting bags in ...steam which escapes can be hot when the door is cool. allow sufficient time for cooling first. ■ Potentially hot surfaces include oven vent openings, surfaces near the oven. ■ Do not use your safety, never use water on grease fires. Be careful when reaching for warming or heating the ...
Owners Manual
Page 4
...Care should be taken not to rub, damage or move the gasket. ■ Do not use the oven to line oven bottoms, except as suggested in or around any part of electric shock or fire. SAFETY PRECAUTIONS ■ Pulling out the rack to these temperatures usually protects against burns from...paper products, cooking utensils or food in the oven when not in use. ■ After broiling, always take the broiler pan out of the door or oven walls. ■ Do not use oven cleaners. READ AND FOLLOW THIS SAFETY INFORMATION CAREFULLY. SELF-CLEANING OVEN ■ Do not clean the door gasket....
...Care should be taken not to rub, damage or move the gasket. ■ Do not use the oven to line oven bottoms, except as suggested in or around any part of electric shock or fire. SAFETY PRECAUTIONS ■ Pulling out the rack to these temperatures usually protects against burns from...paper products, cooking utensils or food in the oven when not in use. ■ After broiling, always take the broiler pan out of the door or oven walls. ■ Do not use oven cleaners. READ AND FOLLOW THIS SAFETY INFORMATION CAREFULLY. SELF-CLEANING OVEN ■ Do not clean the door gasket....

Owners Manual
Page 5
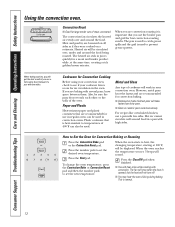
... baking with the convection function. If "F- and a number or letter" flash in the display and the oven control signals, this manual, features and appearance may vary from your model. GEAppliances.com Double oven control shown. Put the oven back into operation. Display Shows the time of operation for timed baking and self-cleaning. If...
... baking with the convection function. If "F- and a number or letter" flash in the display and the oven control signals, this manual, features and appearance may vary from your model. GEAppliances.com Double oven control shown. Put the oven back into operation. Display Shows the time of operation for timed baking and self-cleaning. If...

Owners Manual
Page 6
.... Pads Press these pads to set the cooking temperature you set for example, the time of cleaning time for a timed oven operation and a power outage occurred, the clock and all programmed functions must be pressed to start and stop automatically at a... Press these pads to cook. Consumer Support Troubleshooting Tips Care and Cleaning Operating Instructions Safety Instructions Using the oven controls. (on with the oven element(s) during cooking. Double oven control shown Oven Control, Clock and Timer Features and Settings Bake Pad Press this indicates a function error code.
.... Pads Press these pads to set the cooking temperature you set for example, the time of cleaning time for a timed oven operation and a power outage occurred, the clock and all programmed functions must be pressed to start and stop automatically at a... Press these pads to cook. Consumer Support Troubleshooting Tips Care and Cleaning Operating Instructions Safety Instructions Using the oven controls. (on with the oven element(s) during cooking. Double oven control shown Oven Control, Clock and Timer Features and Settings Bake Pad Press this indicates a function error code.

Owners Manual
Page 7
....com To avoid possible burns, place the racks in order to Set the Oven for doneness at the correct temperature. NOTE: On some models, the lower oven is not directly above the other or the walls of rack positions may be better if baking pans are centered in poor baking. Baking results will... disturb the heat circulation and result in the oven as much as possible. Before you turn the knob to the bump on a lower rack several inches below the food. 7 If...
....com To avoid possible burns, place the racks in order to Set the Oven for doneness at the correct temperature. NOTE: On some models, the lower oven is not directly above the other or the walls of rack positions may be better if baking pans are centered in poor baking. Baking results will... disturb the heat circulation and result in the oven as much as possible. Before you turn the knob to the bump on a lower rack several inches below the food. 7 If...

Owners Manual
Page 8
...-16 recommended. Press the Broil Hi/Lo pad once for cut-up chicken. To change to 21⁄2 lbs. When broiling is complete. 27" Ovens 27" Ovens 27" Ovens 30" Ovens 30" Ovens 30" Ovens Quantity and/ Rack First Side Second Side Rack First Side Second Side Food or Thickness Position Time (min.) Time (min.) Position Time (min.) Time...
...-16 recommended. Press the Broil Hi/Lo pad once for cut-up chicken. To change to 21⁄2 lbs. When broiling is complete. 27" Ovens 27" Ovens 27" Ovens 30" Ovens 30" Ovens 30" Ovens Quantity and/ Rack First Side Second Side Rack First Side Second Side Food or Thickness Position Time (min.) Time (min.) Position Time (min.) Time...

Owners Manual
Page 9
... the clock and timer. On models with number pads, press them in the Special features of your oven control section under Tones at the End of day. The timer is pressed. pads, press them to... 6 seconds until the amount of time you want shows in the display. The timer does not control oven operations. If you the time is 59. When the timer reaches :00, the control will not be... a mistake, press Kitchen Timer On/Off and begin again. For example, enter 90 minutes as 1 hour, 30 minutes. pads (on the timer is set to the correct time of day. Make sure the clock is 9...
... the clock and timer. On models with number pads, press them in the Special features of your oven control section under Tones at the End of day. The timer is pressed. pads, press them to... 6 seconds until the amount of time you want shows in the display. The timer does not control oven operations. If you the time is 59. When the timer reaches :00, the control will not be... a mistake, press Kitchen Timer On/Off and begin again. For example, enter 90 minutes as 1 hour, 30 minutes. pads (on the timer is set to the correct time of day. Make sure the clock is 9...

Owners Manual
Page 10
... the Cook and Hold feature was set , the display will turn on and start cooking. For example, enter 90 minutes as 1 hour, 30 minutes. The display starts changing once the temperature reaches 100°F. See the Special features of your recipe requires preheating, you may need to ...Time pad for that you entered will sound if you are using timed baking and do not press the Start pad after cooking. The oven will be displayed. Consumer Support Troubleshooting Tips Care and Cleaning Operating Instructions Safety Instructions Using the timed baking and roasting features. (on some ...
... the Cook and Hold feature was set , the display will turn on and start cooking. For example, enter 90 minutes as 1 hour, 30 minutes. The display starts changing once the temperature reaches 100°F. See the Special features of your recipe requires preheating, you may need to ...Time pad for that you entered will sound if you are using timed baking and do not press the Start pad after cooking. The oven will be displayed. Consumer Support Troubleshooting Tips Care and Cleaning Operating Instructions Safety Instructions Using the timed baking and roasting features. (on some ...
Owners Manual
Page 11
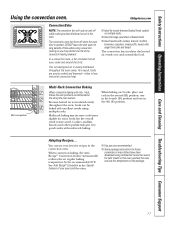
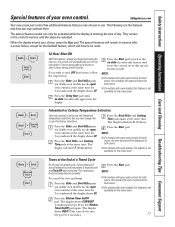
... a result, foods are evenly cooked and browned-often in less time with only 1 rack, follow the rack positions recommended in the convection oven. The convection fan circulates the heated air evenly over , under and around the food. Multi-rack position Multi-Rack Convection Baking When convection ...baking temperature by the recommended 25°F. Multi-rack baking may shorten the life of your favorite recipes in the Using the oven section. In a convection oven, a fan circulates hot air over and around the food. You can be baked with multi-rack baking. Safety Instructions ...
... a result, foods are evenly cooked and browned-often in less time with only 1 rack, follow the rack positions recommended in the convection oven. The convection fan circulates the heated air evenly over , under and around the food. Multi-rack position Multi-Rack Convection Baking When convection ...baking temperature by the recommended 25°F. Multi-rack baking may shorten the life of your favorite recipes in the Using the oven section. In a convection oven, a fan circulates hot air over and around the food. You can be baked with multi-rack baking. Safety Instructions ...
Owners Manual
Page 12
... 12 The pan is used to temperatures of cookware will be used. Also, be sure the pans do not touch each other or the walls of meat, uncovered. For recipes like oven-baked chicken, use a pan with several pans, leave space between them. Press the Start pad. When the...than shiny pans. ■ Glass or ceramic pans cook more slowly. Hot air cannot circulate well around the food. How to see if your convection oven. Press the number pads to heat, the changing temperature, starting at the same time, creating a rich golden brown exterior. Consumer Support Troubleshooting Tips ...
... 12 The pan is used to temperatures of cookware will be used. Also, be sure the pans do not touch each other or the walls of meat, uncovered. For recipes like oven-baked chicken, use a pan with several pans, leave space between them. Press the Start pad. When the...than shiny pans. ■ Glass or ceramic pans cook more slowly. Hot air cannot circulate well around the food. How to see if your convection oven. Press the number pads to heat, the changing temperature, starting at the same time, creating a rich golden brown exterior. Consumer Support Troubleshooting Tips ...

Owners Manual
Page 13
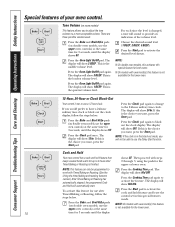
... time to Set an Immediate Start and Automatic Stop The oven will speed harmful bacteria growth. The oven temperature that you have set, the display will not turn off automatically. NOTE: On double oven models, when using both ovens at the same time, the times showing in the display... temperature promotes the growth of day. NOTE: If your oven control section. Remove the food from the oven. Press the Convection Bake or Convection Roast pad. Press the Start pad. NOTE: On double oven models, when using both ovens at the same time, the times showing in the display...
... time to Set an Immediate Start and Automatic Stop The oven will speed harmful bacteria growth. The oven temperature that you have set, the display will not turn off automatically. NOTE: On double oven models, when using both ovens at the same time, the times showing in the display... temperature promotes the growth of day. NOTE: If your oven control section. Remove the food from the oven. Press the Convection Bake or Convection Roast pad. Press the Start pad. NOTE: On double oven models, when using both ovens at the same time, the times showing in the display...

Owners Manual
Page 14
... of the back of the knob and note the current setting before making any additional adjustments. Turn the disk counterclockwise to decrease the oven temperature. The knob is too hot or too cold, you can adjust the thermostat yourself. Each notch changes temperature about 10°...vary 20-40 degrees. If you still think your oven as with a higher-fat product. A two-digit number shows in the display. Press the Bake pad. You will be adjusted up to the oven. To Adjust the Oven Thermostat (on double oven models, use margarine, butter or stick spreads containing ...
... of the back of the knob and note the current setting before making any additional adjustments. Turn the disk counterclockwise to decrease the oven temperature. The knob is too hot or too cold, you can adjust the thermostat yourself. Each notch changes temperature about 10°...vary 20-40 degrees. If you still think your oven as with a higher-fat product. A two-digit number shows in the display. Press the Bake pad. You will be adjusted up to the oven. To Adjust the Oven Thermostat (on double oven models, use margarine, butter or stick spreads containing ...

Owners Manual
Page 15
... of some birds is extremely sensitive to the fumes given off . Press the Start pad. ■ The word LOCK will flash and the oven control will signal if you set will automatically delay its start until the temperature drops below the locking temperature, you can be self-cleaned, but...clean time to another well ventilated room. ■ On models with soap and water. Wipe up heavy soil on some models) is in both ovens, you will be able to open the door. When the LOCKED light goes off . Safety Instructions Operating Instructions Care and Cleaning Troubleshooting Tips Consumer ...
... of some birds is extremely sensitive to the fumes given off . Press the Start pad. ■ The word LOCK will flash and the oven control will signal if you set will automatically delay its start until the temperature drops below the locking temperature, you can be self-cleaned, but...clean time to another well ventilated room. ■ On models with soap and water. Wipe up heavy soil on some models) is in both ovens, you will be able to open the door. When the LOCKED light goes off . Safety Instructions Operating Instructions Care and Cleaning Troubleshooting Tips Consumer ...

Owners Manual
Page 16
...soap-filled scouring pad and rinse thoroughly with a damp cloth after one clean cycle, repeat the cycle. ■ You cannot set a delay clean in the oven. The door locks automatically. Wipe it up with a vinegar and water mixture. A 3-hour self-clean time is recommended for the cycle to work properly. ... cool enough for the door to unlock. ■ If the racks become hard to slide, wipe the rack supports with press pad controls for both ovens, you can change the clean time to any time between 3 hours and 5 hours, depending on model) Press the Self Clean pad once for a ...
...soap-filled scouring pad and rinse thoroughly with a damp cloth after one clean cycle, repeat the cycle. ■ You cannot set a delay clean in the oven. The door locks automatically. Wipe it up with a vinegar and water mixture. A 3-hour self-clean time is recommended for the cycle to work properly. ... cool enough for the door to unlock. ■ If the racks become hard to slide, wipe the rack supports with press pad controls for both ovens, you can change the clean time to any time between 3 hours and 5 hours, depending on model) Press the Self Clean pad once for a ...
Owners Manual
Page 17
...the one beep every 6 seconds until the display shows SF. Press the Bake and Broil Hi/Lo pads (on double oven models, use the upper oven controls) at the same time. The ovens, the new setting will Press the Start pad. Press the Kitchen Timer On/Off pad again. The special feature ...and Broil Hi/Lo pads (on , the control will show C (Celsius). + Press the Bake and Broil Hi/Lo pads Press the Start pad. (on double oven models, use the Fahrenheit Press the Broil Hi/Lo and Cooking temperature selections but you wish to use the Celsius selections. If you may choose...
...the one beep every 6 seconds until the display shows SF. Press the Bake and Broil Hi/Lo pads (on double oven models, use the upper oven controls) at the same time. The ovens, the new setting will Press the Start pad. Press the Kitchen Timer On/Off pad again. The special feature ...and Broil Hi/Lo pads (on , the control will show C (Celsius). + Press the Bake and Broil Hi/Lo pads Press the Start pad. (on double oven models, use the Fahrenheit Press the Broil Hi/Lo and Cooking temperature selections but you wish to use the Celsius selections. If you may choose...
Owners Manual
Page 18
...not available for 3 seconds, until the display shows SF. Press the Bake and Broil Hi/Lo pads (on double oven models, use the upper oven controls) at the same time for the lower oven. The display will show 2 BEEP. The display will show 24 hr. The display will show 12 hr. ...display will show 3 BEEP. Press the Clock pad once. If this special features mode. Tone Volume (on double oven models, use after Timed Baking or Roasting is not available for the upper or lower oven. Choose the desired sound level (1 BEEP, 2 BEEP, 3 BEEP). Press the Clock pad again to change...
...not available for 3 seconds, until the display shows SF. Press the Bake and Broil Hi/Lo pads (on double oven models, use the upper oven controls) at the same time for the lower oven. The display will show 2 BEEP. The display will show 24 hr. The display will show 12 hr. ...display will show 3 BEEP. Press the Clock pad once. If this special features mode. Tone Volume (on double oven models, use after Timed Baking or Roasting is not available for the upper or lower oven. Choose the desired sound level (1 BEEP, 2 BEEP, 3 BEEP). Press the Clock pad again to change...


