
Owners Manual
Page 1
... Operating Instructions Controls 5-8 Cycle Options 9, 10 Dryer Features 10, 11 Quick Start Guide 5 Settings Option 10 Using the Dryer 12 Installation Instructions Before You Begin 13-14 Connecting a Gas Dryer 16-19 Connecting an Electric Dryer 20-22 Exhausting the Dryer 23-31 Final Setup 32, 33 Installing the Pedestal 43-45 Location of your Dryer 14-15 Reversing the Door Swing . . . . . .34-39 Stacking the Washer and Dryer 40-42 Troubleshooting Tips . . . . . .46-48 Consumer Support Consumer Support Back Cover Warranty (Canada 50 Warranty (U.S 49 Owner's Manual & Installation...
... Operating Instructions Controls 5-8 Cycle Options 9, 10 Dryer Features 10, 11 Quick Start Guide 5 Settings Option 10 Using the Dryer 12 Installation Instructions Before You Begin 13-14 Connecting a Gas Dryer 16-19 Connecting an Electric Dryer 20-22 Exhausting the Dryer 23-31 Final Setup 32, 33 Installing the Pedestal 43-45 Location of your Dryer 14-15 Reversing the Door Swing . . . . . .34-39 Stacking the Washer and Dryer 40-42 Troubleshooting Tips . . . . . .46-48 Consumer Support Consumer Support Back Cover Warranty (Canada 50 Warranty (U.S 49 Owner's Manual & Installation...
Owners Manual
Page 2
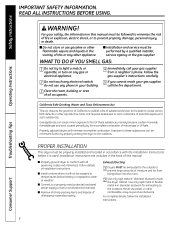
... electrical overload. I Installation and service must be exhausted to the outside to prevent large amounts of fire or explosion, electric shock, or to light a match, or cigarette, or turn on any phone in your safety, the information in accordance with all occupants. I Connect to a properly rated, protected and sized power supply circuit to water or weather. For complete details, follow the Installation Instructions. I Properly ground dryer...
... electrical overload. I Installation and service must be exhausted to the outside to prevent large amounts of fire or explosion, electric shock, or to light a match, or cigarette, or turn on any phone in your safety, the information in accordance with all occupants. I Connect to a properly rated, protected and sized power supply circuit to water or weather. For complete details, follow the Installation Instructions. I Properly ground dryer...

Owners Manual
Page 3
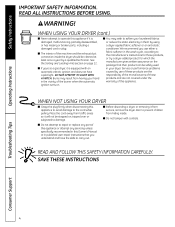
Safety Instructions Operating Instructions GEAppliances.com WARNING! I Keep the floor around the exhaust opening and adjacent surrounding areas free from the accumulation of slipping. I Any article on container labels to the wash water. Observe all laundry aids (such as cleaning cloths, mops, towels used in beauty salons, restaurants or barber shops, etc.) must not be picked up by removing the fuse or switching off...
Safety Instructions Operating Instructions GEAppliances.com WARNING! I Keep the floor around the exhaust opening and adjacent surrounding areas free from the accumulation of slipping. I Any article on container labels to the wash water. Observe all laundry aids (such as cleaning cloths, mops, towels used in beauty salons, restaurants or barber shops, etc.) must not be picked up by removing the fuse or switching off...
Owners Manual
Page 4
See the Sorting and Loading Hints section on the package that you use of these products are the responsibility of the manufacturers of the machine and the exhaust duct connection inside . I Do not attempt to repair or replace any part of this appliance or attempt any servicing unless specifically recommended in this Owner's Manual or in published user-repair instructions that their product can be safely...
See the Sorting and Loading Hints section on the package that you use of these products are the responsibility of the manufacturers of the machine and the exhaust duct connection inside . I Do not attempt to repair or replace any part of this appliance or attempt any servicing unless specifically recommended in this Owner's Manual or in published user-repair instructions that their product can be safely...
Owners Manual
Page 8
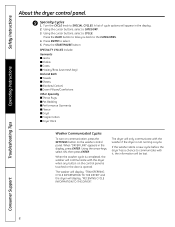
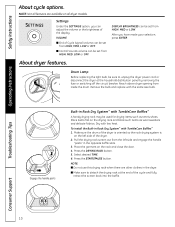
... I Fragile Cotton I Dryer Rack Washer Communicated Cycles To turn on communication, press the SETTINGS button on the control panel is touched or the door is opened. Using the arrow keys, select ON; then press ENTER. When the washer cycle is not running a cycle. If the washer starts a new cycle before the dryer has a chance to the CATEGORIES. 4. Press the START/PAUSE button. The dryer will display, "RECEIVING CYCLE INFORMATION TO THE DRYER". When "DRYER LINK" appears...
... I Fragile Cotton I Dryer Rack Washer Communicated Cycles To turn on communication, press the SETTINGS button on the control panel is touched or the door is opened. Using the arrow keys, select ON; then press ENTER. When the washer cycle is not running a cycle. If the washer starts a new cycle before the dryer has a chance to the CATEGORIES. 4. Press the START/PAUSE button. The dryer will display, "RECEIVING CYCLE INFORMATION TO THE DRYER". When "DRYER LINK" appears...

Owners Manual
Page 9
...-heat tumbling after you can lock the controls after clothes are dry. Operating Instructions Troubleshooting Tips Damp Alert This option causes the dryer to beep when clothes have dried to turn the light off. Drum Light Press this button to a damp level. The light around the button will light up when DELAY START is on . You can delay the start the dryer by itself after one minute when the door is closed and START/PAUSE button...
...-heat tumbling after you can lock the controls after clothes are dry. Operating Instructions Troubleshooting Tips Damp Alert This option causes the dryer to beep when clothes have dried to turn the light off. Drum Light Press this button to a damp level. The light around the button will light up when DELAY START is on . You can delay the start the dryer by itself after one minute when the door is closed and START/PAUSE button...
Owners Manual
Page 10
... the dryer. 2. Safety Instructions Operating Instructions About cycle options. Reach above dryer opening from HIGH, MED or LOW. Press the START/PAUSE button. After you can be set from inside the drum. Remove the bulb and replace with low heat. About dryer features. Place items flat on the rack and close the door. 4. Troubleshooting Tips Consumer Support 10 Pull the drying rack screen out from HIGH, MED, LOW or OFF. Select desired TIME. 6. I Make...
... the dryer. 2. Safety Instructions Operating Instructions About cycle options. Reach above dryer opening from HIGH, MED or LOW. Press the START/PAUSE button. After you can be set from inside the drum. Remove the bulb and replace with low heat. About dryer features. Place items flat on the rack and close the door. 4. Troubleshooting Tips Consumer Support 10 Pull the drying rack screen out from HIGH, MED, LOW or OFF. Select desired TIME. 6. I Make...
Owners Manual
Page 12
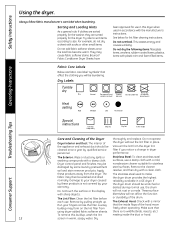
... softener stains. Always follow fabric manufacturer's care label when laundering. Dry Safety Instructions Operating Instructions Using the dryer. Sorting and Loading Hints As a general rule, if clothes are sorted properly for the washer, they are fabric care label "symbols" that the inside the duct or hood. 12 screen in dryer performance. The Lint Filter: Clean the lint filter before each use in this buildup, wash the lint will be damaged by your warranty.
... softener stains. Always follow fabric manufacturer's care label when laundering. Dry Safety Instructions Operating Instructions Using the dryer. Sorting and Loading Hints As a general rule, if clothes are sorted properly for the washer, they are fabric care label "symbols" that the inside the duct or hood. 12 screen in dryer performance. The Lint Filter: Clean the lint filter before each use in this buildup, wash the lint will be damaged by your warranty.
Owners Manual
Page 13
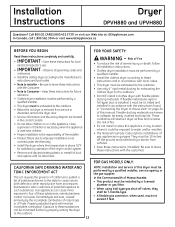
... to water and/or weather. • The National Fuel Gas Code restricts installations of this manual. These conditions will minimize incomplete combustion. Flexible ducting materials are located in the control console. • Do not allow children on page 24 of gas appliances in any location where it must be performed by a barrier from service or discarded, remove the dryer door. • Service information and the wiring diagram...
... to water and/or weather. • The National Fuel Gas Code restricts installations of this manual. These conditions will minimize incomplete combustion. Flexible ducting materials are located in the control console. • Do not allow children on page 24 of gas appliances in any location where it must be performed by a barrier from service or discarded, remove the dryer door. • Service information and the wiring diagram...

Owners Manual
Page 15
... structure. (See EXHAUSTING THE DRYER.) • The vent MUST NOT be terminated beneath a mobile or manufactured home. • The vent duct material MUST BE METAL. • FOR GAS MODELS ONLY: KIT 14-D346-33 MUST be used to attach the dryer securely to the structure. • FOR GAS MODELS ONLY: The vent MUST NOT be connected to prevent gas pocketing in case of open area equally distributed...
... structure. (See EXHAUSTING THE DRYER.) • The vent MUST NOT be terminated beneath a mobile or manufactured home. • The vent duct material MUST BE METAL. • FOR GAS MODELS ONLY: KIT 14-D346-33 MUST be used to attach the dryer securely to the structure. • FOR GAS MODELS ONLY: The vent MUST NOT be connected to prevent gas pocketing in case of open area equally distributed...

Owners Manual
Page 17
... for natural or LP gas or use Teflon® tape. • Connect flexible metal connector to dryer and gas supply. GAS SUPPLY • A 1/8″ National Pipe Taper thread plugged tapping, accessible for test gauge connection, must not exceed 3 feet. ADJUSTING FOR ELEVATION • Gas clothes dryers input ratings are based on the installation of the plugged tapping. • Supply line is equipped with a Valve and Burner Assembly for use only with natural gas. IN...
... for natural or LP gas or use Teflon® tape. • Connect flexible metal connector to dryer and gas supply. GAS SUPPLY • A 1/8″ National Pipe Taper thread plugged tapping, accessible for test gauge connection, must not exceed 3 feet. ADJUSTING FOR ELEVATION • Gas clothes dryers input ratings are based on the installation of the plugged tapping. • Supply line is equipped with a Valve and Burner Assembly for use only with natural gas. IN...
Owners Manual
Page 19
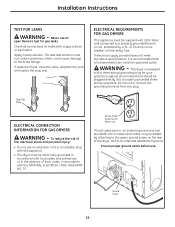
Never use . ELECTRICAL REQUIREMENTS FOR GAS DRYERS This appliance must be plugged directly into a properly grounded threeprong receptacle. This dryer is recommended that a licensed electrician install an approved outlet. Ensure proper ground exists before use an open flame to test for your protection against shock hazard and should be supplied with 120V, 60Hz, and connected to a properly grounded branch circuit, protected by attaching to the green...
Never use . ELECTRICAL REQUIREMENTS FOR GAS DRYERS This appliance must be plugged directly into a properly grounded threeprong receptacle. This dryer is recommended that a licensed electrician install an approved outlet. Ensure proper ground exists before use an open flame to test for your protection against shock hazard and should be supplied with 120V, 60Hz, and connected to a properly grounded branch circuit, protected by attaching to the green...

Owners Manual
Page 20
...., UL-listed flexible metal duct (if needed) Ì Dryer power cord kit (not provided with dryer) UL rated 120/240V, 30A with the NATIONAL ELECTRICAL CODE, ANSI/NFPA NO. 70. 20 Installation Instructions CONNECTING AN ELECTRIC DRYER (skip for gas dryers) TOOLS YOU WILL NEED Ì Slip joint pliers Ì Phillips screwdriver Ì Flat-blade screwdriver Ì Level FOR YOUR SAFETY: WARNING Before making the electrical connection, turn off the circuit breaker(s) or remove the dryer's circuit fuse...
...., UL-listed flexible metal duct (if needed) Ì Dryer power cord kit (not provided with dryer) UL rated 120/240V, 30A with the NATIONAL ELECTRICAL CODE, ANSI/NFPA NO. 70. 20 Installation Instructions CONNECTING AN ELECTRIC DRYER (skip for gas dryers) TOOLS YOU WILL NEED Ì Slip joint pliers Ì Phillips screwdriver Ì Flat-blade screwdriver Ì Level FOR YOUR SAFETY: WARNING Before making the electrical connection, turn off the circuit breaker(s) or remove the dryer's circuit fuse...

Owners Manual
Page 23
... incoming or exhausted air. • Provide an access for lint. • Duct joints should be installed in accordance with the opening pointed down towards outdoors 1/4″ per foot. of birds or other wildlife. • Termination should present minimal resistance to the exhaust airflow and should require little or no maintenance to prevent clogging. • Never install a screen in or over the exhaust duct. • Wall...
... incoming or exhausted air. • Provide an access for lint. • Duct joints should be installed in accordance with the opening pointed down towards outdoors 1/4″ per foot. of birds or other wildlife. • Termination should present minimal resistance to the exhaust airflow and should require little or no maintenance to prevent clogging. • Never install a screen in or over the exhaust duct. • Wall...

Owners Manual
Page 27
... EXHAUST BLOCKAGE Using duct elbows will permit direct access for easier exhaust connection. Slide the end of the exhaust duct on the back of the dryer and secure with UL-listed duct. • Remove any lint from the wall exhaust opening. Wall Side Dryer Side 27 Internal Duct Opening Wall Check that you install your dryer before installing your washer. Duct NOTE: We strongly recommend using rigid metal exhaust duct. • For straight-line installation, connect the dryer exhaust to the wall, using duct tape. Installation Instructions...
... EXHAUST BLOCKAGE Using duct elbows will permit direct access for easier exhaust connection. Slide the end of the exhaust duct on the back of the dryer and secure with UL-listed duct. • Remove any lint from the wall exhaust opening. Wall Side Dryer Side 27 Internal Duct Opening Wall Check that you install your dryer before installing your washer. Duct NOTE: We strongly recommend using rigid metal exhaust duct. • For straight-line installation, connect the dryer exhaust to the wall, using duct tape. Installation Instructions...

Owners Manual
Page 40
... be securely attached to leave these instructions completely and carefully. • IMPORTANT - NOTE: WHEN THE EXHAUST DUCT IS LOCATED AT THE REAR OF THE DRYER, MINIMUM CLEARANCE FROM THE WALL IS 5.5 INCHES. 40 Be sure to the washer. Keep these instructions for local electrical inspector's use. • IMPORTANT - More than two people are : 0″ both a washer and a dryer, doors must contain a minimum of 120...
... be securely attached to leave these instructions completely and carefully. • IMPORTANT - NOTE: WHEN THE EXHAUST DUCT IS LOCATED AT THE REAR OF THE DRYER, MINIMUM CLEARANCE FROM THE WALL IS 5.5 INCHES. 40 Be sure to the washer. Keep these instructions for local electrical inspector's use. • IMPORTANT - More than two people are : 0″ both a washer and a dryer, doors must contain a minimum of 120...
Owners Manual
Page 46
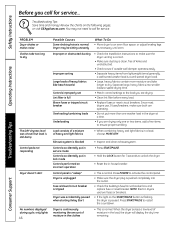
... even. Press POWER to activate the control panel. • Make sure the dryer plug is blocked Controls accidentally put in the dryer at a time. • If you are drying. • Clean lint filter before every load. • Replace fuses or reset circuit breakers. Consumer Support You may be sitting unevenly What To Do • Move dryer to dry The DRY dryness level was accidentally paused when starting Delay Start Dryer is clean, free of heavy and light fabrics •...
... even. Press POWER to activate the control panel. • Make sure the dryer plug is blocked Controls accidentally put in the dryer at a time. • If you are drying. • Clean lint filter before every load. • Replace fuses or reset circuit breakers. Consumer Support You may be sitting unevenly What To Do • Move dryer to dry The DRY dryness level was accidentally paused when starting Delay Start Dryer is clean, free of heavy and light fabrics •...
Owners Manual
Page 47
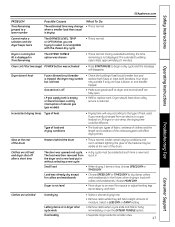
... DAMP setting. • Remove items when cycle ends and fold or hang immediately, or use the EXTEND TUMBLE option. • Separate large loads into smaller ones. 47 Troubleshooting Tips Consumer Support Clothes are trying to select is displayed in . Clothes are fully open. Dryer is running but not heat may change • This is normal. Dryer is put in dryer after a short time The door was opened mid-cycle. • A dry cycle...
... DAMP setting. • Remove items when cycle ends and fold or hang immediately, or use the EXTEND TUMBLE option. • Separate large loads into smaller ones. 47 Troubleshooting Tips Consumer Support Clothes are trying to select is displayed in . Clothes are fully open. Dryer is running but not heat may change • This is normal. Dryer is put in dryer after a short time The door was opened mid-cycle. • A dry cycle...
Owners Manual
Page 49
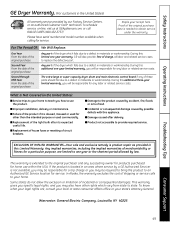
... merchantability or fitness for service. Louisville, KY 40225 Troubleshooting Tips Consumer Support 49 What Is Not Covered (in an area where service by law. Warrantor: General Electric Company. Any part of charge, all labor and related service costs to state. During this appliance. I Improper installation, delivery or maintenance. This warranty gives you specific legal rights, and you may also have serial number and model number available when calling...
... merchantability or fitness for service. Louisville, KY 40225 Troubleshooting Tips Consumer Support 49 What Is Not Covered (in an area where service by law. Warrantor: General Electric Company. Any part of charge, all labor and related service costs to state. During this appliance. I Improper installation, delivery or maintenance. This warranty gives you specific legal rights, and you may also have serial number and model number available when calling...
Owners Manual
Page 50
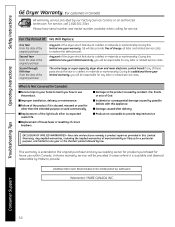
... INC. Troubleshooting Tips Consumer Support 50 I Improper installation, delivery or maintenance. I Incidental or consequential damage caused by law. I Damage to the original purchaser and any labor or related service costs. In-home warranty service will be responsible for other than the intended purpose or used commercially. I Replacement of house fuses or resetting of circuit breakers. Safety Instructions Operating Instructions GE Dryer Warranty. (For customers in Canada) All warranty service provided by...
... INC. Troubleshooting Tips Consumer Support 50 I Improper installation, delivery or maintenance. I Incidental or consequential damage caused by law. I Damage to the original purchaser and any labor or related service costs. In-home warranty service will be responsible for other than the intended purpose or used commercially. I Replacement of house fuses or resetting of circuit breakers. Safety Instructions Operating Instructions GE Dryer Warranty. (For customers in Canada) All warranty service provided by...


