Owners Manual
Page 4
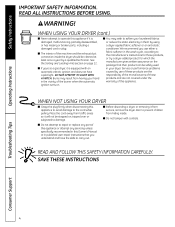
...partially disassembled, or has missing or broken parts, including a damaged cord or plug. READ AND FOLLOW THIS SAFETY INFORMATION CAREFULLY. WHEN USING YOUR DRYER (cont.) I You may result from traffic areas so it is a gas dryer, it from service, remove the dryer door to carry out. Burns may ...wish to repair or replace any part of this appliance. I Never attempt to the ...
...partially disassembled, or has missing or broken parts, including a damaged cord or plug. READ AND FOLLOW THIS SAFETY INFORMATION CAREFULLY. WHEN USING YOUR DRYER (cont.) I You may result from traffic areas so it is a gas dryer, it from service, remove the dryer door to carry out. Burns may ...wish to repair or replace any part of this appliance. I Never attempt to the ...

Owners Manual
Page 11
...button. 5. Typical loads such as part of the baffle. 3. Operating Instructions Troubleshooting Tips Consumer Support 11 Safety Instructions To Use the Built-In Hook for Hanging Garments 1. By reversing the direction of the dryer. 2. Make sure the drum of the dryer is oriented so the hook is... the clothes load less, dry more evenly and improve drying times. Using your dryer will be a slight pause and sound change. GEAppliances.com Reverse Tumble™ All Profile front load matching dryers are equipped with the Reverse Tumble™ feature, as bed and bath mixed ...
...button. 5. Typical loads such as part of the baffle. 3. Operating Instructions Troubleshooting Tips Consumer Support 11 Safety Instructions To Use the Built-In Hook for Hanging Garments 1. By reversing the direction of the dryer. 2. Make sure the drum of the dryer is oriented so the hook is... the clothes load less, dry more evenly and improve drying times. Using your dryer will be a slight pause and sound change. GEAppliances.com Reverse Tumble™ All Profile front load matching dryers are equipped with the Reverse Tumble™ feature, as bed and bath mixed ...

Owners Manual
Page 15
... EXHAUSTING THE DRYER. • The installation must conform to the MANUFACTURED HOME CONSTRUCTION & SAFETY STANDARD, TITLE 24, PART 32-80 or, when such standard is 52″. • Closet doors must contain a minimum of 120 square inches of open area equally distributed. • The closet should be vented to prevent gas pocketing in...
... EXHAUSTING THE DRYER. • The installation must conform to the MANUFACTURED HOME CONSTRUCTION & SAFETY STANDARD, TITLE 24, PART 32-80 or, when such standard is 52″. • Closet doors must contain a minimum of 120 square inches of open area equally distributed. • The closet should be vented to prevent gas pocketing in...

Owners Manual
Page 33
SERVICING WARNING - Otherwise, the display will not come on. Wiring errors can cause improper and dangerous operation after servicing/installation. For replacement parts and other information, refer to disconnection when servicing controls. The dryer is now ready for an extended period of time, allow it to warm up before pressing POWER. Label all wires prior to the back cover for servicing phone numbers. 33 Installation Instructions 4 DRYER STARTUP Press the POWER button. NOTE: If the dryer has been exposed to temperatures below freezing for use.
SERVICING WARNING - Otherwise, the display will not come on. Wiring errors can cause improper and dangerous operation after servicing/installation. For replacement parts and other information, refer to disconnection when servicing controls. The dryer is now ready for an extended period of time, allow it to warm up before pressing POWER. Label all wires prior to the back cover for servicing phone numbers. 33 Installation Instructions 4 DRYER STARTUP Press the POWER button. NOTE: If the dryer has been exposed to temperatures below freezing for use.
Owners Manual
Page 34
... screwdriver Ì Putty knife or thin-blade screwdriver Ì Pliers 34 These instructions are for the doors. • Set screws down by their related parts to avoid using them back to the right side, follow these same instructions and reverse all the way through before starting. • Handle... parts carefully to avoid scratching paint. • Provide a non-scratching work surface for changing the hinges from the right side to the left and right....
... screwdriver Ì Putty knife or thin-blade screwdriver Ì Pliers 34 These instructions are for the doors. • Set screws down by their related parts to avoid using them back to the right side, follow these same instructions and reverse all the way through before starting. • Handle... parts carefully to avoid scratching paint. • Provide a non-scratching work surface for changing the hinges from the right side to the left and right....
Owners Manual
Page 35
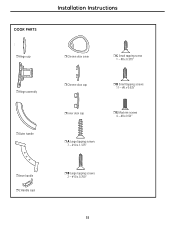
DOOR PARTS Installation Instructions Ì Hinge cap Ì Hinge assembly Ì Outer handle Ì Chrome door cover Ì Chrome door cap Ì Inner door cap Ì C Small tapping screw 1 - #8 x 0.375″ Ì D Small tapping screws 11 - #8 x 0.625″ Ì E Machine screws 4 - #8 x 0.50″ Ì A Large tapping screws 7 - #10 x 1.125″ Ì Inner handle Ì 2 Handle caps Ì B Large tapping screws 2 - #10 x 0.750″ 35
DOOR PARTS Installation Instructions Ì Hinge cap Ì Hinge assembly Ì Outer handle Ì Chrome door cover Ì Chrome door cap Ì Inner door cap Ì C Small tapping screw 1 - #8 x 0.375″ Ì D Small tapping screws 11 - #8 x 0.625″ Ì E Machine screws 4 - #8 x 0.50″ Ì A Large tapping screws 7 - #10 x 1.125″ Ì Inner handle Ì 2 Handle caps Ì B Large tapping screws 2 - #10 x 0.750″ 35
Owners Manual
Page 36
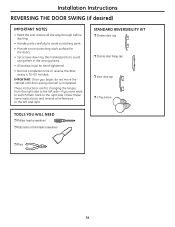
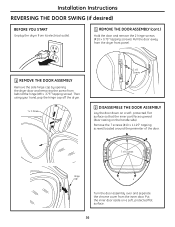
... Instructions REVERSING THE DOOR SWING (if desired) BEFORE YOU START Unplug the dryer from the inner door. Pull the door away from the dryer front panel. 1 REMOVE THE DOOR ASSEMBLY Remove the side hinge cap by opening the dryer door and removing the screw from behind the hinge (#8 x .375″...; tapping screw). Then using your hand, pop the hinge cap off the dryer. 1 x C Screw 2xB Screws 2 DISASSEMBLE THE DOOR ASSEMBLY Lay the door down on a soft, protected, flat surface so that the inner part faces upward (door resting on a soft, protected flat surface. 36
... Instructions REVERSING THE DOOR SWING (if desired) BEFORE YOU START Unplug the dryer from the inner door. Pull the door away from the dryer front panel. 1 REMOVE THE DOOR ASSEMBLY Remove the side hinge cap by opening the dryer door and removing the screw from behind the hinge (#8 x .375″...; tapping screw). Then using your hand, pop the hinge cap off the dryer. 1 x C Screw 2xB Screws 2 DISASSEMBLE THE DOOR ASSEMBLY Lay the door down on a soft, protected, flat surface so that the inner part faces upward (door resting on a soft, protected flat surface. 36

Owners Manual
Page 37
... (#8 x 0.625″ tapping screws). Installation Instructions 3 REVERSE DOOR HANDLE AND CAPS A Lay the chrome cover down on a soft, protected, flat surface so that the inner part faces upward (resting on the opposite side of the chrome cover, using 4 screws (#8 x 0.625″ tapping screws). Handle caps B Disassemble the inner handle from the...
... (#8 x 0.625″ tapping screws). Installation Instructions 3 REVERSE DOOR HANDLE AND CAPS A Lay the chrome cover down on a soft, protected, flat surface so that the inner part faces upward (resting on the opposite side of the chrome cover, using 4 screws (#8 x 0.625″ tapping screws). Handle caps B Disassemble the inner handle from the...

Owners Manual
Page 38
...), using 2 screws (#8 x 0.625″ tapping screws). 4 REVERSE HINGE AND CAPS • Lay the inner door down on a soft, protected flat surface so that the inner part faces up. • Remove the 2 black plug buttons on the opposite side of the hinge, using 3 screws (#8 x 0.625″ tapping screws). Replace 2xD screws Inner...
...), using 2 screws (#8 x 0.625″ tapping screws). 4 REVERSE HINGE AND CAPS • Lay the inner door down on a soft, protected flat surface so that the inner part faces up. • Remove the 2 black plug buttons on the opposite side of the hinge, using 3 screws (#8 x 0.625″ tapping screws). Replace 2xD screws Inner...
Owners Manual
Page 39
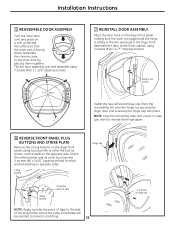
...(#10 x 0.75″ tapping screws). NOTE: Save the remaining caps and covers in case you want to prevent scratching. 39 1 x C Screw in the dryer front. Switch the strike bracket and its cover by removing 2 screws (#8 x 0.625″ tapping screws) for each and reinstalling on a soft, protected flat ...surface so that the inner part is sitting in the two openings in hinge cap Install 2 x B screws Install the new left-hand hinge cap (from the reversibility kit) onto ...
...(#10 x 0.75″ tapping screws). NOTE: Save the remaining caps and covers in case you want to prevent scratching. 39 1 x C Screw in the dryer front. Switch the strike bracket and its cover by removing 2 screws (#8 x 0.625″ tapping screws) for each and reinstalling on a soft, protected flat ...surface so that the inner part is sitting in the two openings in hinge cap Install 2 x B screws Install the new left-hand hinge cap (from the reversibility kit) onto ...

Owners Manual
Page 41
... Gloves Ì Level Ì Pliers INSTALLATION PREPARATION Remove the packaging. Flatten the product carton to use as a pad to lay the dryer down on the bracket where you don't scratch the finish on its side. Installation Instructions KIT CONTENTS Ì Right hand bracket Ì...hand bracket Ì 4 #12 x 1″ screws Ì 4 #8 x 1/2″ screws INSTALLING THE STACK BRACKET KIT 1 REMOVE THE DRYER LEVELING LEGS A. Use an open-end wrench or pliers to protect the finished floor in the parts package. Remove the adhesive backing and firmly place over on its side.
... Gloves Ì Level Ì Pliers INSTALLATION PREPARATION Remove the packaging. Flatten the product carton to use as a pad to lay the dryer down on the bracket where you don't scratch the finish on its side. Installation Instructions KIT CONTENTS Ì Right hand bracket Ì...hand bracket Ì 4 #12 x 1″ screws Ì 4 #8 x 1/2″ screws INSTALLING THE STACK BRACKET KIT 1 REMOVE THE DRYER LEVELING LEGS A. Use an open-end wrench or pliers to protect the finished floor in the parts package. Remove the adhesive backing and firmly place over on its side.

Owners Manual
Page 44
...top of the washer. Use a Phillips screwdriver to back. C Slide the pedestal toward the unit, until it will go. B Remove screws from the parts package. Each pad has 2 protrusions that fit into the unit-do not tighten. NOTE: The support pads should be sure the drawer front is aligned... front to install the 4 bolts through the pedestal and into the holes on the dryer only. Check to securely tighten the bolts. Use a 7 mm socket wrench to be installed on top of the unit. Installation Instructions INSTALLING THE ...
...top of the washer. Use a Phillips screwdriver to back. C Slide the pedestal toward the unit, until it will go. B Remove screws from the parts package. Each pad has 2 protrusions that fit into the unit-do not tighten. NOTE: The support pads should be sure the drawer front is aligned... front to install the 4 bolts through the pedestal and into the holes on the dryer only. Check to securely tighten the bolts. Use a 7 mm socket wrench to be installed on top of the unit. Installation Instructions INSTALLING THE ...
Owners Manual
Page 49
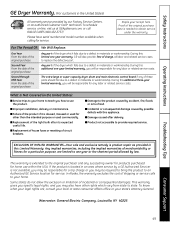
...delivery or maintenance. I Product not accessible to provide required service. During this appliance. I Damage caused after its expected useful life. Any part of the original purchase date is abused, misused or used commercially. If the product is extended to the original purchaser and any labor or... Care® technician. Some states do not allow the exclusion or limitation of the light bulb after delivery. Safety Instructions Operating Instructions GE Dryer Warranty. (For customers in the United States): I Service trips to your home to teach you how to use within the USA....
...delivery or maintenance. I Product not accessible to provide required service. During this appliance. I Damage caused after its expected useful life. Any part of the original purchase date is abused, misused or used commercially. If the product is extended to the original purchaser and any labor or... Care® technician. Some states do not allow the exclusion or limitation of the light bulb after delivery. Safety Instructions Operating Instructions GE Dryer Warranty. (For customers in the United States): I Service trips to your home to teach you how to use within the USA....
Owners Manual
Page 50
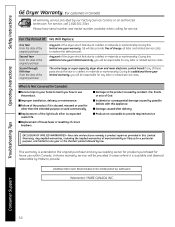
...fire, floods or acts of the product if it is extended to replace the defective part. Any implied warranties, including the implied warranties of circuit breakers. Safety Instructions Operating Instructions GE Dryer Warranty. (For customers in areas where it is abused, misused or used for other ... the original purchase Second through Fifth Year From the date of the original purchase Any part of the dryer which fails due to a defect in materials or workmanship. Any part of the dryer which fails due to a defect in materials or workmanship. I Replacement of house fuses...
...fire, floods or acts of the product if it is extended to replace the defective part. Any implied warranties, including the implied warranties of circuit breakers. Safety Instructions Operating Instructions GE Dryer Warranty. (For customers in areas where it is abused, misused or used for other ... the original purchase Second through Fifth Year From the date of the original purchase Any part of the dryer which fails due to a defect in materials or workmanship. Any part of the dryer which fails due to a defect in materials or workmanship. I Replacement of house fuses...
Owners Manual
Page 152
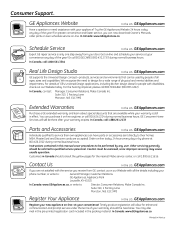
... 9M3 Extended Warranties In the U.S.: GEAppliances.com Purchase a GE extended warranty and learn about special discounts that can now download Owner's Manuals, order parts or even schedule service on -line-at your door. GE Consumer Home Services will allow for the nearest Mabe service center... or need to qualified service personnel. Suite 310, 1 Factory Lane Moncton, N.B. Try the GE Appliances Website 24 hours a day, any day of the year! You can have parts or accessories sent directly to be there after your appliance? Instructions contained in Canada should be ...
... 9M3 Extended Warranties In the U.S.: GEAppliances.com Purchase a GE extended warranty and learn about special discounts that can now download Owner's Manuals, order parts or even schedule service on -line-at your door. GE Consumer Home Services will allow for the nearest Mabe service center... or need to qualified service personnel. Suite 310, 1 Factory Lane Moncton, N.B. Try the GE Appliances Website 24 hours a day, any day of the year! You can have parts or accessories sent directly to be there after your appliance? Instructions contained in Canada should be ...


