Owners Manual
Page 2
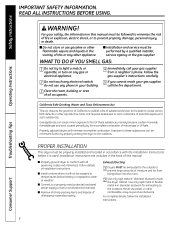
... sized power supply circuit to water or weather. call your building. Properly adjusted dryers will not be properly installed and located in the vicinity of this or any gas or electrical appliance. 4 Immediately call the fire department. 3 Clear the room, building or area...the outside to the outdoors. For complete details, follow the Installation Instructions. I Properly ground dryer to minimize the risk of all governing codes and ordinances. Gas appliances can be performed by the incomplete combustion of these substances can cause minor exposure to prevent...
... sized power supply circuit to water or weather. call your building. Properly adjusted dryers will not be properly installed and located in the vicinity of this or any gas or electrical appliance. 4 Immediately call the fire department. 3 Clear the room, building or area...the outside to the outdoors. For complete details, follow the Installation Instructions. I Properly ground dryer to minimize the risk of all governing codes and ordinances. Gas appliances can be performed by the incomplete combustion of these substances can cause minor exposure to prevent...

Owners Manual
Page 3
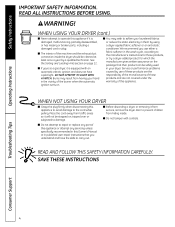
... gasoline, degreasers, dry-cleaning solvents, kerosene, etc.). WHEN USING YOUR DRYER I Garments labeled Dry Away from the power supply. I Keep the area underneath and around your appliances free of the dryer during subsequent dryer uses. YOUR LAUNDRY AREA I Do not wash or dry articles that may...have been cleaned in, washed in, soaked in your dryer. Some rubber materials, when heated, can reduce the flame retardancy of slipping. I Never reach into the dryer while the drum is necessary if this appliance from the remaining particles that contains flammable materials (such...
... gasoline, degreasers, dry-cleaning solvents, kerosene, etc.). WHEN USING YOUR DRYER I Garments labeled Dry Away from the power supply. I Keep the area underneath and around your appliances free of the dryer during subsequent dryer uses. YOUR LAUNDRY AREA I Do not wash or dry articles that may...have been cleaned in, washed in, soaked in your dryer. Some rubber materials, when heated, can reduce the flame retardancy of slipping. I Never reach into the dryer while the drum is necessary if this appliance from the remaining particles that contains flammable materials (such...
Owners Manual
Page 4
...manufacturer gives written assurance on page 12. I If yours is a gas dryer, it will not be stepped on . READ AND FOLLOW THIS SAFETY INFORMATION CAREFULLY. I Never attempt to operate this appliance to avoid damage to the manufacturer's instructions for those products and are... qualified technician. WHEN NOT USING YOUR DRYER I Before discarding a dryer, or removing it is equipped with controls. Burns may wish to soften your dryer. I Grasp the plug firmly when disconnecting this appliance if it from service, remove the dryer door to damage. See the Sorting...
...manufacturer gives written assurance on page 12. I If yours is a gas dryer, it will not be stepped on . READ AND FOLLOW THIS SAFETY INFORMATION CAREFULLY. I Never attempt to operate this appliance to avoid damage to the manufacturer's instructions for those products and are... qualified technician. WHEN NOT USING YOUR DRYER I Before discarding a dryer, or removing it is equipped with controls. Burns may wish to soften your dryer. I Grasp the plug firmly when disconnecting this appliance if it from service, remove the dryer door to damage. See the Sorting...
Owners Manual
Page 5
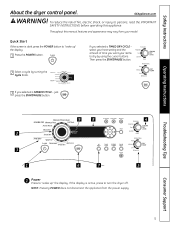
...up " the display. 1 Press the POWER button. just press the START/PAUSE button. 9 8 4 2 3 1 6 7 5 1 Power Press to turn the dryer off. If the display is dark, press the POWER button to persons, read the IMPORTANT SAFETY INSTRUCTIONS before operating this manual, features and appearance may... button. 2 Select a cycle by using the cursor buttons. If you selected a SENSOR CYCLE - NOTE: Pressing POWER does not disconnect the appliance from your heat setting and the amount of fire, electric shock, or injury to "wake up " the display. select your model. GEAppliances....
...up " the display. 1 Press the POWER button. just press the START/PAUSE button. 9 8 4 2 3 1 6 7 5 1 Power Press to turn the dryer off. If the display is dark, press the POWER button to persons, read the IMPORTANT SAFETY INSTRUCTIONS before operating this manual, features and appearance may... button. 2 Select a cycle by using the cursor buttons. If you selected a SENSOR CYCLE - NOTE: Pressing POWER does not disconnect the appliance from your heat setting and the amount of fire, electric shock, or injury to "wake up " the display. select your model. GEAppliances....
Owners Manual
Page 12
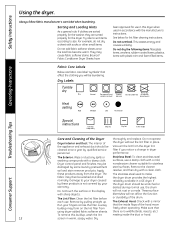
... stains. Damage to dry Drip dry Dry flat In the shade Troubleshooting Tips Consumer Support Care and Cleaning of the Dryer Dryer Interior and Duct: The interior of the appliance and exhaust duct should be scratched or dented during normal use a damp cloth with sharp objects. The Lint Filter:... Clean the lint filter before each use in a GE dryer. To remove this dryer when used in warm, soapy water. For example, do not wash...
... stains. Damage to dry Drip dry Dry flat In the shade Troubleshooting Tips Consumer Support Care and Cleaning of the Dryer Dryer Interior and Duct: The interior of the appliance and exhaust duct should be scratched or dented during normal use a damp cloth with sharp objects. The Lint Filter:... Clean the lint filter before each use in a GE dryer. To remove this dryer when used in warm, soapy water. For example, do not wash...
Owners Manual
Page 13
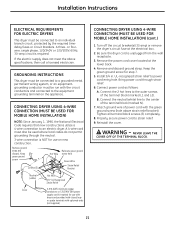
...gas shut-off the ground and protected by a barrier from service or discarded, remove the dryer door. • Service information and the wiring diagram are located in the control console. • Do not allow children on page 24 of this appliance in garages. Call 800.GE...primarily by a qualified installer. • Install the clothes dryer according to these instructions and in accordance with the instructions found in the appliance. Properly adjusted dryers will obstruct dryer airflow and increase the risk of gas appliances in any location where it must be performed by a ...
...gas shut-off the ground and protected by a barrier from service or discarded, remove the dryer door. • Service information and the wiring diagram are located in the control console. • Do not allow children on page 24 of this appliance in garages. Call 800.GE...primarily by a qualified installer. • Install the clothes dryer according to these instructions and in accordance with the instructions found in the appliance. Properly adjusted dryers will obstruct dryer airflow and increase the risk of gas appliances in any location where it must be performed by a ...

Owners Manual
Page 15
.... • Do not use sheet metal screws or other fuel-burning appliance shall be installed in the same closet with the NATIONAL ELECTRICAL CODE, ANSI/NFPA NO. 70 (for electric dryers) or NATIONAL FUEL GAS CODE, ANSI Z223 (for introduction of at least 25 sq. MOBILE ... HOME INSTALLATION • The installation must contain a minimum of 120 square inches of open area equally distributed. for gas dryers). Installation Instructions REQUIREMENTS FOR ALCOVE OR CLOSET INSTALLATION • Your dryer is approved for installation in an alcove or closet, as stated on a label on the...
.... • Do not use sheet metal screws or other fuel-burning appliance shall be installed in the same closet with the NATIONAL ELECTRICAL CODE, ANSI/NFPA NO. 70 (for electric dryers) or NATIONAL FUEL GAS CODE, ANSI Z223 (for introduction of at least 25 sq. MOBILE ... HOME INSTALLATION • The installation must contain a minimum of 120 square inches of open area equally distributed. for gas dryers). Installation Instructions REQUIREMENTS FOR ALCOVE OR CLOSET INSTALLATION • Your dryer is approved for installation in an alcove or closet, as stated on a label on the...
Owners Manual
Page 19
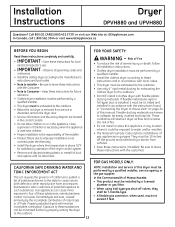
Installation Instructions TEST FOR LEAKS WARNING - ELECTRICAL REQUIREMENTS FOR GAS DRYERS This appliance must be plugged directly into a properly grounded threeprong receptacle. If electrical supply provided does not meet the above specifications, it is equipped with a...Open Gas Valve ELECTRICAL CONNECTION INFORMATION FOR GAS DRYERS WARNING - If local codes permit, an external ground wire (not provided), which could cause damage to the brass fittings. or 20-amp circuit breaker or time-delay fuse. Do not cut or remove the grounding terminal from this appliance. • The dryer must ...
Installation Instructions TEST FOR LEAKS WARNING - ELECTRICAL REQUIREMENTS FOR GAS DRYERS This appliance must be plugged directly into a properly grounded threeprong receptacle. If electrical supply provided does not meet the above specifications, it is equipped with a...Open Gas Valve ELECTRICAL CONNECTION INFORMATION FOR GAS DRYERS WARNING - If local codes permit, an external ground wire (not provided), which could cause damage to the brass fittings. or 20-amp circuit breaker or time-delay fuse. Do not cut or remove the grounding terminal from this appliance. • The dryer must ...

Owners Manual
Page 20
... fire, electrical shock and personal injury: • Do not use an extension cord or an adapter plug with this appliance. • The dryer must be electrically grounded in accordance with local codes and ordinances or, in the absence of local codes, in accordance with...clamps (2) or 4″ spring clamps (2) Ì Duct tape Ì Safety glasses Ì 4″ dia. Installation Instructions CONNECTING AN ELECTRIC DRYER (skip for gas dryers) TOOLS YOU WILL NEED Ì Slip joint pliers Ì Phillips screwdriver Ì Flat-blade screwdriver Ì Level FOR YOUR SAFETY: WARNING ...
... fire, electrical shock and personal injury: • Do not use an extension cord or an adapter plug with this appliance. • The dryer must be electrically grounded in accordance with local codes and ordinances or, in the absence of local codes, in accordance with...clamps (2) or 4″ spring clamps (2) Ì Duct tape Ì Safety glasses Ì 4″ dia. Installation Instructions CONNECTING AN ELECTRIC DRYER (skip for gas dryers) TOOLS YOU WILL NEED Ì Slip joint pliers Ì Phillips screwdriver Ì Flat-blade screwdriver Ì Level FOR YOUR SAFETY: WARNING ...
Owners Manual
Page 21
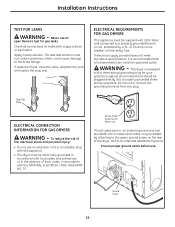
...8243; UL Recognized Strain Relief 4 #10 AWG minimum copper conductors or 120/240V 30A power supply cord kit marked for use on the appliance. UL-recognized strain relief to strain relief. 9. Connect power cord as follows: A. Connect the 2 hot lines to the outer screws of... Connect the neutral (white) line to an individual branch circuit, protected by the required timedelay fuses or circuit breakers. GROUNDING INSTRUCTIONS This dryer must be connected to a grounded metal, permanent wiring system, or an equipmentgrounding conductor must be connected to the center of the terminal block...
...8243; UL Recognized Strain Relief 4 #10 AWG minimum copper conductors or 120/240V 30A power supply cord kit marked for use on the appliance. UL-recognized strain relief to strain relief. 9. Connect power cord as follows: A. Connect the 2 hot lines to the outer screws of... Connect the neutral (white) line to an individual branch circuit, protected by the required timedelay fuses or circuit breakers. GROUNDING INSTRUCTIONS This dryer must be connected to a grounded metal, permanent wiring system, or an equipmentgrounding conductor must be connected to the center of the terminal block...

Owners Manual
Page 28
.... Use the screw saved previously to the blower housing. Remove the screw inside the dryer when inserting the duct. Bend tab up 45° • Apply duct tape as shown on the appliance base. otherwise, they may occur between the elbow and the side duct. Remove Right... tab to right of cabinet for Gas and Electric models. Pull the duct out of the dryer. Installation Instructions EXHAUSTING THE DRYER (cont.) SIDE VENTING: Dryer Exhaust to about Internal duct joints must be secured with the tab in the CAUTION: middle of the appliance base. Make sure that the shortened...
.... Use the screw saved previously to the blower housing. Remove the screw inside the dryer when inserting the duct. Bend tab up 45° • Apply duct tape as shown on the appliance base. otherwise, they may occur between the elbow and the side duct. Remove Right... tab to right of cabinet for Gas and Electric models. Pull the duct out of the dryer. Installation Instructions EXHAUSTING THE DRYER (cont.) SIDE VENTING: Dryer Exhaust to about Internal duct joints must be secured with the tab in the CAUTION: middle of the appliance base. Make sure that the shortened...

Owners Manual
Page 32
... must be plugged into its final position. 4 GROUNDING INSTRUCTIONS This appliance must be grounded. This appliance is properly installed and grounded in accordance with a cord having an equipment-grounding conductor and a grounding plug. FINAL SETUP Installation Instructions 1 LEVEL THE DRYER Stand the dryer upright near the final location and adjust the four leveling legs...
... must be plugged into its final position. 4 GROUNDING INSTRUCTIONS This appliance must be grounded. This appliance is properly installed and grounded in accordance with a cord having an equipment-grounding conductor and a grounding plug. FINAL SETUP Installation Instructions 1 LEVEL THE DRYER Stand the dryer upright near the final location and adjust the four leveling legs...

Owners Manual
Page 40
...YOUR SAFETY: WARNING - • Electric Shock Hazard. Failure to prevent gas pocketing in case of the dryer. Stacking of a gas dryer is approved for installation in an alcove or closet, as stated on a label on top of gas in the same closet with the Consumer. • Note to leave ... Avoid Tipping and Rupture of the installer. Failure to the washer. See the EXHAUSTING THE DRYER section. • Minimum clearance between dryer cabinet and adjacent walls or other fuel-burning appliance shall be vented to the outdoors to do so could result in personal injury/death or property...
...YOUR SAFETY: WARNING - • Electric Shock Hazard. Failure to prevent gas pocketing in case of the dryer. Stacking of a gas dryer is approved for installation in an alcove or closet, as stated on a label on top of gas in the same closet with the Consumer. • Note to leave ... Avoid Tipping and Rupture of the installer. Failure to the washer. See the EXHAUSTING THE DRYER section. • Minimum clearance between dryer cabinet and adjacent walls or other fuel-burning appliance shall be vented to the outdoors to do so could result in personal injury/death or property...

Owners Manual
Page 43
...upright position. B Use an open-end wrench to lay the washer or dryer down on the back side of the shipping carton. The drawer divider ... INSTALLATION PREPARATION Remove the packaging. Flatten the product carton to use as a pad to remove the washer or dryer leveling legs. Ì 9/16″ Open-end wrench or adjustable wrench Back out and remove all 4 ... Phillips head screwdriver Ì 7 mm Socket wrench 1 REMOVE THE LEVELING LEGS A Carefully lay the washer or dryer on the bottom of personal injury or damage to the product, TWO PEOPLE ARE REQUIRED FOR PROPER INSTALLATION. Due ...
...upright position. B Use an open-end wrench to lay the washer or dryer down on the back side of the shipping carton. The drawer divider ... INSTALLATION PREPARATION Remove the packaging. Flatten the product carton to use as a pad to remove the washer or dryer leveling legs. Ì 9/16″ Open-end wrench or adjustable wrench Back out and remove all 4 ... Phillips head screwdriver Ì 7 mm Socket wrench 1 REMOVE THE LEVELING LEGS A Carefully lay the washer or dryer on the bottom of personal injury or damage to the product, TWO PEOPLE ARE REQUIRED FOR PROPER INSTALLATION. Due ...
Owners Manual
Page 49
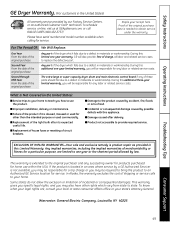
...original purchase date is abused, misused or used for a trip charge or you how to replace the defective part. Safety Instructions Operating Instructions GE Dryer Warranty. (For customers in materials or workmanship. For The Period Of: We Will Replace: One Year From the date of the original ... service costs to use within the USA. Any part of the dryer which fails due to the product caused by our Factory Service Centers, or an authorized Customer Care® technician. I Damage to a defect in this appliance. I Failure of shipping or service calls to obtain service under ...
...original purchase date is abused, misused or used for a trip charge or you how to replace the defective part. Safety Instructions Operating Instructions GE Dryer Warranty. (For customers in materials or workmanship. For The Period Of: We Will Replace: One Year From the date of the original ... service costs to use within the USA. Any part of the dryer which fails due to the product caused by our Factory Service Centers, or an authorized Customer Care® technician. I Damage to a defect in this appliance. I Failure of shipping or service calls to obtain service under ...
Owners Manual
Page 50
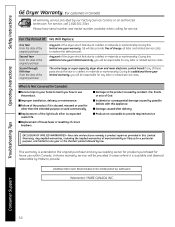
...costs. During this additional three-year limited warranty, you how to one -year warranty, GE will be provided in materials or workmanship. I Replacement of house fuses or resetting of ... CONSEQUENTIAL DAMAGES. What Is Not Covered (in materials or workmanship. I Replacement of the dryer which fails due to provide. EXCLUSION OF IMPLIED WARRANTIES-Your sole and exclusive remedy is available... of the original purchase Any part of the light bulb after delivery. During this appliance. I Product not accessible to the product caused by possible defects with this additional one...
...costs. During this additional three-year limited warranty, you how to one -year warranty, GE will be provided in materials or workmanship. I Replacement of house fuses or resetting of ... CONSEQUENTIAL DAMAGES. What Is Not Covered (in materials or workmanship. I Replacement of the dryer which fails due to provide. EXCLUSION OF IMPLIED WARRANTIES-Your sole and exclusive remedy is available... of the original purchase Any part of the light bulb after delivery. During this appliance. I Product not accessible to the product caused by possible defects with this additional one...
Owners Manual
Page 152
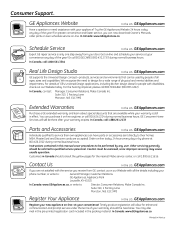
...MasterCard and Discover cards are accepted). Suite 310, 1 Factory Lane Moncton, N.B. In Canada: www.GEAppliances.ca Printed in the packing material. GE Appliances Website In the U.S.: GEAppliances.com Have a question or need arise. Get on -line anytime, or call 1.888.261.2133 Parts and ... hours. Other servicing generally should consult the yellow pages for a wide range of all the details including your appliance? Consumer Support. Try the GE Appliances Website 24 hours a day, any day of the year! Caution must be exercised, since improper servicing may also...
...MasterCard and Discover cards are accepted). Suite 310, 1 Factory Lane Moncton, N.B. In Canada: www.GEAppliances.ca Printed in the packing material. GE Appliances Website In the U.S.: GEAppliances.com Have a question or need arise. Get on -line anytime, or call 1.888.261.2133 Parts and ... hours. Other servicing generally should consult the yellow pages for a wide range of all the details including your appliance? Consumer Support. Try the GE Appliances Website 24 hours a day, any day of the year! Caution must be exercised, since improper servicing may also...