Installation Instructions
Page 2
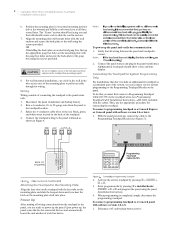
... mounting plate to a Concord panel with the wall anchors and secure the back-plate to the Programming Touchpad Header on the mounting plate click into place. With the panel powered up the panel and verify bus communication: 1. 6. To power up , connect the cable to the gang box using the screws provided. Alphanumeric touchpads should create a tab...
... mounting plate to a Concord panel with the wall anchors and secure the back-plate to the Programming Touchpad Header on the mounting plate click into place. With the panel powered up the panel and verify bus communication: 1. 6. To power up , connect the cable to the gang box using the screws provided. Alphanumeric touchpads should create a tab...
Installation Instructions
Page 3
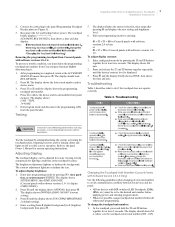
... then TIME AND DATE (Concord panels with DIP switches (LED Touchpads, ESMs, HIMs, etc.) must delete the programming touchpad unit number from the panel header. 5. Use the following guidelines when changing device unit numbers to help compensate for Concord panels with software versions ... setting). 3. Test the touchpad by arming/disarming the system, activating the touchpad panics, bypassing sensors, and by pressing 9 + user, partition, or system master CODE. Enter user programming mode by turning chime and lights on/off to the panel Programming Touchpad Header pins (see Figure...
... then TIME AND DATE (Concord panels with DIP switches (LED Touchpads, ESMs, HIMs, etc.) must delete the programming touchpad unit number from the panel header. 5. Use the following guidelines when changing device unit numbers to help compensate for Concord panels with software versions ... setting). 3. Test the touchpad by arming/disarming the system, activating the touchpad panics, bypassing sensors, and by pressing 9 + user, partition, or system master CODE. Enter user programming mode by turning chime and lights on/off to the panel Programming Touchpad Header pins (see Figure...

