8512565 - Component Replacement Manual R1
Page 5
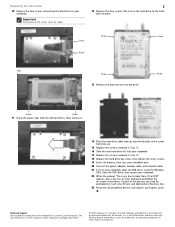
...turn your notebook over. 20 Connect the power adapter, modem cable, and network cable 21 Turn on your notebook, open the DVD drive, insert the Windows DVD, close the DVD drive, then restart your notebook. 22 When the prompt "Press any Express cards. Screw Screw Screw Screw -OR- As ...part of the notebook for important safety, regulatory, and legal information. © 2007 Gateway, Inc. All rights reserved. Screw Screw 11 Using the plastic tab, slide the old hard drive, then remove it. 14 Place the new drive, label...
...turn your notebook over. 20 Connect the power adapter, modem cable, and network cable 21 Turn on your notebook, open the DVD drive, insert the Windows DVD, close the DVD drive, then restart your notebook. 22 When the prompt "Press any Express cards. Screw Screw Screw Screw -OR- As ...part of the notebook for important safety, regulatory, and legal information. © 2007 Gateway, Inc. All rights reserved. Screw Screw 11 Using the plastic tab, slide the old hard drive, then remove it. 14 Place the new drive, label...
8512599 - Gateway Notebook Reference Guide R1
Page 5
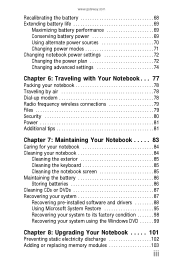
www.gateway.com Recalibrating the battery 68 Extending battery life 69 Maximizing battery performance 69 Conserving battery power 69 Using alternate power sources 70 Changing power modes ... Recovering pre-installed software and drivers 88 Using Microsoft System Restore 95 Recovering your system to its factory condition 98 Recovering your system using the Windows DVD 99 Chapter 8: Upgrading Your Notebook . . . . . 101 Preventing static electricity discharge 102 Adding or replacing memory modules 103 iii
www.gateway.com Recalibrating the battery 68 Extending battery life 69 Maximizing battery performance 69 Conserving battery power 69 Using alternate power sources 70 Changing power modes ... Recovering pre-installed software and drivers 88 Using Microsoft System Restore 95 Recovering your system to its factory condition 98 Recovering your system using the Windows DVD 99 Chapter 8: Upgrading Your Notebook . . . . . 101 Preventing static electricity discharge 102 Adding or replacing memory modules 103 iii

8512599 - Gateway Notebook Reference Guide R1
Page 10
Gateway contact information Important The labels shown in -depth, easy-to this guide, your online User Guide has been included on the following topics: • Help and technical support • Using and customizing Windows and other notebook information..., see your hard drive. Accessing your online User Guide In addition to -read manual that are for informational purposes only. For all other software • Using the Internet • Protecting your files • Playing and recording media • Networking To access your model of Gateway...
Gateway contact information Important The labels shown in -depth, easy-to this guide, your online User Guide has been included on the following topics: • Help and technical support • Using and customizing Windows and other notebook information..., see your hard drive. Accessing your online User Guide In addition to -read manual that are for informational purposes only. For all other software • Using the Internet • Protecting your files • Playing and recording media • Networking To access your model of Gateway...
8512599 - Gateway Notebook Reference Guide R1
Page 24
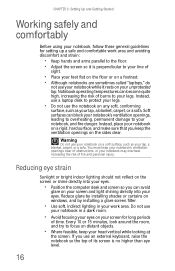
.... You must keep the ventilation openings on your screen for setting up a safe and comfortable work area. Reduce glare by installing shades or curtains on windows, and by installing a glare screen filter. • Use soft, indirect lighting in a dark room. • Avoid focusing your eyes on the sides clear. If you...
.... You must keep the ventilation openings on your screen for setting up a safe and comfortable work area. Reduce glare by installing shades or curtains on windows, and by installing a glare screen filter. • Use soft, indirect lighting in a dark room. • Avoid focusing your eyes on the sides clear. If you...
8512599 - Gateway Notebook Reference Guide R1
Page 30
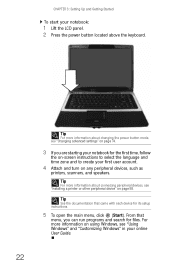
... and search for its setup instructions. 5 To open the main menu, click (Start). Tip For more information about connecting peripheral devices, see "Using Windows" and "Customizing Windows" in your notebook: 1 Lift the LCD panel. 2 Press the power button located above the keyboard. CHAPTER 3: Setting Up and Getting Started To... start your online User Guide. 22 From that came with each device for files. For more information on using Windows, see "Installing a printer or other peripheral device" on any peripheral devices, such as printers, scanners, and speakers.
... and search for its setup instructions. 5 To open the main menu, click (Start). Tip For more information about connecting peripheral devices, see "Using Windows" and "Customizing Windows" in your notebook: 1 Lift the LCD panel. 2 Press the power button located above the keyboard. CHAPTER 3: Setting Up and Getting Started To... start your online User Guide. 22 From that came with each device for files. For more information on using Windows, see "Installing a printer or other peripheral device" on any peripheral devices, such as printers, scanners, and speakers.
8512599 - Gateway Notebook Reference Guide R1
Page 32
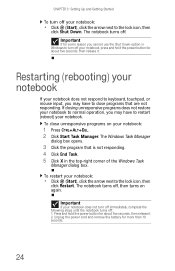
... next to keyboard, touchpad, or mouse input, you cannot use the Shut Down option in the top-right corner of the Windows Task Manager dialog box. The Windows Task Manager dialog box opens. 3 Click the program that are not responding. Press and hold the power button for more than... 10 seconds. 24 The notebook turns off. To close programs that is not responding. 4 Click End Task. 5 Click X in Windows to the lock icon, then click Shut Down. Unplug the power cord and remove the battery for about five seconds, then release it . CHAPTER 3: Setting...
... next to keyboard, touchpad, or mouse input, you cannot use the Shut Down option in the top-right corner of the Windows Task Manager dialog box. The Windows Task Manager dialog box opens. 3 Click the program that are not responding. Press and hold the power button for more than... 10 seconds. 24 The notebook turns off. To close programs that is not responding. 4 Click End Task. 5 Click X in Windows to the lock icon, then click Shut Down. Unplug the power cord and remove the battery for about five seconds, then release it . CHAPTER 3: Setting...
8512599 - Gateway Notebook Reference Guide R1
Page 34
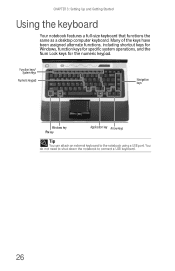
Function keys/ System keys Numeric keypad Navigation keys Windows key FN key Application key Arrow keys Tip You can attach an external keyboard to connect a USB keyboard. 26 CHAPTER 3: Setting Up and Getting Started ... need to shut down the notebook to the notebook using a USB port. Many of the keys have been assigned alternate functions, including shortcut keys for Windows, function keys for specific system operations, and the Num Lock keys for the numeric keypad.
Function keys/ System keys Numeric keypad Navigation keys Windows key FN key Application key Arrow keys Tip You can attach an external keyboard to connect a USB keyboard. 26 CHAPTER 3: Setting Up and Getting Started ... need to shut down the notebook to the notebook using a USB port. Many of the keys have been assigned alternate functions, including shortcut keys for Windows, function keys for specific system operations, and the Num Lock keys for the numeric keypad.
8512599 - Gateway Notebook Reference Guide R1
Page 35
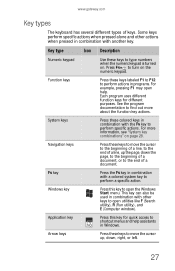
www.gateway.com Key types The keyboard has several different types of a document. Some ...end of a line, up , down the page, to the beginning of a document, or to the end of keys. Windows key Press this key for different purposes. System keys Press these colored keys in combination with other actions when pressed in programs...perform actions in combination with the FN key to open utilities like F (Search utility), R (Run utility), and E (Computer window). Function keys Press these keys to move the cursor up the page, down , right, or left. 27 For more about the...
www.gateway.com Key types The keyboard has several different types of a document. Some ...end of a line, up , down the page, to the beginning of a document, or to the end of keys. Windows key Press this key for different purposes. System keys Press these colored keys in combination with other actions when pressed in programs...perform actions in combination with the FN key to open utilities like F (Search utility), R (Run utility), and E (Computer window). Function keys Press these keys to move the cursor up the page, down , right, or left. 27 For more about the...
8512599 - Gateway Notebook Reference Guide R1
Page 39
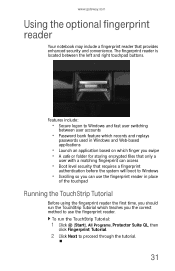
...gateway.com Using the optional fingerprint reader Your notebook may include a fingerprint reader that requires a fingerprint authentication before the system will boot to Windows • Scrolling so you can access • Boot level security that provides enhanced security and convenience. Features include: • Secure logon to Windows... The fingerprint reader is located between user accounts • Password bank feature which records and replays passwords used in Windows and Web-based applications • Launch an application based on which teaches you swipe • A safe or ...
...gateway.com Using the optional fingerprint reader Your notebook may include a fingerprint reader that requires a fingerprint authentication before the system will boot to Windows • Scrolling so you can access • Boot level security that provides enhanced security and convenience. Features include: • Secure logon to Windows... The fingerprint reader is located between user accounts • Password bank feature which records and replays passwords used in Windows and Web-based applications • Launch an application based on which teaches you swipe • A safe or ...

8512599 - Gateway Notebook Reference Guide R1
Page 48
...turned off ) and open Media Center (Windows Vista Home Premium or Windows Vista Ultimate) or Windows Media Player (Windows Vista Home Basic). Instant on Video-Opens Media Center (Windows Vista Home Premium or Windows Vista Ultimate) or the DVD player program (Windows Vista Home Basic). Play or pause the...CHAPTER 3: Setting Up and Getting Started Using the optional multimedia panel Windows Hotstart Instant On Audio Capacitive volume control Mute sound Skip ahead Instant On Video Play/Pause Skip back Stop Button Description Windows Hotstart-Turns on the notebook (if turned off , or in...
...turned off ) and open Media Center (Windows Vista Home Premium or Windows Vista Ultimate) or Windows Media Player (Windows Vista Home Basic). Instant on Video-Opens Media Center (Windows Vista Home Premium or Windows Vista Ultimate) or the DVD player program (Windows Vista Home Basic). Play or pause the...CHAPTER 3: Setting Up and Getting Started Using the optional multimedia panel Windows Hotstart Instant On Audio Capacitive volume control Mute sound Skip ahead Instant On Video Play/Pause Skip back Stop Button Description Windows Hotstart-Turns on the notebook (if turned off , or in...
8512599 - Gateway Notebook Reference Guide R1
Page 52
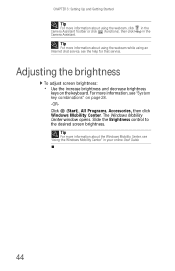
...For more information about using an Internet chat service, see the help for that service. For more information, see "Using the Windows Mobility Center" in the Camera Assistant. Adjusting the brightness To adjust screen brightness: • Use the increase brightness and decrease brightness... keys on page 28. -ORClick (Start), All Programs, Accessories, then click Windows Mobility Center. Slide the Brightness control to the desired screen brightness. Tip For more information about the Windows Mobility Center, see "System key combinations" on the keyboard. Tip For more ...
...For more information about using an Internet chat service, see the help for that service. For more information, see "Using the Windows Mobility Center" in the Camera Assistant. Adjusting the brightness To adjust screen brightness: • Use the increase brightness and decrease brightness... keys on page 28. -ORClick (Start), All Programs, Accessories, then click Windows Mobility Center. Slide the Brightness control to the desired screen brightness. Tip For more information about the Windows Mobility Center, see "System key combinations" on the keyboard. Tip For more ...
8512599 - Gateway Notebook Reference Guide R1
Page 53
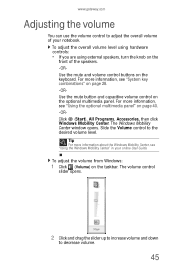
... multimedia panel. For more information about the Windows Mobility Center, see "System key combinations" on page 28. -ORUse the mute button and capacitive volume control on page 40. -ORClick (Start), All Programs, Accessories, then click Windows Mobility Center. Slide the Volume control to ...decrease volume. 45 Tip For more information, see "Using the Windows Mobility Center" in your notebook. To adjust the volume from Windows: 1 Click (Volume) on the keyboard. The Windows Mobility Center window opens. www.gateway.com Adjusting the volume You can use the volume control to adjust...
... multimedia panel. For more information about the Windows Mobility Center, see "System key combinations" on page 28. -ORUse the mute button and capacitive volume control on page 40. -ORClick (Start), All Programs, Accessories, then click Windows Mobility Center. Slide the Volume control to ...decrease volume. 45 Tip For more information, see "Using the Windows Mobility Center" in your notebook. To adjust the volume from Windows: 1 Click (Volume) on the keyboard. The Windows Mobility Center window opens. www.gateway.com Adjusting the volume You can use the volume control to adjust...
8512599 - Gateway Notebook Reference Guide R1
Page 54
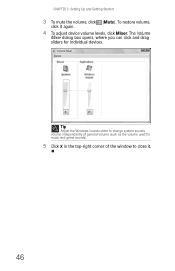
The Volume Mixer dialog box opens, where you can click and drag sliders for music and game sounds). 5 Click X in the top-right corner of the window to close it again. 4 To adjust device volume levels, click Mixer. To restore volume, click it . 46 Tip Adjust the Windows Sounds slider to change system sounds volume independently of general volume (such as the volume used for individual devices. CHAPTER 3: Setting Up and Getting Started 3 To mute the volume, click (Mute).
The Volume Mixer dialog box opens, where you can click and drag sliders for music and game sounds). 5 Click X in the top-right corner of the window to close it again. 4 To adjust device volume levels, click Mixer. To restore volume, click it . 46 Tip Adjust the Windows Sounds slider to change system sounds volume independently of general volume (such as the volume used for individual devices. CHAPTER 3: Setting Up and Getting Started 3 To mute the volume, click (Mute).
8512599 - Gateway Notebook Reference Guide R1
Page 56
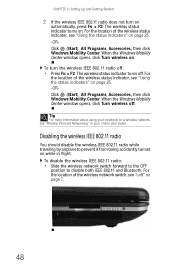
...your notebook on a wireless network, see "Using the status indicators" on page 25. -ORClick (Start), All Programs, Accessories, then click Windows Mobility Center. To turn on . The wireless status indicator turns on while in flight. For the location of the wireless network switch, see... "Using the status indicators" on page 25. -ORClick (Start), All Programs, Accessories, then click Windows Mobility Center. For the location of the wireless status indicator, see "Wireless Ethernet Networking" in your online User Guide Disabling the wireless ...
...your notebook on a wireless network, see "Using the status indicators" on page 25. -ORClick (Start), All Programs, Accessories, then click Windows Mobility Center. To turn on . The wireless status indicator turns on while in flight. For the location of the wireless network switch, see... "Using the status indicators" on page 25. -ORClick (Start), All Programs, Accessories, then click Windows Mobility Center. For the location of the wireless status indicator, see "Wireless Ethernet Networking" in your online User Guide Disabling the wireless ...
8512599 - Gateway Notebook Reference Guide R1
Page 68
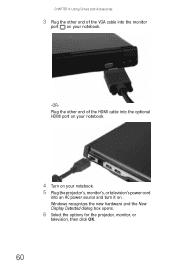
CHAPTER 4: Using Drives and Accessories 3 Plug the other end of the VGA cable into the monitor port on your notebook. -ORPlug the other end of the HDMI cable into the optional HDMI port on your notebook. 4 Turn on your notebook. 5 Plug the projector's, monitor's, or television's power cord into an AC power source and turn it on. Windows recognizes the new hardware and the New Display Detected dialog box opens. 6 Select the options for the projector, monitor, or television, then click OK. 60
CHAPTER 4: Using Drives and Accessories 3 Plug the other end of the VGA cable into the monitor port on your notebook. -ORPlug the other end of the HDMI cable into the optional HDMI port on your notebook. 4 Turn on your notebook. 5 Plug the projector's, monitor's, or television's power cord into an AC power source and turn it on. Windows recognizes the new hardware and the New Display Detected dialog box opens. 6 Select the options for the projector, monitor, or television, then click OK. 60
8512599 - Gateway Notebook Reference Guide R1
Page 69
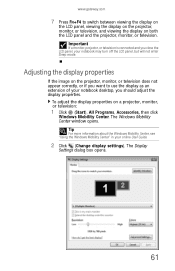
www.gateway.com 7 Press FN+F4 to use the display as an extension of your notebook desktop, you should adjust the display properties. The Windows Mobility Center window opens. To adjust the display properties on both the LCD panel and the projector, monitor, or television. The Display Settings ...dialog box opens. 61 Tip For more information about the Windows Mobility Center, see "Using the Windows Mobility Center" in your notebook may turn off the LCD panel, but will not enter Sleep mode. Adjusting the display...
www.gateway.com 7 Press FN+F4 to use the display as an extension of your notebook desktop, you should adjust the display properties. The Windows Mobility Center window opens. To adjust the display properties on both the LCD panel and the projector, monitor, or television. The Display Settings ...dialog box opens. 61 Tip For more information about the Windows Mobility Center, see "Using the Windows Mobility Center" in your notebook may turn off the LCD panel, but will not enter Sleep mode. Adjusting the display...
8512599 - Gateway Notebook Reference Guide R1
Page 70
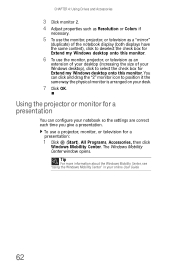
... your online User Guide. 62 To use a projector, monitor, or television for a presentation: 1 Click (Start), All Programs, Accessories, then click Windows Mobility Center. CHAPTER 4: Using Drives and Accessories 3 Click monitor 2. 4 Adjust properties such as Resolution or Colors if necessary. 5 To use the ... as a "mirror" (duplicate) of the notebook display (both displays have the same content), click to select the check box for Extend my Windows desktop onto this monitor. 6 To use the monitor, projector, or television as an extension of your desktop (increasing the size of your desk....
... your online User Guide. 62 To use a projector, monitor, or television for a presentation: 1 Click (Start), All Programs, Accessories, then click Windows Mobility Center. CHAPTER 4: Using Drives and Accessories 3 Click monitor 2. 4 Adjust properties such as Resolution or Colors if necessary. 5 To use the ... as a "mirror" (duplicate) of the notebook display (both displays have the same content), click to select the check box for Extend my Windows desktop onto this monitor. 6 To use the monitor, projector, or television as an extension of your desktop (increasing the size of your desk....

8512599 - Gateway Notebook Reference Guide R1
Page 80
... performance in Hibernate mode, your notebook ...and you want ...then is... You can select one of power settings) let you will be away from the Windows Mobility Center by changing power settings on your notebook. In Sleep, Hybrid Exit Sleep, Hybrid Press the power Sleep, or Hibernate Sleep, or button. This...
... performance in Hibernate mode, your notebook ...and you want ...then is... You can select one of power settings) let you will be away from the Windows Mobility Center by changing power settings on your notebook. In Sleep, Hybrid Exit Sleep, Hybrid Press the power Sleep, or Hibernate Sleep, or button. This...

8512599 - Gateway Notebook Reference Guide R1
Page 81
... Save changes. Type the keyword power plan in order to under the other two power plans. www.gateway.com • High performance - This power plan sacrifices battery life in the Search Help box, then press ENTER. 73 The Select a power plan window opens. 3 Select the power plan you are accustomed to gain performance.
... Save changes. Type the keyword power plan in order to under the other two power plans. www.gateway.com • High performance - This power plan sacrifices battery life in the Search Help box, then press ENTER. 73 The Select a power plan window opens. 3 Select the power plan you are accustomed to gain performance.

8512599 - Gateway Notebook Reference Guide R1
Page 82
... box, then press ENTER. The Windows Mobility Center window opens. 2 Click (Change power settings). The Select a power plan window opens. 3 Click a setting on Hybrid Sleep mode: 1 On the Select a power plan window, click Change plan settings for the plan window opens. 2 Click Change advanced power...screen that you are not tied to change advanced power management settings: 1 Click (Start), All Programs, Accessories, then click Windows Mobility Center. CHAPTER 5: Managing Power Changing advanced settings Advanced power settings let you close the LCD panel. The Change settings for...
... box, then press ENTER. The Windows Mobility Center window opens. 2 Click (Change power settings). The Select a power plan window opens. 3 Click a setting on Hybrid Sleep mode: 1 On the Select a power plan window, click Change plan settings for the plan window opens. 2 Click Change advanced power...screen that you are not tied to change advanced power management settings: 1 Click (Start), All Programs, Accessories, then click Windows Mobility Center. CHAPTER 5: Managing Power Changing advanced settings Advanced power settings let you close the LCD panel. The Change settings for...


