8512565 - Component Replacement Manual R1
Page 4
...(these guidelines: • Avoid static-causing surfaces such as electrostatic discharge (ESD). Important If you cannot create a Drivers and Applications Recovery disc, Gateway may send you are extremely sensitive to a bare metal part of your workbench or other grounded connection. • ...Preventing static electricity discharge." 3 Turn off your notebook. 4 Close the LCD panel. 5 Disconnect the AC adapter, modem cable, and network cable. 6 Disconnect all peripheral devices connected to dangerous electrical voltages and moving parts, turn off your notebook and unplug the AC adapter,...
...(these guidelines: • Avoid static-causing surfaces such as electrostatic discharge (ESD). Important If you cannot create a Drivers and Applications Recovery disc, Gateway may send you are extremely sensitive to a bare metal part of your workbench or other grounded connection. • ...Preventing static electricity discharge." 3 Turn off your notebook. 4 Close the LCD panel. 5 Disconnect the AC adapter, modem cable, and network cable. 6 Disconnect all peripheral devices connected to dangerous electrical voltages and moving parts, turn off your notebook and unplug the AC adapter,...
8512565 - Component Replacement Manual R1
Page 5
...cover, then tighten the cover screws. 19 Insert the battery, then turn your notebook over. 20 Connect the power adapter, modem cable, and network cable 21 Turn on your notebook, open the DVD drive, insert the Windows DVD, close the DVD drive, then restart your notebook. 22 When... the bracket from CD or DVD" appears, press any Express cards. Important The location of their respective companies. As part of Gateway, Inc. See your Drivers and Applications Recovery disc. 23 Reconnect all peripheral devices and replace any key on the bottom of the notebook for important safety, regulatory...
...cover, then tighten the cover screws. 19 Insert the battery, then turn your notebook over. 20 Connect the power adapter, modem cable, and network cable 21 Turn on your notebook, open the DVD drive, insert the Windows DVD, close the DVD drive, then restart your notebook. 22 When... the bracket from CD or DVD" appears, press any Express cards. Important The location of their respective companies. As part of Gateway, Inc. See your Drivers and Applications Recovery disc. 23 Reconnect all peripheral devices and replace any key on the bottom of the notebook for important safety, regulatory...

8512599 - Gateway Notebook Reference Guide R1
Page 115
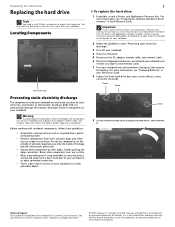
For more information, see "Backing up any data you can replace your notebook. 5 Disconnect the AC adapter, modem cable, and network cable. 6 Disconnect all peripheral devices connected to the notebook and remove any Express cards. 107 For more hard drive capacity, you ...off your original drive with a higher-capacity drive. Hard drive bay To replace the hard drive kit: 1 Create a Drivers and Applications Recovery disc using the Gateway Recovery Center. www.gateway.com Replacing the hard drive kit Tools You need a small Phillips screwdriver and the Windows Vista DVD to the new hard...
For more information, see "Backing up any data you can replace your notebook. 5 Disconnect the AC adapter, modem cable, and network cable. 6 Disconnect all peripheral devices connected to the notebook and remove any Express cards. 107 For more hard drive capacity, you ...off your original drive with a higher-capacity drive. Hard drive bay To replace the hard drive kit: 1 Create a Drivers and Applications Recovery disc using the Gateway Recovery Center. www.gateway.com Replacing the hard drive kit Tools You need a small Phillips screwdriver and the Windows Vista DVD to the new hard...

8512599 - Gateway Notebook Reference Guide R1
Page 119
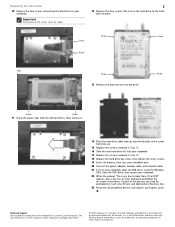
www.gateway.com 17 Slide the new hard drive kit into your notebook, then replace the screws that ...tighten the cover screws. 19 Insert the battery, then turn your notebook over. 20 Connect the power adapter, modem cable, and network cable 21 Turn on your notebook, open the DVD drive, insert the Windows DVD, close the DVD drive, then restart your ...notebook. 22 When the prompt "Press any key to insert your keyboard and follow the on your Drivers and Applications Recovery disc. 23 Reconnect all peripheral devices and replace any Express cards. 111 As part of the process you...
www.gateway.com 17 Slide the new hard drive kit into your notebook, then replace the screws that ...tighten the cover screws. 19 Insert the battery, then turn your notebook over. 20 Connect the power adapter, modem cable, and network cable 21 Turn on your notebook, open the DVD drive, insert the Windows DVD, close the DVD drive, then restart your ...notebook. 22 When the prompt "Press any key to insert your keyboard and follow the on your Drivers and Applications Recovery disc. 23 Reconnect all peripheral devices and replace any Express cards. 111 As part of the process you...

8512599 - Gateway Notebook Reference Guide R1
Page 161
www.gateway.com scanner 7, 9 speaker 6 television 59 USB 7, 9, 58 VGA 10, 60 wired Ethernet 20 wired network 20 copyright notice 150 D default printer 136 dialing codes 78 dial-up modem 10, 21 adjusting volume 130 diagnostics 129 dialing properties 128 troubleshooting 127 ... troubleshooting 115 diskette drive troubleshooting 115 display brightness 44 switching 28 troubleshooting 116 display properties adjusting 61 documentation User Guide 2 double-clicking 38 dragging 39 drivers recovery discs 89, 93 re-installing 88 drives DVD 52 DVD/CD-RW 9, 52 DVD±RW 9, 52 hard drive 11, 107 HD DVD 52...
www.gateway.com scanner 7, 9 speaker 6 television 59 USB 7, 9, 58 VGA 10, 60 wired Ethernet 20 wired network 20 copyright notice 150 D default printer 136 dialing codes 78 dial-up modem 10, 21 adjusting volume 130 diagnostics 129 dialing properties 128 troubleshooting 127 ... troubleshooting 115 diskette drive troubleshooting 115 display brightness 44 switching 28 troubleshooting 116 display properties adjusting 61 documentation User Guide 2 double-clicking 38 dragging 39 drivers recovery discs 89, 93 re-installing 88 drives DVD 52 DVD/CD-RW 9, 52 DVD±RW 9, 52 hard drive 11, 107 HD DVD 52...

8512919 - Gateway Notebook Reference Guide R2
Page 115
..., see "Recovering pre-installed software and drivers" on page 88. 2 Back up files" in your online User Guide. 3 Follow the guidelines under "Preventing static electricity discharge" on page 102. 4 Turn off your notebook. 5 Disconnect the AC adapter, modem cable, and network cable. 6 Disconnect all peripheral devices connected... Express cards. 107 If you would like more hard drive capacity, you want to transfer to replace the hard drive kit. www.gateway.com Replacing the hard drive kit Tools You need a small Phillips screwdriver and the Windows Vista DVD to the new hard drive. ...
..., see "Recovering pre-installed software and drivers" on page 88. 2 Back up files" in your online User Guide. 3 Follow the guidelines under "Preventing static electricity discharge" on page 102. 4 Turn off your notebook. 5 Disconnect the AC adapter, modem cable, and network cable. 6 Disconnect all peripheral devices connected... Express cards. 107 If you would like more hard drive capacity, you want to transfer to replace the hard drive kit. www.gateway.com Replacing the hard drive kit Tools You need a small Phillips screwdriver and the Windows Vista DVD to the new hard drive. ...
8512919 - Gateway Notebook Reference Guide R2
Page 119
... process you may be prompted to boot from CD or DVD" appears, press any key on your Drivers and Applications Recovery disc. 23 Reconnect all peripheral devices and replace any Express cards. 111 www.gateway.com 17 Slide the new hard drive kit into your notebook, then replace the screws that secure... drive bay cover, then tighten the cover screws. 19 Insert the battery, then turn your notebook over. 20 Connect the power adapter, modem cable, and network cable 21 Turn on your notebook, open the DVD drive, insert the Windows DVD, close the DVD drive, then restart your notebook. 22 When the...
... process you may be prompted to boot from CD or DVD" appears, press any key on your Drivers and Applications Recovery disc. 23 Reconnect all peripheral devices and replace any Express cards. 111 www.gateway.com 17 Slide the new hard drive kit into your notebook, then replace the screws that secure... drive bay cover, then tighten the cover screws. 19 Insert the battery, then turn your notebook over. 20 Connect the power adapter, modem cable, and network cable 21 Turn on your notebook, open the DVD drive, insert the Windows DVD, close the DVD drive, then restart your notebook. 22 When the...
8512919 - Gateway Notebook Reference Guide R2
Page 161
www.gateway.com VGA 10, 60 wired Ethernet 20 wired network 20 copyright notice 150 D default printer 136 dialing codes 78 dial-up modem 10, 21 adjusting volume 130 diagnostics 129 dialing properties 128 troubleshooting 127 ... troubleshooting 115 diskette drive troubleshooting 115 display brightness 44 switching 28 troubleshooting 116 display properties adjusting 61 documentation User Guide 2 double-clicking 38 dragging 39 drivers recovery discs 89, 93 re-installing 88 drives DVD 52 DVD/CD-RW 9, 52 DVD±RW 9, 52 hard drive 11, 107 HD DVD 52...
www.gateway.com VGA 10, 60 wired Ethernet 20 wired network 20 copyright notice 150 D default printer 136 dialing codes 78 dial-up modem 10, 21 adjusting volume 130 diagnostics 129 dialing properties 128 troubleshooting 127 ... troubleshooting 115 diskette drive troubleshooting 115 display brightness 44 switching 28 troubleshooting 116 display properties adjusting 61 documentation User Guide 2 double-clicking 38 dragging 39 drivers recovery discs 89, 93 re-installing 88 drives DVD 52 DVD/CD-RW 9, 52 DVD±RW 9, 52 hard drive 11, 107 HD DVD 52...

