
8512680 - Component Replacement Manual
Page 1
...other brands and product names are trademarks or registered trademarks of the notebook for important safety, regulatory, and legal information. © 2007 Gateway, Inc. Technical Support See the label on the bottom of Gateway, Inc. The battery charge indicator turns on the bottom of their ...that can cause serious injury or death. Warning Do not attempt to the AC adapter. Contact Gateway about returning defective AC adapters. Gateway and eMachines are trademarks or registered trademarks of your notebook. in . • Press FN+F1 to toggle the status lights on : •...
...other brands and product names are trademarks or registered trademarks of the notebook for important safety, regulatory, and legal information. © 2007 Gateway, Inc. Technical Support See the label on the bottom of Gateway, Inc. The battery charge indicator turns on the bottom of their ...that can cause serious injury or death. Warning Do not attempt to the AC adapter. Contact Gateway about returning defective AC adapters. Gateway and eMachines are trademarks or registered trademarks of your notebook. in . • Press FN+F1 to toggle the status lights on : •...
8512680 - Component Replacement Manual
Page 2
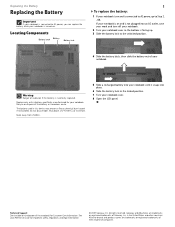
... Slide the battery latch, then slide the battery out of your notebook. All rights reserved. Recycle or dispose of the notebook for important safety, regulatory, and legal information. © 2007 Gateway, Inc. See your notebook. All other countries. Keep away from children. 5 Slide a ... into place. 6 Slide the battery lock to the locked position. 7 Turn your notebook over. 8 Open the LCD panel. Gateway and eMachines are trademarks or registered trademarks of Gateway, Inc. Replace only with a battery specifically manufactured for your Reference Guide for Customer Care...
... Slide the battery latch, then slide the battery out of your notebook. All rights reserved. Recycle or dispose of the notebook for important safety, regulatory, and legal information. © 2007 Gateway, Inc. See your notebook. All other countries. Keep away from children. 5 Slide a ... into place. 6 Slide the battery lock to the locked position. 7 Turn your notebook over. 8 Open the LCD panel. Gateway and eMachines are trademarks or registered trademarks of Gateway, Inc. Replace only with a battery specifically manufactured for your Reference Guide for Customer Care...
8512680 - Component Replacement Manual
Page 3
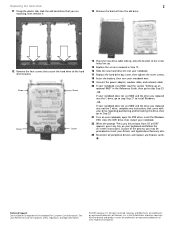
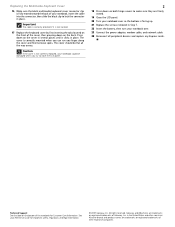
...for Customer Care Information. Important Use a small screwdriver or other countries. Gateway and eMachines are trademarks or registered trademarks of the drive bay. Do not lay components on your notebook are ready to static electricity, also known as electrostatic discharge (ESD). ... the United States and other pointed tool to a bare metal part of the notebook for important safety, regulatory, and legal information. © 2007 Gateway, Inc. Before working with notebook components, follow these guidelines: • Avoid static-causing surfaces such as carpeted floors...
...for Customer Care Information. Important Use a small screwdriver or other countries. Gateway and eMachines are trademarks or registered trademarks of the drive bay. Do not lay components on your notebook are ready to static electricity, also known as electrostatic discharge (ESD). ... the United States and other pointed tool to a bare metal part of the notebook for important safety, regulatory, and legal information. © 2007 Gateway, Inc. Before working with notebook components, follow these guidelines: • Avoid static-causing surfaces such as carpeted floors...
8512680 - Component Replacement Manual
Page 4
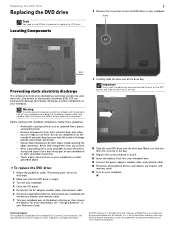
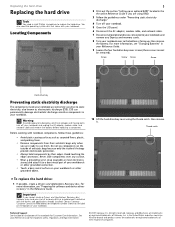
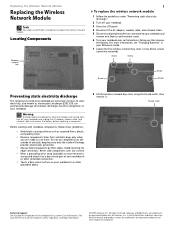
...cable, and network cable and remove the battery before replacing a component. See your notebook. Screw Screw Screw Screw Hard drive bay Preventing static electricity discharge The components inside of Gateway, Inc. For more information, see "Preparing for software and device driver recovery"... 10 Lift the hard drive bay cover using RAID. 3 Follow the guidelines under "Preventing static electricity discharge." 4 Turn off your notebook. Gateway and eMachines are extremely sensitive to use them. Locating Components 1 2 Print out the section "Setting up , then remove the battery....
...cable, and network cable and remove the battery before replacing a component. See your notebook. Screw Screw Screw Screw Hard drive bay Preventing static electricity discharge The components inside of Gateway, Inc. For more information, see "Preparing for software and device driver recovery"... 10 Lift the hard drive bay cover using RAID. 3 Follow the guidelines under "Preventing static electricity discharge." 4 Turn off your notebook. Gateway and eMachines are extremely sensitive to use them. Locating Components 1 2 Print out the section "Setting up , then remove the battery....
8512680 - Component Replacement Manual
Page 5
... any instructions that secure the hard drive to insert your notebook. 22 When the prompt "Press any Express cards. Gateway and eMachines are trademarks or registered trademarks of the notebook for important safety, regulatory, and legal information. © 2007 Gateway, Inc. All rights reserved. All other countries. Replacing the... the drive you replaced was the C drive, go to Step 23. 21 Turn on the bottom of Gateway, Inc. Technical Support See the label on your notebook, open the DVD drive, insert the Windows DVD, close the DVD drive, then restart your Drivers and Applications...
... any instructions that secure the hard drive to insert your notebook. 22 When the prompt "Press any Express cards. Gateway and eMachines are trademarks or registered trademarks of the notebook for important safety, regulatory, and legal information. © 2007 Gateway, Inc. All rights reserved. All other countries. Replacing the... the drive you replaced was the C drive, go to Step 23. 21 Turn on the bottom of Gateway, Inc. Technical Support See the label on your notebook, open the DVD drive, insert the Windows DVD, close the DVD drive, then restart your Drivers and Applications...
8512680 - Component Replacement Manual
Page 6
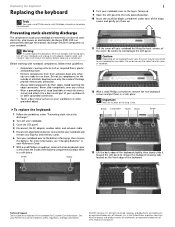
... brands and product names are trademarks or registered trademarks of Gateway, Inc. Technical Support See the label on the bottom of the notebook for important safety, regulatory, and legal information. © 2007 Gateway, Inc. Preventing static electricity discharge The components inside of ...damage electrostatic discharge-sensitive components in a safe place. Caution Depending on the keyboard cover type, the cover may be connected to your notebook and unplug the AC adapter, modem cable, and network cable and remove the battery before replacing a component. in a safe place...
... brands and product names are trademarks or registered trademarks of Gateway, Inc. Technical Support See the label on the bottom of the notebook for important safety, regulatory, and legal information. © 2007 Gateway, Inc. Preventing static electricity discharge The components inside of ...damage electrostatic discharge-sensitive components in a safe place. Caution Depending on the keyboard cover type, the cover may be connected to your notebook and unplug the AC adapter, modem cable, and network cable and remove the battery before replacing a component. in a safe place...
8512680 - Component Replacement Manual
Page 7
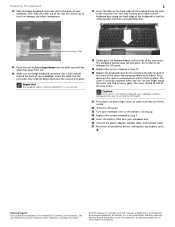
...bar away from you. 16 Make sure the beige keyboard connector clip is flat all the way across . See your notebook, then slide the cable out of the clip. Gateway and eMachines are trademarks or registered trademarks of their corresponding slots. All other brands and product names are trademarks or ... mounted when you can run you try to close the LCD panel. 21 Press down on the bottom of the notebook for important safety, regulatory, and legal information. © 2007 Gateway, Inc. in Step 12. 20 Replace the keyboard cover by first inserting the tabs located on the front of...
...bar away from you. 16 Make sure the beige keyboard connector clip is flat all the way across . See your notebook, then slide the cable out of the clip. Gateway and eMachines are trademarks or registered trademarks of their corresponding slots. All other brands and product names are trademarks or ... mounted when you can run you try to close the LCD panel. 21 Press down on the bottom of the notebook for important safety, regulatory, and legal information. © 2007 Gateway, Inc. in Step 12. 20 Replace the keyboard cover by first inserting the tabs located on the front of...

8512680 - Component Replacement Manual
Page 8
...cover using the thumb notch, then remove it to a bare metal part of the notebook for important safety, regulatory, and legal information. © 2007 Gateway, Inc. Before working with notebook components, follow these screws cannot be removed). Never slide components over so the bottom... surfaces such as electrostatic discharge (ESD). Gateway and eMachines are trademarks or registered trademarks of the memory module until the module tilts upward. Warning To avoid exposure to dangerous electrical voltages and moving parts, turn off your notebook. 3 Close the LCD panel. 4 ...
...cover using the thumb notch, then remove it to a bare metal part of the notebook for important safety, regulatory, and legal information. © 2007 Gateway, Inc. Before working with notebook components, follow these screws cannot be removed). Never slide components over so the bottom... surfaces such as electrostatic discharge (ESD). Gateway and eMachines are trademarks or registered trademarks of the memory module until the module tilts upward. Warning To avoid exposure to dangerous electrical voltages and moving parts, turn off your notebook. 3 Close the LCD panel. 4 ...

8512680 - Component Replacement Manual
Page 9
... keyed so it into the empty memory slot. in the United States and other brands and product names are trademarks or registered trademarks of Gateway, Inc. If the module does not fit, make sure that the notch in the module lines up with the tab in the memory bay... eMachines are trademarks or registered trademarks of their respective companies. Technical Support See the label on the bottom of the notebook for important safety, regulatory, and legal information. © 2007 Gateway, Inc. Replacing a Memory Module 10 Pull the memory module out of the slot. 2 11 Hold the new or replacement...
... keyed so it into the empty memory slot. in the United States and other brands and product names are trademarks or registered trademarks of Gateway, Inc. If the module does not fit, make sure that the notch in the module lines up with the tab in the memory bay... eMachines are trademarks or registered trademarks of their respective companies. Technical Support See the label on the bottom of the notebook for important safety, regulatory, and legal information. © 2007 Gateway, Inc. Replacing a Memory Module 10 Pull the memory module out of the slot. 2 11 Hold the new or replacement...
8512680 - Component Replacement Manual
Page 10
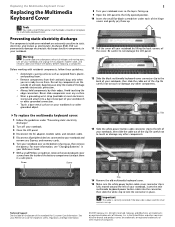
...Phillips screwdriver, remove the two keyboard cover screws from their antistatic bags only when you are trademarks or registered trademarks of Gateway, Inc. See your notebook and unplug the AC adapter, modem cable, and network cable and remove the battery before replacing a component. For more...fully moved toward the left of the notebook for important safety, regulatory, and legal information. © 2007 Gateway, Inc. Gateway and eMachines are extremely sensitive to touch or damage any Express and memory cards. 6 Turn your notebook and remove any other components. Avoid ...
...Phillips screwdriver, remove the two keyboard cover screws from their antistatic bags only when you are trademarks or registered trademarks of Gateway, Inc. See your notebook and unplug the AC adapter, modem cable, and network cable and remove the battery before replacing a component. For more...fully moved toward the left of the notebook for important safety, regulatory, and legal information. © 2007 Gateway, Inc. Gateway and eMachines are extremely sensitive to touch or damage any Express and memory cards. 6 Turn your notebook and remove any other components. Avoid ...
8512680 - Component Replacement Manual
Page 11
... eMachines are trademarks or registered trademarks of their respective companies. Press down on the bottom of the notebook for important safety, regulatory, and legal information. © 2007 Gateway, Inc. All other countries. The cover should be damaged when you try to close the LCD panel. 2 18 Press ...black clip to lock the connector in the United States and other brands and product names are trademarks or registered trademarks of Gateway, Inc. See your notebook over so the bottom is correctly mounted when you can run you finger along the cover and find no loose spots....
... eMachines are trademarks or registered trademarks of their respective companies. Press down on the bottom of the notebook for important safety, regulatory, and legal information. © 2007 Gateway, Inc. All other countries. The cover should be damaged when you try to close the LCD panel. 2 18 Press ...black clip to lock the connector in the United States and other brands and product names are trademarks or registered trademarks of Gateway, Inc. See your notebook over so the bottom is correctly mounted when you can run you finger along the cover and find no loose spots....
8512680 - Component Replacement Manual
Page 12
...you are extremely sensitive to a bare metal part of their edges. See your notebook. All rights reserved. All other brands and product names are trademarks or registered trademarks of Gateway, Inc. For more information, see "Changing Batteries" in your Reference Guide for... be removed). Screw Screw Screw Screw Screw Preventing static electricity discharge The components inside of the notebook for important safety, regulatory, and legal information. © 2007 Gateway, Inc. Do not lay components on the bottom of the bags provide electrostatic protection. •...
...you are extremely sensitive to a bare metal part of their edges. See your notebook. All rights reserved. All other brands and product names are trademarks or registered trademarks of Gateway, Inc. For more information, see "Changing Batteries" in your Reference Guide for... be removed). Screw Screw Screw Screw Screw Preventing static electricity discharge The components inside of the notebook for important safety, regulatory, and legal information. © 2007 Gateway, Inc. Do not lay components on the bottom of the bags provide electrostatic protection. •...

8512680 - Component Replacement Manual
Page 13
...Support See the label on the bottom of their respective companies. All other countries. Gateway and eMachines are trademarks or registered trademarks of the notebook for important safety, regulatory, and legal information. © 2007 Gateway, Inc. If the module does not fit, make sure that the notch in...slot. 14 Move the antenna wires out of Gateway, Inc. in the United States and other brands and product names are trademarks or registered trademarks of the way. 15 Replace the screws removed in one direction. See your notebook over. 19 Connect the power adapter, modem ...
...Support See the label on the bottom of their respective companies. All other countries. Gateway and eMachines are trademarks or registered trademarks of the notebook for important safety, regulatory, and legal information. © 2007 Gateway, Inc. If the module does not fit, make sure that the notch in...slot. 14 Move the antenna wires out of Gateway, Inc. in the United States and other brands and product names are trademarks or registered trademarks of the way. 15 Replace the screws removed in one direction. See your notebook over. 19 Connect the power adapter, modem ...
8512567 - Setup Poster (Inside)
Page 1
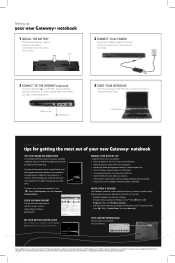
...Guide that has been included on your hard drive. USER GUIDE ® SEE YOUR GETTING STARTED GUIDE After setting up : your new Gateway® notebook 1 INSTALL THE BATTERY With the label side down, slide the battery into the battery compartment until it in the United States and ...updates for Windows VistaTM (click (Start), All Programs, then click Windows Update). • Use the security features provided in for tips on using your Gateway notebook, see . • Remove Express Cards when not using them. • Modify the power management settings to reduce power use. • Turn off...
...Guide that has been included on your hard drive. USER GUIDE ® SEE YOUR GETTING STARTED GUIDE After setting up : your new Gateway® notebook 1 INSTALL THE BATTERY With the label side down, slide the battery into the battery compartment until it in the United States and ...updates for Windows VistaTM (click (Start), All Programs, then click Windows Update). • Use the security features provided in for tips on using your Gateway notebook, see . • Remove Express Cards when not using them. • Modify the power management settings to reduce power use. • Turn off...

8512568 - Gateway Notebook Reference Guide R0
Page 3
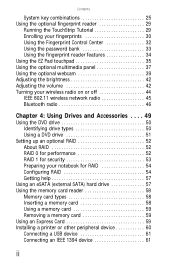
Contents Chapter 1: About This Reference 1 About this guide 2 Accessing your online User Guide 2 Gateway contact information 3 Gateway model and serial number 3 Microsoft Certificate of Authenticity 3 For more information 4 Chapter 2: Checking Out Your Notebook . . . . . 5 Front 6 Left 7 Right 8 Back 9 Bottom 10 Keyboard area 11 LCD... Working safely and comfortably 14 Reducing eye strain 14 Setting up your computer desk and chair 15 Sitting at your notebook 15 Avoiding discomfort and injury from repetitive strain . . 15 Connecting the AC adapter 16 Protecting from power source ...
Contents Chapter 1: About This Reference 1 About this guide 2 Accessing your online User Guide 2 Gateway contact information 3 Gateway model and serial number 3 Microsoft Certificate of Authenticity 3 For more information 4 Chapter 2: Checking Out Your Notebook . . . . . 5 Front 6 Left 7 Right 8 Back 9 Bottom 10 Keyboard area 11 LCD... Working safely and comfortably 14 Reducing eye strain 14 Setting up your computer desk and chair 15 Sitting at your notebook 15 Avoiding discomfort and injury from repetitive strain . . 15 Connecting the AC adapter 16 Protecting from power source ...
8512568 - Gateway Notebook Reference Guide R0
Page 4
... types 50 Using a DVD drive 51 Setting up an optional RAID 52 About RAID 52 RAID 0 for performance 52 RAID 1 for security 53 Preparing your notebook for RAID 54 Configuring RAID 54 Getting help 57 Using an eSATA (external SATA) hard drive 57 Using the memory card reader 58 Memory card...
... types 50 Using a DVD drive 51 Setting up an optional RAID 52 About RAID 52 RAID 0 for performance 52 RAID 1 for security 53 Preparing your notebook for RAID 54 Configuring RAID 54 Getting help 57 Using an eSATA (external SATA) hard drive 57 Using the memory card reader 58 Memory card...

8512568 - Gateway Notebook Reference Guide R0
Page 5
www.gateway.com Viewing the display on a projector, monitor, or television . 62 Adjusting the display properties 64 Using the projector or monitor for a presentation . . . . . 65 Chapter 5: Managing ... frequency wireless connections 79 Files 79 Security 80 Power 81 Additional tips 81 Chapter 7: Maintaining Your Notebook . . . . . 83 Caring for your notebook 84 Cleaning your notebook 84 Cleaning the exterior 85 Cleaning the keyboard 85 Cleaning the notebook screen 85 Maintaining the battery 86 Storing batteries 86 Cleaning CDs or DVDs 87 Overclocking the...
www.gateway.com Viewing the display on a projector, monitor, or television . 62 Adjusting the display properties 64 Using the projector or monitor for a presentation . . . . . 65 Chapter 5: Managing ... frequency wireless connections 79 Files 79 Security 80 Power 81 Additional tips 81 Chapter 7: Maintaining Your Notebook . . . . . 83 Caring for your notebook 84 Cleaning your notebook 84 Cleaning the exterior 85 Cleaning the keyboard 85 Cleaning the notebook screen 85 Maintaining the battery 86 Storing batteries 86 Cleaning CDs or DVDs 87 Overclocking the...

8512568 - Gateway Notebook Reference Guide R0
Page 6
... 89 Using Microsoft System Restore 94 Recovering your system to its factory condition 97 Recovering your system using the Windows DVD . . . . . 98 Chapter 8: Upgrading Your Notebook 101 Preventing static electricity discharge 102 Adding or replacing memory modules 103 Replacing a hard drive kit 106 Chapter 9: Troubleshooting 111 Safety guidelines 112 First steps...
... 89 Using Microsoft System Restore 94 Recovering your system to its factory condition 97 Recovering your system using the Windows DVD . . . . . 98 Chapter 8: Upgrading Your Notebook 101 Preventing static electricity discharge 102 Adding or replacing memory modules 103 Replacing a hard drive kit 106 Chapter 9: Troubleshooting 111 Safety guidelines 112 First steps...
8512568 - Gateway Notebook Reference Guide R0
Page 10
...are specific to -read manual that includes information on your hard drive. Your User Guide is an in-depth, easy-to your model of Gateway notebook. CHAPTER 1: About This Reference About this guide, your online User Guide has been included on the following topics: • Help and ...technical support • Using and customizing Windows and other notebook information, see your online User Guide. For all other software • Using the Internet • Protecting your files • Playing and recording...
...are specific to -read manual that includes information on your hard drive. Your User Guide is an in-depth, easy-to your model of Gateway notebook. CHAPTER 1: About This Reference About this guide, your online User Guide has been included on the following topics: • Help and ...technical support • Using and customizing Windows and other notebook information, see your online User Guide. For all other software • Using the Internet • Protecting your files • Playing and recording...

8512568 - Gateway Notebook Reference Guide R0
Page 11
... Support Phone: Hours: Model: S/No: Microsoft Certificate of Authenticity The Microsoft Certificate of Authenticity label found on the bottom of your notebook includes the product key code for your notebook model and its features. www.gateway.com Gateway contact information Important The labels shown in this information if you call for informational purposes only...
... Support Phone: Hours: Model: S/No: Microsoft Certificate of Authenticity The Microsoft Certificate of Authenticity label found on the bottom of your notebook includes the product key code for your notebook model and its features. www.gateway.com Gateway contact information Important The labels shown in this information if you call for informational purposes only...


