8512680 - Component Replacement Manual
Page 2
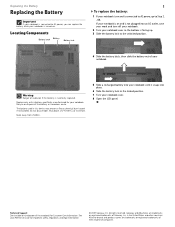
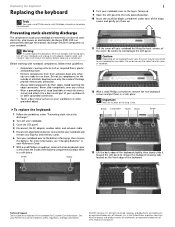
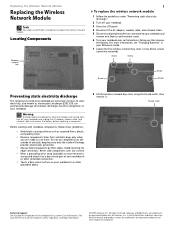
...your notebook until it snaps into an AC outlet, save your work and turn off your notebook. 2 Turn your notebook over . 8 Open the LCD panel. Locating Components Battery latch Battery Battery lock 1 To replace the battery: 1 If your notebook is on and is connected to AC power, ...up. 3 Slide the battery lock to the unlocked position. 4 Slide the battery latch, then slide the battery out of their respective companies. Gateway and eMachines are trademarks or registered trademarks of your notebook. All rights reserved. The battery used in the United States and other brands and ...
...your notebook until it snaps into an AC outlet, save your work and turn off your notebook. 2 Turn your notebook over . 8 Open the LCD panel. Locating Components Battery latch Battery Battery lock 1 To replace the battery: 1 If your notebook is on and is connected to AC power, ...up. 3 Slide the battery lock to the unlocked position. 4 Slide the battery latch, then slide the battery out of their respective companies. Gateway and eMachines are trademarks or registered trademarks of your notebook. All rights reserved. The battery used in the United States and other brands and ...
8512680 - Component Replacement Manual
Page 3
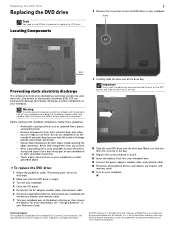
...their antistatic bags only when you are trademarks or registered trademarks of the notebook for important safety, regulatory, and legal information. © 2007 Gateway, Inc. To replace the DVD drive: 1 Follow the guidelines under "Preventing static electricity discharge." 2 Make sure that secures the DVD drive... drive into the drive bay. All rights reserved. in Step 8. 12 Insert the battery, then turn off your notebook. 4 Close the LCD panel. 5 Disconnect the AC adapter, modem cable, and network cable. 6 Disconnect all peripheral devices connected to your notebook and remove any ...
...their antistatic bags only when you are trademarks or registered trademarks of the notebook for important safety, regulatory, and legal information. © 2007 Gateway, Inc. To replace the DVD drive: 1 Follow the guidelines under "Preventing static electricity discharge." 2 Make sure that secures the DVD drive... drive into the drive bay. All rights reserved. in Step 8. 12 Insert the battery, then turn off your notebook. 4 Close the LCD panel. 5 Disconnect the AC adapter, modem cable, and network cable. 6 Disconnect all peripheral devices connected to your notebook and remove any ...
8512680 - Component Replacement Manual
Page 4
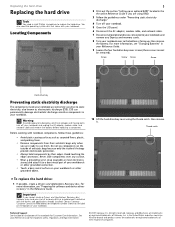
... from their antistatic bags only when you are ready to dangerous electrical voltages and moving parts, turn off your notebook. 5 Close the LCD panel. 6 Disconnect the AC adapter, modem cable, and network cable. 7 Disconnect all peripheral devices connected to a bare metal part ... over any Express and memory cards. 8 Turn your notebook. For more information, see "Changing Batteries" in your notebook. Contact Gateway Customer Care at most electronics stores) and attach it . ESD can permanently damage electrostatic discharge-sensitive components in your Reference Guide for...
... from their antistatic bags only when you are ready to dangerous electrical voltages and moving parts, turn off your notebook. 5 Close the LCD panel. 6 Disconnect the AC adapter, modem cable, and network cable. 7 Disconnect all peripheral devices connected to a bare metal part ... over any Express and memory cards. 8 Turn your notebook. For more information, see "Changing Batteries" in your notebook. Contact Gateway Customer Care at most electronics stores) and attach it . ESD can permanently damage electrostatic discharge-sensitive components in your Reference Guide for...
8512680 - Component Replacement Manual
Page 6
...fully opened position. 10 Insert the small flat-blade screwdriver under "Preventing static electricity discharge." 2 Turn off your notebook. 3 Close the LCD panel. 4 Disconnect the AC adapter, modem cable, and network cable. 5 Disconnect all peripheral devices connected to your workbench or other grounded... slightly, then slowly slide it to dangerous electrical voltages and moving parts, turn off your workbench or other grounded object. Gateway and eMachines are extremely sensitive to your Reference Guide for Customer Care Information. Warning To avoid exposure to a bare metal ...
...fully opened position. 10 Insert the small flat-blade screwdriver under "Preventing static electricity discharge." 2 Turn off your notebook. 3 Close the LCD panel. 4 Disconnect the AC adapter, modem cable, and network cable. 5 Disconnect all peripheral devices connected to your workbench or other grounded... slightly, then slowly slide it to dangerous electrical voltages and moving parts, turn off your workbench or other grounded object. Gateway and eMachines are extremely sensitive to your Reference Guide for Customer Care Information. Warning To avoid exposure to a bare metal ...
8512680 - Component Replacement Manual
Page 7
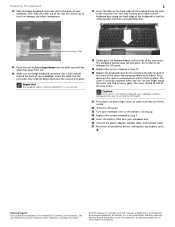
... modem cable, and network cable 27 Reconnect all the way across . All other brands and product names are firmly seated. 22 Close the LCD panel. 23 Turn your notebook over so the bottom is not twisted. 18 Gently press the keyboard down on both hinge covers to make sure... States and other components. 2 17 Insert the tabs on the bottom of the clip. Be careful to seat the retaining tabs into place. Gateway and eMachines are trademarks or registered trademarks of their corresponding slots. The cover should easily fall into their respective companies. The cover is flat all...
... modem cable, and network cable 27 Reconnect all the way across . All other brands and product names are firmly seated. 22 Close the LCD panel. 23 Turn your notebook over so the bottom is not twisted. 18 Gently press the keyboard down on both hinge covers to make sure... States and other components. 2 17 Insert the tabs on the bottom of the clip. Be careful to seat the retaining tabs into place. Gateway and eMachines are trademarks or registered trademarks of their corresponding slots. The cover should easily fall into their respective companies. The cover is flat all...

8512680 - Component Replacement Manual
Page 8
...removing a module, gently press outward on the bottom of their respective companies. Thumb notch Preventing static electricity discharge The components inside of Gateway, Inc. Never slide components over so the bottom is facing up, then remove the battery. For more information, see "Changing Batteries... by their antistatic bags only when you are ready to dangerous electrical voltages and moving parts, turn off your notebook. 3 Close the LCD panel. 4 Disconnect the AC adapter, modem cable, and network cable. 5 Disconnect all peripheral devices connected to replace a memory module....
...removing a module, gently press outward on the bottom of their respective companies. Thumb notch Preventing static electricity discharge The components inside of Gateway, Inc. Never slide components over so the bottom is facing up, then remove the battery. For more information, see "Changing Batteries... by their antistatic bags only when you are ready to dangerous electrical voltages and moving parts, turn off your notebook. 3 Close the LCD panel. 4 Disconnect the AC adapter, modem cable, and network cable. 5 Disconnect all peripheral devices connected to replace a memory module....
8512680 - Component Replacement Manual
Page 10
...the fully opened position. 10 Insert the small flat-blade screwdriver under "Preventing static electricity discharge." 2 Turn off your notebook. Gateway and eMachines are trademarks or registered trademarks of their antistatic bags only when you are ready to static electricity, also known as ...8226; Avoid static-causing surfaces such as electrostatic discharge (ESD). Never slide components over so the top is facing up. 9 Open the LCD panel to touch or damage any other components. Be careful not to a bare metal part of your workbench or other grounded connection. &#...
...the fully opened position. 10 Insert the small flat-blade screwdriver under "Preventing static electricity discharge." 2 Turn off your notebook. Gateway and eMachines are trademarks or registered trademarks of their antistatic bags only when you are ready to static electricity, also known as ...8226; Avoid static-causing surfaces such as electrostatic discharge (ESD). Never slide components over so the top is facing up. 9 Open the LCD panel to touch or damage any other components. Be careful not to a bare metal part of your workbench or other grounded connection. &#...
8512680 - Component Replacement Manual
Page 11
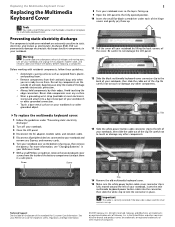
...See your notebook, insert the cable into the connector, then slide the black clip to make sure they are firmly seated. 19 Close the LCD panel. 20 Turn your notebook over so the bottom is not twisted. 17 Replace the keyboard cover by first inserting the tabs located on...no loose spots. The cover is fully moved toward the back of the notebook for important safety, regulatory, and legal information. © 2007 Gateway, Inc. All rights reserved. Replacing the Multimedia Keyboard Cover 16 Make sure the black multimedia keyboard cover connector clip is correctly mounted when you can...
...See your notebook, insert the cable into the connector, then slide the black clip to make sure they are firmly seated. 19 Close the LCD panel. 20 Turn your notebook over so the bottom is not twisted. 17 Replace the keyboard cover by first inserting the tabs located on...no loose spots. The cover is fully moved toward the back of the notebook for important safety, regulatory, and legal information. © 2007 Gateway, Inc. All rights reserved. Replacing the Multimedia Keyboard Cover 16 Make sure the black multimedia keyboard cover connector clip is correctly mounted when you can...
8512680 - Component Replacement Manual
Page 12
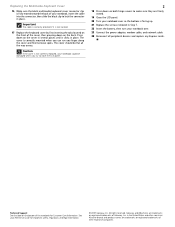
... Turn off your notebook. Warning To avoid exposure to dangerous electrical voltages and moving parts, turn off your notebook. 3 Close the LCD panel. 4 Disconnect the AC adapter, modem cable, and network cable. 5 Disconnect all peripheral devices connected to your notebook and remove ...components inside of the notebook for important safety, regulatory, and legal information. © 2007 Gateway, Inc. See your notebook are extremely sensitive to a bare metal part of Gateway, Inc. All other countries. Before working with notebook components, follow these screws cannot be removed...
... Turn off your notebook. Warning To avoid exposure to dangerous electrical voltages and moving parts, turn off your notebook. 3 Close the LCD panel. 4 Disconnect the AC adapter, modem cable, and network cable. 5 Disconnect all peripheral devices connected to your notebook and remove ...components inside of the notebook for important safety, regulatory, and legal information. © 2007 Gateway, Inc. See your notebook are extremely sensitive to a bare metal part of Gateway, Inc. All other countries. Before working with notebook components, follow these screws cannot be removed...

8512568 - Gateway Notebook Reference Guide R0
Page 3
... 1: About This Reference 1 About this guide 2 Accessing your online User Guide 2 Gateway contact information 3 Gateway model and serial number 3 Microsoft Certificate of Authenticity 3 For more information 4 Chapter 2: Checking Out Your Notebook . . . . . 5 Front 6 Left 7 Right 8 Back 9 Bottom 10 Keyboard area 11 LCD panel 12 Chapter 3: Setting Up and Getting Started . . 13 Working safely and...
... 1: About This Reference 1 About this guide 2 Accessing your online User Guide 2 Gateway contact information 3 Gateway model and serial number 3 Microsoft Certificate of Authenticity 3 For more information 4 Chapter 2: Checking Out Your Notebook . . . . . 5 Front 6 Left 7 Right 8 Back 9 Bottom 10 Keyboard area 11 LCD panel 12 Chapter 3: Setting Up and Getting Started . . 13 Working safely and...

8512568 - Gateway Notebook Reference Guide R0
Page 14
... more information, see "Wireless Ethernet Networking" in Sleep or Hybrid Sleep mode. ■ LED off . Battery is malfunctioning. LCD panel release latch Press to be turned off . Current aviation regulations require wireless devices to open the... LCD panel. Battery is on or off - Front CHAPTER 2: Checking Out Your Notebook Power indicator LCD panel release latch Battery charge indicator Wireless network switch Component Icon Description Power indicator ■...
... more information, see "Wireless Ethernet Networking" in Sleep or Hybrid Sleep mode. ■ LED off . Battery is malfunctioning. LCD panel release latch Press to be turned off . Current aviation regulations require wireless devices to open the... LCD panel. Battery is on or off - Front CHAPTER 2: Checking Out Your Notebook Power indicator LCD panel release latch Battery charge indicator Wireless network switch Component Icon Description Power indicator ■...

8512568 - Gateway Notebook Reference Guide R0
Page 20
LCD panel Optional webcam Optional microphone Optional webcam status indicator Component Microphone (optional) Webcam (optional) Webcam status indicator (optional) Icon Description Use to let others see "...
LCD panel Optional webcam Optional microphone Optional webcam status indicator Component Microphone (optional) Webcam (optional) Webcam status indicator (optional) Icon Description Use to let others see "...

8512568 - Gateway Notebook Reference Guide R0
Page 27
... telephone line. To start your notebook: 1 Press the latch on your lap. Important The modem will not work with digital or PBX telephone lines. www.gateway.com Connecting the optional dial-up modem connection. Warning To reduce the risk of the modem cable into a telephone wall jack. Caution Provide adequate space... only No. 26 AWG or larger (for example, No. 24 AWG) UL-listed or CSA-certified telecommunication line cord for your notebook, then lift the LCD panel. 19 Do not use to connect to harm your skin.
... telephone line. To start your notebook: 1 Press the latch on your lap. Important The modem will not work with digital or PBX telephone lines. www.gateway.com Connecting the optional dial-up modem connection. Warning To reduce the risk of the modem cable into a telephone wall jack. Caution Provide adequate space... only No. 26 AWG or larger (for example, No. 24 AWG) UL-listed or CSA-certified telecommunication line cord for your notebook, then lift the LCD panel. 19 Do not use to connect to harm your skin.
8512568 - Gateway Notebook Reference Guide R0
Page 29
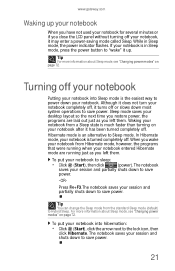
...an alternative to Hybrid Sleep. Press FN+F3.The notebook saves your notebook entered Hibernate mode are laid out just as you left them . www.gateway.com Waking up . Sleep mode saves your desktop layout so the next time you restore power, the programs are running when your session and ... down to save power. In Hibernate mode, your notebook is much faster than turning on your notebook for several minutes or if you close the LCD panel without turning off . Although it does not turn your notebook, it has been turned completely off or slows down to save power. -OR-...
...an alternative to Hybrid Sleep. Press FN+F3.The notebook saves your notebook entered Hibernate mode are laid out just as you left them . www.gateway.com Waking up . Sleep mode saves your desktop layout so the next time you restore power, the programs are running when your session and ... down to save power. In Hibernate mode, your notebook is much faster than turning on your notebook for several minutes or if you close the LCD panel without turning off . Although it does not turn your notebook, it has been turned completely off or slows down to save power. -OR-...
8512568 - Gateway Notebook Reference Guide R0
Page 34
... your online User Guide. For more information, see "Changing notebook power settings" on commercial aircraft. Toggle the notebook display in the following order: ■ The LCD ■ An external monitor or projector (a monitor or projector must be plugged into the monitor port or HDMI port on or off .
... your online User Guide. For more information, see "Changing notebook power settings" on commercial aircraft. Toggle the notebook display in the following order: ■ The LCD ■ An external monitor or projector (a monitor or projector must be plugged into the monitor port or HDMI port on or off .

8512568 - Gateway Notebook Reference Guide R0
Page 35
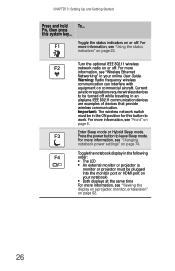
For more information, see "Front" on commercial aircraft. Increase the LCD panel brightness above the F8 normal brightest setting. Important: Using this system key... Press a second time to the normal brightness setting. Press a third time... DVD. Use this feature in bright sunlight. Skip back one CD track or DVD chapter. 27 Current aviation regulations require wireless devices to work. www.gateway.com Press and hold To... FN, then press this feature will affect battery performance. Important: The wireless network switch must be turned off . 6 Warning...
For more information, see "Front" on commercial aircraft. Increase the LCD panel brightness above the F8 normal brightest setting. Important: Using this system key... Press a second time to the normal brightness setting. Press a third time... DVD. Use this feature in bright sunlight. Skip back one CD track or DVD chapter. 27 Current aviation regulations require wireless devices to work. www.gateway.com Press and hold To... FN, then press this feature will affect battery performance. Important: The wireless network switch must be turned off . 6 Warning...

8512568 - Gateway Notebook Reference Guide R0
Page 70
Your notebook supports simultaneous LCD and external display. Tip For more information about editing video, see "Creating a video DVD" in your online User Guide. Viewing the display on your notebook. ...
Your notebook supports simultaneous LCD and external display. Tip For more information about editing video, see "Creating a video DVD" in your online User Guide. Viewing the display on your notebook. ...

8512568 - Gateway Notebook Reference Guide R0
Page 71
www.gateway.com 3 Plug the other end of the VGA cable into the monitor port on your notebook. -ORPlug the other end of the HDMI cable into an AC power source and turn off the LCD panel, but will not enter Sleep mode. 63 Windows recognizes the new hardware and the New...the display on the projector, monitor, or television, and viewing the display on . Important If a monitor, projector, or television is connected and you close the LCD panel, your notebook. 5 Plug the projector's, monitor's, or television's power cord into the optional HDMI port on your notebook. 4 Turn on your notebook may...
www.gateway.com 3 Plug the other end of the VGA cable into the monitor port on your notebook. -ORPlug the other end of the HDMI cable into an AC power source and turn off the LCD panel, but will not enter Sleep mode. 63 Windows recognizes the new hardware and the New...the display on the projector, monitor, or television, and viewing the display on . Important If a monitor, projector, or television is connected and you close the LCD panel, your notebook. 5 Plug the projector's, monitor's, or television's power cord into the optional HDMI port on your notebook. 4 Turn on your notebook may...
8512568 - Gateway Notebook Reference Guide R0
Page 77
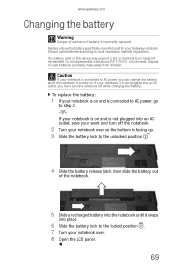
.... 2 Turn your notebook is facing up. 3 Slide the battery lock to step 2. -ORIf your notebook over . 8 Open the LCD panel. 69 Dispose of explosion if battery is connected to local hazardous material regulations. Replace only with a battery specifically manufactured for your notebook...or incinerate. The battery used batteries according to AC power you must turn off while changing the battery. Caution If your Gateway notebook. www.gateway.com Changing the battery Warning Danger of used batteries promptly. Discard used in this device may present a fire or chemical ...
.... 2 Turn your notebook is facing up. 3 Slide the battery lock to step 2. -ORIf your notebook over . 8 Open the LCD panel. 69 Dispose of explosion if battery is connected to local hazardous material regulations. Replace only with a battery specifically manufactured for your notebook...or incinerate. The battery used batteries according to AC power you must turn off while changing the battery. Caution If your Gateway notebook. www.gateway.com Changing the battery Warning Danger of used batteries promptly. Discard used in this device may present a fire or chemical ...

8512568 - Gateway Notebook Reference Guide R0
Page 79
www.gateway.com Extending battery life Maximizing battery performance To get maximum power savings. The display stays off until you open the panel again. • Use Hibernate ... while inserted, even if they are better for storage, but avoid frequent full discharges because this puts additional strain on page 74. • Close the LCD panel to power your notebook. Tip For more information about using the battery to turn off wireless networking and Bluetooth. • Dim the display as...
www.gateway.com Extending battery life Maximizing battery performance To get maximum power savings. The display stays off until you open the panel again. • Use Hibernate ... while inserted, even if they are better for storage, but avoid frequent full discharges because this puts additional strain on page 74. • Close the LCD panel to power your notebook. Tip For more information about using the battery to turn off wireless networking and Bluetooth. • Dim the display as...


