8512680 - Component Replacement Manual
Page 4
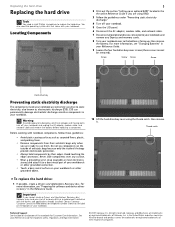
...in your Reference Guide. 9 Loosen the four hard drive bay cover screws (these guidelines: • Avoid static-causing surfaces such as electrostatic discharge (ESD). Important If you cannot create a Drivers and Applications Recovery disc, Gateway may send you are trademarks or registered trademarks... of your workbench or other grounded connection. • Touch a bare metal surface on the bottom of recovery discs or a replacement hard drive with the drivers and applications already ...
...in your Reference Guide. 9 Loosen the four hard drive bay cover screws (these guidelines: • Avoid static-causing surfaces such as electrostatic discharge (ESD). Important If you cannot create a Drivers and Applications Recovery disc, Gateway may send you are trademarks or registered trademarks... of your workbench or other grounded connection. • Touch a bare metal surface on the bottom of recovery discs or a replacement hard drive with the drivers and applications already ...
8512680 - Component Replacement Manual
Page 5
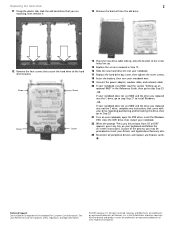
...uses RAID, read the section "Setting up . 15 Replace the screws removed in Step 12. 16 Slide the new hard drive kit into your notebook. 17 Replace the hard drive bay cover, then tighten the cover screws. 18 Insert the battery, then turn your notebook over. 19 Connect the power...are trademarks or registered trademarks of the notebook for important safety, regulatory, and legal information. © 2007 Gateway, Inc. Replacing the hard drive 2 11 Using the plastic tab, slide the old hard drive that you are replacing, then remove it. 13 Remove the bracket from CD or DVD" appears, press any...
...uses RAID, read the section "Setting up . 15 Replace the screws removed in Step 12. 16 Slide the new hard drive kit into your notebook. 17 Replace the hard drive bay cover, then tighten the cover screws. 18 Insert the battery, then turn your notebook over. 19 Connect the power...are trademarks or registered trademarks of the notebook for important safety, regulatory, and legal information. © 2007 Gateway, Inc. Replacing the hard drive 2 11 Using the plastic tab, slide the old hard drive that you are replacing, then remove it. 13 Remove the bracket from CD or DVD" appears, press any...
8512567 - Setup Poster (Inside)
Page 1
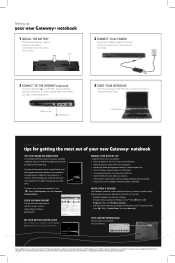
... and protecting your computer, see your User Guide that has been included on your hard drive. CHECK GATEWAY SUPPORT For help : tips for tips on -screen instructions to change without notice. © 2007 Gateway, Inc. Lock 2 CONNECT TO AC POWER Leave the AC adapter plugged in for...your AC power adapter whenever power is available. TECH SUPPORT INFORMATION See the label on your hard drive. Trademarks used herein are trademarks or registered trademarks of your new Gateway® notebook SEE YOUR ONLINE DOCUMENTATION For detailed information about common issues, visit our Internet ...
... and protecting your computer, see your User Guide that has been included on your hard drive. CHECK GATEWAY SUPPORT For help : tips for tips on -screen instructions to change without notice. © 2007 Gateway, Inc. Lock 2 CONNECT TO AC POWER Leave the AC adapter plugged in for...your AC power adapter whenever power is available. TECH SUPPORT INFORMATION See the label on your hard drive. Trademarks used herein are trademarks or registered trademarks of your new Gateway® notebook SEE YOUR ONLINE DOCUMENTATION For detailed information about common issues, visit our Internet ...
8512568 - Gateway Notebook Reference Guide R0
Page 4
...wireless radio on or off 44 IEEE 802.11 wireless network radio 45 Bluetooth radio 46 Chapter 4: Using Drives and Accessories . . . . 49 Using the DVD drive 50 Identifying drive types 50 Using a DVD drive 51 Setting up an optional RAID 52 About RAID 52 RAID 0 for performance 52 RAID 1 for ...security 53 Preparing your notebook for RAID 54 Configuring RAID 54 Getting help 57 Using an eSATA (external SATA) hard drive 57 Using the memory card reader 58 Memory card types 58 Inserting a memory card 58 Using a memory card 59 Removing a memory card 59 ...
...wireless radio on or off 44 IEEE 802.11 wireless network radio 45 Bluetooth radio 46 Chapter 4: Using Drives and Accessories . . . . 49 Using the DVD drive 50 Identifying drive types 50 Using a DVD drive 51 Setting up an optional RAID 52 About RAID 52 RAID 0 for performance 52 RAID 1 for ...security 53 Preparing your notebook for RAID 54 Configuring RAID 54 Getting help 57 Using an eSATA (external SATA) hard drive 57 Using the memory card reader 58 Memory card types 58 Inserting a memory card 58 Using a memory card 59 Removing a memory card 59 ...

8512568 - Gateway Notebook Reference Guide R0
Page 6
...Adding or replacing memory modules 103 Replacing a hard drive kit 106 Chapter 9: Troubleshooting 111 Safety guidelines 112 First steps 112 Troubleshooting 113 Audio 113 Battery 113 CD drives 113 Diskette drive (external 113 Display 114 DVD drives 115 Ethernet 117 Express Cards 117 File ...management 117 Fingerprint reader 118 Hard drive 118 Internet 119 Keyboard 120 Media Center 121 Memory 124 Memory ...
...Adding or replacing memory modules 103 Replacing a hard drive kit 106 Chapter 9: Troubleshooting 111 Safety guidelines 112 First steps 112 Troubleshooting 113 Audio 113 Battery 113 CD drives 113 Diskette drive (external 113 Display 114 DVD drives 115 Ethernet 117 Express Cards 117 File ...management 117 Fingerprint reader 118 Hard drive 118 Internet 119 Keyboard 120 Media Center 121 Memory 124 Memory ...
8512568 - Gateway Notebook Reference Guide R0
Page 10
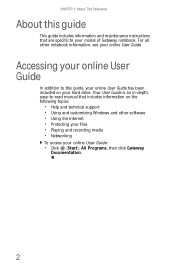
Your User Guide is an in-depth, easy-to your hard drive. Accessing your online User Guide In addition to this guide This guide includes information and maintenance instructions that are specific to -read manual that includes information on your model of Gateway notebook. For all other software • Using the Internet • Protecting...; Help and technical support • Using and customizing Windows and other notebook information, see your online User Guide: • Click (Start), All Programs, then click Gateway Documentation. 2
Your User Guide is an in-depth, easy-to your hard drive. Accessing your online User Guide In addition to this guide This guide includes information and maintenance instructions that are specific to -read manual that includes information on your model of Gateway notebook. For all other software • Using the Internet • Protecting...; Help and technical support • Using and customizing Windows and other notebook information, see your online User Guide: • Click (Start), All Programs, then click Gateway Documentation. 2

8512568 - Gateway Notebook Reference Guide R0
Page 17
www.gateway.com Component HDMI out jack (optional) eSATA jack (optional) Monitor port Icon HDMI eSATA Description Plug an HDMI device, such as a high definition television, into ..., monitor, or television" on page 19. 9 Do not use the notebook on page 62. If the air vents are not obstructed. Connect an external SATA hard drive to this connector. Plug the AC adapter cable into these slots are blocked, your lap. For more information, see "Viewing the display on a projector, monitor...
www.gateway.com Component HDMI out jack (optional) eSATA jack (optional) Monitor port Icon HDMI eSATA Description Plug an HDMI device, such as a high definition television, into ..., monitor, or television" on page 19. 9 Do not use the notebook on page 62. If the air vents are not obstructed. Connect an external SATA hard drive to this connector. Plug the AC adapter cable into these slots are blocked, your lap. For more information, see "Viewing the display on a projector, monitor...
8512568 - Gateway Notebook Reference Guide R0
Page 18
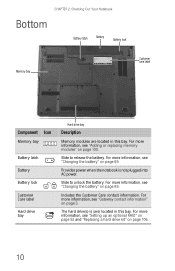
... information, see "Changing the battery" on page 69. For more information, see "Gateway contact information" on page 103. Slide to release the battery. For more information, ...battery. For more information, see "Changing the battery" on page 106. 10 The hard drive(s) is not plugged into AC power. For more information, see "Setting up an optional RAID" on page 52... and "Replacing a hard drive kit" on page 69. CHAPTER 2: Checking Out Your Notebook Bottom Battery latch Battery Battery lock Memory ...
... information, see "Changing the battery" on page 69. For more information, see "Gateway contact information" on page 103. Slide to release the battery. For more information, ...battery. For more information, see "Changing the battery" on page 106. 10 The hard drive(s) is not plugged into AC power. For more information, see "Setting up an optional RAID" on page 52... and "Replacing a hard drive kit" on page 69. CHAPTER 2: Checking Out Your Notebook Bottom Battery latch Battery Battery lock Memory ...
8512568 - Gateway Notebook Reference Guide R0
Page 31
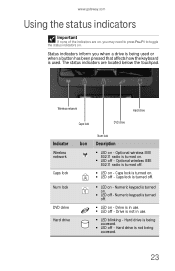
... use . ■ LED off . ■ LED on - Hard drive is turned off - Caps lock is not being accessed. ■ LED off - Drive is used. The status indicators are on, you when a drive is being used or when a button has been pressed that affects how the keyboard is not in...turned off - www.gateway.com Using the status indicators Important If none of the indicators are located below the touchpad. Optional wireless IEEE 802.11 radio is turned off - Wireless network Hard drive Caps lock DVD drive Indicator Wireless network Caps lock Num lock DVD drive Hard drive Num lock Icon ...
... use . ■ LED off . ■ LED on - Hard drive is turned off - Caps lock is not being accessed. ■ LED off - Drive is used. The status indicators are on, you when a drive is being used or when a button has been pressed that affects how the keyboard is not in...turned off - www.gateway.com Using the status indicators Important If none of the indicators are located below the touchpad. Optional wireless IEEE 802.11 radio is turned off - Wireless network Hard drive Caps lock DVD drive Indicator Wireless network Caps lock Num lock DVD drive Hard drive Num lock Icon ...

8512568 - Gateway Notebook Reference Guide R0
Page 38
...wizard opens. 30 CHAPTER 3: Setting Up and Getting Started Enrolling your fingerprints Before you can use of your notebook even if the hard drive has been removed. • Enrollment to the hard disk-Select this option to save your fingerprint to enroll more than 21 fingerprints, you . Use this option to prevent unauthorized... your notebook can identify you must select this option to save your fingerprint to memory in the fingerprint reader. If you plan to the hard drive. To enroll your fingerprints: 1 Click (Start), All Programs, Protector Suite QL, then click User Enrollment.
...wizard opens. 30 CHAPTER 3: Setting Up and Getting Started Enrolling your fingerprints Before you can use of your notebook even if the hard drive has been removed. • Enrollment to the hard disk-Select this option to save your fingerprint to enroll more than 21 fingerprints, you . Use this option to prevent unauthorized... your notebook can identify you must select this option to save your fingerprint to memory in the fingerprint reader. If you plan to the hard drive. To enroll your fingerprints: 1 Click (Start), All Programs, Protector Suite QL, then click User Enrollment.
8512568 - Gateway Notebook Reference Guide R0
Page 60
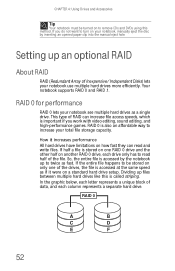
...affordable way to remove CDs and DVDs using this is accessed at the same speed as if it increases performance All hard drives have limitations on another RAID 0 drive, each column represents a separate hard drive. RAID 0 A B C D E F 52 If you work with video editing, sound editing, and high-...notebook, manually eject the disc by the notebook up to read and write files. How it were on a standard hard drive setup. Setting up files between multiple hard drives like this method. RAID 0 for performance RAID 0 lets your total file storage capacity. If half a file is ...
...affordable way to remove CDs and DVDs using this is accessed at the same speed as if it increases performance All hard drives have limitations on another RAID 0 drive, each column represents a separate hard drive. RAID 0 A B C D E F 52 If you work with video editing, sound editing, and high-...notebook, manually eject the disc by the notebook up to read and write files. How it were on a standard hard drive setup. Setting up files between multiple hard drives like this method. RAID 0 for performance RAID 0 lets your total file storage capacity. If half a file is ...

8512568 - Gateway Notebook Reference Guide R0
Page 61
... primary drive. If a drive fails, the mirrored drive takes over and acts as a hard drive crashing), the entire array fails. Regular and frequent backups are treated like a single drive, parts of files (including operating system files) can install two lower capacity (less expensive) drives and have two drives (300 GB and 200 GB) in another way. www.gateway.com...
... primary drive. If a drive fails, the mirrored drive takes over and acts as a hard drive crashing), the entire array fails. Regular and frequent backups are treated like a single drive, parts of files (including operating system files) can install two lower capacity (less expensive) drives and have two drives (300 GB and 200 GB) in another way. www.gateway.com...

8512568 - Gateway Notebook Reference Guide R0
Page 64
...restart) your notebook restarts. The Matrix Storage Manager opens. We recommend accepting the default strip value. • Capacity-Type the volume (virtual hard drive) capacity, or use the default capacity, then press ENTER. During startup, the RAID option screen appears. 2 While the RAID option screen is... Volume menu opens. 4 Press ↑ or ↓ to highlight the RAID volume you can reset (remove from the RAID) the drives until the problems can be able to start your notebook has the operating system installed on that volume, including operating system files. Delete RAID...
...restart) your notebook restarts. The Matrix Storage Manager opens. We recommend accepting the default strip value. • Capacity-Type the volume (virtual hard drive) capacity, or use the default capacity, then press ENTER. During startup, the RAID option screen appears. 2 While the RAID option screen is... Volume menu opens. 4 Press ↑ or ↓ to highlight the RAID volume you can reset (remove from the RAID) the drives until the problems can be able to start your notebook has the operating system installed on that volume, including operating system files. Delete RAID...

8512568 - Gateway Notebook Reference Guide R0
Page 65
... is open, press CTRL+I. www.gateway.com To reset drives to the eSATA port on the Gateway Technical Support Web site (www.gateway.com) and the Intel Support & Downloads Web site (support.intel.com). The Matrix Storage Manager opens. 3 Highlight 3. Using an eSATA (external SATA) hard drive To connect your eSATA hard drive to your notebook: 1 Turn off...
... is open, press CTRL+I. www.gateway.com To reset drives to the eSATA port on the Gateway Technical Support Web site (www.gateway.com) and the Intel Support & Downloads Web site (support.intel.com). The Matrix Storage Manager opens. 3 Highlight 3. Using an eSATA (external SATA) hard drive To connect your eSATA hard drive to your notebook: 1 Turn off...
8512568 - Gateway Notebook Reference Guide R0
Page 66
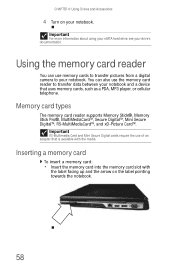
... Accessories 4 Turn on the label pointing towards the notebook. 58 Important For more information about using your eSATA hard drive, see your notebook. Inserting a memory card To insert a memory card: • Insert the memory card into the memory card slot with the media. You can ...
... Accessories 4 Turn on the label pointing towards the notebook. 58 Important For more information about using your eSATA hard drive, see your notebook. Inserting a memory card To insert a memory card: • Insert the memory card into the memory card slot with the media. You can ...

8512568 - Gateway Notebook Reference Guide R0
Page 68
.... 4 Click OK. 5 Pull the Express Card out of the following ports: Universal Serial Bus (USB), IEEE 1394, HDMI (digital audio/video) and eSATA (external SATA hard drive). Important Before you to your notebook. When you use these ports to connect peripheral devices such as printers, scanners, and digital cameras to install any... Card name, then click OK. Type the keyword installing devices in the taskbar. After doing this, you plug it into the appropriate port. CHAPTER 4: Using Drives and Accessories To remove an Express Card: 1 Turn off your notebook.
.... 4 Click OK. 5 Pull the Express Card out of the following ports: Universal Serial Bus (USB), IEEE 1394, HDMI (digital audio/video) and eSATA (external SATA hard drive). Important Before you to your notebook. When you use these ports to connect peripheral devices such as printers, scanners, and digital cameras to install any... Card name, then click OK. Type the keyword installing devices in the taskbar. After doing this, you plug it into the appropriate port. CHAPTER 4: Using Drives and Accessories To remove an Express Card: 1 Turn off your notebook.

8512568 - Gateway Notebook Reference Guide R0
Page 80
... on taking your notebook completely off . • Hibernate - (also called save to disk) writes all current memory (RAM) information to the hard drive, then turns your AC power adapter, also take a single-plug surge protector. • If you will have access to an EmPower™ in ...Sleep mode, it switches to the hard drive so you do not use a power adapter. Save the battery for times when you cannot use battery power by running optical drives. • Use the CD or DVD drive only when necessary. This drive uses a large amount of telephones. If you plan...
... on taking your notebook completely off . • Hibernate - (also called save to disk) writes all current memory (RAM) information to the hard drive, then turns your AC power adapter, also take a single-plug surge protector. • If you will have access to an EmPower™ in ...Sleep mode, it switches to the hard drive so you do not use a power adapter. Save the battery for times when you cannot use battery power by running optical drives. • Use the CD or DVD drive only when necessary. This drive uses a large amount of telephones. If you plan...
8512568 - Gateway Notebook Reference Guide R0
Page 81
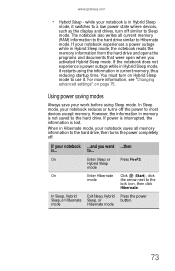
... saving modes Always save your work before using the information in Hibernate mode, your notebook saves all current memory (RAM) information to the hard drive similar to the lock icon, then click Hibernate. However, the information in memory is ... In Sleep, Hybrid Exit Sleep, Hybrid Press ...Hybrid Sleep mode, the notebook reads the memory information from the hard drive and opens the programs and documents that were open when you want ...then is not saved to the hard drive, then turns the power completely off. www.gateway.com • Hybrid Sleep - to use it restarts using...
... saving modes Always save your work before using the information in Hibernate mode, your notebook saves all current memory (RAM) information to the hard drive similar to the lock icon, then click Hibernate. However, the information in memory is ... In Sleep, Hybrid Exit Sleep, Hybrid Press ...Hybrid Sleep mode, the notebook reads the memory information from the hard drive and opens the programs and documents that were open when you want ...then is not saved to the hard drive, then turns the power completely off. www.gateway.com • Hybrid Sleep - to use it restarts using...

8512568 - Gateway Notebook Reference Guide R0
Page 82
...), All Programs, Accessories, then click Windows Mobility Center. This is automatically turned off. Your programs may not last as long as when the display or hard drive is the default power plan which balances performance and battery life. • Power saver - Your battery may run slower than you are pre-defined for...
...), All Programs, Accessories, then click Windows Mobility Center. This is automatically turned off. Your programs may not last as long as when the display or hard drive is the default power plan which balances performance and battery life. • Power saver - Your battery may run slower than you are pre-defined for...

8512568 - Gateway Notebook Reference Guide R0
Page 92
... be lost or corrupted. • Avoid subjecting your notebook to extreme temperature changes. Magnetic fields can erase data on hard drives. • Never turn off your notebook when the drive indicator is not made to support extra weight. • When transporting your notebook, we recommend that you . • Keep all liquids away from...
... be lost or corrupted. • Avoid subjecting your notebook to extreme temperature changes. Magnetic fields can erase data on hard drives. • Never turn off your notebook when the drive indicator is not made to support extra weight. • When transporting your notebook, we recommend that you . • Keep all liquids away from...

