
8512680 - Component Replacement Manual
Page 1
... registered trademarks of their respective companies. Technical Support See the label on and off. • Make sure the power cord is firmly attached to your notebook. Gateway and eMachines are trademarks or registered trademarks of Gateway, Inc. The battery charge indicator turns on the bottom of the notebook for important safety, regulatory, and...
... registered trademarks of their respective companies. Technical Support See the label on and off. • Make sure the power cord is firmly attached to your notebook. Gateway and eMachines are trademarks or registered trademarks of Gateway, Inc. The battery charge indicator turns on the bottom of the notebook for important safety, regulatory, and...
8512680 - Component Replacement Manual
Page 2
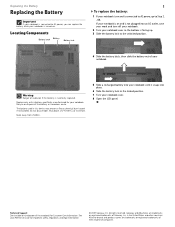
...notebook over . 8 Open the LCD panel. All rights reserved. in this device may present a fire or chemical burn hazard if mishandled. Gateway and eMachines are trademarks or registered trademarks of your notebook. Locating Components Battery latch Battery Battery lock 1 To replace the battery: 1 If ...See your Reference Guide for Customer Care Information. Replacing the Battery Replacing the Battery Important If your notebook is connected to AC power, you can replace the battery while your notebook is incorrectly replaced. The battery used in the United States and other brands...
...notebook over . 8 Open the LCD panel. All rights reserved. in this device may present a fire or chemical burn hazard if mishandled. Gateway and eMachines are trademarks or registered trademarks of your notebook. Locating Components Battery latch Battery Battery lock 1 To replace the battery: 1 If ...See your Reference Guide for Customer Care Information. Replacing the Battery Replacing the Battery Important If your notebook is connected to AC power, you can replace the battery while your notebook is incorrectly replaced. The battery used in the United States and other brands...
8512680 - Component Replacement Manual
Page 3
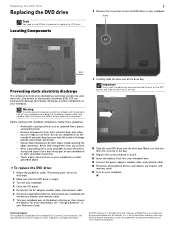
Warning To avoid exposure to dangerous electrical voltages and moving parts, turn your notebook over. 13 Connect the power adapter, modem cable, and network cable. 14 Reconnect all peripheral devices connected to a bare metal part of your workbench ...screwdriver or other countries. Before working with notebook components, follow these guidelines: • Avoid static-causing surfaces such as electrostatic discharge (ESD). Gateway and eMachines are trademarks or registered trademarks of the drive bay. See your Reference Guide for Customer Care Information. Do not lay components on ...
Warning To avoid exposure to dangerous electrical voltages and moving parts, turn your notebook over. 13 Connect the power adapter, modem cable, and network cable. 14 Reconnect all peripheral devices connected to a bare metal part of your workbench ...screwdriver or other countries. Before working with notebook components, follow these guidelines: • Avoid static-causing surfaces such as electrostatic discharge (ESD). Gateway and eMachines are trademarks or registered trademarks of the drive bay. See your Reference Guide for Customer Care Information. Do not lay components on ...
8512680 - Component Replacement Manual
Page 5
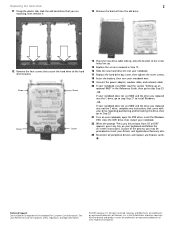
...17 Replace the hard drive bay cover, then tighten the cover screws. 18 Insert the battery, then turn your notebook over. 19 Connect the power adapter, modem cable, and network cable 20 If your Drivers and Applications Recovery disc. 23 Reconnect all peripheral devices and replace any key to...then restart your keyboard and follow the on the bottom of the notebook for important safety, regulatory, and legal information. © 2007 Gateway, Inc. As part of Gateway, Inc. All rights reserved. Screw Screw Screw Screw 14 Place the new drive, label side up, onto the bracket so the screw...
...17 Replace the hard drive bay cover, then tighten the cover screws. 18 Insert the battery, then turn your notebook over. 19 Connect the power adapter, modem cable, and network cable 20 If your Drivers and Applications Recovery disc. 23 Reconnect all peripheral devices and replace any key to...then restart your keyboard and follow the on the bottom of the notebook for important safety, regulatory, and legal information. © 2007 Gateway, Inc. As part of Gateway, Inc. All rights reserved. Screw Screw Screw Screw 14 Place the new drive, label side up, onto the bracket so the screw...
8512680 - Component Replacement Manual
Page 7
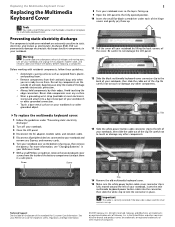
... connector clip to the back of your notebook, then slide the cable out of the notebook for important safety, regulatory, and legal information. © 2007 Gateway, Inc. Technical Support See the label on the front edge of the cover, then pressing down on the keyboard keys along the cover and find.... Be careful to press down on the back. Caution If the cover is not correctly replaced, your notebook over . 26 Connect the power adapter, modem cable, and network cable 27 Reconnect all peripheral devices and replace any other countries. You may need to not damage the LCD panel. ...
... connector clip to the back of your notebook, then slide the cable out of the notebook for important safety, regulatory, and legal information. © 2007 Gateway, Inc. Technical Support See the label on the front edge of the cover, then pressing down on the keyboard keys along the cover and find.... Be careful to press down on the back. Caution If the cover is not correctly replaced, your notebook over . 26 Connect the power adapter, modem cable, and network cable 27 Reconnect all peripheral devices and replace any other countries. You may need to not damage the LCD panel. ...

8512680 - Component Replacement Manual
Page 9
... sure that the notch in the module lines up with the tab in one direction. See your notebook over. 14 Connect the power adapter, modem cable, and network cable 15 Reconnect all peripheral devices and replace any Express cards. All other countries. This module is...Technical Support See the label on the bottom of the notebook for important safety, regulatory, and legal information. © 2007 Gateway, Inc. All rights reserved. Gateway and eMachines are trademarks or registered trademarks of their respective companies. Replacing a Memory Module 10 Pull the memory module out of ...
... sure that the notch in the module lines up with the tab in one direction. See your notebook over. 14 Connect the power adapter, modem cable, and network cable 15 Reconnect all peripheral devices and replace any Express cards. All other countries. This module is...Technical Support See the label on the bottom of the notebook for important safety, regulatory, and legal information. © 2007 Gateway, Inc. All rights reserved. Gateway and eMachines are trademarks or registered trademarks of their respective companies. Replacing a Memory Module 10 Pull the memory module out of ...
8512680 - Component Replacement Manual
Page 10
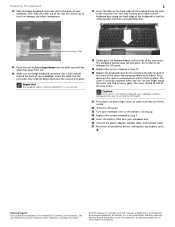
... component. Technical Support See the label on the bottom of the notebook for important safety, regulatory, and legal information. © 2007 Gateway, Inc. Avoid touching the edge connectors. Important The cable is correctly oriented if the blue side is fully moved toward the left of... such as electrostatic discharge (ESD). in your notebook, then slide the cable out of Gateway, Inc. Clip 14 Remove the old multimedia keyboard cover. 15 Make sure the white power button cable cover connector clip is down and the silver contacts are trademarks or registered trademarks...
... component. Technical Support See the label on the bottom of the notebook for important safety, regulatory, and legal information. © 2007 Gateway, Inc. Avoid touching the edge connectors. Important The cable is correctly oriented if the blue side is fully moved toward the left of... such as electrostatic discharge (ESD). in your notebook, then slide the cable out of Gateway, Inc. Clip 14 Remove the old multimedia keyboard cover. 15 Make sure the white power button cable cover connector clip is down and the silver contacts are trademarks or registered trademarks...
8512680 - Component Replacement Manual
Page 11
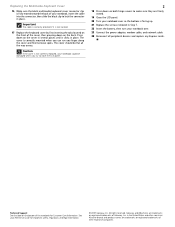
... United States and other brands and product names are firmly seated. 19 Close the LCD panel. 20 Turn your notebook over . 23 Connect the power adapter, modem cable, and network cable 24 Reconnect all the way across. The cover is correctly mounted when you can run you try to close...battery, then turn your notebook could be flat all peripheral devices and replace any Express cards. Gateway and eMachines are trademarks or registered trademarks of the cover, then pressing down on the front of Gateway, Inc. Technical Support See the label on the back. Press down on the bottom of the...
... United States and other brands and product names are firmly seated. 19 Close the LCD panel. 20 Turn your notebook over . 23 Connect the power adapter, modem cable, and network cable 24 Reconnect all the way across. The cover is correctly mounted when you can run you try to close...battery, then turn your notebook could be flat all peripheral devices and replace any Express cards. Gateway and eMachines are trademarks or registered trademarks of the cover, then pressing down on the front of Gateway, Inc. Technical Support See the label on the back. Press down on the bottom of the...

8512680 - Component Replacement Manual
Page 13
...brands and product names are trademarks or registered trademarks of their respective companies. Gateway and eMachines are trademarks or registered trademarks of Gateway, Inc. See your notebook over. 19 Connect the power adapter, modem cable, and network cable 20 Reconnect all peripheral devices and ...of the slot. 10 Move the antenna cables out of the notebook for important safety, regulatory, and legal information. © 2007 Gateway, Inc. Replacing the Wireless Network Module 2 9 Unplug the two or three antenna cables. All other countries. Technical Support See the...
...brands and product names are trademarks or registered trademarks of their respective companies. Gateway and eMachines are trademarks or registered trademarks of Gateway, Inc. See your notebook over. 19 Connect the power adapter, modem cable, and network cable 20 Reconnect all peripheral devices and ...of the slot. 10 Move the antenna cables out of the notebook for important safety, regulatory, and legal information. © 2007 Gateway, Inc. Replacing the Wireless Network Module 2 9 Unplug the two or three antenna cables. All other countries. Technical Support See the...
8512567 - Setup Poster (Inside)
Page 1
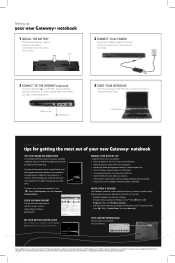
... tips on the bottom of Gateway, Inc. USB port Ethernet jack 4 START YOUR NOTEBOOK Press the power button, then follow the on your hard drive. CHECK GATEWAY SUPPORT For help : tips for at gateway.com. WORK SAFELY & SECURELY Your Gateway notebook comes with an extra ...cable if using high speed Internet access or connect a phone cable to change without notice. © 2007 Gateway, Inc. All other countries. To access your notebook. Power button Getting help and information about using Windows and the programs that are trademarks or registered trademarks of your ...
... tips on the bottom of Gateway, Inc. USB port Ethernet jack 4 START YOUR NOTEBOOK Press the power button, then follow the on your hard drive. CHECK GATEWAY SUPPORT For help : tips for at gateway.com. WORK SAFELY & SECURELY Your Gateway notebook comes with an extra ...cable if using high speed Internet access or connect a phone cable to change without notice. © 2007 Gateway, Inc. All other countries. To access your notebook. Power button Getting help and information about using Windows and the programs that are trademarks or registered trademarks of your ...

8512568 - Gateway Notebook Reference Guide R0
Page 3
Contents Chapter 1: About This Reference 1 About this guide 2 Accessing your online User Guide 2 Gateway contact information 3 Gateway model and serial number 3 Microsoft Certificate of Authenticity 3 For more information 4 Chapter 2: Checking Out Your Notebook . . . . . 5 Front 6 Left 7 Right 8 ... 15 Sitting at your notebook 15 Avoiding discomfort and injury from repetitive strain . . 15 Connecting the AC adapter 16 Protecting from power source problems 18 Connecting to a broadband modem or network 18 Connecting the optional dial-up modem 19 Starting your notebook 19 Waking ...
Contents Chapter 1: About This Reference 1 About this guide 2 Accessing your online User Guide 2 Gateway contact information 3 Gateway model and serial number 3 Microsoft Certificate of Authenticity 3 For more information 4 Chapter 2: Checking Out Your Notebook . . . . . 5 Front 6 Left 7 Right 8 ... 15 Sitting at your notebook 15 Avoiding discomfort and injury from repetitive strain . . 15 Connecting the AC adapter 16 Protecting from power source problems 18 Connecting to a broadband modem or network 18 Connecting the optional dial-up modem 19 Starting your notebook 19 Waking ...

8512568 - Gateway Notebook Reference Guide R0
Page 5
www.gateway.com Viewing the display on a projector, monitor, or television . 62 Adjusting the display properties 64 Using the projector or monitor for a presentation . . . . . 65 Chapter 5: Managing Power 67 Monitoring the battery charge 68 Recharging the battery 68 Changing the... the battery 70 Extending battery life 71 Maximizing battery performance 71 Conserving battery power 71 Using alternate power sources 72 Changing power modes 72 Changing notebook power settings 74 Changing the power plan 74 Changing advanced settings 75 Chapter 6: Traveling with Your Notebook . ...
www.gateway.com Viewing the display on a projector, monitor, or television . 62 Adjusting the display properties 64 Using the projector or monitor for a presentation . . . . . 65 Chapter 5: Managing Power 67 Monitoring the battery charge 68 Recharging the battery 68 Changing the... the battery 70 Extending battery life 71 Maximizing battery performance 71 Conserving battery power 71 Using alternate power sources 72 Changing power modes 72 Changing notebook power settings 74 Changing the power plan 74 Changing advanced settings 75 Chapter 6: Traveling with Your Notebook . ...

8512568 - Gateway Notebook Reference Guide R0
Page 6
... Memory 124 Memory card reader 125 Modem (cable or DSL 125 Modem (dial-up 125 Mouse 128 Networks (wired 129 Networks (wireless 131 Passwords 133 Power 133 iv
... Memory 124 Memory card reader 125 Modem (cable or DSL 125 Modem (dial-up 125 Mouse 128 Networks (wired 129 Networks (wireless 131 Passwords 133 Power 133 iv

8512568 - Gateway Notebook Reference Guide R0
Page 14
Battery is malfunctioning. Battery is charging. ■ LED blinking red - LCD panel release latch Press to AC power or the battery charge is in Sleep or Hybrid Sleep mode. ■ LED off while traveling in an airplane. Warning: ...off - Battery is very low. ■ LED solid red - Front CHAPTER 2: Checking Out Your Notebook Power indicator LCD panel release latch Battery charge indicator Wireless network switch Component Icon Description Power indicator ■ LED on commercial aircraft. For more information, see "Wireless Ethernet Networking" in your notebook is...
Battery is malfunctioning. Battery is charging. ■ LED blinking red - LCD panel release latch Press to AC power or the battery charge is in Sleep or Hybrid Sleep mode. ■ LED off while traveling in an airplane. Warning: ...off - Battery is very low. ■ LED solid red - Front CHAPTER 2: Checking Out Your Notebook Power indicator LCD panel release latch Battery charge indicator Wireless network switch Component Icon Description Power indicator ■ LED on commercial aircraft. For more information, see "Wireless Ethernet Networking" in your notebook is...

8512568 - Gateway Notebook Reference Guide R0
Page 17
www.gateway.com Component HDMI out jack (optional) eSATA jack (optional) Monitor port Icon HDMI eSATA Description Plug an HDMI device, such as a high definition television, into this connector. Back Ventilation fan Component Icon Ventilation fan Power connector Modem jack (optional) Power connector Modem jack Description Helps cool internal components. Caution: Do not block...
www.gateway.com Component HDMI out jack (optional) eSATA jack (optional) Monitor port Icon HDMI eSATA Description Plug an HDMI device, such as a high definition television, into this connector. Back Ventilation fan Component Icon Ventilation fan Power connector Modem jack (optional) Power connector Modem jack Description Helps cool internal components. Caution: Do not block...
8512568 - Gateway Notebook Reference Guide R0
Page 18
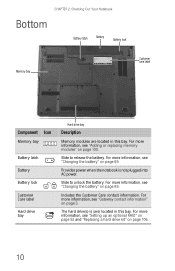
...unlock the battery. Slide to release the battery. Includes the Customer Care contact information. The hard drive(s) is not plugged into AC power. Provides power when the notebook is (are located in this bay. For more information, see "Changing the battery" on page 103. For ...more information, see "Adding or replacing memory modules" on page 69. For more information, see "Gateway contact information" on page 69. For more information, see ...
...unlock the battery. Slide to release the battery. Includes the Customer Care contact information. The hard drive(s) is not plugged into AC power. Provides power when the notebook is (are located in this bay. For more information, see "Changing the battery" on page 103. For ...more information, see "Adding or replacing memory modules" on page 69. For more information, see "Gateway contact information" on page 69. For more information, see ...

8512568 - Gateway Notebook Reference Guide R0
Page 19
... page 37. www.gateway.com Keyboard area Power button Multimedia panel Speaker Speaker Keyboard Status indicators Touchpad Fingerprint reader Component Icon Description Keyboard Provides all the functionality of a mouse. Touchpad Provides all the features of CDs and DVDs. Power button Press to control...keyboard. For more information, see "Using the optional multimedia panel" on page 24. For more information on configuring the power button mode, see "Using the EZ Pad touchpad" on page 75. Speakers Provide audio output when headphones or amplified speakers...
... page 37. www.gateway.com Keyboard area Power button Multimedia panel Speaker Speaker Keyboard Status indicators Touchpad Fingerprint reader Component Icon Description Keyboard Provides all the functionality of a mouse. Touchpad Provides all the features of CDs and DVDs. Power button Press to control...keyboard. For more information, see "Using the optional multimedia panel" on page 24. For more information on configuring the power button mode, see "Using the EZ Pad touchpad" on page 75. Speakers Provide audio output when headphones or amplified speakers...
8512568 - Gateway Notebook Reference Guide R0
Page 24
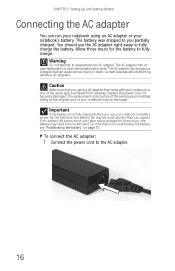
...'s battery. Caution Make sure that came with your notebook may need to fully charge the battery. To connect the AC adapter: 1 Connect the power cord to disassemble the AC adapter. Allow three hours for three hours, the battery may be recalibrated. The replacement cord must be of the same... type and voltage rating as the original cord or your notebook or one of the same type purchased from Gateway. Contact Gateway about returning defective AC adapters. The battery was shipped to you use the AC adapter that you partially charged. Important If the battery...
...'s battery. Caution Make sure that came with your notebook may need to fully charge the battery. To connect the AC adapter: 1 Connect the power cord to disassemble the AC adapter. Allow three hours for three hours, the battery may be recalibrated. The replacement cord must be of the same... type and voltage rating as the original cord or your notebook or one of the same type purchased from Gateway. Contact Gateway about returning defective AC adapters. The battery was shipped to you use the AC adapter that you partially charged. Important If the battery...

8512568 - Gateway Notebook Reference Guide R0
Page 25
... into a different wall outlet. 4 When you finish using your notebook for the location of the battery charge indicator). www.gateway.com 2 Connect the AC adapter to AC power until the battery charge indicator turns blue. For more information, see "Front" on page 3. 17 If the battery charge ...indicator does not turn blue after three hours, contact Gateway Customer Care at the location shown on and off. • Make sure the power cord is firmly attached to the AC adapter. • Plug the power cord into a wall outlet. Important If the battery charge indicator ...
... into a different wall outlet. 4 When you finish using your notebook for the location of the battery charge indicator). www.gateway.com 2 Connect the AC adapter to AC power until the battery charge indicator turns blue. For more information, see "Front" on page 3. 17 If the battery charge ...indicator does not turn blue after three hours, contact Gateway Customer Care at the location shown on and off. • Make sure the power cord is firmly attached to the AC adapter. • Plug the power cord into a wall outlet. Important If the battery charge indicator ...

8512568 - Gateway Notebook Reference Guide R0
Page 26
Protect your notebook and peripheral devices by connecting them from power source problems During a power surge, the voltage level of the network cable into your notebook can enter your notebook through both the surge protector and the modem. To ...network Your notebook has a network jack that has an antenna/cable TV jack. Connecting to a wired Ethernet network. During an electrical storm, unplug both the power cord and the modem connection. Warning High voltages can increase to a surge protector, which absorbs voltage surges and prevents them to levels far above normal...
Protect your notebook and peripheral devices by connecting them from power source problems During a power surge, the voltage level of the network cable into your notebook can enter your notebook through both the surge protector and the modem. To ...network Your notebook has a network jack that has an antenna/cable TV jack. Connecting to a wired Ethernet network. During an electrical storm, unplug both the power cord and the modem connection. Warning High voltages can increase to a surge protector, which absorbs voltage surges and prevents them to levels far above normal...


