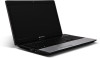
Gateway Quick Start Guide for Windows 7
Page 4
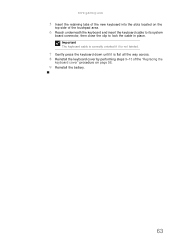
...magnetic fields or any other surface that may expose you spill liquid on your computer, switch it off immediately, unplug the AC adapter, remove the battery and make sure it is required, use only parts certified for use when no risk of objects. • Only use the AC adapter that ...during use by keeping it clear of people walking or tripping over them can seriously damage the computer. • Is not used on again. If a replacement is completely dry before switching it with too many adapters). Save the dummies for use with your computer. Refer all servicing to the computer as...
...magnetic fields or any other surface that may expose you spill liquid on your computer, switch it off immediately, unplug the AC adapter, remove the battery and make sure it is required, use only parts certified for use when no risk of objects. • Only use the AC adapter that ...during use by keeping it clear of people walking or tripping over them can seriously damage the computer. • Is not used on again. If a replacement is completely dry before switching it with too many adapters). Save the dummies for use with your computer. Refer all servicing to the computer as...
Gateway Quick Start Guide for Windows 7
Page 10
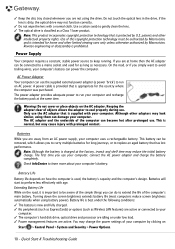
.... Keeping the adapter clear of the computer can be removed, which allows you use your computer's battery. The first time you to replace an aged battery that has lost performance. Battery Life Battery life depends on the AC adapter. AC Power Adapter Your computer can power the computer. The power ... home and other limited viewing uses only unless otherwise authorized by U.S. If you simply want to avoid trailing wires, your computer's battery can use . Batteries While you can be aware of the simple things you are at home then the AC adapter can do to a mains socket...
.... Keeping the adapter clear of the computer can be removed, which allows you use your computer's battery. The first time you to replace an aged battery that has lost performance. Battery Life Battery life depends on the AC adapter. AC Power Adapter Your computer can power the computer. The power ... home and other limited viewing uses only unless otherwise authorized by U.S. If you simply want to avoid trailing wires, your computer's battery can use . Batteries While you can be aware of the simple things you are at home then the AC adapter can do to a mains socket...
Gateway Quick Start Guide for Windows 7
Page 11
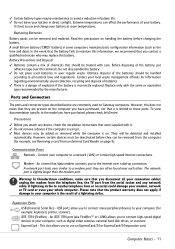
...to nearby telephone lines or an aerial could damage your modem, network or TV card or even your computer is on Gateway computers. Computer Basics - 11 Ports and Connectors The ports and connector types described below are often found near each other... A network port looks very similar to avoid a reduction in battery life. ✓ Do not leave your battery in your battery at room temperatures. Modem - ✓ Certain battery types require maintenance to a modem port; Replacing Batteries Battery packs can be added or removed while the computer is the result...
...to nearby telephone lines or an aerial could damage your modem, network or TV card or even your computer is on Gateway computers. Computer Basics - 11 Ports and Connectors The ports and connector types described below are often found near each other... A network port looks very similar to avoid a reduction in battery life. ✓ Do not leave your battery in your battery at room temperatures. Modem - ✓ Certain battery types require maintenance to a modem port; Replacing Batteries Battery packs can be added or removed while the computer is the result...
Gateway Quick Start Guide for Windows 7
Page 51
... a 3-wire grounded power cord. The cord must unplug the power supply cord and remove the battery to your power adapter complies with the CE Marking. Use only UL Listed No. 26AWG or...in your dealer for 250 VAC, 10 amp minimum. MODIFICATIONS TO THE PRODUCT CE Marking Gateway cannot be returned to disconnect the equipment from the power supply. POWER SUPPLY AND CABLES ... standard to a building supply that aim, the socket-outlet should be rated for an exact replacement. Building Supply Only connect the equipment to demonstrate the compliance of use in accordance with the ...
... a 3-wire grounded power cord. The cord must unplug the power supply cord and remove the battery to your power adapter complies with the CE Marking. Use only UL Listed No. 26AWG or...in your dealer for 250 VAC, 10 amp minimum. MODIFICATIONS TO THE PRODUCT CE Marking Gateway cannot be returned to disconnect the equipment from the power supply. POWER SUPPLY AND CABLES ... standard to a building supply that aim, the socket-outlet should be rated for an exact replacement. Building Supply Only connect the equipment to demonstrate the compliance of use in accordance with the ...
Gateway Quick Start Guide for Windows 7
Page 52
CHASSIS COVER REMOVAL AND REPLACEMENT Before removing the chassis cover to disassemble the laser device....the computer can become hot after prolonged use FTP shielded cables only (cat ≥ 5). During product certification, Gateway used the following cable quality: USB2.0 Certified Cables from Hama 46778 IEEE1394 shielded FireWire from...You then must disconnect all power and modem cords, and remove the battery. Gateway recommends that you add a ferrite core round clip to each cable connecting your Gateway computer to a hardware device that there is never human access to laser...
CHASSIS COVER REMOVAL AND REPLACEMENT Before removing the chassis cover to disassemble the laser device....the computer can become hot after prolonged use FTP shielded cables only (cat ≥ 5). During product certification, Gateway used the following cable quality: USB2.0 Certified Cables from Hama 46778 IEEE1394 shielded FireWire from...You then must disconnect all power and modem cords, and remove the battery. Gateway recommends that you add a ferrite core round clip to each cable connecting your Gateway computer to a hardware device that there is never human access to laser...
Gateway Quick Start Guide for Windows 7
Page 53
... forms of recovery and to reduce the quantity of any batteries that all our products. You can use. Do not throw your retailer if you have been taken to anticipate and facilitate the recycling of its valorisation. Gateway is replaced by clips. Thus, all accessories, such as lead, ...are designed to be fitted in the dustbin. Energy Star® was introduced by returning your old equipment to your used batteries in the equipment. Gateway has determined that may be easily dismantled, with your local authority, or by the US environmental Protection Agency in order to...
... forms of recovery and to reduce the quantity of any batteries that all our products. You can use. Do not throw your retailer if you have been taken to anticipate and facilitate the recycling of its valorisation. Gateway is replaced by clips. Thus, all accessories, such as lead, ...are designed to be fitted in the dustbin. Energy Star® was introduced by returning your old equipment to your used batteries in the equipment. Gateway has determined that may be easily dismantled, with your local authority, or by the US environmental Protection Agency in order to...
Gateway Quick Start Guide for Windows 7
Page 55
INDEX A AC Adapter 10, 12 Aerial 12 Audio CDs 18, 40 Audio ports 12 Autoplay 19 B Backups 14 Batteries 10, 53 Battery disposal 11, 53 Battery life 10 Replacing batteries 11 BIOS 36 Blu-ray 9, 19 Browser 23 C Cable modem 41 Cables 4, 51 Cleaning your computer 4 Codec 19 Computer environment 4 Connectors 11 Control devices Keyboard 6, ...
INDEX A AC Adapter 10, 12 Aerial 12 Audio CDs 18, 40 Audio ports 12 Autoplay 19 B Backups 14 Batteries 10, 53 Battery disposal 11, 53 Battery life 10 Replacing batteries 11 BIOS 36 Blu-ray 9, 19 Browser 23 C Cable modem 41 Cables 4, 51 Cleaning your computer 4 Codec 19 Computer environment 4 Connectors 11 Control devices Keyboard 6, ...
Service Guide
Page 4
... Removing the battery 48 Removing the bay cover 49 Adding or replacing memory modules 50 Replacing the wireless card 52 Replacing the hard drive 54 Replacing the optical drive 56 Replacing the keyboard cover 58 Replacing the multimedia board 60 Replacing the keyboard 62 Replacing the LCD panel assembly 64 Replacing the palm rest 68 Replacing the speakers 72 Replacing the touchpad...
... Removing the battery 48 Removing the bay cover 49 Adding or replacing memory modules 50 Replacing the wireless card 52 Replacing the hard drive 54 Replacing the optical drive 56 Replacing the keyboard cover 58 Replacing the multimedia board 60 Replacing the keyboard 62 Replacing the LCD panel assembly 64 Replacing the palm rest 68 Replacing the speakers 72 Replacing the touchpad...
Service Guide
Page 50
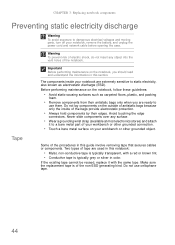
... are extremely sensitive to static electricity, also known as carpeted floors, plastic, and packing foam. • Remove components from their edges. CHAPTER 3: Replacing notebook components Preventing static electricity discharge Warning To avoid exposure to dangerous electrical voltages and moving parts, turn off your workbench or other grounded connection... the information in this guide involve removing tape that secures cables or components. Before performing maintenance on your notebook, remove the battery, and unplug the power cord and network cable before opening the case.
... are extremely sensitive to static electricity, also known as carpeted floors, plastic, and packing foam. • Remove components from their edges. CHAPTER 3: Replacing notebook components Preventing static electricity discharge Warning To avoid exposure to dangerous electrical voltages and moving parts, turn off your workbench or other grounded connection... the information in this guide involve removing tape that secures cables or components. Before performing maintenance on your notebook, remove the battery, and unplug the power cord and network cable before opening the case.
Service Guide
Page 54
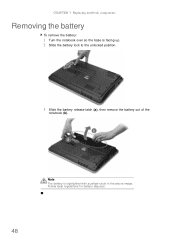
Note The battery is facing up. 2 Slide the battery lock to the unlocked position. 3 Slide the battery release latch (a), then remove the battery out of the notebook (b). CHAPTER 3: Replacing notebook components Removing the battery To remove the battery: 1 Turn the notebook over so the base is highlighted with a yellow circle in the above image. Follow local regulations for battery disposal. 48
Note The battery is facing up. 2 Slide the battery lock to the unlocked position. 3 Slide the battery release latch (a), then remove the battery out of the notebook (b). CHAPTER 3: Replacing notebook components Removing the battery To remove the battery: 1 Turn the notebook over so the base is highlighted with a yellow circle in the above image. Follow local regulations for battery disposal. 48
Service Guide
Page 64
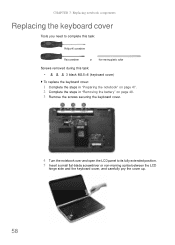
...-marring plastic scribe Screws removed during this task: • 3 black M2.5×6 (keyboard cover) To replace the keyboard cover: 1 Complete the steps in "Preparing the notebook" on page 47. 2 Complete the steps in "Removing the battery" on page 48. 3 Remove the screws securing the keyboard cover. 4 Turn the notebook over and open...
...-marring plastic scribe Screws removed during this task: • 3 black M2.5×6 (keyboard cover) To replace the keyboard cover: 1 Complete the steps in "Preparing the notebook" on page 47. 2 Complete the steps in "Removing the battery" on page 48. 3 Remove the screws securing the keyboard cover. 4 Turn the notebook over and open...

Service Guide
Page 65
...disconnect the cable (c). 7 If you will be damaged when you finger along the sides of the "Replacing the multimedia board" procedure on page 60. 8 Secure the multimedia board, with the connector facing up... the multimedia board, then close the clip to close the LCD panel. 14 Reinstall the battery. 59 Caution If the cover is not correctly installed, your notebook could be using the multimedia...and turn the notebook over the keyboard to the notebook through the multimedia board cable. www.gateway.com Caution The keyboard cover is connected to access its connector on the cover until it...
...disconnect the cable (c). 7 If you will be damaged when you finger along the sides of the "Replacing the multimedia board" procedure on page 60. 8 Secure the multimedia board, with the connector facing up... the multimedia board, then close the clip to close the LCD panel. 14 Reinstall the battery. 59 Caution If the cover is not correctly installed, your notebook could be using the multimedia...and turn the notebook over the keyboard to the notebook through the multimedia board cable. www.gateway.com Caution The keyboard cover is connected to access its connector on the cover until it...

Service Guide
Page 67
www.gateway.com 5 Secure the new multimedia board, with the connector facing up . 10 Secure the keyboard cover with the screws removed in step 3 of the palm ... side of the keyboard cover into the slots located on the top corners of the "Replacing the keyboard cover" procedure on the multimedia board, then close the clip to close the LCD panel. 11 Reinstall the battery. 61 The keyboard cover is correctly mounted when you can run you finger along the...
www.gateway.com 5 Secure the new multimedia board, with the connector facing up . 10 Secure the keyboard cover with the screws removed in step 3 of the palm ... side of the keyboard cover into the slots located on the top corners of the "Replacing the keyboard cover" procedure on the multimedia board, then close the clip to close the LCD panel. 11 Reinstall the battery. 61 The keyboard cover is correctly mounted when you can run you finger along the...
Service Guide
Page 69
Important The keyboard cable is correctly oriented if it is not twisted. 7 Gently press the keyboard down until it is flat all the way across. 8 Reinstall the keyboard cover by performing steps 9-13 of the touchpad area. 6 Reach underneath the keyboard and insert the keyboard cable to its system board connector, then close the clip to lock the cable in place. www.gateway.com 5 Insert the retaining tabs of the new keyboard into the slots located on the top side of the "Replacing the keyboard cover" procedure on page 58. 9 Reinstall the battery. 63
Important The keyboard cable is correctly oriented if it is not twisted. 7 Gently press the keyboard down until it is flat all the way across. 8 Reinstall the keyboard cover by performing steps 9-13 of the touchpad area. 6 Reach underneath the keyboard and insert the keyboard cable to its system board connector, then close the clip to lock the cable in place. www.gateway.com 5 Insert the retaining tabs of the new keyboard into the slots located on the top side of the "Replacing the keyboard cover" procedure on page 58. 9 Reinstall the battery. 63

Service Guide
Page 73
www.gateway.com 15 Lift the LCD panel assembly up . 22 If the notebook has a wireless card installed, ...step 18 to its system board connector. 20 Arrange the LCD, webcam, and microphone cables on page 62. 26 Reinstall the battery. 67 If there's no wireless card installed, proceed to step 19 to reconnect the power button board cable. 18 Refer to ...over so the palm rest is facing up. 25 Reinstall the keyboard and the keyboard cover by performing steps 5-8 of the "Replacing the keyboard" procedure on the palm rest and reconnect them to their system board connectors. 21 Close the LCD panel and turn...
www.gateway.com 15 Lift the LCD panel assembly up . 22 If the notebook has a wireless card installed, ...step 18 to its system board connector. 20 Arrange the LCD, webcam, and microphone cables on page 62. 26 Reinstall the battery. 67 If there's no wireless card installed, proceed to step 19 to reconnect the power button board cable. 18 Refer to ...over so the palm rest is facing up. 25 Reinstall the keyboard and the keyboard cover by performing steps 5-8 of the "Replacing the keyboard" procedure on the palm rest and reconnect them to their system board connectors. 21 Close the LCD panel and turn...
Service Guide
Page 83
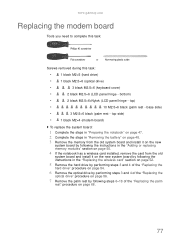
www.gateway.com Replacing the modem board Tools you need to complete this task: Phillips #0 screwdriver Flat screwdriver or Non-marring plastic scribe Screws removed during this task: • 1 ...) • 3 M2.5×6 black (palm rest - top side) • 1 black M2×4 (modem board) To replace the system board: 1 Complete the steps in "Preparing the notebook" on page 47. 2 Complete the steps in "Removing the battery" on page 48. 3 Remove the memory from the old system board and install it on the...
www.gateway.com Replacing the modem board Tools you need to complete this task: Phillips #0 screwdriver Flat screwdriver or Non-marring plastic scribe Screws removed during this task: • 1 ...) • 3 M2.5×6 black (palm rest - top side) • 1 black M2×4 (modem board) To replace the system board: 1 Complete the steps in "Preparing the notebook" on page 47. 2 Complete the steps in "Removing the battery" on page 48. 3 Remove the memory from the old system board and install it on the...

Service Guide
Page 85
...gateway.com 11 Connect the modem cable to the new modem board, and then attach to board to its system board connector. 12 Secure the new modem board with the screw removed in step 9. 13 Reinstall the palm rest by performing steps 19-21 of the "Replacing... the palm rest" procedure on page 68. 14 Reinstall the LCD panel assembly by following the steps 16-23 of the "Replacing... cover by performing steps 5-8 of the "Replacing the keyboard" procedure on page 62. 16..."Replacing the optical drive" procedure on page 56. 18 Reinstall the hard drive by performing steps 8 and 9 of the "Replacing ...
...gateway.com 11 Connect the modem cable to the new modem board, and then attach to board to its system board connector. 12 Secure the new modem board with the screw removed in step 9. 13 Reinstall the palm rest by performing steps 19-21 of the "Replacing... the palm rest" procedure on page 68. 14 Reinstall the LCD panel assembly by following the steps 16-23 of the "Replacing... cover by performing steps 5-8 of the "Replacing the keyboard" procedure on page 62. 16..."Replacing the optical drive" procedure on page 56. 18 Reinstall the hard drive by performing steps 8 and 9 of the "Replacing ...

Service Guide
Page 86
top side) To replace the USB board: 1 Complete the steps in "Preparing the notebook" on page 47. 2 Complete the steps in "Removing the battery" on page 48. 3 Complete the steps in "Removing the bay cover" on page 49. 4 If the notebook has a wireless card installed, ... 80 top) • 10 M2.5×6 black (palm rest - bottom) • 2 black M2.5×6+Nylok (LCD panel hinge - CHAPTER 3: Replacing notebook components Replacing the USB board Tools you need to complete this task: Phillips #0 screwdriver Flat screwdriver or Non-marring plastic scribe Screws removed during this task...
top side) To replace the USB board: 1 Complete the steps in "Preparing the notebook" on page 47. 2 Complete the steps in "Removing the battery" on page 48. 3 Complete the steps in "Removing the bay cover" on page 49. 4 If the notebook has a wireless card installed, ... 80 top) • 10 M2.5×6 black (palm rest - bottom) • 2 black M2.5×6+Nylok (LCD panel hinge - CHAPTER 3: Replacing notebook components Replacing the USB board Tools you need to complete this task: Phillips #0 screwdriver Flat screwdriver or Non-marring plastic scribe Screws removed during this task...

Service Guide
Page 88
...board. 13 Reinstall the palm rest by performing steps 19-21 of the "Replacing the palm rest" procedure on page 68. 14 Reinstall the LCD panel assembly by performing steps 16-23 of...on page 64. 15 Reinstall the keyboard and the keyboard cover by performing steps 5-8 of the "Replacing the keyboard" procedure on page 62. 16 Close the LCD panel and turn the notebook over so ... the optical screw drive in its place. 18 Reinstall the hard drive by performing steps 8 and 9 of the "Replacing the hard drive" procedure on page 54. 19 If you have disconnected any wireless antennas, reconnect them now. 20 ...
...board. 13 Reinstall the palm rest by performing steps 19-21 of the "Replacing the palm rest" procedure on page 68. 14 Reinstall the LCD panel assembly by performing steps 16-23 of...on page 64. 15 Reinstall the keyboard and the keyboard cover by performing steps 5-8 of the "Replacing the keyboard" procedure on page 62. 16 Close the LCD panel and turn the notebook over so ... the optical screw drive in its place. 18 Reinstall the hard drive by performing steps 8 and 9 of the "Replacing the hard drive" procedure on page 54. 19 If you have disconnected any wireless antennas, reconnect them now. 20 ...
Service Guide
Page 89
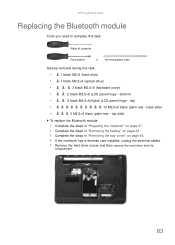
top side) To replace the Bluetooth module: 1 Complete the steps in "Preparing the notebook" on page 47. 2 Complete the steps in "Removing the battery" on page 48. 3 Complete the steps in "Removing the bay cover" on page 49. 4 If the notebook has a wireless card ... rest - bottom) • 2 black M2.5×6+Nylok (LCD panel hinge - base side) • 3 M2.5×6 black (palm rest - www.gateway.com Replacing the Bluetooth module Tools you need to complete this task: Phillips #0 screwdriver Flat screwdriver or Non-marring plastic scribe Screws removed during this task: •...
top side) To replace the Bluetooth module: 1 Complete the steps in "Preparing the notebook" on page 47. 2 Complete the steps in "Removing the battery" on page 48. 3 Complete the steps in "Removing the bay cover" on page 49. 4 If the notebook has a wireless card ... rest - bottom) • 2 black M2.5×6+Nylok (LCD panel hinge - base side) • 3 M2.5×6 black (palm rest - www.gateway.com Replacing the Bluetooth module Tools you need to complete this task: Phillips #0 screwdriver Flat screwdriver or Non-marring plastic scribe Screws removed during this task: •...


