
8511418 - Component Replacement Manual
Page 2
...respective companies. 1 Technical Support See the label on the bottom of Gateway, Inc. All other countries. Important If the battery charge indicator does not turn off your notebook. 2 Close the LCD panel. 6 Slide the replacement battery into the notebook until it snaps into place. 7 Slide the... battery lock to AC power, save your notebook is on . Gateway and eMachines are trademarks or registered trademarks of the notebook...
...respective companies. 1 Technical Support See the label on the bottom of Gateway, Inc. All other countries. Important If the battery charge indicator does not turn off your notebook. 2 Close the LCD panel. 6 Slide the replacement battery into the notebook until it snaps into place. 7 Slide the... battery lock to AC power, save your notebook is on . Gateway and eMachines are trademarks or registered trademarks of the notebook...

8511418 - Component Replacement Manual
Page 7
... and gently pry it up . 10 With a small Phillips screwdriver, remove the two hinge cover screws and put it to replace the keyboard. Replacing the Keyboard Tools You need a small Phillips and a small flat-blade screwdriver to a bare metal part of your workbench or... or registered trademarks of the notebook for important safety, regulatory, and legal information. 12 Carefully open the LCD panel to the fully opened position. www.gateway.com © 2006 Gateway, Inc. Before working with a K. Screw Screw 11 Insert the small flat-blade screwdriver under "Preventing static...
... and gently pry it up . 10 With a small Phillips screwdriver, remove the two hinge cover screws and put it to replace the keyboard. Replacing the Keyboard Tools You need a small Phillips and a small flat-blade screwdriver to a bare metal part of your workbench or... or registered trademarks of the notebook for important safety, regulatory, and legal information. 12 Carefully open the LCD panel to the fully opened position. www.gateway.com © 2006 Gateway, Inc. Before working with a K. Screw Screw 11 Insert the small flat-blade screwdriver under "Preventing static...

8511418 - Component Replacement Manual
Page 8
... the cover and find no loose spots. Be careful to not damage the LCD panel. 17 Slide the black keyboard connector clip to close the LCD panel. 7 Close the LCD panel, then replace the two hinge cover screws. 8 Turn your notebook. Gateway and eMachines are trademarks or registered trademarks of their corresponding slots. 15 Lift...
... the cover and find no loose spots. Be careful to not damage the LCD panel. 17 Slide the black keyboard connector clip to close the LCD panel. 7 Close the LCD panel, then replace the two hinge cover screws. 8 Turn your notebook. Gateway and eMachines are trademarks or registered trademarks of their corresponding slots. 15 Lift...

8511369 - Gateway Notebook Hardware Reference
Page 31
... present a fire or chemical burn hazard if mishandled. Do not disassemble, heat above 212°F (100°C), or incinerate. Turn off your Gateway notebook. Replace only with a battery specifically manufactured for your notebook. 2 Release the eject button by pressing the PC Card eject button once. 3 Eject the .... If your notebook is not plugged into an AC outlet, you can change the battery: 1 If your notebook off your notebook. 2 Close the LCD panel. 3 Turn your notebook is on . If your notebook over so the bottom is facing up. 27 Changing batteries To remove a PC Card:...
... present a fire or chemical burn hazard if mishandled. Do not disassemble, heat above 212°F (100°C), or incinerate. Turn off your Gateway notebook. Replace only with a battery specifically manufactured for your notebook. 2 Release the eject button by pressing the PC Card eject button once. 3 Eject the .... If your notebook is not plugged into an AC outlet, you can change the battery: 1 If your notebook off your notebook. 2 Close the LCD panel. 3 Turn your notebook is on . If your notebook over so the bottom is facing up. 27 Changing batteries To remove a PC Card:...

8511369 - Gateway Notebook Hardware Reference
Page 45
Keyboard screw 7 Turn your notebook over so the top is marked with a K. www.gateway.com Tips & Tricks The screw hole is facing up. 8 With a small Phillips screwdriver, remove the two hinge cover screws and put it up , then remove ... gently pry it in a safe place. For more information, see "Changing batteries" on page 27. 6 Remove the keyboard screw and put them in a safe place. Replacing the keyboard 5 Turn your notebook over so the bottom is facing up . 10 Carefully open the...
Keyboard screw 7 Turn your notebook over so the top is marked with a K. www.gateway.com Tips & Tricks The screw hole is facing up. 8 With a small Phillips screwdriver, remove the two hinge cover screws and put it up , then remove ... gently pry it in a safe place. For more information, see "Changing batteries" on page 27. 6 Remove the keyboard screw and put them in a safe place. Replacing the keyboard 5 Turn your notebook over so the bottom is facing up . 10 Carefully open the...

8511369 - Gateway Notebook Hardware Reference
Page 47
Be careful not to lift the memory bay cover, then remove it. www.gateway.com Replacing the keyboard Tips & Tricks Depending on the end of the cover opposite of the thumb notch. 16 Loosen the mini-PCI bay cover screw (this screw cannot be removed). Screw Screw Screw Screw Screw Screw 15 Use the thumb notch to break off the tabs located on your model, not all screws may be captive. 14 Close the LCD panel, turn your notebook over so the bottom is facing up, then loosen the six memory bay cover screws (these screws cannot be removed), then remove the mini-PCI bay cover. 43
Be careful not to lift the memory bay cover, then remove it. www.gateway.com Replacing the keyboard Tips & Tricks Depending on the end of the cover opposite of the thumb notch. 16 Loosen the mini-PCI bay cover screw (this screw cannot be removed). Screw Screw Screw Screw Screw Screw 15 Use the thumb notch to break off the tabs located on your model, not all screws may be captive. 14 Close the LCD panel, turn your notebook over so the bottom is facing up, then loosen the six memory bay cover screws (these screws cannot be removed), then remove the mini-PCI bay cover. 43

8511369 - Gateway Notebook Hardware Reference
Page 49
Be careful not to lock the connector in place. 3 Rotate the keyboard toward the LCD panel until the keyboard is not twisted. www.gateway.com Replacing the keyboard 21 Slide the black keyboard connector clip to the front of your notebook and remove the cable. To install the keyboard: 1 Place the ...
Be careful not to lock the connector in place. 3 Rotate the keyboard toward the LCD panel until the keyboard is not twisted. www.gateway.com Replacing the keyboard 21 Slide the black keyboard connector clip to the front of your notebook and remove the cable. To install the keyboard: 1 Place the ...
8511369 - Gateway Notebook Hardware Reference
Page 50
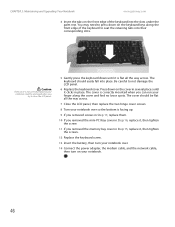
...to not damage the LCD panel. 6 Replace the keyboard cover. The cover should easily fall into the slots under the palm rest. Be careful to close the LCD panel. 5 Gently press the keyboard down until it clicks in place. CHAPTER 3: Maintaining and Upgrading Your Notebook www.gateway.com 4 Insert the... tabs on the front edge of the keyboard to seat the retaining tabs into their corresponding slots. Caution If the cover is not correctly replaced, your notebook could be flat all the way across . 7 Close the LCD panel, then replace the two ...
...to not damage the LCD panel. 6 Replace the keyboard cover. The cover should easily fall into the slots under the palm rest. Be careful to close the LCD panel. 5 Gently press the keyboard down until it clicks in place. CHAPTER 3: Maintaining and Upgrading Your Notebook www.gateway.com 4 Insert the... tabs on the front edge of the keyboard to seat the retaining tabs into their corresponding slots. Caution If the cover is not correctly replaced, your notebook could be flat all the way across . 7 Close the LCD panel, then replace the two ...

8511369 - Gateway Notebook Hardware Reference
Page 64
Index opening 22 finding specifications 3 Firewire port 8 Fn key 19 folders opening 22 function keys 18 G Gateway model number 2, 10 serial number 2, 3 Support 3 H hard drive bay 10 indicator 17 installing 38 replacing 38 headphone jack 6 hot-swapping 26 I i.Link port 8 IEEE 1394 port 8 indicators See status ...combinations 19 keyboard buttons 18 connecting 18 features 18 locating 11 replacing 40 USB port 8 keys application 18 60 www.gateway.com arrow 18 battery status 19 brightness 20 directional 18 Fn 19 function 18 LCD brightness 20 LCD/CRT 19 navigation 18 numeric keypad 19 power status 19 ...
Index opening 22 finding specifications 3 Firewire port 8 Fn key 19 folders opening 22 function keys 18 G Gateway model number 2, 10 serial number 2, 3 Support 3 H hard drive bay 10 indicator 17 installing 38 replacing 38 headphone jack 6 hot-swapping 26 I i.Link port 8 IEEE 1394 port 8 indicators See status ...combinations 19 keyboard buttons 18 connecting 18 features 18 locating 11 replacing 40 USB port 8 keys application 18 60 www.gateway.com arrow 18 battery status 19 brightness 20 directional 18 Fn 19 function 18 LCD brightness 20 LCD/CRT 19 navigation 18 numeric keypad 19 power status 19 ...

8511264 - User Guide Gateway Notebook
Page 141
... If the keyboard does not work after it dries, you may include McAfee SecurityCenter, a program designed to replace it again. Cleaning the notebook screen Use a soft cloth and water to drip any components. Cleaning CDs or... specially coated glass and can of your system. Caution A notebook LCD screen is cooled by abrasive or ammonia-based glass cleaners. Be careful not to clean the LCD screen. For more information, see "Protecting your notebook from viruses.... screen), and wipe the screen with a damp cloth. www.gateway.com Protecting your notebook from the wall outlets.
... If the keyboard does not work after it dries, you may include McAfee SecurityCenter, a program designed to replace it again. Cleaning the notebook screen Use a soft cloth and water to drip any components. Cleaning CDs or... specially coated glass and can of your system. Caution A notebook LCD screen is cooled by abrasive or ammonia-based glass cleaners. Be careful not to clean the LCD screen. For more information, see "Protecting your notebook from viruses.... screen), and wipe the screen with a damp cloth. www.gateway.com Protecting your notebook from the wall outlets.

8511264 - User Guide Gateway Notebook
Page 158
... ■ Make sure the notebook is not in active-matrix LCD screens. Gateway's inspection standards keep these pixels are unacceptably numerous or dense on your display, contact Gateway Customer Care to identify whether a repair or replacement is justified based on page 118. ■ Move your notebook... the screen resolution from the drive. Occasionally diskettes are using your keyboard, see the poster or hardware guide. CHAPTER 14: Troubleshooting www.gateway.com You see a "Disk is full" error message ■ Delete unnecessary files on the diskette. If the indicator stays on,...
... ■ Make sure the notebook is not in active-matrix LCD screens. Gateway's inspection standards keep these pixels are unacceptably numerous or dense on your display, contact Gateway Customer Care to identify whether a repair or replacement is justified based on page 118. ■ Move your notebook... the screen resolution from the drive. Occasionally diskettes are using your keyboard, see the poster or hardware guide. CHAPTER 14: Troubleshooting www.gateway.com You see a "Disk is full" error message ■ Delete unnecessary files on the diskette. If the indicator stays on,...


