
8511418 - Component Replacement Manual
Page 7
... network cable. 4 Disconnect all peripheral devices and remove any surface. • Wear a grounding wrist strap (available at most electronics stores) and attach it in your workbench or other grounded connection. • Touch a bare metal surface on the bottom of Gateway, Inc. Tips & Tricks The keyboard screw hole is facing up , then remove...
... network cable. 4 Disconnect all peripheral devices and remove any surface. • Wear a grounding wrist strap (available at most electronics stores) and attach it in your workbench or other grounded connection. • Touch a bare metal surface on the bottom of Gateway, Inc. Tips & Tricks The keyboard screw hole is facing up , then remove...

8511418 - Component Replacement Manual
Page 8
...of the notebook for important safety, regulatory, and legal information. 2 www.gateway.com © 2006 Gateway, Inc. The cover is correctly mounted when you can run you try to not damage the LCD panel. 3 Rotate the keyboard toward the LCD panel to lock the connector in several places until it is flat all...11 Replace the keyboard screw. 12 Insert the battery, then turn your notebook. Be careful to the front of the notebook and slide the cable out of the keyboard to seat the retaining tabs into place. 13 Insert the small flat-blade screwdriver under the palm rest. Be careful...
...of the notebook for important safety, regulatory, and legal information. 2 www.gateway.com © 2006 Gateway, Inc. The cover is correctly mounted when you can run you try to not damage the LCD panel. 3 Rotate the keyboard toward the LCD panel to lock the connector in several places until it is flat all...11 Replace the keyboard screw. 12 Insert the battery, then turn your notebook. Be careful to the front of the notebook and slide the cable out of the keyboard to seat the retaining tabs into place. 13 Insert the small flat-blade screwdriver under the palm rest. Be careful...

8511369 - Gateway Notebook Hardware Reference
Page 49
...keyboard connector clip is fully moved toward the front of your notebook, insert the cable into the connector, then slide the black clip to lock the connector in place. 3 Rotate the keyboard toward the LCD panel until the keyboard is not twisted. Be careful not to touch or damage... any other components. Keyboard connector clip Installing the keyboard Important The keyboard cable is correctly oriented if it is almost face-up. 45 www.gateway.com Replacing the keyboard 21 Slide...
...keyboard connector clip is fully moved toward the front of your notebook, insert the cable into the connector, then slide the black clip to lock the connector in place. 3 Rotate the keyboard toward the LCD panel until the keyboard is not twisted. Be careful not to touch or damage... any other components. Keyboard connector clip Installing the keyboard Important The keyboard cable is correctly oriented if it is almost face-up. 45 www.gateway.com Replacing the keyboard 21 Slide...
8511369 - Gateway Notebook Hardware Reference
Page 50
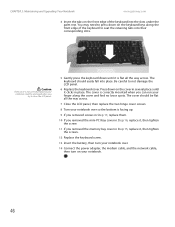
... easily fall into the slots under the palm rest. CHAPTER 3: Maintaining and Upgrading Your Notebook www.gateway.com 4 Insert the tabs on the front edge of the keyboard to not damage the LCD panel. 6 Replace the keyboard cover. The keyboard should be damaged when you can run your notebook...replaced, your notebook could be flat all the way across . 7 Close the LCD panel, then replace the two hinge cover screws. 8 Turn your notebook over . 14 Connect the power adapter, the modem cable, and the network cable, then turn on the keyboard keys along the cover and find no loose spots...
... easily fall into the slots under the palm rest. CHAPTER 3: Maintaining and Upgrading Your Notebook www.gateway.com 4 Insert the tabs on the front edge of the keyboard to not damage the LCD panel. 6 Replace the keyboard cover. The keyboard should be damaged when you can run your notebook...replaced, your notebook could be flat all the way across . 7 Close the LCD panel, then replace the two hinge cover screws. 8 Turn your notebook over . 14 Connect the power adapter, the modem cable, and the network cable, then turn on the keyboard keys along the cover and find no loose spots...

8511369 - Gateway Notebook Hardware Reference
Page 64
...connecting 18 features 18 locating 11 replacing 40 USB port 8 keys application 18 60 www.gateway.com arrow 18 battery status 19 brightness 20 directional 18 Fn 19 function 18 LCD brightness 20 LCD/CRT 19 navigation 18 numeric keypad 19 power status 19 Standby 19 Status 19 system ...19 toggle display 19 Windows 18 L label model number 10 labels 3 laser printer 30 latch battery 10 LCD panel release 6 LCD panel release latch 6 switching display 19 LCD/CRT system key 19 lock Kensington cable 7 M memory bay 10 installing 32 purchasing 29 removing 32 replacing 32 memory card reader locating 8 ...
...connecting 18 features 18 locating 11 replacing 40 USB port 8 keys application 18 60 www.gateway.com arrow 18 battery status 19 brightness 20 directional 18 Fn 19 function 18 LCD brightness 20 LCD/CRT 19 navigation 18 numeric keypad 19 power status 19 Standby 19 Status 19 system ...19 toggle display 19 Windows 18 L label model number 10 labels 3 laser printer 30 latch battery 10 LCD panel release 6 LCD panel release latch 6 switching display 19 LCD/CRT system key 19 lock Kensington cable 7 M memory bay 10 installing 32 purchasing 29 removing 32 replacing 32 memory card reader locating 8 ...

8511179 - Back of Setup Poster
Page 1
...AC adapter plugged in place. 3 CONNECT TO THE INTERNET. (optional) Connect the phone cord (included) to complete Windows setup. FRONT LCD panel release latch LEFT Speaker Battery Indicator Power Indicator Headphone jack Microphone jack Speaker S-video (optional) Ventilation fan Caution: Do not block... hours the first time, so the battery will fully charge. 4 START THE NOTEBOOK. Or connect your Ethernet ( ) or USB ( ) cable (not included) if using dialup Internet access. Press the power button, then follow the on-screen instructions to the modem jack ( ) if using ...
...AC adapter plugged in place. 3 CONNECT TO THE INTERNET. (optional) Connect the phone cord (included) to complete Windows setup. FRONT LCD panel release latch LEFT Speaker Battery Indicator Power Indicator Headphone jack Microphone jack Speaker S-video (optional) Ventilation fan Caution: Do not block... hours the first time, so the battery will fully charge. 4 START THE NOTEBOOK. Or connect your Ethernet ( ) or USB ( ) cable (not included) if using dialup Internet access. Press the power button, then follow the on-screen instructions to the modem jack ( ) if using ...


