
8511418 - Component Replacement Manual
Page 1
... telephone number shown on the label on , unplug the adapter from your hardware guide for Customer Care Information. www.gateway.com © 2006 Gateway, Inc. Gateway and eMachines are trademarks or registered trademarks of your notebook's power connector. Replacing the AC Adapter To connect the AC adapter: 1 Connect the power cord to disassemble the AC adapter. in . All other countries. Technical Support See the label on . Caution Replace the power...
... telephone number shown on the label on , unplug the adapter from your hardware guide for Customer Care Information. www.gateway.com © 2006 Gateway, Inc. Gateway and eMachines are trademarks or registered trademarks of your notebook's power connector. Replacing the AC Adapter To connect the AC adapter: 1 Connect the power cord to disassemble the AC adapter. in . All other countries. Technical Support See the label on . Caution Replace the power...

8511418 - Component Replacement Manual
Page 2
.... 10 Open the LCD panel and press the power button. www.gateway.com © 2006 Gateway, Inc. All other countries. The battery used in the United States and other brands and product names are trademarks or registered trademarks of their respective companies. 1 Do not disassemble, heat above 212°F (100°C), or incinerate. Replace only with a battery specifically manufactured for your hardware guide for Customer...
.... 10 Open the LCD panel and press the power button. www.gateway.com © 2006 Gateway, Inc. All other countries. The battery used in the United States and other brands and product names are trademarks or registered trademarks of their respective companies. 1 Do not disassemble, heat above 212°F (100°C), or incinerate. Replace only with a battery specifically manufactured for your hardware guide for Customer...

8511418 - Component Replacement Manual
Page 3
... you are extremely sensitive to replace the DVD drive. Before working with a K. Replacing the DVD Drive 7 With a small Phillips screwdriver, remove the keyboard screw and put it to a bare metal part of Gateway, Inc. in a safe place. Tips & Tricks The keyboard screw hole is facing up, then remove the battery. www.gateway.com © 2006 Gateway, Inc. Screw 8 Loosen the six memory bay cover screws (these guidelines: • Avoid...
... you are extremely sensitive to replace the DVD drive. Before working with a K. Replacing the DVD Drive 7 With a small Phillips screwdriver, remove the keyboard screw and put it to a bare metal part of Gateway, Inc. in a safe place. Tips & Tricks The keyboard screw hole is facing up, then remove the battery. www.gateway.com © 2006 Gateway, Inc. Screw 8 Loosen the six memory bay cover screws (these guidelines: • Avoid...

8511418 - Component Replacement Manual
Page 5
... adapter, modem cable, and network cable. 5 Disconnect all peripheral devices and remove any PC Cards. 6 Turn your notebook over any surface. • Wear a grounding wrist strap (available at most electronics stores) and attach it . Important If you cannot create a Drivers and Applications Recovery disc, Gateway may send you are extremely sensitive to a bare metal part of recovery discs or a replacement hard drive with your notebook. For more information, see "Changing Batteries" in your hardware guide...
... adapter, modem cable, and network cable. 5 Disconnect all peripheral devices and remove any PC Cards. 6 Turn your notebook over any surface. • Wear a grounding wrist strap (available at most electronics stores) and attach it . Important If you cannot create a Drivers and Applications Recovery disc, Gateway may send you are extremely sensitive to a bare metal part of recovery discs or a replacement hard drive with your notebook. For more information, see "Changing Batteries" in your hardware guide...

8511418 - Component Replacement Manual
Page 6
... the hard drive to you from the old drive. 8 Remove the four screws that secure the cover to the drive. 12 Slide the new hard drive kit into your notebook, then replace the cover screws. 13 Insert the battery and turn your notebook over. 14 Connect the power adapter, modem cable, and network cable. 15 Reconnect all peripheral devices and replace any PC Cards. 16 Turn on your notebook. 17 If the hard drive was sent to the hard drive cover.
... the hard drive to you from the old drive. 8 Remove the four screws that secure the cover to the drive. 12 Slide the new hard drive kit into your notebook, then replace the cover screws. 13 Insert the battery and turn your notebook over. 14 Connect the power adapter, modem cable, and network cable. 15 Reconnect all peripheral devices and replace any PC Cards. 16 Turn on your notebook. 17 If the hard drive was sent to the hard drive cover.

8511418 - Component Replacement Manual
Page 10
... memory slot. See your hardware guide for Customer Care Information. in place. 12 Replace the memory bay cover, then tighten the six cover screws. 13 Replace the keyboard screw. 14 Insert the battery, then turn your notebook over. 15 Connect the power adapter, the modem cable, and the network cable. 16 Reconnect all peripheral devices and replace any PC Cards. 17 Turn on the bottom of the slot. Technical Support See the label on your Gateway notebook...
... memory slot. See your hardware guide for Customer Care Information. in place. 12 Replace the memory bay cover, then tighten the six cover screws. 13 Replace the keyboard screw. 14 Insert the battery, then turn your notebook over. 15 Connect the power adapter, the modem cable, and the network cable. 16 Reconnect all peripheral devices and replace any PC Cards. 17 Turn on the bottom of the slot. Technical Support See the label on your Gateway notebook...

8511418 - Component Replacement Manual
Page 12
.... 13 If your card is held by a screw, replace the screw. 14 Reattach the black antenna cable to the connector labelled MAIN or M, then reattach the light gray antenna cable to the connector labelled AUX or A. 15 Replace the wireless network bay cover, then tighten the cover screw. 16 Insert the battery, then turn your hardware guide for Customer Care Information. in the module slot. 12 Move...
.... 13 If your card is held by a screw, replace the screw. 14 Reattach the black antenna cable to the connector labelled MAIN or M, then reattach the light gray antenna cable to the connector labelled AUX or A. 15 Replace the wireless network bay cover, then tighten the cover screw. 16 Insert the battery, then turn your hardware guide for Customer Care Information. in the module slot. 12 Move...
8511369 - Gateway Notebook Hardware Reference
Page 3
... notebook 15 Turning off your notebook 15 Restarting (rebooting) your notebook 16 Using the status indicators 17 Using the keyboard 18 Key types 18 System key combinations 19 Using the EZ Pad touchpad 21 Adjusting the volume 22 Turning your wireless radio on or off 23 Using the DVD drive 24 Identifying drive types 24 Inserting a CD or DVD 25 Using the memory card reader 25 Memory card types 25 Inserting a memory card 25 Using a memory card 26 Removing a memory card 26 Adding and removing a PC Card 26 Changing batteries 27 Recalibrating the battery 29 Ordering...
... notebook 15 Turning off your notebook 15 Restarting (rebooting) your notebook 16 Using the status indicators 17 Using the keyboard 18 Key types 18 System key combinations 19 Using the EZ Pad touchpad 21 Adjusting the volume 22 Turning your wireless radio on or off 23 Using the DVD drive 24 Identifying drive types 24 Inserting a CD or DVD 25 Using the memory card reader 25 Memory card types 25 Inserting a memory card 25 Using a memory card 26 Removing a memory card 26 Adding and removing a PC Card 26 Changing batteries 27 Recalibrating the battery 29 Ordering...
8511369 - Gateway Notebook Hardware Reference
Page 4
Contents www.gateway.com Chapter 3: Maintaining and Upgrading Your Notebook 31 Preventing static electricity discharge 32 Adding or replacing memory 32 Replacing the DVD drive 35 Replacing the hard drive kit 38 Replacing the keyboard 40 Removing the keyboard 40 Installing the keyboard 45 Appendix A: Safety, Regulatory, and Legal Information 47 Index 59 ii
Contents www.gateway.com Chapter 3: Maintaining and Upgrading Your Notebook 31 Preventing static electricity discharge 32 Adding or replacing memory 32 Replacing the DVD drive 35 Replacing the hard drive kit 38 Replacing the keyboard 40 Removing the keyboard 40 Installing the keyboard 45 Appendix A: Safety, Regulatory, and Legal Information 47 Index 59 ii
8511369 - Gateway Notebook Hardware Reference
Page 6
... ordered, and location. The User Guide is for assistance. For all other software ■ Controlling audio and video settings ■ Using the Internet ■ Protecting your files ■ Playing and recording media ■ Networking ■ Maintenance and troubleshooting To access the online User Guide: ■ Click Start, All Programs, then click Gateway Documentation. Gateway contact information Gateway model and serial number Important The label shown in this section is an in-depth, easy-to-read manual...
... ordered, and location. The User Guide is for assistance. For all other software ■ Controlling audio and video settings ■ Using the Internet ■ Protecting your files ■ Playing and recording media ■ Networking ■ Maintenance and troubleshooting To access the online User Guide: ■ Click Start, All Programs, then click Gateway Documentation. Gateway contact information Gateway model and serial number Important The label shown in this section is an in-depth, easy-to-read manual...
8511369 - Gateway Notebook Hardware Reference
Page 11
Ventilation fan Helps cool internal components. DVD drive Insert CDs or DVDs into this optional jack. S-Video out jack (optional) Plug an S-Video device, such as a television, into this slot. If these slots. Do not use your notebook, examine the drive tray's plastic cover and compare the logo to this drive. To determine the type of drive in "Identifying drive types" on a bed, sofa, rug, or other similar surface. Warning: Do not work for long...
Ventilation fan Helps cool internal components. DVD drive Insert CDs or DVDs into this optional jack. S-Video out jack (optional) Plug an S-Video device, such as a television, into this slot. If these slots. Do not use your notebook, examine the drive tray's plastic cover and compare the logo to this drive. To determine the type of drive in "Identifying drive types" on a bed, sofa, rug, or other similar surface. Warning: Do not work for long...

8511369 - Gateway Notebook Hardware Reference
Page 15
... also configure the power button for Standby/Resume mode. Provides all the features of a mouse. Inform you when a drive is in the online User Guide. www.gateway.com Keyboard area Identifying features Power button Keyboard Status indicators Touchpad Component Icon Power button Keyboard Touchpad Status indicators Description Press to turn the power on page 18. For more information, see "Using the status indicators" on page 21. For more information, see "Changing Power-Saving Settings" in use or when a button...
... also configure the power button for Standby/Resume mode. Provides all the features of a mouse. Inform you when a drive is in the online User Guide. www.gateway.com Keyboard area Identifying features Power button Keyboard Status indicators Touchpad Component Icon Power button Keyboard Touchpad Status indicators Description Press to turn the power on page 18. For more information, see "Using the status indicators" on page 21. For more information, see "Changing Power-Saving Settings" in use or when a button...
8511369 - Gateway Notebook Hardware Reference
Page 19
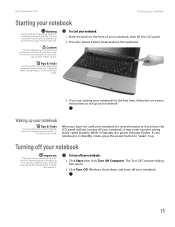
... enter a power-saving mode called Standby. While in Windows to "wake" it . Do not use the Turn Off Computer option in Standby, the power indicator flashes. www.gateway.com Starting your notebook Starting your notebook Warning Do not work for long periods with your notebook resting on your notebook so air vents are not obstructed. If the air vents are starting your notebook for the first time, follow the on-screen instructions...
... enter a power-saving mode called Standby. While in Windows to "wake" it . Do not use the Turn Off Computer option in Standby, the power indicator flashes. www.gateway.com Starting your notebook Starting your notebook Warning Do not work for long periods with your notebook resting on your notebook so air vents are not obstructed. If the air vents are starting your notebook for the first time, follow the on-screen instructions...
8511369 - Gateway Notebook Hardware Reference
Page 22
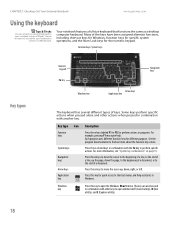
... keyboard. See the program documentation to open help assistants in Windows. Windows key Press this key for quick access to the end of a document. Key type Icon Function keys System keys Navigation keys Arrow keys Application key Description Press these keys to move the cursor up the page, down the page, to the beginning of a line, up , down your notebook using a USB port. For more about the function key actions. You do not need...
... keyboard. See the program documentation to open help assistants in Windows. Windows key Press this key for quick access to the end of a document. Key type Icon Function keys System keys Navigation keys Arrow keys Application key Description Press these keys to move the cursor up the page, down the page, to the beginning of a line, up , down your notebook using a USB port. For more about the function key actions. You do not need...

8511369 - Gateway Notebook Hardware Reference
Page 23
... "Changing Power-Saving Settings" in your online User Guide. Turn the optional Bluetooth feature on the key. www.gateway.com Using the keyboard Key type Icon FN key Numeric keypad Description Press the FN key in combination with equipment on the numeric keypad. Use these keys to perform a specific action. Enter Standby mode. Toggle your notebook display in the following order: ■ The LCD ■ An external monitor or projector (a monitor or projector must be plugged into the monitor port...
... "Changing Power-Saving Settings" in your online User Guide. Turn the optional Bluetooth feature on the key. www.gateway.com Using the keyboard Key type Icon FN key Numeric keypad Description Press the FN key in combination with equipment on the numeric keypad. Use these keys to perform a specific action. Enter Standby mode. Toggle your notebook display in the following order: ■ The LCD ■ An external monitor or projector (a monitor or projector must be plugged into the monitor port...

8511369 - Gateway Notebook Hardware Reference
Page 26
Do this... Access a shortcut menu or find more information, see "Adjusting the Volume" in rapid succession. Quickly press and release the right button once. Position the pointer over the object. Adjusting the volume Tips & Tricks For instructions on how to adjust the volume in Windows, see "System key combinations" on the screen. www.gateway.com Position the pointer over the object. This action is called right...
Do this... Access a shortcut menu or find more information, see "Adjusting the Volume" in rapid succession. Quickly press and release the right button once. Position the pointer over the object. Adjusting the volume Tips & Tricks For instructions on how to adjust the volume in Windows, see "System key combinations" on the screen. www.gateway.com Position the pointer over the object. This action is called right...
8511369 - Gateway Notebook Hardware Reference
Page 63
... external audio 6 external diskette drive 8 external speakers 6 Firewire 8 flash drive 8 headphone 6 i.Link 8 IEEE 1394 8 keyboard 8 microphone 6 modem 8, 13 monitor (VGA) 9 mouse 8 network 8, 14 power 9, 12 printer 8 scanner 8 speaker 6 S-Video (TV) out 7 USB 8 VGA 9 video camera 8 copyright notice 57 D dial-up modem 13 digital camera USB port 8 digital video camera IEEE 1394 port 8 directional keys 18 display switching 19 double-clicking 22 dragging 22 drives DVD 24, 35 DVD/CD-RW 7, 24 DVD±RW 7, 24 hard drive 10, 38 identifying drive types 24 multi-format DVD...
... external audio 6 external diskette drive 8 external speakers 6 Firewire 8 flash drive 8 headphone 6 i.Link 8 IEEE 1394 8 keyboard 8 microphone 6 modem 8, 13 monitor (VGA) 9 mouse 8 network 8, 14 power 9, 12 printer 8 scanner 8 speaker 6 S-Video (TV) out 7 USB 8 VGA 9 video camera 8 copyright notice 57 D dial-up modem 13 digital camera USB port 8 digital video camera IEEE 1394 port 8 directional keys 18 display switching 19 double-clicking 22 dragging 22 drives DVD 24, 35 DVD/CD-RW 7, 24 DVD±RW 7, 24 hard drive 10, 38 identifying drive types 24 multi-format DVD...

8511369 - Gateway Notebook Hardware Reference
Page 64
... 19 LCD/CRT system key 19 lock Kensington cable 7 M memory bay 10 installing 32 purchasing 29 removing 32 replacing 32 memory card reader locating 8 memory card types supported 25 using 25 microphone jack 6 Microsoft Certificate of Authenticity 3 model number 2 modem cable 14 connecting DSL 14 jack 8, 13 monitor port 9 13, 14 mouse USB port 8 moving pointer 21 screen objects 22 MP3 player memory cards 25 multimedia adjusting volume 22 using DVD drive 24 muting sound 20, 22 N navigation keys 18 network jack 8, 14 networking turning off wireless network 23 turning on wireless network 23...
... 19 LCD/CRT system key 19 lock Kensington cable 7 M memory bay 10 installing 32 purchasing 29 removing 32 replacing 32 memory card reader locating 8 memory card types supported 25 using 25 microphone jack 6 Microsoft Certificate of Authenticity 3 model number 2 modem cable 14 connecting DSL 14 jack 8, 13 monitor port 9 13, 14 mouse USB port 8 moving pointer 21 screen objects 22 MP3 player memory cards 25 multimedia adjusting volume 22 using DVD drive 24 muting sound 20, 22 N navigation keys 18 network jack 8, 14 networking turning off wireless network 23 turning on wireless network 23...
8511369 - Gateway Notebook Hardware Reference
Page 65
... USB port 8 screen objects getting information 22 moving 22 selecting 22 security features Kensington cable lock 7 serial number 2, 3 setting up safety precautions 48 shortcut menus accessing 22 shortcuts opening menu 22 shutting down notebook 15, 16 SO-DIMM See memory sound adjusting 20, 22 controls 22 muting 20, 22 speakers built-in 6 jack 6 Standby mode 15, 19 system key 19 starting notebook 15 programs 22 static electricity 32 status indicators battery charge 6 Caps Lock 17 drive activity...
... USB port 8 screen objects getting information 22 moving 22 selecting 22 security features Kensington cable lock 7 serial number 2, 3 setting up safety precautions 48 shortcut menus accessing 22 shortcuts opening menu 22 shutting down notebook 15, 16 SO-DIMM See memory sound adjusting 20, 22 controls 22 muting 20, 22 speakers built-in 6 jack 6 Standby mode 15, 19 system key 19 starting notebook 15 programs 22 static electricity 32 status indicators battery charge 6 Caps Lock 17 drive activity...

8511179 - Back of Setup Poster
Page 1
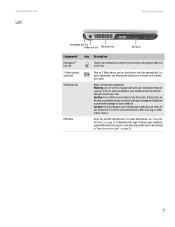
... Battery Indicator Power Indicator Headphone jack Microphone jack Speaker S-video (optional) Ventilation fan Caution: Do not block Kensington™ lock slot Optical Drive 1 INSTALL THE BATTERY. Press the power button, then follow the on-screen instructions to the modem jack ( ) if using high-speed access. Or connect your Ethernet ( ) or USB ( ) cable (not included) if using dialup Internet access. BACK Power connector Monitor port RIGHT IEEE 1394 port USB ports Modem jack PC Card slot Memory card reader Ethernet jack USB ports 2 CONNECT TO AC POWER. Then lock...
... Battery Indicator Power Indicator Headphone jack Microphone jack Speaker S-video (optional) Ventilation fan Caution: Do not block Kensington™ lock slot Optical Drive 1 INSTALL THE BATTERY. Press the power button, then follow the on-screen instructions to the modem jack ( ) if using high-speed access. Or connect your Ethernet ( ) or USB ( ) cable (not included) if using dialup Internet access. BACK Power connector Monitor port RIGHT IEEE 1394 port USB ports Modem jack PC Card slot Memory card reader Ethernet jack USB ports 2 CONNECT TO AC POWER. Then lock...


