
8511418 - Component Replacement Manual
Page 1
... not turn on the bottom of their respective companies. 1 Contact Gateway about returning defective AC adapters. See your notebook's power connector. All other countries. The power indicator turns on the bottom of Gateway, Inc. Warning Do not attempt to your hardware guide for Customer...in the United States and other brands and product names are trademarks or registered trademarks of the notebook for important safety, regulatory, and legal information. www.gateway.com © 2006 Gateway, Inc. Replacing the AC Adapter To connect the AC adapter: 1 Connect the power cord...
... not turn on the bottom of their respective companies. 1 Contact Gateway about returning defective AC adapters. See your notebook's power connector. All other countries. The power indicator turns on the bottom of Gateway, Inc. Warning Do not attempt to your hardware guide for Customer...in the United States and other brands and product names are trademarks or registered trademarks of the notebook for important safety, regulatory, and legal information. www.gateway.com © 2006 Gateway, Inc. Replacing the AC Adapter To connect the AC adapter: 1 Connect the power cord...

8511418 - Component Replacement Manual
Page 2
... is not connected to AC power, save your work and turn blue after three hours, contact Gateway Customer Care at the Web address or telephone number shown on the label on the bottom of your notebook is on and is facing up. 4 Slide the battery lock to the unlock position. 5 ...Slide the battery release latch, then slide the battery out of Gateway, Inc. www.gateway.com © 2006 Gateway, Inc. Gateway and eMachines are trademarks or registered trademarks of ...
... is not connected to AC power, save your work and turn blue after three hours, contact Gateway Customer Care at the Web address or telephone number shown on the label on the bottom of your notebook is on and is facing up. 4 Slide the battery lock to the unlock position. 5 ...Slide the battery release latch, then slide the battery out of Gateway, Inc. www.gateway.com © 2006 Gateway, Inc. Gateway and eMachines are trademarks or registered trademarks of ...

8511418 - Component Replacement Manual
Page 3
...sure that the DVD drive is empty. 3 Turn off your hardware guide for Customer Care Information. Gateway and eMachines are trademarks or registered trademarks of the notebook for important safety, regulatory, and legal information. ESD can permanently damage electrostatic discharge-sensitive components in a...screwdriver, remove the DVD drive screw, then put it in your notebook are ready to static electricity, also known as electrostatic discharge (ESD). Screw Technical Support See the label on the outside of Gateway, Inc. Tips & Tricks The keyboard screw hole is facing up...
...sure that the DVD drive is empty. 3 Turn off your hardware guide for Customer Care Information. Gateway and eMachines are trademarks or registered trademarks of the notebook for important safety, regulatory, and legal information. ESD can permanently damage electrostatic discharge-sensitive components in a...screwdriver, remove the DVD drive screw, then put it in your notebook are ready to static electricity, also known as electrostatic discharge (ESD). Screw Technical Support See the label on the outside of Gateway, Inc. Tips & Tricks The keyboard screw hole is facing up...

8511418 - Component Replacement Manual
Page 4
...the DVD bracket. Gateway and eMachines are trademarks or registered trademarks of their respective companies. All other countries. in Step 9. 13 Replace the memory bay cover, then tighten the six cover screws. 14 Replace the keyboard screw. 15 Insert the battery, then turn your notebook over. 16 ...Information. 10 Slide the DVD drive out of the drive bay by pushing on the bottom of the notebook for important safety, regulatory, and legal information. 2 www.gateway.com © 2006 Gateway, Inc. All rights reserved. DVD bracket Replacing the DVD Drive 11 Slide the new DVD drive into...
...the DVD bracket. Gateway and eMachines are trademarks or registered trademarks of their respective companies. All other countries. in Step 9. 13 Replace the memory bay cover, then tighten the six cover screws. 14 Replace the keyboard screw. 15 Insert the battery, then turn your notebook over. 16 ...Information. 10 Slide the DVD drive out of the drive bay by pushing on the bottom of the notebook for important safety, regulatory, and legal information. 2 www.gateway.com © 2006 Gateway, Inc. All rights reserved. DVD bracket Replacing the DVD Drive 11 Slide the new DVD drive into...

8511418 - Component Replacement Manual
Page 5
...If you cannot create a Drivers and Applications Recovery disc, Gateway may send you are trademarks or registered trademarks of your notebook. 2 Follow the guidelines under "Preventing static electricity discharge." 3 Turn off your notebook and unplug the AC adapter, modem cable, and network ... a small Phillips screwdriver to a bare metal part of the notebook for important safety, regulatory, and legal information. Gateway and eMachines are ready to dangerous electrical voltages and moving parts, turn off your notebook. 4 Disconnect the AC adapter, modem cable, and network cable...
...If you cannot create a Drivers and Applications Recovery disc, Gateway may send you are trademarks or registered trademarks of your notebook. 2 Follow the guidelines under "Preventing static electricity discharge." 3 Turn off your notebook and unplug the AC adapter, modem cable, and network ... a small Phillips screwdriver to a bare metal part of the notebook for important safety, regulatory, and legal information. Gateway and eMachines are ready to dangerous electrical voltages and moving parts, turn off your notebook. 4 Disconnect the AC adapter, modem cable, and network cable...

8511418 - Component Replacement Manual
Page 6
... for Customer Care Information. in the United States and other brands and product names are trademarks or registered trademarks of Gateway, Inc. Screws Screws 9 Remove the cover from Gateway with the operating system, applications, and drivers installed, you will see the Windows startup screen. -ORIf you from ...so the screw holes line up. 11 Replace the four screws that secure the hard drive to you see a blank screen, restart your notebook, then press F11 while your computer is starting. 18 Insert the Operating System Recovery CD/DVD when prompted, then follow the on-screen ...
... for Customer Care Information. in the United States and other brands and product names are trademarks or registered trademarks of Gateway, Inc. Screws Screws 9 Remove the cover from Gateway with the operating system, applications, and drivers installed, you will see the Windows startup screen. -ORIf you from ...so the screw holes line up. 11 Replace the four screws that secure the hard drive to you see a blank screen, restart your notebook, then press F11 while your computer is starting. 18 Insert the Operating System Recovery CD/DVD when prompted, then follow the on-screen ...

8511418 - Component Replacement Manual
Page 7
... bottom of their antistatic bags only when you are ready to use them. Gateway and eMachines are extremely sensitive to the fully opened position. Never slide components over any PC Cards. 5 Turn your notebook over so the top is facing up, then remove the battery. See your...be removed), then remove the bay covers. 8 If your notebook has the two optional keyboard screws, remove them in your online hardware guide. 9 Turn your hardware guide for Customer Care Information. Do not lay components on the outside of Gateway, Inc. Removing the old keyboard Replacing the Keyboard 6 ...
... bottom of their antistatic bags only when you are ready to use them. Gateway and eMachines are extremely sensitive to the fully opened position. Never slide components over any PC Cards. 5 Turn your notebook over so the top is facing up, then remove the battery. See your...be removed), then remove the bay covers. 8 If your notebook has the two optional keyboard screws, remove them in your online hardware guide. 9 Turn your hardware guide for Customer Care Information. Do not lay components on the outside of Gateway, Inc. Removing the old keyboard Replacing the Keyboard 6 ...

8511418 - Component Replacement Manual
Page 8
... toward you finger along the front edge of the keyboard to the front of the notebook and slide the cable out of the notebook for important safety, regulatory, and legal information. 2 www.gateway.com © 2006 Gateway, Inc. Press down on the cover in place. The cover is correctly oriented if... when you . 2 Make sure the black keyboard connector clip is not twisted. 14 Pull the cover off the notebook. Technical Support See the label on the front edge of Gateway, Inc. in place. Be careful not to release the keyboard retaining tabs located on the front of the keyboard....
... toward you finger along the front edge of the keyboard to the front of the notebook and slide the cable out of the notebook for important safety, regulatory, and legal information. 2 www.gateway.com © 2006 Gateway, Inc. Press down on the cover in place. The cover is correctly oriented if... when you . 2 Make sure the black keyboard connector clip is not twisted. 14 Pull the cover off the notebook. Technical Support See the label on the front edge of Gateway, Inc. in place. Be careful not to release the keyboard retaining tabs located on the front of the keyboard....

8511418 - Component Replacement Manual
Page 9
... connection. • Touch a bare metal surface on your notebook and unplug the AC adapter, modem cable, and network cable before replacing a component. www.gateway.com © 2006 Gateway, Inc. in your notebook. Locating Components Memory bay Replacing the Memory Module 4 Disconnect all... peripheral devices and remove any PC Cards. 5 Turn your notebook over any surface. • Wear a grounding ...
... connection. • Touch a bare metal surface on your notebook and unplug the AC adapter, modem cable, and network cable before replacing a component. www.gateway.com © 2006 Gateway, Inc. in your notebook. Locating Components Memory bay Replacing the Memory Module 4 Disconnect all... peripheral devices and remove any PC Cards. 5 Turn your notebook over any surface. • Wear a grounding ...

8511418 - Component Replacement Manual
Page 10
... notch in the module lines up with the tab in the United States and other brands and product names are trademarks or registered trademarks of Gateway, Inc. Gateway and eMachines are trademarks or registered trademarks of their respective companies. This module is keyed so it can only be inserted in place. 12.... 13 Replace the keyboard screw. 14 Insert the battery, then turn your hardware guide for Customer Care Information. Technical Support See the label on your Gateway notebook. 11 Gently push the module down until the module tilts upward. 9 Pull the memory module out of the...
... notch in the module lines up with the tab in the United States and other brands and product names are trademarks or registered trademarks of Gateway, Inc. Gateway and eMachines are trademarks or registered trademarks of their respective companies. This module is keyed so it can only be inserted in place. 12.... 13 Replace the keyboard screw. 14 Insert the battery, then turn your hardware guide for Customer Care Information. Technical Support See the label on your Gateway notebook. 11 Gently push the module down until the module tilts upward. 9 Pull the memory module out of the...
8511418 - Component Replacement Manual
Page 11
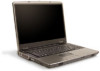
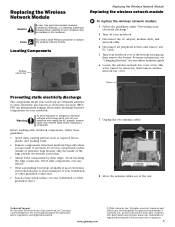
.... • Always hold components by Gateway, or a Gateway authorized representative, explicitly for your notebook may be removed), then remove wireless network bay cover. Do not lay components on the outside of their edges. See your notebook are trademarks or registered trademarks of antistatic...because only the inside your hardware guide for important safety, regulatory, and legal information. Gateway and eMachines are ready to use them. Technical Support See the label on your notebook. All other grounded object. 7 Unplug the two antenna cables. 8 Move the ...
.... • Always hold components by Gateway, or a Gateway authorized representative, explicitly for your notebook may be removed), then remove wireless network bay cover. Do not lay components on the outside of their edges. See your notebook are trademarks or registered trademarks of antistatic...because only the inside your hardware guide for important safety, regulatory, and legal information. Gateway and eMachines are ready to use them. Technical Support See the label on your notebook. All other grounded object. 7 Unplug the two antenna cables. 8 Move the ...

8511418 - Component Replacement Manual
Page 12
...module lines up with the tab in the module slot. 12 Move the antenna wires out of the notebook for important safety, regulatory, and legal information. 2 www.gateway.com © 2006 Gateway, Inc. Replacing the Wireless Network Module 10 Pull the module out of the module until it into place.... -OR- 9 If your card is held by clips, press outward on your notebook. If your card is held by a screw,...
...module lines up with the tab in the module slot. 12 Move the antenna wires out of the notebook for important safety, regulatory, and legal information. 2 www.gateway.com © 2006 Gateway, Inc. Replacing the Wireless Network Module 10 Pull the module out of the module until it into place.... -OR- 9 If your card is held by clips, press outward on your notebook. If your card is held by a screw,...

8511179 - Back of Setup Poster
Page 1
... battery into the battery compartment until it in for at least three hours the first time, so the battery will fully charge. 4 START THE NOTEBOOK. Then lock it clicks. Leave the AC adapter plugged in place. 3 CONNECT TO THE INTERNET. (optional) Connect the phone cord (included) to complete Windows setup...
... battery into the battery compartment until it in for at least three hours the first time, so the battery will fully charge. 4 START THE NOTEBOOK. Then lock it clicks. Leave the AC adapter plugged in place. 3 CONNECT TO THE INTERNET. (optional) Connect the phone cord (included) to complete Windows setup...

8511264 - User Guide Gateway Notebook
Page 3
Contents Chapter 1: Getting Help 1 Thank you for purchasing our notebook 2 Gateway Web site 2 Using Support 3 Help and Support 4 Searching for a topic 4 Getting help in Media Center 5 BigFix 6 Online help 6 Chapter 2: Using Windows XP 7 About the Windows ...
Contents Chapter 1: Getting Help 1 Thank you for purchasing our notebook 2 Gateway Web site 2 Using Support 3 Help and Support 4 Searching for a topic 4 Getting help in Media Center 5 BigFix 6 Online help 6 Chapter 2: Using Windows XP 7 About the Windows ...
8511264 - User Guide Gateway Notebook
Page 4
...gateway.com Chapter 4: Using the Internet 35 Learning about the Internet 36 Setting up an Internet account 37 Accessing your Internet account 37 Using the World Wide Web 37 Connecting to a Web site 38 Downloading files 39 Using e-mail 39 Sending e-mail 40 Checking your e-mail 40 Chapter 5: Protecting your notebook... projector or monitor 55 Viewing the display on a television 56 Modifying television settings 58 Connecting a video camera to your notebook 58 Using an optional port replicator 59 Chapter 7: Using Multimedia 61 Adjusting the volume 62 Playing music and movies 64 ...
...gateway.com Chapter 4: Using the Internet 35 Learning about the Internet 36 Setting up an Internet account 37 Accessing your Internet account 37 Using the World Wide Web 37 Connecting to a Web site 38 Downloading files 39 Using e-mail 39 Sending e-mail 40 Checking your e-mail 40 Chapter 5: Protecting your notebook... projector or monitor 55 Viewing the display on a television 56 Modifying television settings 58 Connecting a video camera to your notebook 58 Using an optional port replicator 59 Chapter 7: Using Multimedia 61 Adjusting the volume 62 Playing music and movies 64 ...

8511264 - User Guide Gateway Notebook
Page 5
www.gateway.com Contents Editing track information 71 Creating and editing videos 72 Editing videos 72 Transferring your video to your notebook 73 Editing your video 74 Saving your video 74 Creating music CDs and video DVDs 75 Creating a music CD 75 Creating a ...charge 90 Recharging the battery 90 Extending battery life 90 Conserving battery power 90 Using alternate power sources 91 Changing power modes 91 Changing notebook power settings 92 Changing the power scheme 92 Changing alarm options 93 Changing advanced settings 94 Activating and using Hibernate mode 95 Chapter ...
www.gateway.com Contents Editing track information 71 Creating and editing videos 72 Editing videos 72 Transferring your video to your notebook 73 Editing your video 74 Saving your video 74 Creating music CDs and video DVDs 75 Creating a music CD 75 Creating a ...charge 90 Recharging the battery 90 Extending battery life 90 Conserving battery power 90 Using alternate power sources 91 Changing power modes 91 Changing notebook power settings 92 Changing the power scheme 92 Changing alarm options 93 Changing advanced settings 94 Activating and using Hibernate mode 95 Chapter ...

8511264 - User Guide Gateway Notebook
Page 6
Contents www.gateway.com Adding devices to your network 107 Adding a desktop ...Canceling a fax 115 Automatically retry sending a fax 116 Automatically canceling a fax 116 Chapter 11: Customizing Your notebook 117 Adjusting the screen and desktop settings 118 Adjusting the color depth 118 Adjusting the screen resolution 119 Changing... user accounts 128 Modifying security settings 129 Chapter 12: Maintaining Your Notebook 131 Caring for your notebook 132 Cleaning your notebook 132 Protecting your notebook from viruses 133 Updating Windows 134 Using BigFix 134 Managing hard drive...
Contents www.gateway.com Adding devices to your network 107 Adding a desktop ...Canceling a fax 115 Automatically retry sending a fax 116 Automatically canceling a fax 116 Chapter 11: Customizing Your notebook 117 Adjusting the screen and desktop settings 118 Adjusting the color depth 118 Adjusting the screen resolution 119 Changing... user accounts 128 Modifying security settings 129 Chapter 12: Maintaining Your Notebook 131 Caring for your notebook 132 Cleaning your notebook 132 Protecting your notebook from viruses 133 Updating Windows 134 Using BigFix 134 Managing hard drive...
8511264 - User Guide Gateway Notebook
Page 7
www.gateway.com Contents Scheduling maintenance tasks 139 Moving from Your Old Computer 139 Using the Files and Settings Transfer Wizard 139 Transferring files 140 Transferring Internet settings 141 Installing your old printer or scanner 142 Installing your old programs 142 Chapter 13: Traveling with Your Notebook 143 Packing your notebook 144 Traveling by...
www.gateway.com Contents Scheduling maintenance tasks 139 Moving from Your Old Computer 139 Using the Files and Settings Transfer Wizard 139 Transferring files 140 Transferring Internet settings 141 Installing your old printer or scanner 142 Installing your old programs 142 Chapter 13: Traveling with Your Notebook 143 Packing your notebook 144 Traveling by...

8511264 - User Guide Gateway Notebook
Page 10
...with the outstanding quality, reliability, and performance of your new Gateway notebook for years to ensure that you keep your notebook. CHAPTER 1: Getting Help www.gateway.com Thank you again, from your new notebook. Your new Gateway notebook is available 24 hours per day, 7 days per week ... the utmost satisfaction and enjoyment from all of us at Gateway. You have made an excellent decision choosing Gateway. Your notebook uses the latest chipset and mobile processor technologies to our customers - Gateway stands behind our value proposition to manage the processor speed ...
...with the outstanding quality, reliability, and performance of your new Gateway notebook for years to ensure that you keep your notebook. CHAPTER 1: Getting Help www.gateway.com Thank you again, from your new notebook. Your new Gateway notebook is available 24 hours per day, 7 days per week ... the utmost satisfaction and enjoyment from all of us at Gateway. You have made an excellent decision choosing Gateway. Your notebook uses the latest chipset and mobile processor technologies to our customers - Gateway stands behind our value proposition to manage the processor speed ...

8511264 - User Guide Gateway Notebook
Page 11
...For more information, see "Telephone support" on page 167. 3 Downloads Click Downloads to get drivers specific to get a list of all Gateway notebooks. By entering your account and general information about warranties and special offers. Click Call Us to your... notebook. Product Support Click Product Support to locate your notebook. Click Browse All Downloads to walk through a step-by-step wizard to view a list of Gateway telephone numbers for all the products that Gateway supports. www.gateway.com Using Support Gateway Web site The Support site ...
...For more information, see "Telephone support" on page 167. 3 Downloads Click Downloads to get drivers specific to get a list of all Gateway notebooks. By entering your account and general information about warranties and special offers. Click Call Us to your... notebook. Product Support Click Product Support to locate your notebook. Click Browse All Downloads to walk through a step-by-step wizard to view a list of Gateway telephone numbers for all the products that Gateway supports. www.gateway.com Using Support Gateway Web site The Support site ...


