
8511418 - Component Replacement Manual
Page 1
... AC adapter has no user-replaceable or user-serviceable parts inside. in . Gateway and eMachines are trademarks or registered trademarks of Gateway, Inc. Technical Support See the label on . Caution Replace the power cord if it back in the United States and other brands and product names... returning defective AC adapters. All other countries. Replacing the AC Adapter 3 Plug the power cord into a wall outlet. Power indicator If the power indicator does not turn blue after three hours, contact Gateway Customer Care at the Web address or telephone number shown on the label on ,...
... AC adapter has no user-replaceable or user-serviceable parts inside. in . Gateway and eMachines are trademarks or registered trademarks of Gateway, Inc. Technical Support See the label on . Caution Replace the power cord if it back in the United States and other brands and product names... returning defective AC adapters. All other countries. Replacing the AC Adapter 3 Plug the power cord into a wall outlet. Power indicator If the power indicator does not turn blue after three hours, contact Gateway Customer Care at the Web address or telephone number shown on the label on ,...

8511418 - Component Replacement Manual
Page 2
... Care at the Web address or telephone number shown on the label on . OR If your notebook is on and is connected to AC power, go to Step 2. - Gateway and eMachines are trademarks or registered trademarks of their respective companies. 1 All rights reserved. Recycle or dispose of explosion if the battery is...
... Care at the Web address or telephone number shown on the label on . OR If your notebook is on and is connected to AC power, go to Step 2. - Gateway and eMachines are trademarks or registered trademarks of their respective companies. 1 All rights reserved. Recycle or dispose of explosion if the battery is...

8511418 - Component Replacement Manual
Page 4
... in the United States and other brands and product names are trademarks or registered trademarks of their respective companies. Gateway and eMachines are trademarks or registered trademarks of Gateway, Inc. DVD bracket Replacing the DVD Drive 11 Slide the new DVD drive into the drive bay. Technical ... then tighten the six cover screws. 14 Replace the keyboard screw. 15 Insert the battery, then turn your notebook over. 16 Connect the power adapter, modem cable, and network cable, then turn on the DVD bracket. 10 Slide the DVD drive out of the notebook for important ...
... in the United States and other brands and product names are trademarks or registered trademarks of their respective companies. Gateway and eMachines are trademarks or registered trademarks of Gateway, Inc. DVD bracket Replacing the DVD Drive 11 Slide the new DVD drive into the drive bay. Technical ... then tighten the six cover screws. 14 Replace the keyboard screw. 15 Insert the battery, then turn your notebook over. 16 Connect the power adapter, modem cable, and network cable, then turn on the DVD bracket. 10 Slide the DVD drive out of the notebook for important ...

8511418 - Component Replacement Manual
Page 6
..., then press F11 while your computer is starting. 18 Insert the Operating System Recovery CD/DVD when prompted, then follow the on the bottom of Gateway, Inc. See your hardware guide for Customer Care Information. 8 Remove the four screws that secure the cover to the drive. 12 Slide the new hard... drive kit into your notebook, then replace the cover screws. 13 Insert the battery and turn your notebook over. 14 Connect the power adapter, modem cable, and network cable. 15 Reconnect all peripheral devices and replace any PC Cards. 16 Turn on your notebook. 17 If the hard...
..., then press F11 while your computer is starting. 18 Insert the Operating System Recovery CD/DVD when prompted, then follow the on the bottom of Gateway, Inc. See your hardware guide for Customer Care Information. 8 Remove the four screws that secure the cover to the drive. 12 Slide the new hard... drive kit into your notebook, then replace the cover screws. 13 Insert the battery and turn your notebook over. 14 Connect the power adapter, modem cable, and network cable. 15 Reconnect all peripheral devices and replace any PC Cards. 16 Turn on your notebook. 17 If the hard...

8511418 - Component Replacement Manual
Page 8
...to the front of the notebook and slide the cable out of the notebook for important safety, regulatory, and legal information. 2 www.gateway.com © 2006 Gateway, Inc. Replacing the Keyboard Installing the new keyboard To install the new keyboard: 1 Place the new keyboard keys-down on your ...Technical Support See the label on the front edge of the notebook, insert the cable into place. See your notebook over . 13 Connect the power adapter, the modem cable, and the network cable, then turn on the cover in place. Be careful not to your notebook. Connector 5 Gently...
...to the front of the notebook and slide the cable out of the notebook for important safety, regulatory, and legal information. 2 www.gateway.com © 2006 Gateway, Inc. Replacing the Keyboard Installing the new keyboard To install the new keyboard: 1 Place the new keyboard keys-down on your ...Technical Support See the label on the front edge of the notebook, insert the cable into place. See your notebook over . 13 Connect the power adapter, the modem cable, and the network cable, then turn on the cover in place. Be careful not to your notebook. Connector 5 Gently...

8511418 - Component Replacement Manual
Page 10
...cover, then tighten the six cover screws. 13 Replace the keyboard screw. 14 Insert the battery, then turn your notebook over. 15 Connect the power adapter, the modem cable, and the network cable. 16 Reconnect all peripheral devices and replace any PC Cards. 17 Turn on your hardware guide for...Memory Module 10 Hold the new or replacement module at each end of the notebook for important safety, regulatory, and legal information. 2 www.gateway.com © 2006 Gateway, Inc. Technical Support See the label on the bottom of the module until it can only be inserted in the memory bay. 8 If...
...cover, then tighten the six cover screws. 13 Replace the keyboard screw. 14 Insert the battery, then turn your notebook over. 15 Connect the power adapter, the modem cable, and the network cable. 16 Reconnect all peripheral devices and replace any PC Cards. 17 Turn on your hardware guide for...Memory Module 10 Hold the new or replacement module at each end of the notebook for important safety, regulatory, and legal information. 2 www.gateway.com © 2006 Gateway, Inc. Technical Support See the label on the bottom of the module until it can only be inserted in the memory bay. 8 If...

8511418 - Component Replacement Manual
Page 12
... A. 15 Replace the wireless network bay cover, then tighten the cover screw. 16 Insert the battery, then turn your notebook over. 17 Connect the power adapter, the modem cable, and the network cable. 18 Reconnect all peripheral devices and replace any PC Cards. 19 Turn on your card is held...module tilts upward. See your hardware guide for Customer Care Information. All rights reserved. in the module slot. 12 Move the antenna wires out of Gateway, Inc. Replacing the Wireless Network Module 10 Pull the module out of the module until it clicks into the empty slot. Screw 11 Hold the...
... A. 15 Replace the wireless network bay cover, then tighten the cover screw. 16 Insert the battery, then turn your notebook over. 17 Connect the power adapter, the modem cable, and the network cable. 18 Reconnect all peripheral devices and replace any PC Cards. 19 Turn on your card is held...module tilts upward. See your hardware guide for Customer Care Information. All rights reserved. in the module slot. 12 Move the antenna wires out of Gateway, Inc. Replacing the Wireless Network Module 10 Pull the module out of the module until it clicks into the empty slot. Screw 11 Hold the...

8511179 - Back of Setup Poster
Page 1
...adapter plugged in place. 3 CONNECT TO THE INTERNET. (optional) Connect the phone cord (included) to complete Windows setup. Press the power button, then follow the on-screen instructions to the modem jack ( ) if using high-speed access. Then lock it clicks. FRONT ...LCD panel release latch LEFT Speaker Battery Indicator Power Indicator Headphone jack Microphone jack Speaker S-video (optional) Ventilation fan Caution: Do not block Kensington™ lock slot Optical Drive 1 INSTALL THE...
...adapter plugged in place. 3 CONNECT TO THE INTERNET. (optional) Connect the phone cord (included) to complete Windows setup. Press the power button, then follow the on-screen instructions to the modem jack ( ) if using high-speed access. Then lock it clicks. FRONT ...LCD panel release latch LEFT Speaker Battery Indicator Power Indicator Headphone jack Microphone jack Speaker S-video (optional) Ventilation fan Caution: Do not block Kensington™ lock slot Optical Drive 1 INSTALL THE...

8511264 - User Guide Gateway Notebook
Page 5
www.gateway.com Contents Editing track information 71 Creating and editing videos 72 Editing videos 72 Transferring your video to your notebook 73 Editing your video 74 ... Monitoring the battery charge 90 Recharging the battery 90 Extending battery life 90 Conserving battery power 90 Using alternate power sources 91 Changing power modes 91 Changing notebook power settings 92 Changing the power scheme 92 Changing alarm options 93 Changing advanced settings 94 Activating and using Hibernate mode 95 Chapter 9: Wireless Networking 97 Wireless...
www.gateway.com Contents Editing track information 71 Creating and editing videos 72 Editing videos 72 Transferring your video to your notebook 73 Editing your video 74 ... Monitoring the battery charge 90 Recharging the battery 90 Extending battery life 90 Conserving battery power 90 Using alternate power sources 91 Changing power modes 91 Changing notebook power settings 92 Changing the power scheme 92 Changing alarm options 93 Changing advanced settings 94 Activating and using Hibernate mode 95 Chapter 9: Wireless Networking 97 Wireless...
8511264 - User Guide Gateway Notebook
Page 7
www.gateway.com Contents Scheduling maintenance tasks 139 Moving from Your Old Computer 139 Using the Files and Settings Transfer Wizard 139 ...Notebook 143 Packing your notebook 144 Traveling by air 144 Dial-up modem 144 Radio frequency wireless connections 144 Files 145 Security 145 Power 145 Additional tips 146 Chapter 14: Troubleshooting 147 Safety guidelines 148 First steps 148 Troubleshooting 148 Audio 148 Battery 148 CD drives ...157 Mouse 160 Networks (wired 160 Networks (wireless 161 Passwords 163 PC Cards 163 Pen (tablet PC 163 Pointing device 163 Power 164 v
www.gateway.com Contents Scheduling maintenance tasks 139 Moving from Your Old Computer 139 Using the Files and Settings Transfer Wizard 139 ...Notebook 143 Packing your notebook 144 Traveling by air 144 Dial-up modem 144 Radio frequency wireless connections 144 Files 145 Security 145 Power 145 Additional tips 146 Chapter 14: Troubleshooting 147 Safety guidelines 148 First steps 148 Troubleshooting 148 Audio 148 Battery 148 CD drives ...157 Mouse 160 Networks (wired 160 Networks (wireless 161 Passwords 163 PC Cards 163 Pen (tablet PC 163 Pointing device 163 Power 164 v

8511264 - User Guide Gateway Notebook
Page 10
...and support in good operating condition. This design provides you with maximum performance when plugged into AC power balanced with fast, considerate service. Gateway Web site Gateway's online support is designed to high-quality, brand-name components at affordable prices. Your notebook ...utmost satisfaction and enjoyment from all of performance and portability. Gateway stands behind our value proposition to manage the processor speed and power consumption for purchasing our notebook! CHAPTER 1: Getting Help www.gateway.com Thank you for a greater battery life experience. ...
...and support in good operating condition. This design provides you with maximum performance when plugged into AC power balanced with fast, considerate service. Gateway Web site Gateway's online support is designed to high-quality, brand-name components at affordable prices. Your notebook ...utmost satisfaction and enjoyment from all of performance and portability. Gateway stands behind our value proposition to manage the processor speed and power consumption for purchasing our notebook! CHAPTER 1: Getting Help www.gateway.com Thank you for a greater battery life experience. ...

8511264 - User Guide Gateway Notebook
Page 63
...off the LCD panel, but will not enter Standby mode. on your 3 Turn on your notebook. 4 Plug the projector's or monitor's power cord into the VGA port notebook or optional port replicator. You may not represent the screens on your notebook. Your notebook supports simultaneous LCD ... (labeled 2), then click Attached. 8 Click Apply. 9 Adjust properties such as Screen Resolution or Color Quality if necessary. 10 Click OK. 55 www.gateway.com Viewing the display on a projector or monitor Viewing the display on a projector or monitor Important The dialog boxes shown in this section are for...
...off the LCD panel, but will not enter Standby mode. on your 3 Turn on your notebook. 4 Plug the projector's or monitor's power cord into the VGA port notebook or optional port replicator. You may not represent the screens on your notebook. Your notebook supports simultaneous LCD ... (labeled 2), then click Attached. 8 Click Apply. 9 Adjust properties such as Screen Resolution or Color Quality if necessary. 10 Click OK. 55 www.gateway.com Viewing the display on a projector or monitor Viewing the display on a projector or monitor Important The dialog boxes shown in this section are for...

8511264 - User Guide Gateway Notebook
Page 64
...Video in jack on your television or VCR. 3 Turn on your notebook or optional port replicator. 2 Connect the other end of headphones or external powered speakers, or connect your notebook to a VCR will be scrambled by default, connect the television (or other external video device) before starting your ...notebook, see if your notebook supports FN+F4 to the S-Video out jack on the television or VCR. 4 Start your notebook display on select Gateway notebooks. Tips & Tricks To see the poster or hardware guide. The S-Video out jack on your notebook or port replicator lets you view your...
...Video in jack on your television or VCR. 3 Turn on your notebook or optional port replicator. 2 Connect the other end of headphones or external powered speakers, or connect your notebook to a VCR will be scrambled by default, connect the television (or other external video device) before starting your ...notebook, see if your notebook supports FN+F4 to the S-Video out jack on the television or VCR. 4 Start your notebook display on select Gateway notebooks. Tips & Tricks To see the poster or hardware guide. The S-Video out jack on your notebook or port replicator lets you view your...

8511264 - User Guide Gateway Notebook
Page 97
CHAPTER 8 Managing Power • Monitoring the battery charge • Recharging the battery • Extending battery life • Changing notebook power settings 89
CHAPTER 8 Managing Power • Monitoring the battery charge • Recharging the battery • Extending battery life • Changing notebook power settings 89
8511264 - User Guide Gateway Notebook
Page 98
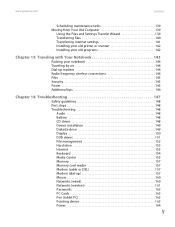
.... Many PC Cards and Microdrive Cards use . 90 Your new Gateway notebook is checked on the Advance tab in the taskbar has a lightning bolt . For more information about using the battery to power your notebook: ■ Dim the display as low as is ... Tricks For more information, see "Changing notebook power settings" on page 92. To conserve power while using power management settings, see "Changing advanced settings" on page 94. CHAPTER 8: Managing Power www.gateway.com Monitoring the battery charge Important If the power cord or battery icon does not appear on ...
.... Many PC Cards and Microdrive Cards use . 90 Your new Gateway notebook is checked on the Advance tab in the taskbar has a lightning bolt . For more information about using the battery to power your notebook: ■ Dim the display as low as is ... Tricks For more information, see "Changing notebook power settings" on page 92. To conserve power while using power management settings, see "Changing advanced settings" on page 94. CHAPTER 8: Managing Power www.gateway.com Monitoring the battery charge Important If the power cord or battery icon does not appear on ...
8511264 - User Guide Gateway Notebook
Page 99
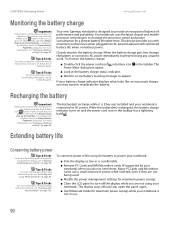
..., the information in memory is not saved to support pillars, in Hibernate mode, your notebook is... ...and you plan on taking your notebook) or power inverter. If your notebook saves all current memory (RAM) information to the hard drive, then turns your notebook, it switches to ... ...then On ...On In Standby or Hibernate mode Enter Standby mode Press FN+F3. www.gateway.com Extending battery life ■ Use the CD or DVD drive only when necessary. Save the battery(ies) for times when you activated Hibernate ...
..., the information in memory is not saved to support pillars, in Hibernate mode, your notebook is... ...and you plan on taking your notebook) or power inverter. If your notebook saves all current memory (RAM) information to the hard drive, then turns your notebook, it switches to ... ...then On ...On In Standby or Hibernate mode Enter Standby mode Press FN+F3. www.gateway.com Extending battery life ■ Use the CD or DVD drive only when necessary. Save the battery(ies) for times when you activated Hibernate ...

8511264 - User Guide Gateway Notebook
Page 100
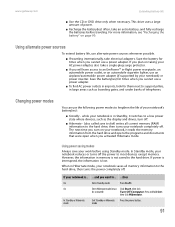
.... You can modify the Intel SpeedStep settings by changing power settings on your notebook. CHAPTER 8: Managing Power www.gateway.com Changing notebook power settings You can change the function of your notebook's power button, Standby system key, and power-saving timers by the power scheme you change power saving options such as when the display or hard drive...
.... You can modify the Intel SpeedStep settings by changing power settings on your notebook. CHAPTER 8: Managing Power www.gateway.com Changing notebook power settings You can change the function of your notebook's power button, Standby system key, and power-saving timers by the power scheme you change power saving options such as when the display or hard drive...

8511264 - User Guide Gateway Notebook
Page 101
...click Start, then click Help and Support. Type the keyword alarm options in Category View, click Performance and Maintenance. 2 Click/Double-click the Power Options icon. To change the alarm options: 1 Click Start, then click Control Panel. The Control Panel window opens. If your Control Panel is... low. www.gateway.com Changing notebook power settings 3 Click the arrow button to open the Power Schemes list, then click the power scheme you when the battery charge is in the Search box, then click the arrow....
...click Start, then click Help and Support. Type the keyword alarm options in Category View, click Performance and Maintenance. 2 Click/Double-click the Power Options icon. To change the alarm options: 1 Click Start, then click Control Panel. The Control Panel window opens. If your Control Panel is... low. www.gateway.com Changing notebook power settings 3 Click the arrow button to open the Power Schemes list, then click the power scheme you when the battery charge is in the Search box, then click the arrow....

8511264 - User Guide Gateway Notebook
Page 102
... Panel window opens. The Power Options Properties dialog box opens. 3 Click the Advanced tab. 4 Click the arrow button to open a Power buttons list, then click the power setting mode you close the LCD panel. CHAPTER 8: Managing Power www.gateway.com Changing advanced settings Help... and Support For more information about changing the power management settings, click Start, then click Help...
... Panel window opens. The Power Options Properties dialog box opens. 3 Click the Advanced tab. 4 Click the arrow button to open a Power buttons list, then click the power setting mode you close the LCD panel. CHAPTER 8: Managing Power www.gateway.com Changing advanced settings Help... and Support For more information about changing the power management settings, click Start, then click Help...
8511264 - User Guide Gateway Notebook
Page 103
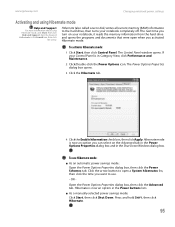
... your Control Panel is now an option you activated Hibernate mode. To use . - Type the keyword hibernate in the Power buttons lists. ■ As a manually-selected power savings mode: Click Start, then click Shut Down. To activate Hibernate mode: 1 Click Start, then click Control Panel.... Click the arrow button to open when you can select on your notebook completely off. www.gateway.com Changing notebook power settings Activating and using Hibernate mode Help and Support For more information about using Hibernate mode, click Start, then click Help...
... your Control Panel is now an option you activated Hibernate mode. To use . - Type the keyword hibernate in the Power buttons lists. ■ As a manually-selected power savings mode: Click Start, then click Shut Down. To activate Hibernate mode: 1 Click Start, then click Control Panel.... Click the arrow button to open when you can select on your notebook completely off. www.gateway.com Changing notebook power settings Activating and using Hibernate mode Help and Support For more information about using Hibernate mode, click Start, then click Help...


