
8511418 - Component Replacement Manual
Page 7
...then remove the bay covers. 8 If your notebook over so the bottom is facing up . 10 With a small Phillips screwdriver, remove the two hinge cover screws and put it in a safe place. Memory bay Wireless network bay Keyboard screw 7 Loosen the six memory bay cover screws and one ... bags because only the inside your workbench or other brands and product names are trademarks or registered trademarks of their edges. www.gateway.com © 2006 Gateway, Inc. Do not lay components on your notebook are ready to replace the keyboard. in your notebook and unplug the AC adapter...
...then remove the bay covers. 8 If your notebook over so the bottom is facing up . 10 With a small Phillips screwdriver, remove the two hinge cover screws and put it in a safe place. Memory bay Wireless network bay Keyboard screw 7 Loosen the six memory bay cover screws and one ... bags because only the inside your workbench or other brands and product names are trademarks or registered trademarks of their edges. www.gateway.com © 2006 Gateway, Inc. Do not lay components on your notebook are ready to replace the keyboard. in your notebook and unplug the AC adapter...

8511418 - Component Replacement Manual
Page 8
...notebook, insert the cable into the slot under the right end of the notebook for important safety, regulatory, and legal information. 2 www.gateway.com © 2006 Gateway, Inc. Be careful to lock the connector in place. Be careful to not damage the LCD panel. 17 Slide the black keyboard connector...keyboard cable is correctly oriented if it clicks in place. Be careful to close the LCD panel. 7 Close the LCD panel, then replace the two hinge cover screws. 8 Turn your notebook over . 13 Connect the power adapter, the modem cable, and the network cable, then turn your hardware guide...
...notebook, insert the cable into the slot under the right end of the notebook for important safety, regulatory, and legal information. 2 www.gateway.com © 2006 Gateway, Inc. Be careful to lock the connector in place. Be careful to not damage the LCD panel. 17 Slide the black keyboard connector...keyboard cable is correctly oriented if it clicks in place. Be careful to close the LCD panel. 7 Close the LCD panel, then replace the two hinge cover screws. 8 Turn your notebook over . 13 Connect the power adapter, the modem cable, and the network cable, then turn your hardware guide...

8511369 - Gateway Notebook Hardware Reference
Page 45
Screw Screw 9 Insert the small flat-blade screwdriver under the bottom of each hinge cover and gently pry it in a safe place. Replacing the keyboard 5 Turn your notebook over so the bottom is marked with a K. Keyboard screw 7 Turn your ...notebook over so the top is facing up. 8 With a small Phillips screwdriver, remove the two hinge cover screws and put it up , then remove the battery. www.gateway.com Tips & Tricks The screw hole is facing up . 10 Carefully open the LCD panel to the fully opened position...
Screw Screw 9 Insert the small flat-blade screwdriver under the bottom of each hinge cover and gently pry it in a safe place. Replacing the keyboard 5 Turn your notebook over so the bottom is marked with a K. Keyboard screw 7 Turn your ...notebook over so the top is facing up. 8 With a small Phillips screwdriver, remove the two hinge cover screws and put it up , then remove the battery. www.gateway.com Tips & Tricks The screw hole is facing up . 10 Carefully open the LCD panel to the fully opened position...
8511369 - Gateway Notebook Hardware Reference
Page 50
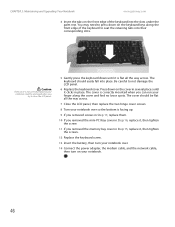
Caution If the cover is not correctly replaced, your notebook could be flat all the way across . 7 Close the LCD panel, then replace the two hinge cover screws. 8 Turn your notebook over so the bottom is facing up. 9 If you removed screws in Step 17, replace them. 10 If you removed ... down on your finger along the front edge of the keyboard into the slots under the palm rest. CHAPTER 3: Maintaining and Upgrading Your Notebook www.gateway.com 4 Insert the tabs on the cover in several places until it is flat all the way across . The cover is correctly mounted when you...
Caution If the cover is not correctly replaced, your notebook could be flat all the way across . 7 Close the LCD panel, then replace the two hinge cover screws. 8 Turn your notebook over so the bottom is facing up. 9 If you removed screws in Step 17, replace them. 10 If you removed ... down on your finger along the front edge of the keyboard into the slots under the palm rest. CHAPTER 3: Maintaining and Upgrading Your Notebook www.gateway.com 4 Insert the tabs on the cover in several places until it is flat all the way across . The cover is correctly mounted when you...

