
8512216 - Gateway Notebook User Guide R1
Page 53
... Mbps or 10/100), or Gigabit Ethernet (1000 Mbps or 10/100/1000). The Ethernet device installed in your computers or Ethernet-ready devices. www.gateway.com Attached to the router are all of your computer is listed. Also connected to the router is not listed, you need: • Two or... running at different speeds will result in front of the slowest rated component. If one . 47 A mixture of components rated at the speed of Network adapters. The Device Manager window opens. 4 Click the plus (+) in your computer To determine if an Ethernet card is already installed on the left.
... Mbps or 10/100), or Gigabit Ethernet (1000 Mbps or 10/100/1000). The Ethernet device installed in your computers or Ethernet-ready devices. www.gateway.com Attached to the router are all of your computer is listed. Also connected to the router is not listed, you need: • Two or... running at different speeds will result in front of the slowest rated component. If one . 47 A mixture of components rated at the speed of Network adapters. The Device Manager window opens. 4 Click the plus (+) in your computer To determine if an Ethernet card is already installed on the left.
8512216 - Gateway Notebook User Guide R1
Page 55
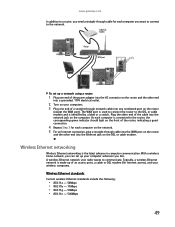
...the other end into any numbered port on the DSL or cable modem. With a wireless home network, you can set up your wireless computers. www.gateway.com In addition to a router, you need a straight-through cable for Internet access), and your computer wherever you like. Cable/DSL modem Router ...WAN port To set up a network using a router: 1 Plug one end of the power adapter into the AC connector on the router and the other end into a grounded, 110V electrical outlet. 2 Turn on your computers. 3 Plug one end of...
...the other end into any numbered port on the DSL or cable modem. With a wireless home network, you can set up your wireless computers. www.gateway.com In addition to a router, you need a straight-through cable for Internet access), and your computer wherever you like. Cable/DSL modem Router ...WAN port To set up a network using a router: 1 Plug one end of the power adapter into the AC connector on the router and the other end into a grounded, 110V electrical outlet. 2 Turn on your computers. 3 Plug one end of...
8512216 - Gateway Notebook User Guide R1
Page 56
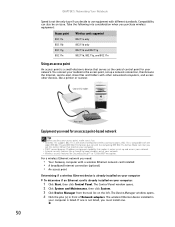
...the task list on your computer: 1 Click Start, then click Control Panel. Cable or DSL modem Access point Equipment you need : • Your Gateway computer with a wireless Ethernet network card installed • A broadband Internet connection (optional) • An access point Determining if a wireless Ethernet device.... For a wireless Ethernet network you need for an access point-based network Tip When you decide to keep intruders out of Network adapters. The Device Manager window opens. 4 Click the plus (+) in your computer is compatible with the older IEEE 802.11g and IEEE...
...the task list on your computer: 1 Click Start, then click Control Panel. Cable or DSL modem Access point Equipment you need : • Your Gateway computer with a wireless Ethernet network card installed • A broadband Internet connection (optional) • An access point Determining if a wireless Ethernet device.... For a wireless Ethernet network you need for an access point-based network Tip When you decide to keep intruders out of Network adapters. The Device Manager window opens. 4 Click the plus (+) in your computer is compatible with the older IEEE 802.11g and IEEE...
8512216 - Gateway Notebook User Guide R1
Page 63
Bluetooth networking You can use of a USB or Firewire cable. Bluetooth lets you can purchase a Bluetooth adapter to connect to a USB port on your computer. If you are sending the file from the CD that device you must install the driver for ... Bluetooth in Bluetooth, you transfer information between these devices without the use Bluetooth to communicate with your printer or from the manufacturer's Web site. www.gateway.com Printing files across the network Important Before you can print a file across the network: 1 Open the file you are using a desktop computer or if...
Bluetooth networking You can use of a USB or Firewire cable. Bluetooth lets you can purchase a Bluetooth adapter to connect to a USB port on your computer. If you are sending the file from the CD that device you must install the driver for ... Bluetooth in Bluetooth, you transfer information between these devices without the use Bluetooth to communicate with your printer or from the manufacturer's Web site. www.gateway.com Printing files across the network Important Before you can print a file across the network: 1 Open the file you are using a desktop computer or if...
8512564 - Component Replacement Manual R0
Page 1
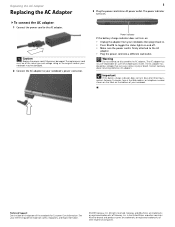
... your notebook's power connector. 1 3 Plug the power cord into a different wall outlet. Warning Do not attempt to the AC adapter. The AC adapter has dangerous voltages that can cause serious injury or death. Gateway and eMachines are trademarks or registered trademarks of their respective companies. All rights reserved. All other countries. See your...
... your notebook's power connector. 1 3 Plug the power cord into a different wall outlet. Warning Do not attempt to the AC adapter. The AC adapter has dangerous voltages that can cause serious injury or death. Gateway and eMachines are trademarks or registered trademarks of their respective companies. All rights reserved. All other countries. See your...
8512564 - Component Replacement Manual R0
Page 3
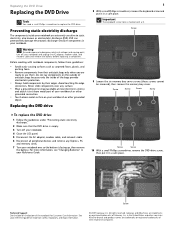
... only when you are trademarks or registered trademarks of the notebook for important safety, regulatory, and legal information. © 2007 Gateway, Inc. Never slide components over so the bottom is marked with notebook components, follow these screws cannot be removed), then remove... any Express, PC, and memory cards. 7 Turn your notebook and unplug the AC adapter, modem cable, and network cable and remove the battery before replacing a component. All rights reserved. Gateway and eMachines are ready to static electricity, also known as carpeted floors, plastic, and packing...
... only when you are trademarks or registered trademarks of the notebook for important safety, regulatory, and legal information. © 2007 Gateway, Inc. Never slide components over so the bottom is marked with notebook components, follow these screws cannot be removed), then remove... any Express, PC, and memory cards. 7 Turn your notebook and unplug the AC adapter, modem cable, and network cable and remove the battery before replacing a component. All rights reserved. Gateway and eMachines are ready to static electricity, also known as carpeted floors, plastic, and packing...
8512564 - Component Replacement Manual R0
Page 4
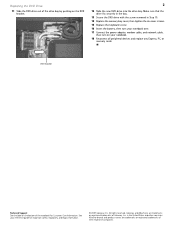
...cover, then tighten the six cover screws. 15 Replace the keyboard screw. 16 Insert the battery, then turn your notebook over. 17 Connect the power adapter, modem cable, and network cable, then turn on your reference guide for Customer Care Information. All rights reserved. Replacing the DVD Drive 11 Slide ... DVD drive out of the drive bay by pushing on the bottom of the notebook for important safety, regulatory, and legal information. © 2007 Gateway, Inc. Make sure that the drive fits securely in the bay. 13 Secure the DVD drive with the screw removed in the United States and...
...cover, then tighten the six cover screws. 15 Replace the keyboard screw. 16 Insert the battery, then turn your notebook over. 17 Connect the power adapter, modem cable, and network cable, then turn on your reference guide for Customer Care Information. All rights reserved. Replacing the DVD Drive 11 Slide ... DVD drive out of the drive bay by pushing on the bottom of the notebook for important safety, regulatory, and legal information. © 2007 Gateway, Inc. Make sure that the drive fits securely in the bay. 13 Secure the DVD drive with the screw removed in the United States and...
8512564 - Component Replacement Manual R0
Page 5
.... Important If you cannot create a Drivers and Applications Recovery disc, Gateway may need a small Phillips screwdriver to dangerous electrical voltages and moving parts, turn off your notebook. 4 Disconnect the AC adapter, modem cable, and network cable. 5 Disconnect all peripheral devices and... driver recovery" in your notebook and unplug the AC adapter, modem cable, and network cable and remove the battery before replacing a component. Contact Gateway Customer Care at most electronics stores) and attach it . Gateway and eMachines are ready to a bare metal part of...
.... Important If you cannot create a Drivers and Applications Recovery disc, Gateway may need a small Phillips screwdriver to dangerous electrical voltages and moving parts, turn off your notebook. 4 Disconnect the AC adapter, modem cable, and network cable. 5 Disconnect all peripheral devices and... driver recovery" in your notebook and unplug the AC adapter, modem cable, and network cable and remove the battery before replacing a component. Contact Gateway Customer Care at most electronics stores) and attach it . Gateway and eMachines are ready to a bare metal part of...
8512564 - Component Replacement Manual R0
Page 6
...battery, then turn your notebook over. 14 Connect the power adapter, modem cable, and network cable. 15 Turn on the bottom of the notebook for important safety, regulatory, and legal information. © 2007 Gateway, Inc. All rights reserved. See your reference guide for ...Customer Care Information. All other countries. Gateway and eMachines are trademarks or registered trademarks of Gateway, Inc. in the United States and other brands and...
...battery, then turn your notebook over. 14 Connect the power adapter, modem cable, and network cable. 15 Turn on the bottom of the notebook for important safety, regulatory, and legal information. © 2007 Gateway, Inc. All rights reserved. See your reference guide for ...Customer Care Information. All other countries. Gateway and eMachines are trademarks or registered trademarks of Gateway, Inc. in the United States and other brands and...
8512564 - Component Replacement Manual R0
Page 7
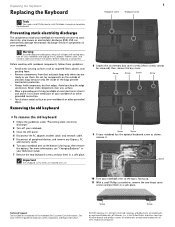
... Warning To avoid exposure to dangerous electrical voltages and moving parts, turn off your notebook. 3 Close the LCD panel. 4 Disconnect the AC adapter, modem cable, and network cable. 5 Disconnect all peripheral devices and remove any surface. • Wear a grounding wrist strap (available at most...other countries. Important The keyboard screw holes are ready to replace the keyboard. in a safe place. Avoid touching the edge connectors. Gateway and eMachines are trademarks or registered trademarks of your notebook over so the top is facing up . 11 With a small Phillips ...
... Warning To avoid exposure to dangerous electrical voltages and moving parts, turn off your notebook. 3 Close the LCD panel. 4 Disconnect the AC adapter, modem cable, and network cable. 5 Disconnect all peripheral devices and remove any surface. • Wear a grounding wrist strap (available at most...other countries. Important The keyboard screw holes are ready to replace the keyboard. in a safe place. Avoid touching the edge connectors. Gateway and eMachines are trademarks or registered trademarks of your notebook over so the top is facing up . 11 With a small Phillips ...
8512564 - Component Replacement Manual R0
Page 8
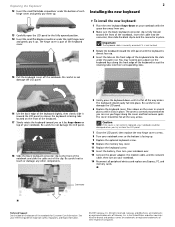
...Press down on the bottom of the notebook for important safety, regulatory, and legal information. © 2007 Gateway, Inc. See your reference guide for Customer Care Information. Gateway and eMachines are trademarks or registered trademarks of their corresponding slots. 15 Pull the keyboard cover off the notebook... the new keyboard To install the new keyboard: 1 Place the new keyboard keys-down on your notebook over . 13 Connect the power adapter, the modem cable, and the network cable, then turn on the keyboard keys along the cover and find no loose spots. Replacing the...
...Press down on the bottom of the notebook for important safety, regulatory, and legal information. © 2007 Gateway, Inc. See your reference guide for Customer Care Information. Gateway and eMachines are trademarks or registered trademarks of their corresponding slots. 15 Pull the keyboard cover off the notebook... the new keyboard To install the new keyboard: 1 Place the new keyboard keys-down on your notebook over . 13 Connect the power adapter, the modem cable, and the network cable, then turn on the keyboard keys along the cover and find no loose spots. Replacing the...
8512564 - Component Replacement Manual R0
Page 9
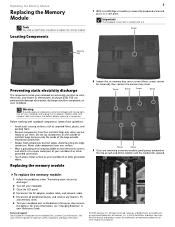
...a small Phillips screwdriver to dangerous electrical voltages and moving parts, turn off your notebook. 3 Close the LCD panel. 4 Disconnect the AC adapter, modem cable, and network cable. 5 Disconnect all peripheral devices and remove any Express, PC, and memory cards. 6 Turn your notebook... Screw Screw 9 If you are trademarks or registered trademarks of the notebook for important safety, regulatory, and legal information. © 2007 Gateway, Inc. Replacing the memory module 8 Loosen the six memory bay cover screws (these guidelines: • Avoid static-causing surfaces such as...
...a small Phillips screwdriver to dangerous electrical voltages and moving parts, turn off your notebook. 3 Close the LCD panel. 4 Disconnect the AC adapter, modem cable, and network cable. 5 Disconnect all peripheral devices and remove any Express, PC, and memory cards. 6 Turn your notebook... Screw Screw 9 If you are trademarks or registered trademarks of the notebook for important safety, regulatory, and legal information. © 2007 Gateway, Inc. Replacing the memory module 8 Loosen the six memory bay cover screws (these guidelines: • Avoid static-causing surfaces such as...
8512564 - Component Replacement Manual R0
Page 10
..., then tighten the six cover screws. 14 Replace the keyboard screw. 15 Insert the battery, then turn your notebook over. 16 Connect the power adapter, the modem cable, and the network cable. 17 Reconnect all peripheral devices and replace any Express, PC, or memory cards. 18 Turn on the... All other countries. Technical Support See the label on your reference guide for Customer Care Information. Important Use only memory modules designed for your Gateway notebook. 12 Gently push the module down until it can only be inserted in the memory bay. Replacing the Memory Module 10 Pull the...
..., then tighten the six cover screws. 14 Replace the keyboard screw. 15 Insert the battery, then turn your notebook over. 16 Connect the power adapter, the modem cable, and the network cable. 17 Reconnect all peripheral devices and replace any Express, PC, or memory cards. 18 Turn on the... All other countries. Technical Support See the label on your reference guide for Customer Care Information. Important Use only memory modules designed for your Gateway notebook. 12 Gently push the module down until it can only be inserted in the memory bay. Replacing the Memory Module 10 Pull the...
8512564 - Component Replacement Manual R0
Page 11
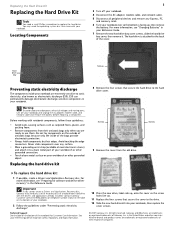
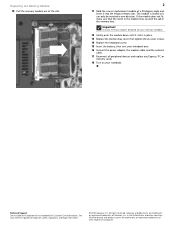
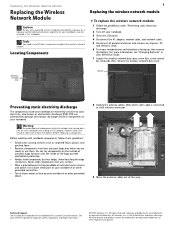
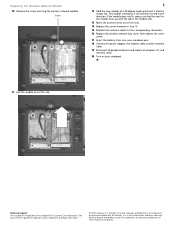
... facing up, then remove the battery. See your notebook and unplug the AC adapter, modem cable, and network cable and remove the battery before replacing a component. Wireless network bay Screw Preventing static electricity discharge The components inside of Gateway, Inc. Replacing the Wireless Network Module Replacing the Wireless Network Module Caution By...
... facing up, then remove the battery. See your notebook and unplug the AC adapter, modem cable, and network cable and remove the battery before replacing a component. Wireless network bay Screw Preventing static electricity discharge The components inside of Gateway, Inc. Replacing the Wireless Network Module Replacing the Wireless Network Module Caution By...
8512564 - Component Replacement Manual R0
Page 12
...16 Replace the wireless network bay cover, then tighten the cover screw. 17 Insert the battery, then turn your notebook over. 18 Connect the power adapter, the modem cable, and the network cable. 19 Reconnect all peripheral devices and replace any Express, PC, and memory cards. 20 Turn on the...slot. All other countries. See your notebook. 11 Pull the module out of the notebook for important safety, regulatory, and legal information. © 2007 Gateway, Inc. Screw 2 12 Hold the new module at a 30-degree angle and insert it can only be inserted in the United States and other ...
...16 Replace the wireless network bay cover, then tighten the cover screw. 17 Insert the battery, then turn your notebook over. 18 Connect the power adapter, the modem cable, and the network cable. 19 Reconnect all peripheral devices and replace any Express, PC, and memory cards. 20 Turn on the...slot. All other countries. See your notebook. 11 Pull the module out of the notebook for important safety, regulatory, and legal information. © 2007 Gateway, Inc. Screw 2 12 Hold the new module at a 30-degree angle and insert it can only be inserted in the United States and other ...
8512488 - Gateway Notebook Reference Guide R2
Page 3
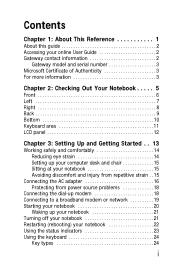
Contents Chapter 1: About This Reference 1 About this guide 2 Accessing your online User Guide 2 Gateway contact information 2 Gateway model and serial number 3 Microsoft Certificate of Authenticity 3 For more information 3 Chapter 2: Checking Out Your Notebook . . . . . 5 Front 6 Left 7 Right 8 Back...your computer desk and chair 15 Sitting at your notebook 15 Avoiding discomfort and injury from repetitive strain . . 15 Connecting the AC adapter 16 Protecting from power source problems 18 Connecting the dial-up modem 18 Connecting to a broadband modem or network 19 Starting your ...
Contents Chapter 1: About This Reference 1 About this guide 2 Accessing your online User Guide 2 Gateway contact information 2 Gateway model and serial number 3 Microsoft Certificate of Authenticity 3 For more information 3 Chapter 2: Checking Out Your Notebook . . . . . 5 Front 6 Left 7 Right 8 Back...your computer desk and chair 15 Sitting at your notebook 15 Avoiding discomfort and injury from repetitive strain . . 15 Connecting the AC adapter 16 Protecting from power source problems 18 Connecting the dial-up modem 18 Connecting to a broadband modem or network 19 Starting your ...
8512488 - Gateway Notebook Reference Guide R2
Page 15
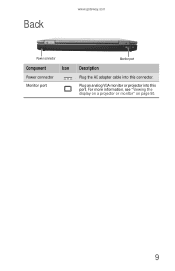
Back www.gateway.com Power connector Component Icon Power connector Monitor port Monitor port Description Plug the AC adapter cable into this connector. Plug an analog VGA monitor or projector into this port. For more information, see "Viewing the display on a projector or monitor" on page 50. 9
Back www.gateway.com Power connector Component Icon Power connector Monitor port Monitor port Description Plug the AC adapter cable into this connector. Plug an analog VGA monitor or projector into this port. For more information, see "Viewing the display on a projector or monitor" on page 50. 9

8512488 - Gateway Notebook Reference Guide R2
Page 19
CHAPTER3 Setting Up and Getting Started • Working safely and comfortably • Connecting the AC adapter • Connecting the dial-up modem • Connecting to a broadband modem or network • Starting your notebook • Turning off your notebook • Restarting (rebooting) your notebook • Using the status indicators • Using the keyboard • Using the EZ Pad touchpad • Using the optional multimedia panel • Using the optional webcam • Adjusting the brightness • Adjusting the volume • Turning your wireless radio on or off 13
CHAPTER3 Setting Up and Getting Started • Working safely and comfortably • Connecting the AC adapter • Connecting the dial-up modem • Connecting to a broadband modem or network • Starting your notebook • Turning off your notebook • Restarting (rebooting) your notebook • Using the status indicators • Using the keyboard • Using the EZ Pad touchpad • Using the optional multimedia panel • Using the optional webcam • Adjusting the brightness • Adjusting the volume • Turning your wireless radio on or off 13
8512488 - Gateway Notebook Reference Guide R2
Page 22
...original cord or your notebook or one of the same type purchased from Gateway. You should use the AC adapter that can run your notebook using an AC adapter or your notebook on page 62. The AC adapter has no user-replaceable or user-serviceable parts inside. Warning Do not... damaged. Allow three hours for three hours, the battery may be recalibrated. Contact Gateway about returning defective AC adapters. Caution Make sure that you use the AC adapter right away to disassemble the AC adapter. If the battery life seems short even after being charged for the battery to ...
...original cord or your notebook or one of the same type purchased from Gateway. You should use the AC adapter that can run your notebook using an AC adapter or your notebook on page 62. The AC adapter has no user-replaceable or user-serviceable parts inside. Warning Do not... damaged. Allow three hours for three hours, the battery may be recalibrated. Contact Gateway about returning defective AC adapters. Caution Make sure that you use the AC adapter right away to disassemble the AC adapter. If the battery life seems short even after being charged for the battery to ...

8512488 - Gateway Notebook Reference Guide R2
Page 23
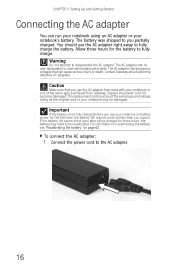
...the battery charge indicator turns blue. The battery charge indicator turns on (see "Gateway contact information" on the Customer Care label. www.gateway.com 2 Connect the AC adapter to AC power until it turns on: • Unplug the adapter from your notebook, then plug it back in. • Press FN+F1 to... toggle the status lights on page 6 for the first time, turn off . • Make sure the power cord is firmly attached to the AC adapter. • Plug the power cord into a different wall outlet. 4 When you finish using your notebook's power connector. 3 Plug the power cord into a...
...the battery charge indicator turns blue. The battery charge indicator turns on (see "Gateway contact information" on the Customer Care label. www.gateway.com 2 Connect the AC adapter to AC power until it turns on: • Unplug the adapter from your notebook, then plug it back in. • Press FN+F1 to... toggle the status lights on page 6 for the first time, turn off . • Make sure the power cord is firmly attached to the AC adapter. • Plug the power cord into a different wall outlet. 4 When you finish using your notebook's power connector. 3 Plug the power cord into a...


