
8511725 - Gateway Service Guide
Page 3
... discharge 5 Tape 5 Preparing the notebook 6 Removing the battery 6 Adding or replacing memory modules 7 Replacing the DVD drive 11 Replacing the cooling assembly 14 Replacing the processor 19 Replacing the IEEE 802.11 wireless card 22 Replacing the hard drive 26 Replacing the keyboard cover 29 Replacing the keyboard 31 Replacing the...
... discharge 5 Tape 5 Preparing the notebook 6 Removing the battery 6 Adding or replacing memory modules 7 Replacing the DVD drive 11 Replacing the cooling assembly 14 Replacing the processor 19 Replacing the IEEE 802.11 wireless card 22 Replacing the hard drive 26 Replacing the keyboard cover 29 Replacing the keyboard 31 Replacing the...

8511725 - Gateway Service Guide
Page 5
... electricity discharge • Preparing the notebook • Adding or replacing memory modules • Replacing the DVD drive • Replacing the cooling assembly • Replacing the processor • Replacing the IEEE 802.11 wireless card • Replacing the hard drive • Replacing the keyboard cover • Replacing the keyboard • Replacing the...
... electricity discharge • Preparing the notebook • Adding or replacing memory modules • Replacing the DVD drive • Replacing the cooling assembly • Replacing the processor • Replacing the IEEE 802.11 wireless card • Replacing the hard drive • Replacing the keyboard cover • Replacing the keyboard • Replacing the...
8511725 - Gateway Service Guide
Page 7
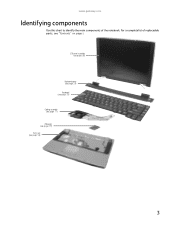
www.gateway.com Identifying components Use this chart to identify the main components of replaceable parts, see page 56) 3 LCD panel assembly (see page 38) Keyboard cover (see page 29) Keyboard (see page 31) Cooling assembly (see page 11) Processor (see page 19) Palm rest (see "Contents" on page i. For a complete list of the notebook.
www.gateway.com Identifying components Use this chart to identify the main components of replaceable parts, see page 56) 3 LCD panel assembly (see page 38) Keyboard cover (see page 29) Keyboard (see page 31) Cooling assembly (see page 11) Processor (see page 19) Palm rest (see "Contents" on page i. For a complete list of the notebook.
8511725 - Gateway Service Guide
Page 21
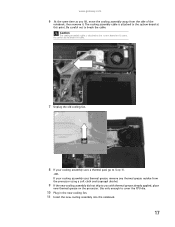
.... 10 Plug in the new cooling fan. 11 Insert the new cooling assembly into the notebook. 17 www.gateway.com 6 .At the same time as you lift, move the cooling assembly away from the processor using a soft cloth and isopropyl alcohol. 9 If the new cooling assembly did not ship to you with...
.... 10 Plug in the new cooling fan. 11 Insert the new cooling assembly into the notebook. 17 www.gateway.com 6 .At the same time as you lift, move the cooling assembly away from the processor using a soft cloth and isopropyl alcohol. 9 If the new cooling assembly did not ship to you with...
8511725 - Gateway Service Guide
Page 23
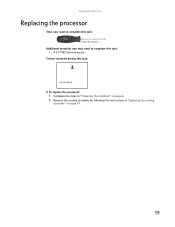
www.gateway.com Replacing the processor Tools you need to complete this task: Phillips #0 screwdriver Additional materials you may need to complete this task: • X-23-7762 thermal grease Screws removed during this task: 1 black (keyboard) To replace the processor: 1 Complete the steps in "Preparing the notebook" on page 6. 2 Remove the cooling assembly by following the instructions in "Replacing the cooling assembly" on page 14. 19
www.gateway.com Replacing the processor Tools you need to complete this task: Phillips #0 screwdriver Additional materials you may need to complete this task: • X-23-7762 thermal grease Screws removed during this task: 1 black (keyboard) To replace the processor: 1 Complete the steps in "Preparing the notebook" on page 6. 2 Remove the cooling assembly by following the instructions in "Replacing the cooling assembly" on page 14. 19
8511725 - Gateway Service Guide
Page 24
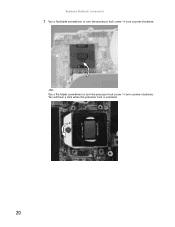
You will hear a click when the processor lock is unlocked. 20 Replacing Notebook Components 3 Use a flat-blade screwdriver to turn the processor lock screw ¼-turn counter-clockwise. -ORUse a flat-blade screwdriver to turn the processor lock screw ½-turn counter-clockwise.
You will hear a click when the processor lock is unlocked. 20 Replacing Notebook Components 3 Use a flat-blade screwdriver to turn the processor lock screw ¼-turn counter-clockwise. -ORUse a flat-blade screwdriver to turn the processor lock screw ½-turn counter-clockwise.
8511725 - Gateway Service Guide
Page 25
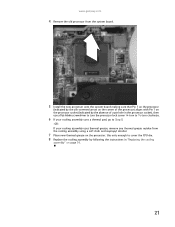
...gateway.com 4 Remove the old processor from the system board. 5 Install the new processor onto the system board making sure that Pin 1 on the processor (indicated by the silk-screened arrow on the corner of the processor) aligns with Pin 1 on the processor socket (indicated by following the instructions in the processor... the CPU die. 8 Replace the cooling assembly by the absence of a pin hole in "Replacing the cooling assembly" on the processor. Use only enough to Step 8. -ORIf your cooling assembly uses thermal grease, remove any thermal grease residue from the cooling assembly using...
...gateway.com 4 Remove the old processor from the system board. 5 Install the new processor onto the system board making sure that Pin 1 on the processor (indicated by the silk-screened arrow on the corner of the processor) aligns with Pin 1 on the processor socket (indicated by following the instructions in the processor... the CPU die. 8 Replace the cooling assembly by the absence of a pin hole in "Replacing the cooling assembly" on the processor. Use only enough to Step 8. -ORIf your cooling assembly uses thermal grease, remove any thermal grease residue from the cooling assembly using...
8511725 - Gateway Service Guide
Page 69
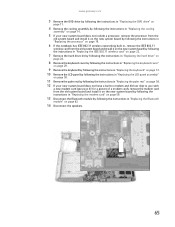
www.gateway.com 3 Remove the DVD drive by following the instructions in "Replacing the DVD drive" on page 11. 4 Remove the cooling assembly by following the instructions in "Replacing the cooling assembly" on page 14. 5 If your new system board does not include a processor, remove the processor from the old system board and install... it on the new system board by following the instructions in "Replacing the processor" on page 19. 6 If the notebook has IEEE 802.11 wireless networking built in, remove the IEEE 802.11 wireless card from the old system ...
www.gateway.com 3 Remove the DVD drive by following the instructions in "Replacing the DVD drive" on page 11. 4 Remove the cooling assembly by following the instructions in "Replacing the cooling assembly" on page 14. 5 If your new system board does not include a processor, remove the processor from the old system board and install... it on the new system board by following the instructions in "Replacing the processor" on page 19. 6 If the notebook has IEEE 802.11 wireless networking built in, remove the IEEE 802.11 wireless card from the old system ...
8512488 - Gateway Notebook Reference Guide R2
Page 61
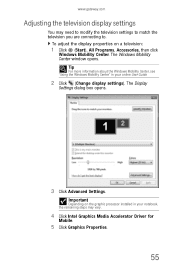
...Center" in your online User Guide. 2 Click (Change display settings). The Display Settings dialog box opens. 3 Click Advanced Settings. www.gateway.com Adjusting the television display settings You may vary. 4 Click Intel Graphics Media Accelerator Driver for Mobile. 5 Click Graphics Properties. 55 Important...Click (Start), All Programs, Accessories, then click Windows Mobility Center. To adjust the display properties on the graphic processor installed in your notebook, the remaining steps may need to modify the television settings to match the television you are connecting to.
...Center" in your online User Guide. 2 Click (Change display settings). The Display Settings dialog box opens. 3 Click Advanced Settings. www.gateway.com Adjusting the television display settings You may vary. 4 Click Intel Graphics Media Accelerator Driver for Mobile. 5 Click Graphics Properties. 55 Important...Click (Start), All Programs, Accessories, then click Windows Mobility Center. To adjust the display properties on the graphic processor installed in your notebook, the remaining steps may need to modify the television settings to match the television you are connecting to.

8512488 - Gateway Notebook Reference Guide R2
Page 66
CHAPTER 5: Managing Power Monitoring the battery charge Your new Gateway notebook is designed to appear. • Look at the battery charge status indicator. To monitor the battery charge: • Move the mouse pointer over the ... battery recharges, the battery charge indicator turns on battery power. Your notebook uses the latest chipset and mobile processor technologies to recalibrate the battery. This design provides you may need to manage the processor speed and power consumption for a Low Battery warning message to provide an exceptional balance of performance and portability...
CHAPTER 5: Managing Power Monitoring the battery charge Your new Gateway notebook is designed to appear. • Look at the battery charge status indicator. To monitor the battery charge: • Move the mouse pointer over the ... battery recharges, the battery charge indicator turns on battery power. Your notebook uses the latest chipset and mobile processor technologies to recalibrate the battery. This design provides you may need to manage the processor speed and power consumption for a Low Battery warning message to provide an exceptional balance of performance and portability...
