8512778 - Gateway Notebook User Guide for Windows Vista R2
Page 3
Contents Chapter 1: Getting Help 1 Thank you for purchasing our notebook 2 Using the Gateway Web site 2 Using Help and Support 2 Contacting Gateway 3 Getting help for Windows Media Center 3 Using online help 3 Chapter 2: Using Windows 5 Using the Windows desktop 6 Using the Start menu 7 Adding ...files 12 Using the Windows Search 12 Browsing for files and folders 13 Using Tablet PC 13 Calibrating your tablet 14 Using gestures 15 Using the digital pen 15 Using the Tablet Input Panel (TIP 16 Working with documents 17 Creating a new document 17 Saving a document 17 Opening a ...
Contents Chapter 1: Getting Help 1 Thank you for purchasing our notebook 2 Using the Gateway Web site 2 Using Help and Support 2 Contacting Gateway 3 Getting help for Windows Media Center 3 Using online help 3 Chapter 2: Using Windows 5 Using the Windows desktop 6 Using the Start menu 7 Adding ...files 12 Using the Windows Search 12 Browsing for files and folders 13 Using Tablet PC 13 Calibrating your tablet 14 Using gestures 15 Using the digital pen 15 Using the Tablet Input Panel (TIP 16 Working with documents 17 Creating a new document 17 Saving a document 17 Opening a ...
8512778 - Gateway Notebook User Guide for Windows Vista R2
Page 56
... as the default protocol. When networking is typically preset when you can configure your router using your workgroup in the Workgroup box. CHAPTER 5: Networking Your Notebook 6 Type a name for all computers in your network workgroup, and the name must be different than any computer name on your network. 7 Click OK.... them, you receive your computer. The workgroup name must be set up the network connection on each other. Using a DHCP server In order to 15 characters with a router or access point router, the protocol must be set up on your router's documentation.
... as the default protocol. When networking is typically preset when you can configure your router using your workgroup in the Workgroup box. CHAPTER 5: Networking Your Notebook 6 Type a name for all computers in your network workgroup, and the name must be different than any computer name on your network. 7 Click OK.... them, you receive your computer. The workgroup name must be set up the network connection on each other. Using a DHCP server In order to 15 characters with a router or access point router, the protocol must be set up on your router's documentation.
8512564 - Component Replacement Manual R0
Page 4
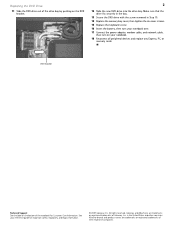
...other brands and product names are trademarks or registered trademarks of Gateway, Inc. in Step 10. 14 Replace the memory bay cover, then tighten the six cover screws. 15 Replace the keyboard screw. 16 Insert the battery, then turn your notebook over. 17 Connect the power adapter, modem cable, and ... reference guide for Customer Care Information. Replacing the DVD Drive 11 Slide the DVD drive out of the drive bay by pushing on your notebook. 18 Reconnect all peripheral devices and replace any Express, PC, or memory cards. DVD bracket Technical Support See the label on the bottom...
...other brands and product names are trademarks or registered trademarks of Gateway, Inc. in Step 10. 14 Replace the memory bay cover, then tighten the six cover screws. 15 Replace the keyboard screw. 16 Insert the battery, then turn your notebook over. 17 Connect the power adapter, modem cable, and ... reference guide for Customer Care Information. Replacing the DVD Drive 11 Slide the DVD drive out of the drive bay by pushing on your notebook. 18 Reconnect all peripheral devices and replace any Express, PC, or memory cards. DVD bracket Technical Support See the label on the bottom...
8512564 - Component Replacement Manual R0
Page 6
... and product names are trademarks or registered trademarks of Gateway, Inc. Replacing the Hard Drive Kit 2 13 Insert the battery, then turn your notebook over. 14 Connect the power adapter, modem cable, and network cable. 15 Turn on your notebook. 16 If the hard drive was sent to you... from Gateway with the operating system, applications, and drivers installed, you will see a...
... and product names are trademarks or registered trademarks of Gateway, Inc. Replacing the Hard Drive Kit 2 13 Insert the battery, then turn your notebook over. 14 Connect the power adapter, modem cable, and network cable. 15 Turn on your notebook. 16 If the hard drive was sent to you... from Gateway with the operating system, applications, and drivers installed, you will see a...
8512564 - Component Replacement Manual R0
Page 8
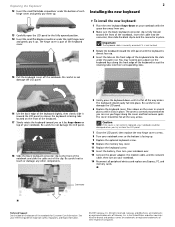
...Be careful not to touch or damage any Express, PC, and memory cards. See your notebook with the space bar away from you. 2 Make sure the black keyboard connector clip is flat all the way across . Gateway and eMachines are trademarks or registered trademarks of the clip. Important The keyboard cable is... is fully moved toward you finger along the front edge of the keyboard to the front of the notebook and slide the cable out of their corresponding slots. 15 Pull the keyboard cover off the notebook. The keyboard should be damaged when you try to close the LCD panel. 7 Close the LCD...
...Be careful not to touch or damage any Express, PC, and memory cards. See your notebook with the space bar away from you. 2 Make sure the black keyboard connector clip is flat all the way across . Gateway and eMachines are trademarks or registered trademarks of the clip. Important The keyboard cable is... is fully moved toward you finger along the front edge of the keyboard to the front of the notebook and slide the cable out of their corresponding slots. 15 Pull the keyboard cover off the notebook. The keyboard should be damaged when you try to close the LCD panel. 7 Close the LCD...
8512564 - Component Replacement Manual R0
Page 10
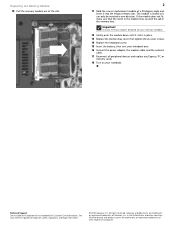
...the tab in place. 13 Replace the memory bay cover, then tighten the six cover screws. 14 Replace the keyboard screw. 15 Insert the battery, then turn your notebook over. 16 Connect the power adapter, the modem cable, and the network cable. 17 Reconnect all peripheral devices and replace any... Express, PC, or memory cards. 18 Turn on your notebook. All rights reserved. Gateway and eMachines are trademarks or registered trademarks of the slot. 2 11 Hold the new or replacement module at a 30-degree angle and ...
...the tab in place. 13 Replace the memory bay cover, then tighten the six cover screws. 14 Replace the keyboard screw. 15 Insert the battery, then turn your notebook over. 16 Connect the power adapter, the modem cable, and the network cable. 17 Reconnect all peripheral devices and replace any... Express, PC, or memory cards. 18 Turn on your notebook. All rights reserved. Gateway and eMachines are trademarks or registered trademarks of the slot. 2 11 Hold the new or replacement module at a 30-degree angle and ...
8512564 - Component Replacement Manual R0
Page 12
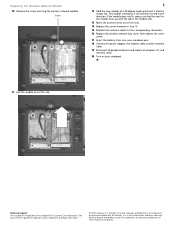
...insert it can only be inserted in Step 10. 15 Reattach the antenna cables to the corresponding connectors. 16 Replace the wireless network bay cover, then tighten the cover screw. 17 Insert the battery, then turn your notebook over. 18 Connect the power adapter, the modem cable... the empty slot. Technical Support See the label on your reference guide for Customer Care Information. See your notebook. 11 Pull the module out of Gateway, Inc. Gateway and eMachines are trademarks or registered trademarks of their respective companies. Replacing the Wireless Network Module 10 Remove the...
...insert it can only be inserted in Step 10. 15 Reattach the antenna cables to the corresponding connectors. 16 Replace the wireless network bay cover, then tighten the cover screw. 17 Insert the battery, then turn your notebook over. 18 Connect the power adapter, the modem cable... the empty slot. Technical Support See the label on your reference guide for Customer Care Information. See your notebook. 11 Pull the module out of Gateway, Inc. Gateway and eMachines are trademarks or registered trademarks of their respective companies. Replacing the Wireless Network Module 10 Remove the...
8512488 - Gateway Notebook Reference Guide R2
Page 3
...Gateway model and serial number 3 Microsoft Certificate of Authenticity 3 For more information 3 Chapter 2: Checking Out Your Notebook . . . . . 5 Front 6 Left 7 Right 8 Back 9 Bottom 10 Keyboard area 11 LCD panel 12 Chapter 3: Setting Up and Getting Started . . 13 Working safely and comfortably 14 Reducing eye strain 14 Setting up your computer desk and chair 15... Sitting at your notebook 15 Avoiding discomfort and injury from repetitive strain . . 15 Connecting the AC adapter 16 Protecting from power source problems ...
...Gateway model and serial number 3 Microsoft Certificate of Authenticity 3 For more information 3 Chapter 2: Checking Out Your Notebook . . . . . 5 Front 6 Left 7 Right 8 Back 9 Bottom 10 Keyboard area 11 LCD panel 12 Chapter 3: Setting Up and Getting Started . . 13 Working safely and comfortably 14 Reducing eye strain 14 Setting up your computer desk and chair 15... Sitting at your notebook 15 Avoiding discomfort and injury from repetitive strain . . 15 Connecting the AC adapter 16 Protecting from power source problems ...
8512488 - Gateway Notebook Reference Guide R2
Page 20
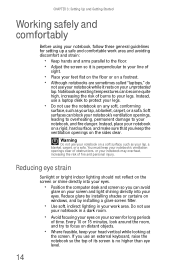
...of sight. • Place your feet flat on the floor or on the sides clear. Do not use your notebook while it rests on your unprotected lap. Notebook operating temperatures can become quite high, increasing the risk of burns to focus on the screen or shine directly into your... on distant objects. • Where feasible, keep the ventilation openings on a footrest. • Although notebooks are sometimes called "laptops," do not use your notebook in your work area. Every 10 or 15 minutes, look around the room, and try to your legs. Reduce glare by installing shades or curtains ...
...of sight. • Place your feet flat on the floor or on the sides clear. Do not use your notebook while it rests on your unprotected lap. Notebook operating temperatures can become quite high, increasing the risk of burns to focus on the screen or shine directly into your... on distant objects. • Where feasible, keep the ventilation openings on a footrest. • Although notebooks are sometimes called "laptops," do not use your notebook in your work area. Every 10 or 15 minutes, look around the room, and try to your legs. Reduce glare by installing shades or curtains ...
8512488 - Gateway Notebook Reference Guide R2
Page 21
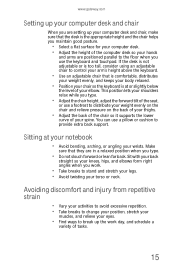
... a relaxed position when you type. • Do not slouch forward or lean far back. Sitting at or slightly below the level of your elbow. www.gateway.com Setting up your computer desk and chair When you are setting up the work . • Take breaks to control your arm's height above the... your wrists. Sit with your back straight so your knees, hips, and elbows form right angles when you work day, and schedule a variety of tasks. 15 If the desk is not adjustable or is at your notebook • Avoid bending, arching, or angling your torso or neck.
... a relaxed position when you type. • Do not slouch forward or lean far back. Sitting at or slightly below the level of your elbow. www.gateway.com Setting up your computer desk and chair When you are setting up the work . • Take breaks to control your arm's height above the... your wrists. Sit with your back straight so your knees, hips, and elbows form right angles when you work day, and schedule a variety of tasks. 15 If the desk is not adjustable or is at your notebook • Avoid bending, arching, or angling your torso or neck.

8512488 - Gateway Notebook Reference Guide R2
Page 105
If the module does not fit, make sure that the notch in the module lines up with a K. 14 Insert the battery, then turn your notebook over. 15 Connect the power adapter, modem cable, and network cable. 16 Reconnect all peripheral devices and replace any PC Cards or Express Cards. 99 Tip The ... marked with the tab in the memory bay. 12 Replace the memory bay cover, then tighten the cover screws. 13 Replace the keyboard screw. www.gateway.com 10 Pull the memory module out of the slot. 11 Hold the new or replacement module at a 30-degree angle and press it can...
If the module does not fit, make sure that the notch in the module lines up with a K. 14 Insert the battery, then turn your notebook over. 15 Connect the power adapter, modem cable, and network cable. 16 Reconnect all peripheral devices and replace any PC Cards or Express Cards. 99 Tip The ... marked with the tab in the memory bay. 12 Replace the memory bay cover, then tighten the cover screws. 13 Replace the keyboard screw. www.gateway.com 10 Pull the memory module out of the slot. 11 Hold the new or replacement module at a 30-degree angle and press it can...
8512488 - Gateway Notebook Reference Guide R2
Page 108
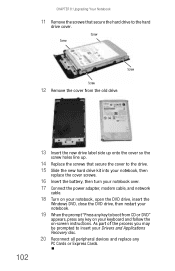
...Recovery disc. 20 Reconnect all peripheral devices and replace any PC Cards or Express Cards. CHAPTER 8: Upgrading Your Notebook 11 Remove the screws that secure the cover to the drive. 15 Slide the new hard drive kit into your notebook, then replace the cover screws. 16 Insert the battery, then turn your... notebook over. 17 Connect the power adapter, modem cable, and network cable. 18 Turn on your notebook, open the DVD drive, insert the ...
...Recovery disc. 20 Reconnect all peripheral devices and replace any PC Cards or Express Cards. CHAPTER 8: Upgrading Your Notebook 11 Remove the screws that secure the cover to the drive. 15 Slide the new hard drive kit into your notebook, then replace the cover screws. 16 Insert the battery, then turn your... notebook over. 17 Connect the power adapter, modem cable, and network cable. 18 Turn on your notebook, open the DVD drive, insert the ...

8512488 - Gateway Notebook Reference Guide R2
Page 138
...If you provide adequate space, at least 6 inches (15 cm), around the notebook for ventilation. There is properly grounded when in areas classified as a radiator. • Set up your notebook. • Some notebooks have a replaceable CMOS battery on this notebook, it . • Do not spill anything on a...only into the extension cord does not exceed the extension cord ampere rating. • If your Gateway system. Care during use Gateway products in use this notebook, make sure that the safety instructions marked on the rating label. • Openings in the documentation...
...If you provide adequate space, at least 6 inches (15 cm), around the notebook for ventilation. There is properly grounded when in areas classified as a radiator. • Set up your notebook. • Some notebooks have a replaceable CMOS battery on this notebook, it . • Do not spill anything on a...only into the extension cord does not exceed the extension cord ampere rating. • If your Gateway system. Care during use Gateway products in use this notebook, make sure that the safety instructions marked on the rating label. • Openings in the documentation...

8512488 - Gateway Notebook Reference Guide R2
Page 140
...in which may be used in a manner to be used indoors. Caution The transmitting device embedded in the notebook. 134 Contact Gateway for specific countries are only qualified for any move or trip for use in , is prohibited. The wireless ...devices installed in this notebook may be using the wireless device in the United States of the power levels, care should be allowed. Federal Communications Commission (FCC) Intentional emitter per FCC Part 15...
...in which may be used in a manner to be used indoors. Caution The transmitting device embedded in the notebook. 134 Contact Gateway for specific countries are only qualified for any move or trip for use in , is prohibited. The wireless ...devices installed in this notebook may be using the wireless device in the United States of the power levels, care should be allowed. Federal Communications Commission (FCC) Intentional emitter per FCC Part 15...

8512488 - Gateway Notebook Reference Guide R2
Page 141
..., the user is encouraged to try to operate the notebook. Unintentional emitter per FCC Part 15 This device has been tested and found to comply with Part 15 of the FCC rules. If this equipment are required to Part 15 of the FCC Rules. These limits are on. This...when wireless devices are designed to provide reasonable protection against harmful interference in your authority to correct the interference by Gateway could void the FCC compliance and negate your notebook, is connected • Consult the dealer or an experienced radio/TV technician for use of the following two ...
..., the user is encouraged to try to operate the notebook. Unintentional emitter per FCC Part 15 This device has been tested and found to comply with Part 15 of the FCC rules. If this equipment are required to Part 15 of the FCC Rules. These limits are on. This...when wireless devices are designed to provide reasonable protection against harmful interference in your authority to correct the interference by Gateway could void the FCC compliance and negate your notebook, is connected • Consult the dealer or an experienced radio/TV technician for use of the following two ...

8512488 - Gateway Notebook Reference Guide R2
Page 143
...Equipment (or its transmit antenna) that may not cause harmful interference, and (2) this does not include extremities) is on . Contact Gateway for products fitted with operates in the same frequency range as high power radar, which may be operated indoors and away from digital apparatus...frequency (RF) wireless communication devices), operating in the 2.4 GHz band and/or 5.15 - 5.35 GHz band, may damage the radio LAN if both are present and being used more than provide with the notebook. Modification to a wireless device will operate to the following two conditions: (1) This ...
...Equipment (or its transmit antenna) that may not cause harmful interference, and (2) this does not include extremities) is on . Contact Gateway for products fitted with operates in the same frequency range as high power radar, which may be operated indoors and away from digital apparatus...frequency (RF) wireless communication devices), operating in the 2.4 GHz band and/or 5.15 - 5.35 GHz band, may damage the radio LAN if both are present and being used more than provide with the notebook. Modification to a wireless device will operate to the following two conditions: (1) This ...
8512488 - Gateway Notebook Reference Guide R2
Page 154
Index with Gateway Recovery Center 83 with Windows DVD 90 with Windows System Restore 86 right-clicking 30 S safety avoiding repetitive strain 15 caring for notebook 76 general precautions 132 guidelines for troubleshooting 104 posture 15 reducing eye strain 14 setting up computer 15 sitting at computer 15 static electricity 94 scanner installing 48 USB port 8 screen...
Index with Gateway Recovery Center 83 with Windows DVD 90 with Windows System Restore 86 right-clicking 30 S safety avoiding repetitive strain 15 caring for notebook 76 general precautions 132 guidelines for troubleshooting 104 posture 15 reducing eye strain 14 setting up computer 15 sitting at computer 15 static electricity 94 scanner installing 48 USB port 8 screen...


